How to Update the Firmware on an Ender 3 – Simple Guide
Learning how to update the firmware on an Ender 3 is a good method of upgrading your 3D printer, and enabling some unique features that are available with different firmware. This article will show you how to update the firmware on an Ender 3.
To update firmware on the Ender 3, download the compatible firmware, copy it onto an SD card and insert the SD card into the printer. For an older motherboard, you also need an external device to upload the firmware onto the printer, and you need to connect your PC or laptop directly to the printer via a USB cable.
Keep on reading for more information.
How to Update/Flash the Firmware on an Ender 3 (Pro, V2, S1)
To download the compatible firmware, you need to find out the current version of the firmware being used by your 3D printer. Also find out the type of mainboard in your specific 3D printer.
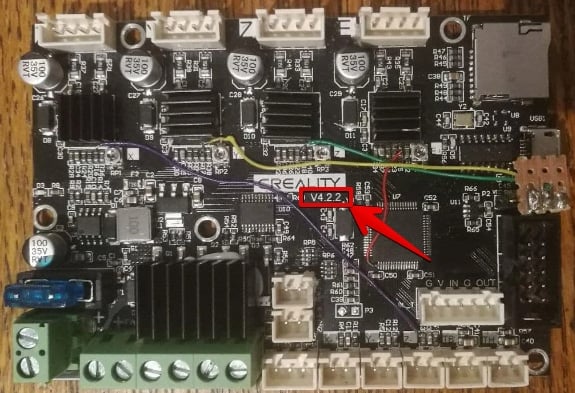
Check the type of motherboard being used by your 3D printer by opening the electronics box.
You need to remove the screws on the top side and bottom of the box using the hex driver as it will uncover the mainboard.
With the opening of coverings, you will be able to see a number right below the “Creality” logo such as V4.2.2 or V4.2.7.
Checking the type of motherboard is necessary to verify whether your 3D printer has a bootloader or it works with an adapter. The bootloader is a program that allows users to make changes and customization to their 3D printers.
You should also find out whether the motherboard is 32-bit or the old 8-bit. This is essential to decide the exact firmware files that can be installed on that specific type of motherboard. Once all these things have been noted, now it’s time to get started.
Updating the Firmware on an Ender 3/Pro
Before flashing or updating the firmware on an Ender 3/Pro, you’ll need to install a bootloader. If your 3D printer has a bootloader on its mainboard, you can tweak the internal settings and update the firmware with simple steps as you do in Ender 3 V2.
The original Ender 3 comes with an 8-bit motherboard which requires the bootloader, while the Ender 3 V2 has a 32-bit motherboard and doesn’t need the bootloader installation.
If there isn’t any bootloader on your 3D printer, you will have to install this program first and then update the firmware as you do with Ender 3.
As the Ender 3 and Ender 3 Pro come without a bootloader on their mainboard, the first thing is to install it by yourself. A few things will be required such as:
- 6 Dupont/Jumper Wires (5 Female to Female, 1 Female to Male) – A single wire or group of electric wires combined in a single cable, used to connect your Arduino Uno Microcontroller to your 3D printer.
- Arduino Uno Microcontroller – a small electric board that reads inputs in programming language, also comes with a USB.
- USB Type B Cable – simply to connect your Ender 3 or Ender 3 Pro to your computer
- Arduino IDE Software – A console or text editor where you can enter commands to be processed and take actions that transfer to the 3D printer
Check out my article How to Connect Ender 3 to Computer (PC) – USB to learn more about connecting your 3D printer up to your computer.
You can choose which firmware you want to use with your Ender 3. In the video below, it takes you through flashing your Ender 3 with Marlin or a Marlin-Based firmware called TH3D.
Teaching Tech has a great video guide that you can follow for installing the bootloader and flashing your firmware afterwards.
There’s another technical method to install a bootloader on the Ender 3 using a Raspberry Pi that is running OctoPi, meaning you won’t need an Arduino to update the bootloader. You’ll still need the jumper cables, but you need to type commands into a Linux command line.
Check out the video below to learn how to install the bootloader in three different ways, including the Raspberry Pi method.
Updating the Firmware on an Ender 3 V2
Start by finding the currently installed version of firmware in your Ender 3 V2. This can be done by navigating to the “Info” option using the button on the 3D printer’s LCD screen.
The middle line will be showing the firmware version, i.e. Ver 1.0.2 with the title “Firmware Version”.
Next, you want to check whether you have a mainboard 4.2.2 version or 4.2.7 version. They have different stepper motors drivers and required different firmware so as shown above in the article, manually check the board inside your 3D printer.
You just need to unscrew the screw ontop of the electronics case and the three screws at the bottom to see the motherboard version.
Now let’s get into the steps of flashing the firmware on an Ender 3 V2:
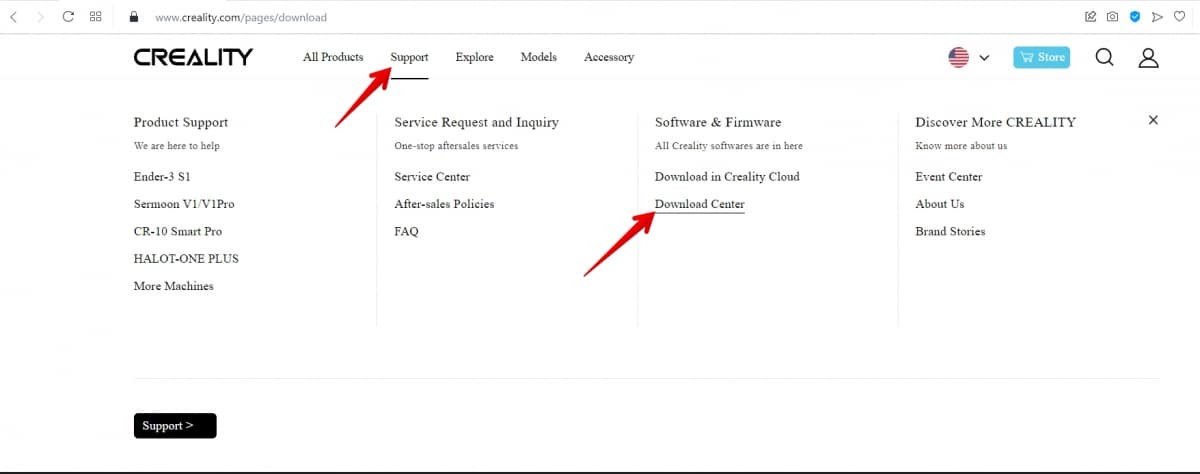
- Open the Creality 3D official website.
- Go to the Menu Bar and click Support > Download Center.
- Find the Ender 3 V2 and select it
- Find the relevant firmware version for your mainboard based on the 4.2.2 or 4.2.7 versions and download the ZIP file
- Extract the ZIP file and copy the file with the “.bin” extension to your SD Card (the card should be empty of any kind of files or media). The file will most probably have a name like “GD-Ender-3 V2-Marlin2.0.8.2-HW-V4.2.2-SW-V1.0.4_E_N_20211230.bin”. (The file name will change depending upon different versions, firmware, and type of mainboard)
- Turn OFF the 3D printer
- Insert the SD Card into the 3D printer slot.
- Turn the 3D printer ON again.
- The display screen will remain black for about 5-10 seconds at the time of the update.
- After installation of new firmware, your 3D printer will take you directly to the menu screen.
- Go to the “Info” section to verify if the new firmware has been installed.
Here is a video by Crosslink showing you the visual representation of the whole updating procedure, step-by-step.
I also have an article about How to Flash & Upgrade 3D Printer Firmware for a wider range of 3D printers.
A user said that he followed the same procedure but the V4.2.2 mainboard caused the screen to turn black for longer and it got stuck there permanently.
He refreshed the screen firmware multiple times but nothing happened. Then to resolve the issues, he suggested formatting the SD Card in FAT32 as it will make things right again.
If you want to learn more about screen firmware and upgrading it, check out my article How to Upgrade Ender 3 V2 Screen Firmware – Marlin, Mriscoc, Jyers.
Updating the Firmware on an Ender 3 S1
For updating the firmware on Ender 3 S1, the procedure is almost the same as updating on Ender 3 V2. The only difference is that you will find the currently installed version of firmware by opening the “Control” section, then scrolling down and clicking “Info”.
You can also use this after you have installed the new firmware to confirm it has updated.
Here is a short video by ScN that will show you how to update the firmware on an Ender 3 S1 in the perfect manner.
A user also suggested that SD cards should not be larger than 32GB because some mainboards may not be able to support large-size SD cards. You can buy a SanDisk 16GB SD Card from Amazon.