How to Connect Ender 3 to Computer (PC) – USB
Learning how to connect the Ender 3 to your computer or PC is a useful skill for 3D printing that many people use. If you want a direct connection from your 3D printer to a computer or laptop, this article is for you.
To connect an Ender 3 to a computer or PC, plug in a data USB cable into your computer and 3D printer. Make sure to install the proper drivers and download a software like Pronterface that allows for a connection between your 3D printer and computer.
Keep on reading to find out the details on how to properly connect your Ender 3 to your PC using a USB cable.
How to Connect Ender 3 to PC with USB Cable
To connect the Ender 3 to your PC via a USB cable, you’re going to need a few items. They include:
- A USB B (Ender 3), Mini-USB (Ender 3 Pro), or Micro USB (Ender 3 V2) cable rated for data transfer.
- A printer control software (Pronterface or Cura)
- CH340/ CH341 Port drivers for an Ender 3 printer.
Let’s go through the installation process step by step.
Step 1: Install your printer control software
- For the printer control software, you can choose between Cura or Pronterface.
- Cura offers you more printing features and functionality, while Pronterface offers you a simpler interface with more control.
Step 1a: Install Pronterface
- Download the software from GitHub
- Run the installation file to install it on your machine
Step 1b: Install Cura
- Download the latest version of Cura.
- Run its installation file to install it on your PC
- Follow the first run instructions and make sure you set up the proper profile for your printer.
Step 2: Install the port Drivers for your PC
- The port drivers ensure your PC can communicate with the Ender 3 over the USB port.
- Now, the drivers for the Ender 3 can differ based on the type of board you have in your printer. However, a large percentage of Ender 3 printers use either the CH340 or CH341
- After downloading the drivers, install them.
Step 3: Connect your PC to the printer
- Power on your 3D printer and wait for it to boot up
- Next, connect your 3D printer to the PC via the USB cable
Note: Make sure the USB cable is rated for data transfer, or else it won’t work. If you don’t have the cable that came with your Ender 3, you can get this Amazon Basics cable as a replacement.

It is a high-quality USB cable with corrosion-resistant gold-plated connectors. It can also transfer data at high speeds, making it perfect for 3D printing.
For the Ender 3 pro and V2, I recommend the Amazon Basics Mini-USB cord and the Anker Powerline Cable, respectively. Both cables are made with good quality materials and are rated for superfast data transfer.
In addition, the Anker powerline cable also has a protective braided Nylon sleeve to protect it from fraying.
Step 4: Verify the connection
- On your Windows search bar, type in Device Manager. Once the device manager comes up, open it.
- Click on the Ports sub-menu.
- If you’ve done everything right, your printer should be under the ports menu.
Step 5a: Connect Pronterface to the printer:
- If you’ve chosen to use Pronterface, fire the application up.
- At the top navigation bar, click on Port. The application will display the ports available.
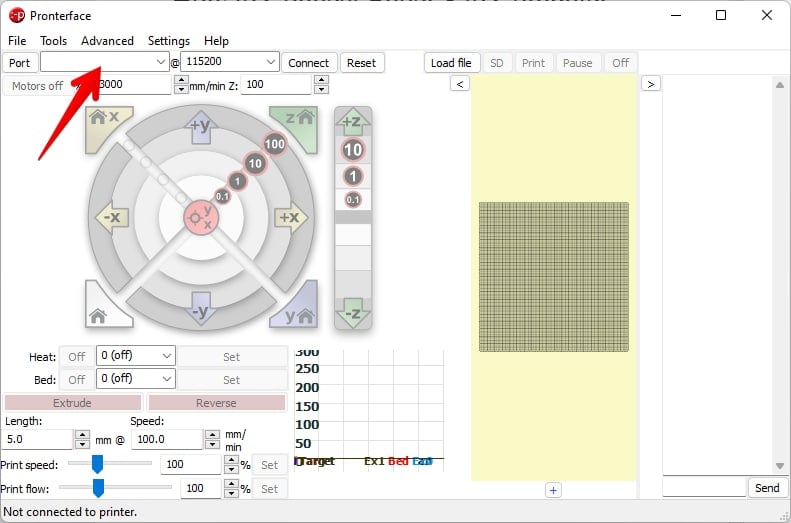
- Choose the port for your 3D printer (It will appear in the sub-menu)
- Next, click on the Baud rate box right next to the Port box and set it to 115200. This is the preferred baud rate for Ender 3 printers.
- After you’ve done all this, click on Connect
- Your printer will initialize in the window to the right. Now, you can control all the printer’s functions with just a mouse click.
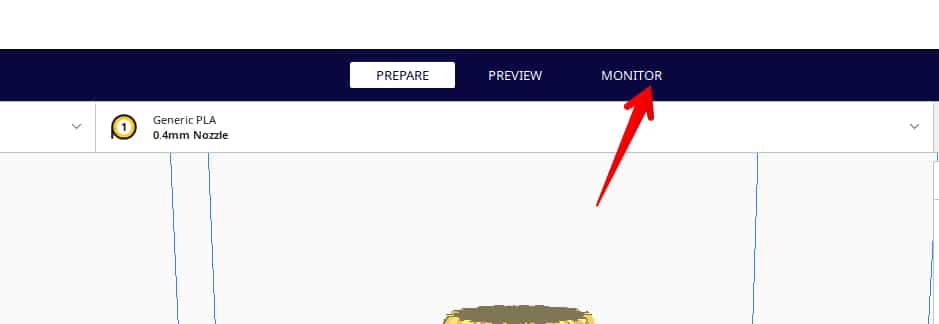
Step 6a: Connect your printer to Cura
- Open Cura and make sure you have the correct profile set for your 3D printer.
- Click on the Monitor Once it opens, you’ll see several options for controlling your printer.
- Once you finish modifying the print settings on your 3D model, click on the Slice
- After slicing, the printer will show you an option to print via USB instead of the regular Save to Disk
Note: If you are printing via USB, ensure your printer isn’t set to sleep or hibernate after long periods of inactivity. This will stop the print as the PC will stop sending data to the 3D printer once it sleeps.
So, disable sleep or screensaver options after long periods of inactivity on your printer.