How to Troubleshoot an XYZ Calibration Cube
The XYZ calibration cube is a staple 3D print that helps you to calibrate and troubleshoot your 3D printer. This article will take you through how to properly use an XYZ Calibration Cube and fix any issues you might be having.
How to Use the XYZ Calibration Cube for 3D Printing
To use the XYZ Calibration Cube for 3D printing, simply download the STL file from Thingiverse and 3D print it with your standard settings. You can then measure and analyze the cube to get an insight about whether your 3D printer is properly calibrated or not. You can significantly improve your dimensional accuracy.
The XYZ Calibration Cube is used to test dimensional calibration and to tune your 3D printer in a way that will help you print 3D models of high quality with a higher level of accuracy and precise dimensions.
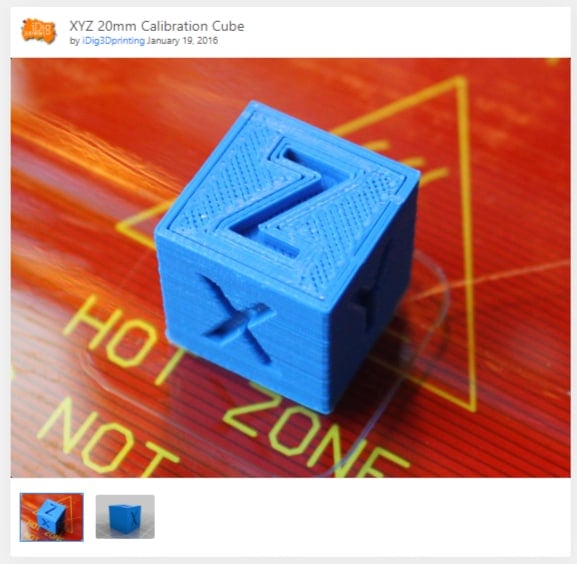
This model takes less than 1 hour to 3D print and is a great way to test a 3D printer’s basic capabilities. It has over 2 million downloads on Thingiverse and over 1,000 user-submitted “Makes” that people have created.
It’s a great way to see how your XYZ calibration cube should look based on how well your 3D printer performs and your settings.
As you can see, it has the letters X, Y & Z engraved on the cube to indicate the axes that you are measuring. Each side should measure up at 20mm on the XYZ Calibration Cube, ideally using Digital Calipers.

Let’s get into how to actually take measurements and do adjustments as needed.
- Download the XYZ Calibration Cube from Thingiverse
- Print the model using your standard settings, no supports or a raft is needed. 10-20% infill should work fine.
- After it’s printed, get your pair of digital calipers and measure each side, then note down the measurements.
- If the values aren’t 20mm or very close like 20.05mm, then you want to make some calculations.
For example, if you measure the Y-axis distance and it was 20.26mm, we would want to use a simple formula:
(Standard Value/Measured value) * Current Steps/mm = New Value for Steps/mm
The Standard Value being 20mm, and your current steps/mm being what your 3D printer is using within the system. You can usually find this by going to something like “Control” and “Parameters” on your 3D printer.
If your firmware doesn’t allow it, you can also find your current steps/mm by inserting the G-Code command M503 on a software like Pronterface. You’ll have to connect your 3D printer to a computer or laptop to get this done.
Let’s go through a real example.
Suppose the Current Steps/mm value is Y160.00 and your measured value of the Y-axis on the XYZ Calibration Cube is 20.26mm. Simply put these values into the formula:
- (Standard Value/Measured value) x Current Steps/mm = New Value for Steps/mm
- (20mm/20.26mm) x 160.00 = New Value for Steps/mm
- 98.716 x 160.00 = 157.95
- New Value for Steps/mm = 157.95
Once you have your new value, input this into your 3D printer, either directly from the control screen or through a software, then save the new setting. You’ll want to reprint the XYZ Calibration Cube to see whether it has improved your dimensional accuracy and given a value closer to 20mm.
One user who said he 3D prints mechanical parts said they need to be very accuracy because even a 1-3mm difference can ruin the prints.
After he finished an XYZ Calibration Cube and changed the values, he could create 3D prints with high precision, mentioning it’s the best option for high precision models.
Another user suggested that before you print the XYZ calibration cube, it is a good idea to first calibrate your 3D printer’s extruder steps/mm. You can do this by following the video below.
Once you’ve properly calibrated your extruder steps, it means that when you tell your 3D printer to extrude 100mm of filament, it actually extrudes 100mm rather than something like 97mm or 105mm.
You can see an example of an XYZ Calibration Cube being done by Technivorous 3D Printing for a better idea of how it works.
Some other versions of calibration cubes that can be used for different purposes such as the Cali Cat & the CHEP Calibration Cube.
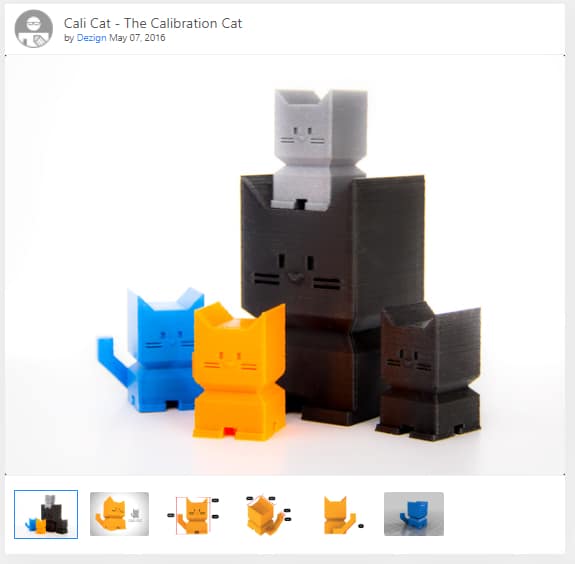
The Cali Cat Calibration Model was designed by Dezign and has more than 430,000 downloads in Thingiverse. It is a great cube to test print a small model to see whether your 3D printer is working to a good standard.
It was designed to be an alternative to standard calibration cubes, having linear dimensions of 20 x 20mm for the body, a height of 35mm and a tail being 5 x 5mm. There are also inclines and overhangs at 45º.
Many people love this model and is their go-to model for test prints. It’s a fast test and you can even give out these models to friends and family as a gift after you’ve done your calibrations.
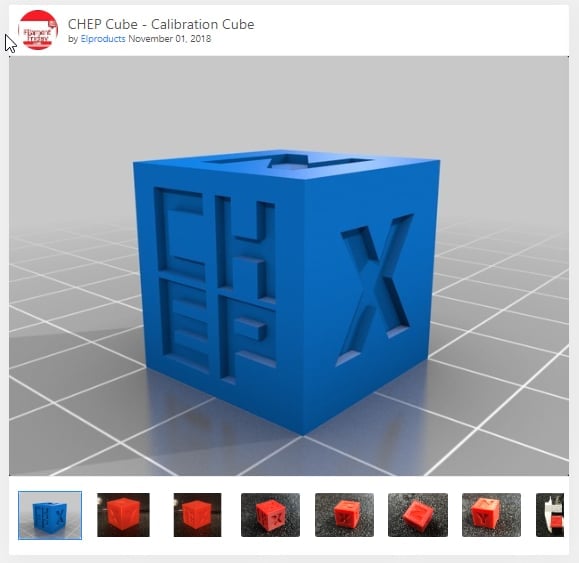
The CHEP Calibration Cube was created by ElProducts as an alternative to many other cubes in the industry. It is one of the most downloaded cubes on Thingiverse, with over 100,000 downloads and can help you identify many printing issues that you can identify using XYZ Calibration Cube.
Many people mention just how beautifully the cube comes out after printing. You can ensure your dimensions are correct by measuring it and getting it to the 20 x 20 x 20mm dimensions by adjust your steps/mm in each axis.
XYZ Calibration Cube Troubleshooting & Diagnosis
Printing, analyzing, and measuring the XYZ Calibration Cube can help you troubleshoot and diagnose a wide range of problems. This will help you not only to find the issues that may occur while printing a model but to resolve those issues by calibrating your 3D printer accordingly.
While troubleshooting and diagnosing the problems, various issues can occur and you can correct them with a little bit of tweaking. Some of the most common issues and their solutions are briefly described below:
- Elephant’s Foot
- Z-Axis Wobbling
- Ghosting or Ringing Texture
1. Elephant Foot
The initial or bottom layers of a 3D print or your calibration cube bulging outside is known as Elephant’s Foot.
You can see an example of what it looks like below with the Calibration Cube below.
Calibration cube has some elephant foot but otherwise looks pretty good. Definitely within a half mm on 2/3 axes. pic.twitter.com/eC0S7eWtWG
— Andrew Kohlsmith (@akohlsmith) November 23, 2019
The probability of Elephant’s Foot occurring increases if using your heated bed at a relatively high temperature. You can try out these steps to resolve this potential issue:
- Reduce your bed temperature
- Ensure your bed is leveled and nozzle is the correct height from the bed
- Add a raft to your model
I wrote an article about How to Fix Elephant’s Foot – Bottom of 3D Print That Looks Bad.
2. Z-Axis Banding/Wobbling
Z-axis wobbling or layer banding is the issue when layers don’t align with each other. Users can easily identify these issues as the cube will look like the layers are placed on each other in different positions.
You should be able to compare your Calibration Cube to successful ones and see if yours has some kind of ‘band-like’ pattern.
These things usually happen if any of the Z-axis movement components are loose or tilted, leading to inaccurate movements.
- Stabilize your 3D printer frame and Z-axis stepper motor
- Make sure your lead screw and coupler is properly aligned and tightened properly, but not too tight
I wrote an article on How to Fix Z Banding/Ribbing in 3D Printing that you can check out for more information.
3. Ghosting or Ringing Texture
Another issue that an XYZ Calibration Cube can help troubleshoot is ghosting or ringing on your prints. Ghosting is basically when your model has a surface defect due to vibrations in your 3D printer.
It causes the surface of your model to display a mirror or echo-like detail of previous features.
Check out the image below. You can see the X has the lines on the right of it that are produced from vibrations.
Some ghosting on my calibration cube, and small bumps. Perfect 20mm dimension though. Suggestions to solve the ghosting and bumps? I think the ghosting may be common with glass beds.
by inender3
In order to fix ghosting or ringing:
- Stabilize your 3D printer by placing it on a sturdy surface
- Check for slack in your X & Y axis belts and tighten them
- Reduce your printing speed
I wrote a more in-depth guide on Ghosting/Ringing/Echoing/Rippling – How To Solve so feel free to check it out.