
How to Get the Perfect 3D Printer Resin Settings – Quality
When it comes to resin 3D printer settings, many people get confused about what they are, what they do, and how to set them correctly. I’ve been there before, and it wasn’t a great experience, so I decided to write this article to help you guys out.
This article will go through the many resin settings, simply explain them, then guide you on how to set them correctly.
What Resin Settings Are There & What Do They Do?
Before we get into getting the ideal resin settings for your 3D printer, it’s a good idea to go back over the basics and form a solid foundation of knowledge before we get to changing things.
First, let’s learn what resin settings are out there.
- Layer Height
- Exposure Time
- Bottom Layer Count
- Bottom Exposure Time
- Light-Off Delay
- Bottom Light-Off Delay
- Bottom Lifting Distance
- Lifting Distance
- Bottom Lift Speed
- Lifting Speed
- Z-Lift Height
- Retract Speed
- Anti-Aliasing
There are also other settings that relate to supports such as contact diameter, tip length, rafts and so on, but this article will focus on the other main settings.
What is Layer Height in Resin 3D Printing?
Layer height is the specific thickness of each layer of your model. You can adjust your layers heights through your resin slicer, with a smaller layer height providing the best surface quality, and a larger layer height providing quicker prints, and possibly more strength.
I would definitely recommend trying out a range of layer heights so you can see just how different your models come out in terms of detail. Resin 3D printing is known to have much higher precision compared to filament printing.
A layer height of 0.05mm against a layer height of 0.1mm would double the number of layers for your model, meaning your print times will significantly increase.
Layer height and the number of layers required to complete a model will determine the printing time and speed. The thickness of each layer not only affects the printing speed or printing time but it has a great impact on print quality as well.
What is Exposure Time in Resin 3D Printing?
Exposure time is the amount of time that each layer is exposed to the printer’s UV light or light source during the printing process. The quality of a print is affected by the exposure time because the light source is responsible to cure the liquid resin.
You want to ensure that your exposure times are properly calibrated because it really has an impact on the overall quality and success of your prints.
If one layer of the resin 3D print is not cured properly, the next layers may not have the solid foundation on which they can stand to build a solid model. You also want to avoid over curing your prints too.
You usually have ranges of exposure times, but they do vary widely with factors such as the printer itself, the UV power settings on your printer, and the color & brand of the resin itself.
What is Bottom Exposure Time in Resin 3D Printing?
Bottom exposure time is similar to exposure time, but only applying to the first few layers or bottom layers of your 3D prints. The bottom layers of the print require more focus because they form the foundation for the whole print, and need better adhesion.
You will always see a higher bottom exposure time compared to normal exposure times because we need the resin to be cured strongly. The reason why 3D prints are cured after the printing process is because they don’t get fully cured during the printing process.
It’s more of a “soft curing” to build up the layers successfully, but to properly harden the plastic resin model, we use a strong UV light for many minutes. This same principle applies in terms of making the bottom layers stronger.
What is Bottom Layer Count in Resin 3D Printing?
The bottom layer count is simply the number of first layers that you will expose UV light on for the set bottom exposure time. These layers ensure strong adhesion to the build plate and help in building a successful 3D model.
Since the exposure time for bottom layers will be high as compared to normal layers, a lot of bottom layers may result in longer printing time, though not significant in comparison to the whole print.
Increasing your bottom layer count is usually a way of improving your print adhesion when your models are not sticking to the printing platform properly.
What is Lifting Speed in Resin 3D Printing?
Lifting speed is simply the speed at which the build plate is lifted from the resin vat after a layer has been cured. A lift speed too high can damage prints, especially where there are weak supports or overhangs, while a slow lifting speed will simply increase your printing times.
Since layers are printed between the aluminum build plate and FEP film sheet, it creates a suction pressure every time the build plate lifts up. The fuller the build plate and quicker the lift speed, the more suction pressure that is created.
In some cases, you can even hear the suction from the FEP film with every lift. You want to have a fairly low lifting speed to be on the safe side. Many resin 3D prints have failed due to a fast lifting speed, which is not worth the reduction in printing times.
- You also have bottom lifting speed
What is Anti-Aliasing in Resin 3D Printing?
Anti-Aliasing is a setting which reduces the “steps” in the layers of your 3D prints, known as the staircase effect. What it does is smooth the edges and corners of an object, which effectively reduces precise details, but makes certain models look better.
Layer lines are more noticeable with aliasing, so anti-aliasing visually tries to reduce layer lines. People have mixed results with this setting depending on what slicer they used, what the model is, and how large of an anti-aliasing setting they used.
Many people have said that the changes are mostly visible under magnification, but hard to see under normal viewing. It’s a lot more prominent for models with a sawtooth-like exterior.
For an in-depth explanation of how anti-aliasing works, you can check out ChiTuBox’s article.
What is a Raft in Resin 3D Printing?
A raft is a foundation beneath your 3D models which sits flat on the build plate and allows the supports to be built on top of it. You will see a raft on many resin 3D models on the first layer to help with bed adhesion and stronger supports.
Supports are built on the strong foundation of the raft and it requires more exposure time than the rest of the supports. Raft settings include various factors such as raft shape, raft height, raft area ratio, raft thickness, raft slope, etc.
What is Hollowing in Resin 3D Printing?
Hollowing is the process of removing the inner material of a model, leaving a hollow outer shell of the print. It is not a required task, but it is one of the best ways to save on resin usage in 3D printing.
Resin can get pretty expensive so it’s a beneficial step to take.
I recommend hollowing out all your models, especially if they don’t serve any kind of functionality. You can still get adequate strength and amazing quality with a hollowed model by making use of wall thickness and infill settings.
What is Wall Thickness in Resin 3D Printing?
Wall thickness is simply the measurement of how wide the external structure of a model is, measured in millimeters. When you hollow your models, you’ll be asked to a wall thickness, which translates to strength and integrity of the print.
It is considered one of the most important aspects of 3D printing because too thin or thick walls can raise different types of issues regarding its printing and quality. You definitely don’t want walls too thin, since it can result in print failures.
Walls that are too thick would mean you are using up more resin than you need, so you want to strike a good balance between these two levels. Your slicer usually has default values, but you’ll want to test these out.
What is Print Orientation in Resin 3D Printing?
Print orientation is the way your model is placed on the build plate in relation to the angles and rotations you use. It involves rotation, scaling, and moving prints across the build plate to provide an optimized printing strategy.
It’s not technically a resin print setting, but it is closely related to the process.
The print model is orientated in software before starting the printing process. A badly oriented 3D print can cause a major difference in the print quality and overall printing success.
A slight difference and change in the print orientation can lead to a major change in the number of layers and printing time. SLA printing is usually faster when the Z-axis height is minimized, so an orientation that does this can be ideal.
Changes in the structure or design of the model can harm the model’s strength and integrity, and it can also result in a print model with visible surface lines as well.
Usually, the surface quality of a print is affected due to improper slicing and printing in badly optimized directions.
You do have to keep in mind that the best precision comes about in the Z-axis too, so having the most intricate details along the Z-axis makes a lot of sense. A balance is needed to get the print orientation perfect.
What is Light-Off Delay in Resin 3D Printing?
Light off delay is how long the printer keeps the light off before curing the next layer, though the true light off delay time includes the total time for the up and down movements of the build plate.
For standard resin 3D printers, you are likely to have a higher light-off delay as compared to a higher quality resin 3D printer, with modern monochrome screens.
- You also have Bottom Light Off Delay
What is Lifting Distance in Resin 3D Printing?
Lifting distance is simply how far the build plate raises up from the FEP film after each layer is cured.
This setting generally doesn’t change too much across 3D printers, so you can keep within a certain range which will be stated in the section below.
What is Z-Lift Height in Resin 3D Printing?
Z-Lift Height is the distance set between your model and the build plate. It stops your models from being built directly on the build plate, allowing it to be fully supported by supports and a raft.
How to Get the Perfect Resin Settings
Resin 3D printers will differ in what settings work best. Some of the resin settings change with the change in resin brand and color as well, but most of the settings are ideal for almost all types of resin and application.
Below are the best and ideal values for each setting but you should do testing with your printer or resin as well.
Many of the settings were gathered by using user submitted results from the Anycubic Photon Resin Settings & Anycubic Photon Mono X Resin Settings (Google Docs).
Best Layer Heights for Resin 3D Printing
The best layer height for resin printing usually ranges between 0.01-0.05mm (10 to 50 microns), where you would use 0.05mm for faster speeds while still maintaining great quality.
If you want exceptional quality, especially for miniatures and smaller 3D prints, a 0.01mm layer height can work very well, but it will take a lot longer to print.
Resin slicers usually default to a layer height of 0.05mm, which is still twice as good as the upper limit of filament 3D printers, having a 0.1mm layer height.
- Perfect Layer Height: 0.25-0.5mm
A layer height of 0.25mm is a perfect mix between amazing quality and a fairly good printing speed.
Best Exposure Times for Resin 3D Printing
The best exposure time ranges from 6-14 seconds for standard resin 3D printers with a 2K LCD screen, while powerful 4K monochrome screens can have exposure times from 1.5-3 seconds depending on the color of the resin and the printer’s UV power.
It’s difficult to narrow down a “best exposure time” since there are so many factors at play, such as the type of printer itself, to the color and brand of resin.
I would recommend running a good exposure time test such as the R_E_R_F (Resin Exposure Range Finder), or another popular one called the Resin XP2 Validation Matrix (direct STL file download).
If you have wondered how to calibrate your 3D printer resin, this is an ideal way to get it done. Resin exposure calibration or a resin calibration test is what people do to properly dial in their settings.
The video below goes through the process of narrowing down the perfect exposure time for your resin prints. This is an important step every time you start using a new resin in your printer.
- Ideal Exposure Time for 2K LCD (Anycubic Photon) : 10 – 16 Seconds
- Ideal Exposure Time for 4K LCD (Anycubic Photon Mono X) : 1.5 – 3 Seconds
Check out my article How to Calibrate Resin 3D Prints – Testing for Resin Exposure for more info.
Best Bottom Exposure Times for Resin 3D Printing
The best bottom exposure time is between 4 – 10x for standard resin 3D printers like the Anycubic Photon, while for more powerful resin 3D printers like the Anycubic Photon Mono X, you’re looking at 12 – 18x your normal exposure time.
The average between over 80 user submitted normal and bottom exposure times for the Anycubic Photon X (4K monochrome screen) was a bottom exposure time of 15.6x the normal exposure time.
For the Anycubic Photon, I saw ranges between 4 – 10x the normal exposure time for the bottom exposure times, so you can take a rough average of 7x the normal exposure time.
- Perfect Bottom Exposure Time: 7 – 16 times longer than the normal exposure time depending on resin printer strength.
Anywhere from 15 seconds up to 150 seconds is the full range, though you’ll usually see people with bottom exposure times from 30 seconds to 90 or 100 seconds.
Best Bottom Layer Counts for Resin 3D Printing
Although there are some 3D printing users that like to go up to 10 bottom layers, 4 to 8 is the ideal count for most of the 3D printers including Photon.
I did notice a pattern where the weaker Anycubic Photon 3D printer had a consistently higher number of bottom layers, going from around 6-10, while the Anycubic Photon Mono X mostly fell between 4-6 bottom layers.
You can definitely increase the number of bottom layers if your prints are getting proper adhesion to the build plate; otherwise I’d stick to the 4-8 bottom layer range, having a middle of 6.
- Perfect Bottom Layer Count: 6
Best Retract/Lifting Speeds for Resin 3D Printing
There are quite a few lifting and speed settings with resin 3D printing, but a good value is something that is fairly slow. People tend to go with a lifting speed of 1-3mm/s or 60-180mm/min.
This helps out with reducing print suction pressures so that your print doesn’t get pulled off the build plate. Faster lifting speeds can definitely increase the failure rate of resin prints, especially larger ones.
Although printing times are going to be slightly higher with a higher lifting speed, the difference isn’t very significant.
Ideal Bottom Lift Speed: 3mm/s or 180mm/min.
Best Lifting Speed: 3mm/s or 180mm/min.
Best Retract Speed (Lowering Speed): 3-4mm/s or 180mm/min.
Ideal Bottom Lift Distance: 5mm
Ideal Lifting Distance: 5mm
The default values for these settings usually do pretty well, but I’d try to reduce the speeds and increase the lifting distance for larger prints. During the printing process, a lower lift speed helps the print to evenly peel off the FEP film each layer cure.
It can put more strain on your supports and overhangs.
Best Anti-Aliasing Setting for Resin 3D Printing
You have settings for anti-aliasing ranging anywhere from 2 up to 16 in the Lychee Slicer (currently 8 in ChiTuBox).
People have gotten mixed results with anti-aliasing when it comes to resin 3D printing, but as the algorithms get improved, so do the results of the final prints.
Honestly, there is not an ideal value of anti-aliasing when it comes to resin 3D printing. The settings come with different levels such as 2, 4, and 8. You can set any of these anti-aliasing levels for your resin 3D print according to the corners’ aliasing effect.
- Best Anti-Aliasing Level: 4-8
- Best Grey Level Setting: 0 or 4
- Best Image Blur Setting: 0 or 2
These settings work together to smoothen out your resin prints.
For models like a sphere that have those “water ripple” effects, anti-aliasing + gray level 0 is ideal for surface quality. You can 3D print spheres and round shapes a lot more accurately when you dial in your anti-aliasing settings properly.
If you use image blur for the same water ripple model, ChiTuBox found that anti-aliasing + gray level 4 + image blur 2 + possibly an increased exposure time works the best.
The increased exposure time was to reduce the presence of horizontal lines that were found under a microscope.
For models with a really rough, staircase-like exterior, anti-aliasing + gray level 0 gives the best surface quality. I couldn’t find what level of anti-aliasing they used in these tests.
In terms of the ChiTuBox algorithm specifically, they have a priority sequence which starts with the image blur, to the gray level, down to anti-aliasing.
For layer lines, the orientation is going to have a large effect on how visible they are, since the Z-axis provides the highest resolution accuracy. If you want details in a certain part of your model, make sure it is printed vertically rather than horizontally.
Best Raft Settings for Resin 3D Printing
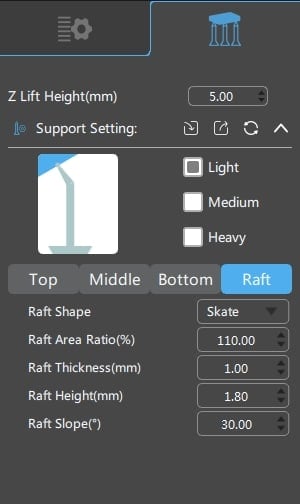
Rafts include many settings that can be adjusted such as the raft shape, area ratio, raft thickness, height and slope. The default settings usually work pretty well for rafts, but we can optimize them for slightly better results.
All these settings will depend on the size and type of your model and the required strength for your supports.
Some of its best suitable settings include the following:
- Raft Shape: None/Skate
- Raft Area Ratio: 110% to 130%
- Raft Thickness: 1 – 2.5mm
- Raft Height: 1.5 – 2.5mm
- Raft Slope: 20-40°
The skate Raft Shape helps to improve adhesion since it provides a whole surface to contact the build plate, and provides a raised edge to make it easier to remove the print afterwards.
The Raft Area Ratio corresponds to how much of a raft will be used in comparison to the print itself. Raising the raft area ratio does well to increase adhesion and provide a great foundation for supports and a heavy model. It does increase resin usage.
Raft Thickness is simply how thick the raft will be, where a larger thickness generally leads to increased adhesion. You want to keep this balanced so you don’t use too much material, and don’t find it too hard to separate.
The Raft Height is similar to the raft thickness, but differs in terms of sticking to just the height rather than the whole raft.
Raft Slope refers to the angle at which the edge of your raft raises from the build plate. Lower raft slope angles
There are other more advanced resin settings that most people won’t really put to use, but I’ll include them below so you are aware of them.
- Tolerance Compensation (ChiTuBox Advanced)
- Bottom Tolerance Compensation (ChiTuBox Advanced)
Best Hollowing & Wall Thickness for Resin 3D Printing
It varies with the nature of 3D print and its functionalities. The wall thickens will be different for supported print as compared to an unsupported print. Perfect wall thickens can only be attained by trial and error tests and an experience of 3D printing.
- Best Wall Thickness: 1.2-2.5mm
Hollowed models with an optimized wall thickness results in resin saved and a lighter model, giving a better chance for your prints to be successful since heavy models can be pulled off the build plate from gravity.
Having walls that are too thin are at risk of breaking when removing the supports, so I’d recommend going for around the 1.5mm mark.
You also have the option to include infill density of your hollowed model.
- Best Infill Density: 10-20%
Check out my article on How to Hollow Resin 3D Prints Properly.
Best Print Orientation for Resin 3D Printing
Print orientation is not a “set value” type setting, instead, it is the combination of different activities such as rotating, scaling, moving, and placing the model on the build plate in slicer software.
Make sure that the print sits completely on the build plate because the parts beyond the build plate will not be printed.
- Ideal Print Model Angle: 45°
A really well done support set up for your model has a pretty big impact on print orientation. I know PrusaSlicer tends to use supports all the way across the bottom of resin 3D prints, so the 45° angle isn’t necessary for success.
For beginners, using that print orientation usually brings about higher success, especially when done in a way to reduce the need of many supports. If you have long unsupported parts on a model, rotating the model correctly is useful.
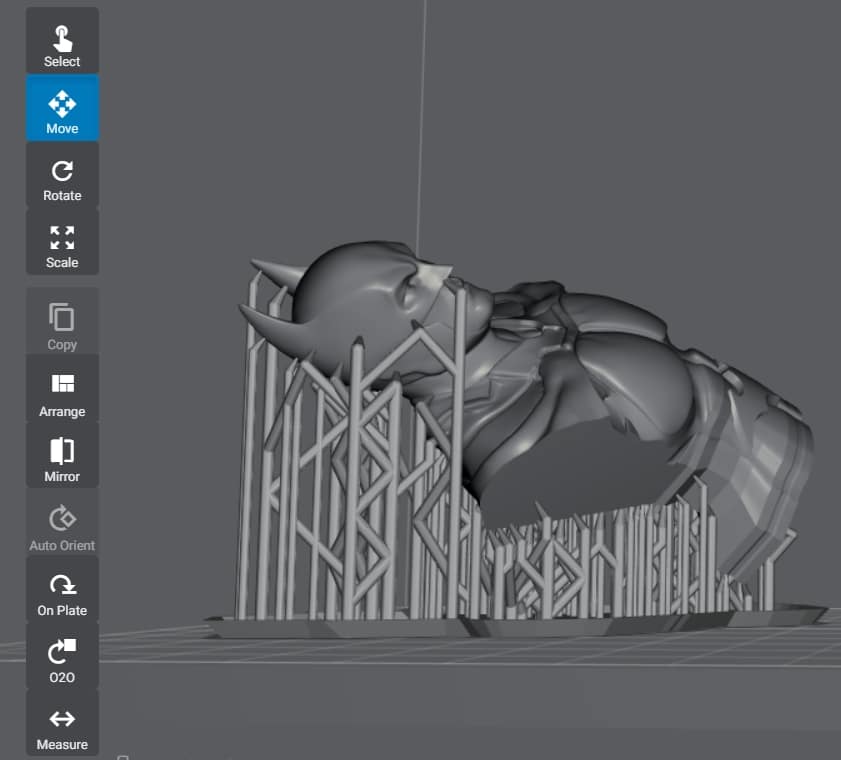
The picture below was a test for an auto-orientation and auto-support in Lychee Slicer, along with a few custom supports along the bottom, though the print orientation angle is much more than 45°.
When you look at the model itself, it could actually be printed flat on the build plate because there aren’t any parts of the model that overhang much, meaning that it has enough support built within the model the whole way through.
Have a read of my article Best Orientation of Parts for 3D Printing for more details.
Best Light-Off Delay Settings
An ideal light-off delay setting is quite hard to come up with because it depends on your 3D printer. General settings tend to fall between 0.5-2 seconds, so I’d take a mid-value of that, being around 1-1.5 seconds.
Ideal Light-Off Delay: 1-1.5 seconds
You want to avoid having a light-off delay too low because it is known to reduce the overall lifetime of your LCD due to overheating.
Depending on your 3D printer, you can get away with a lower light-off delay, especially for those monochrome LCD screens since they have a much longer life of around 2,000 hours.
Many people in the user submitted Anycubic Photon Mono X settings (4K monochrome screen) use values as low as 0.5 seconds, with an average of around 1 second.
AmeraLabs actually did some great testing with light-off delay and showed that having 0 light-off delay resulted in a really grainy and low quality surface finish. Values below 1 second can contribute to lower quality, so you want to use 1 second at minimum.
Best Lifting Distance Setting
Your lifting distance should be high enough that it gives your models clearance to nicely come off the FEP film, and not too high that it unnecessarily increases your printing time significantly.
Going through the lifting distance settings, there is a range between 6-10mm, with an average of around 8mm. I think a lifting distance of 9 or 10 is a bit on the high side, so I’d stick to that 6-8mm range.
- Best Lifting Distance: 6-8mm
Z-Lift Height
Your Z-lift height should be high enough that it gives your models clearance to adequately create a raft and supports underneath, without being too far that your supports are really tall.
You also want to give some space for the supports to build up a good enough foundation before getting to the print itself.
Best Z-Lift Height: 5mm
I do not believe i have ever encountered a more helpful collection of information. If this doesn’t correct the issues you are facing… read it again!