How to Hollow Resin 3D Prints Properly – Save Your Resin
Hollowing your resin 3D prints is an important step that many users overlook, one that I myself used to not know much about. After learning about hollowing models, I decided to write an article to show other people how to do it.
To hollow resin 3D prints, you simply find the “Hollow” button in your chosen resin slicer or software such as Lychee Slicer, PrusaSlicer, ChiTuBox, or even another software like Meshmixer. You can set the Wall Thickness, Infill and other parameters to create a hollowed resin model.
This is the basic answer on how to hollow your prints, but keep reading through this article for more important information that you should find practical for your resin printing experience.
Should You Hollow Your Resin 3D Prints?
You should hollow your resin 3D prints to save material rather than use it to have a print that is 100% solid. Hollowing resin prints can lead to more successful prints since it reduces the weight of the print on the build plate, so it doesn’t detach. Make sure your wall thickness is wide enough for good strength.
Resin 3D prints can definitely be hollow and for most models out there, it’s a good idea to hollow them out unless you are printing miniatures as there isn’t much resin savings there. Another issue with hollowing miniatures is they can be difficult to drain without affecting the model.
Many models out there simply can’t be hollowed based on the design and requiring the foundation to build from.
Some people still choose to hollow their miniature models since the amount of resin you save definitely adds up when you are printing several miniatures. It does depend on the dimensions of the print itself.
Some models don’t benefit very much from hollowing since the dimensions of the model don’t allow for much hollowing, unless you reduce your wall thickness. At that point, the model can become fragile and easily broken.
Resin prints that are chunky or wide can definitely benefit from a good hollowing, using a wall thickness anywhere from 1.5 to 3mm depending on the specific model and your preferences.
How Do You Hollow Resin Prints?
To hollow your resin prints, you simply have to click the hollowing button in your slicer and toggle it to be on. The hollowing settings will be present in the hollowing window where you can set your desired parameters such as wall thickness and infill.
How to Hollow Resin Prints in Lychee Slicer
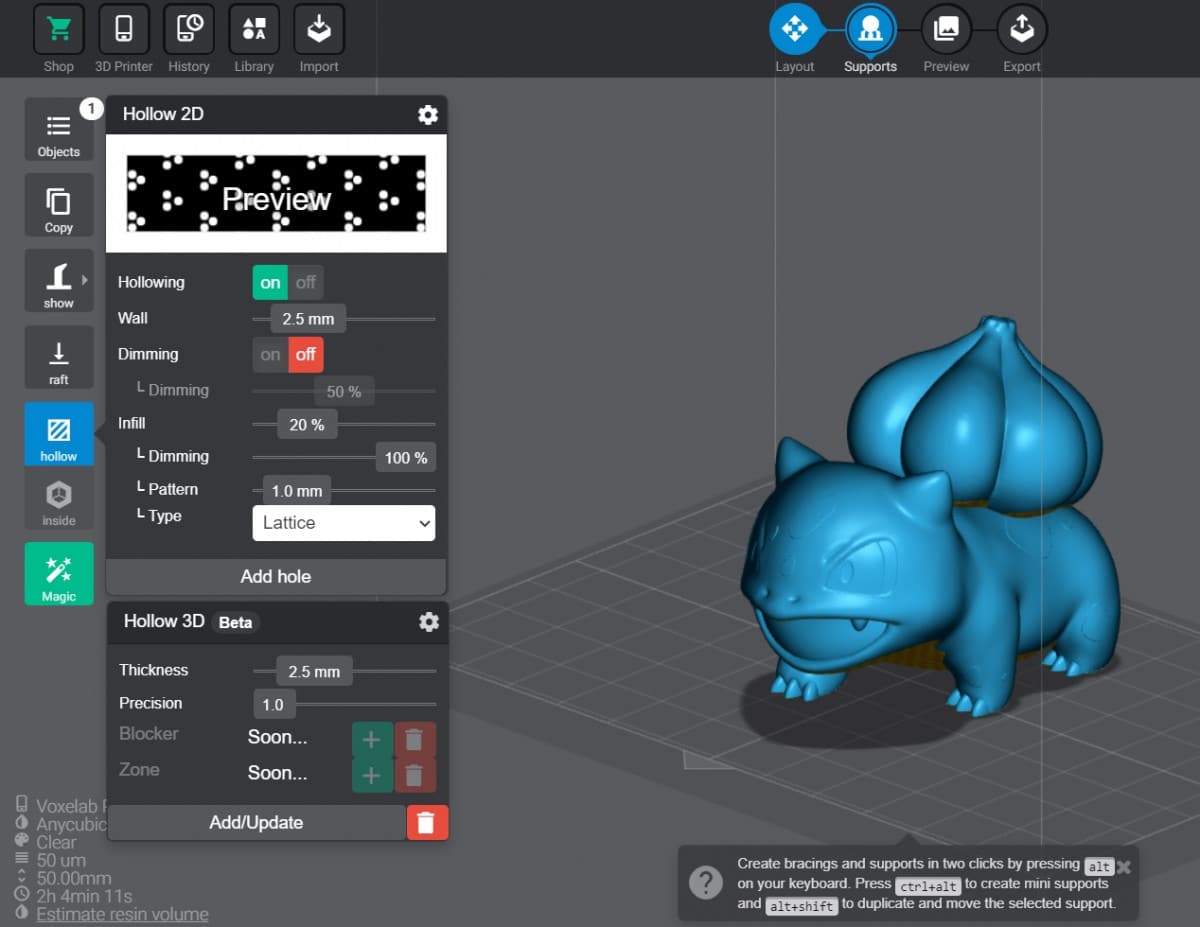
To find the “Hollow” button in Lychee Slicer, you need to click the “Supports” in the Lychee Slicer workflow at the top. This is where you can add supports, holes, rafts, and plenty more.
Simply turn Hollowing on as shown in the picture, then adjust the settings as you wish. The default settings should work pretty well, giving you a Wall Thickness of 2.5mm and an Infill of 20%.
You can choose to use infill, or add in your own custom supports inside the hollowed model to support the unsupported areas. Without hollowing, the model will build upon itself so there would be a foundation, but with hollowing, there is no foundation underneath.
Depending on the model though, if the design has a gradual slope towards the top like the Bulbasaur model below, you might be able to get away without internal supports or infill.
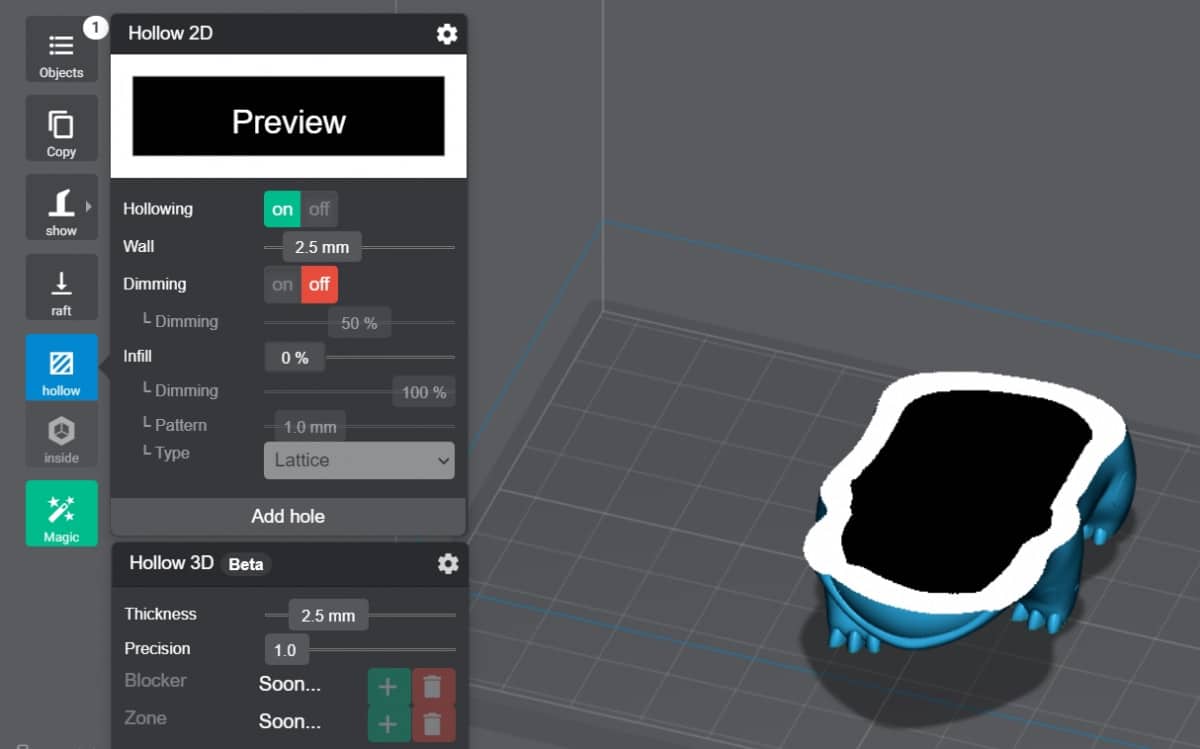
Here is what a hollowed model looks like with no infill. You can see how much resin would be saved by simply hollowing your model.
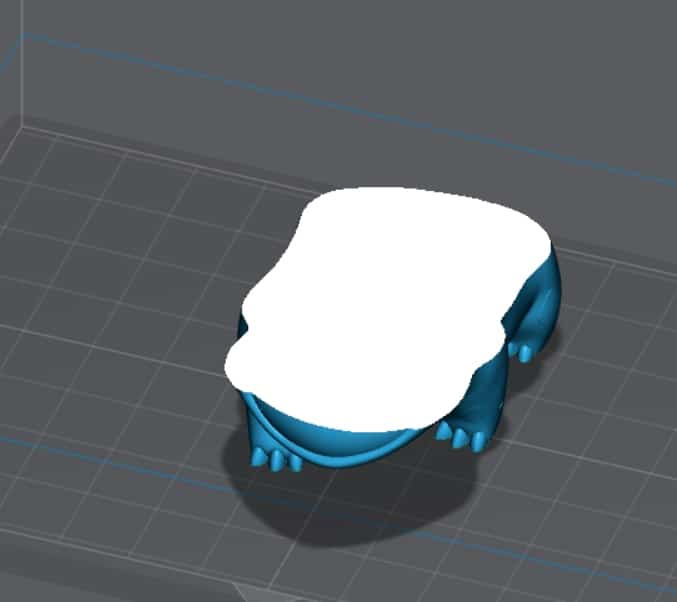
Here is the same model without hollowing and completely filled up. It doesn’t serve much extra function other than adding weight and using up more resin.
If you want your model to have more weight, it can make sense to do this, but you can still hollow the model and have a large wall thickness to save resin.
Now here is a good balance between having a hollowed model and a filled model, which is having infill inside the model. Lychee Slicer creates an internal foundation in your resin prints to provide a model with enough material to print successfully.
20% infill worked well to support the rest of the model, though infill can bring its challenges like having uncured resin left in the model which I’ll explain later in this article.
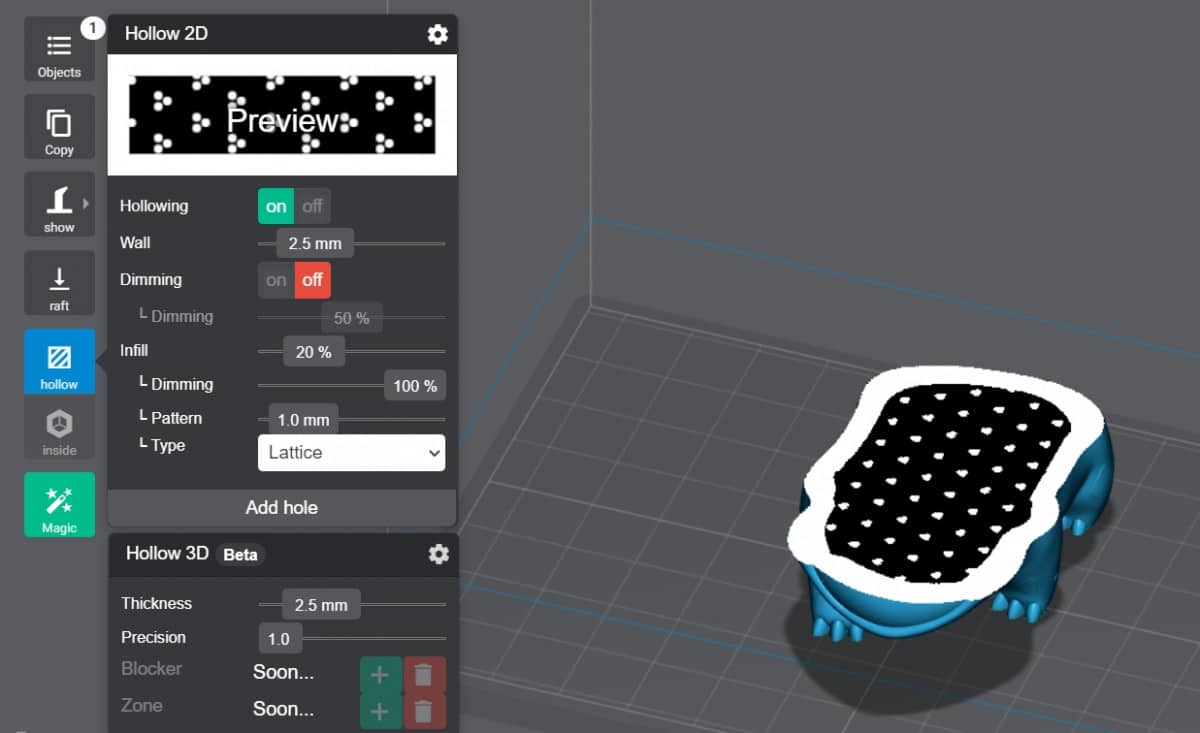
Here is what 20% infill looks like in an actual print.
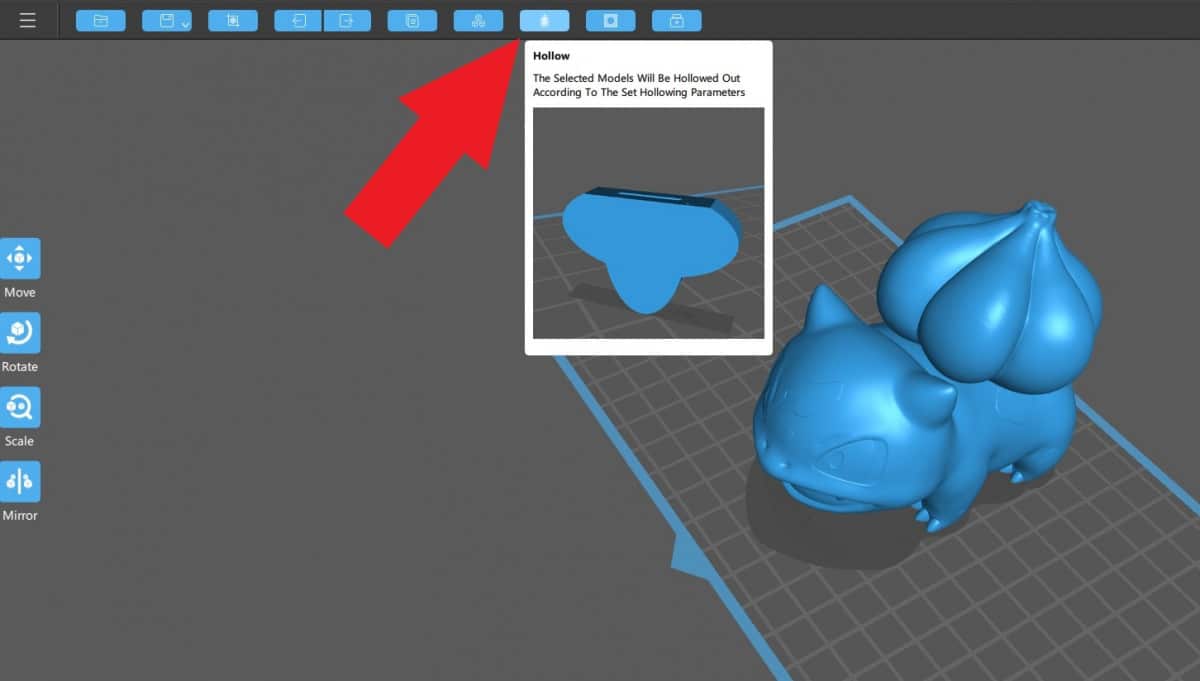
How to Hollow Resin Prints in ChiTuBox
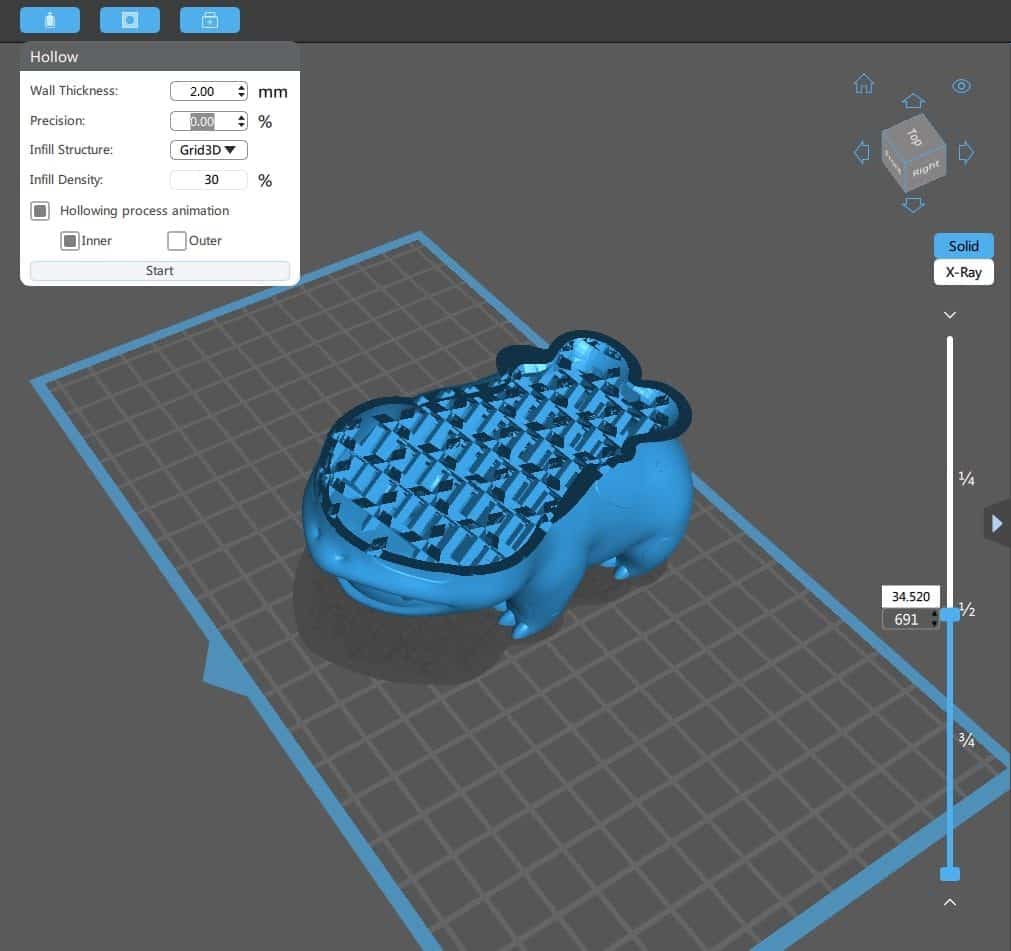
To Hollow a model in ChiTuBox, you simply select the “Hollow” button at the top which brings up the hollowing menu. You can choose your Wall Thickness, Precision, Infill Structure, Infill Density, and whether you want the hollowing animation on the inside or outside. It takes about a minute to hollow.
As you can see from the pictures below, hollowing is really easy to do in ChiTuBox.
You also get to see a cool animation of your model hollowing.
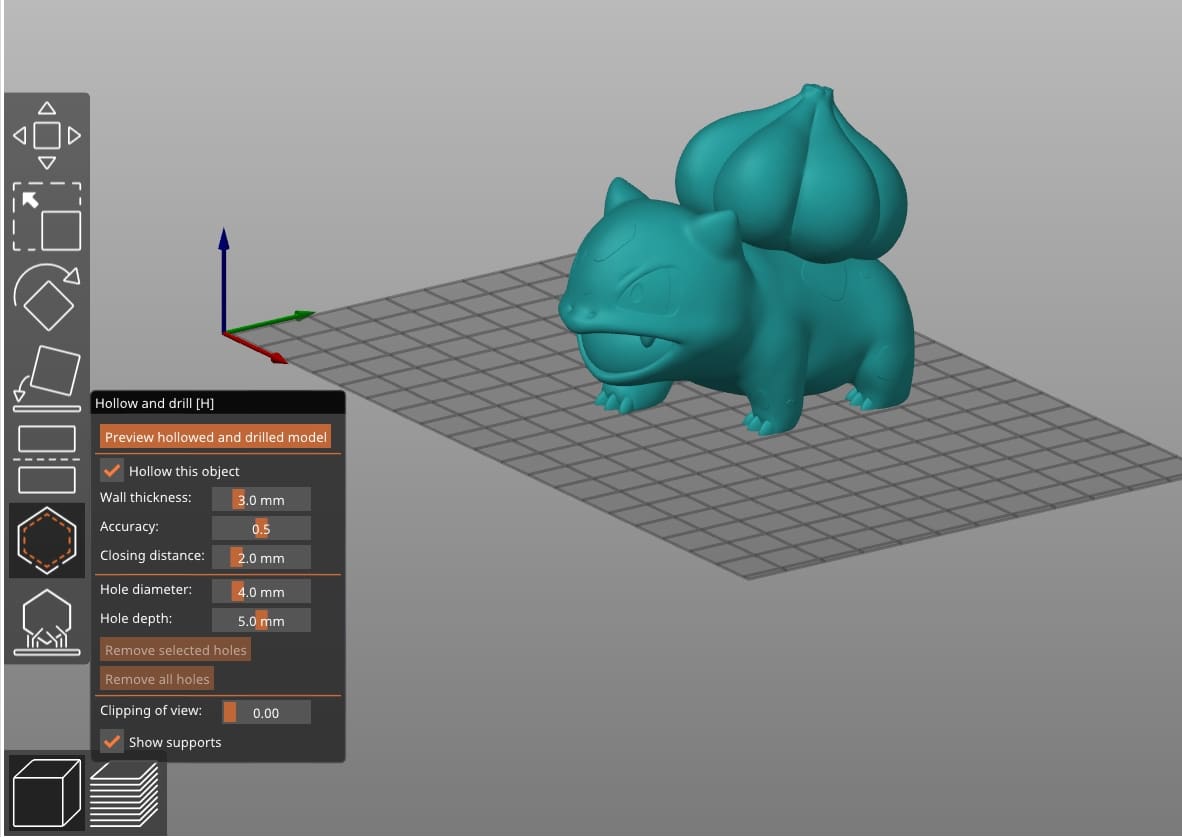
How to Hollow Resin Prints in PrusaSlicer
Prusa Slicer is similarly easy to use for hollowing models.
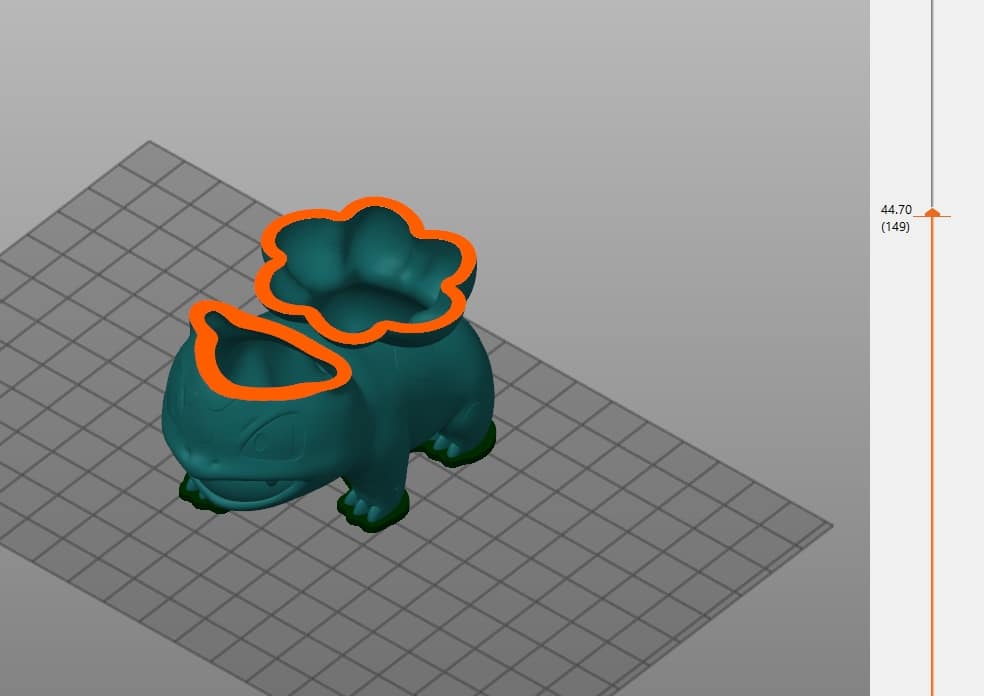
To hollow resin prints in PrusaSlicer, go to the left toolbar and select “Hollow and drill [H]”, then check the “Hollow this object” box to bring up the hollowing parameters to adjust. You can adjust Wall Thickness, Accuracy, and Closing Distance for hollowing, along with inserting holes for drainage.
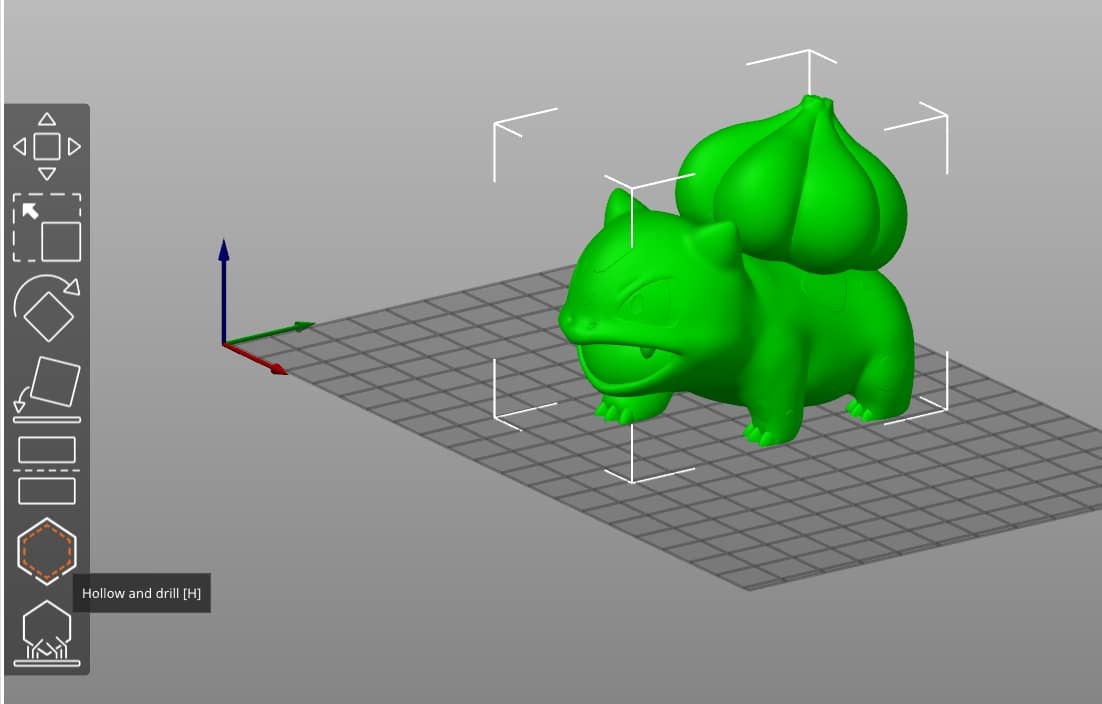
PrusaSlicer defaults the Wall Thickness at 3mm which is a good thickness for stronger prints. The 2-3mm range is usually what most people tend to use, depending on the dimensions of your model and what functions you have for it.
Here is how the hollowed model looks on the inside.
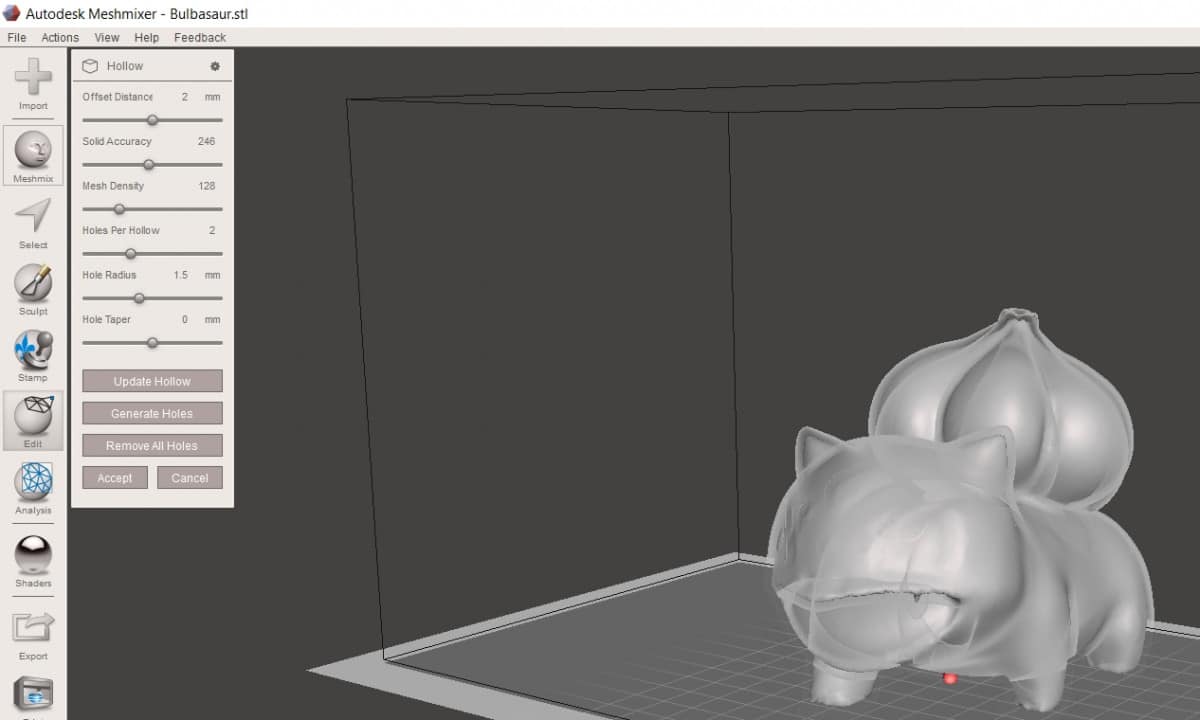
How to Hollow STL Resin Prints in Meshmixer
To hollow a model in Meshmixer, you go to the “Edit” button in the toolbar on the left, then select “Hollow” which then processes the hollowing of your model. You can adjust parameters such as Offset Distance, Solid Accuracy, Mesh Density, and other settings for holes.

If you want to make adjustments to the settings, you can use the sliders as shown below, then once you are happy with it, hit “Accept”.
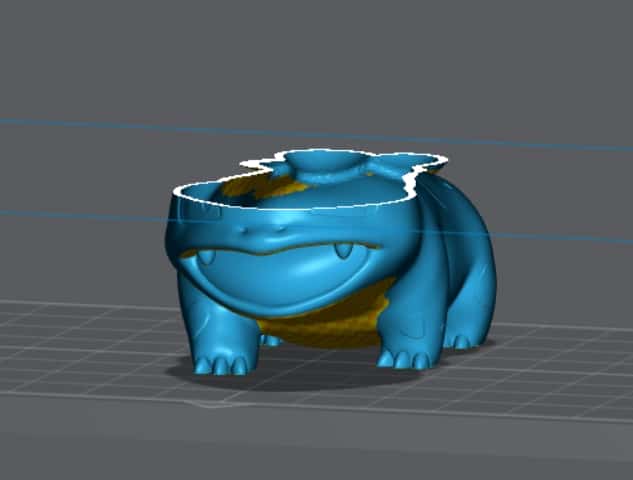
After you have hollowed the model, you can export the model by hitting “Export” in the toolbar on the left, then save the updated model as a new STL file. Here is how the model looks like in Lychee Slicer.
You can check out the video by 3DPrintingPro for more information about hollowing your prints in different software.
As mentioned, one thing you should keep in mind when hollowing your model is to ensure the internal foundation is supported. 3D Printing Pro has another video that details why some prints can fail if not supported properly internally.
How Do You Cure Hollow Resin Prints?
To cure hollow resin prints, you cure the model as you would usually cure it since the UV light penetrates through the resin. It can be helpful to use a small UV torchlight through any holes in your model to cure the inside of it better. Make sure to thoroughly wash the resin inside the model.
The Letion Black Light UV Flashlight from Amazon is a great choice to shine through holes in your model.

One user who uses this flashlight to spot cure resin actually managed to fix a print by painting some resin where it broke, then shining the UV light on it to harden the two pieces together.
The construction of the Letion UV Flashlight is strong and durable, allowing you to get plenty of use out of it.
How to Fix Uncured Resin Inside Prints
To fix uncured resin inside prints you should use little to no infill, so resin doesn’t get trapped in there so easily. Washing your resin prints thoroughly should help clear out uncured resin, using something like a Wash & Cure machine or an ultrasonic cleaner. You can use a syringe to push alcohol through the holes.
Using infill in your models can trap resin inside the model, so reducing your usage of infill can help with uncured resin staying in your resin 3D prints. Rather than use infill, you can use normal supports within the model, so there is space for the resin to escape.
Some people use a syringe to flush out the resin while it’s in the isopropyl alcohol bath, which can work well if your holes are big enough. Smaller holes aren’t going to flush out the resin as well, so if you can, create larger holes that you can plug up afterwards.
ChiTuBox has a great function that gives you the option to 3D print the plugs of the holes you create, so it can be plugged up easily.
It’s possible to drop some resin on your model then cure it to fill up these holes. As mentioned above, using a UV flashlight can help with doing this.
You can try pouring IPA directly into the holes of your prints, cover the hole with your finger and shake up the model to swish it around. Repeat this process until you see the liquid inside the model come out clear and without resin.
Using a Wash & Cure device or an ultrasonic cleaner does pretty well to clear resin out of prints, though you may need to increase the cleaning time and turn it around manual if the print mainly sits on one side.
A simple choice for the ultrasonic cleaner is the Magnasonic Professional Ultrasonic Cleaner from Amazon. It generates 42,000 Hz of ultrasonic soundwaves for a powerful, yet gentle clean. This works great for many resin 3D printer users.
In terms of a Wash & Cure machine, the Elegoo Mercury Plus 2-in-1 Washing & Curing Machine from Amazon. You can fill the washing bucket with a good cleaning solution like isopropyl alcohol, set your parts in the metal strainer, then activate the washing current.
I’ve heard of some people actually drilling their own holes in a model using a handheld drill, but you definitely want to be careful doing something like this. Ensure you use gloves, goggles, protective clothing like a long-sleeve, and a facemask.
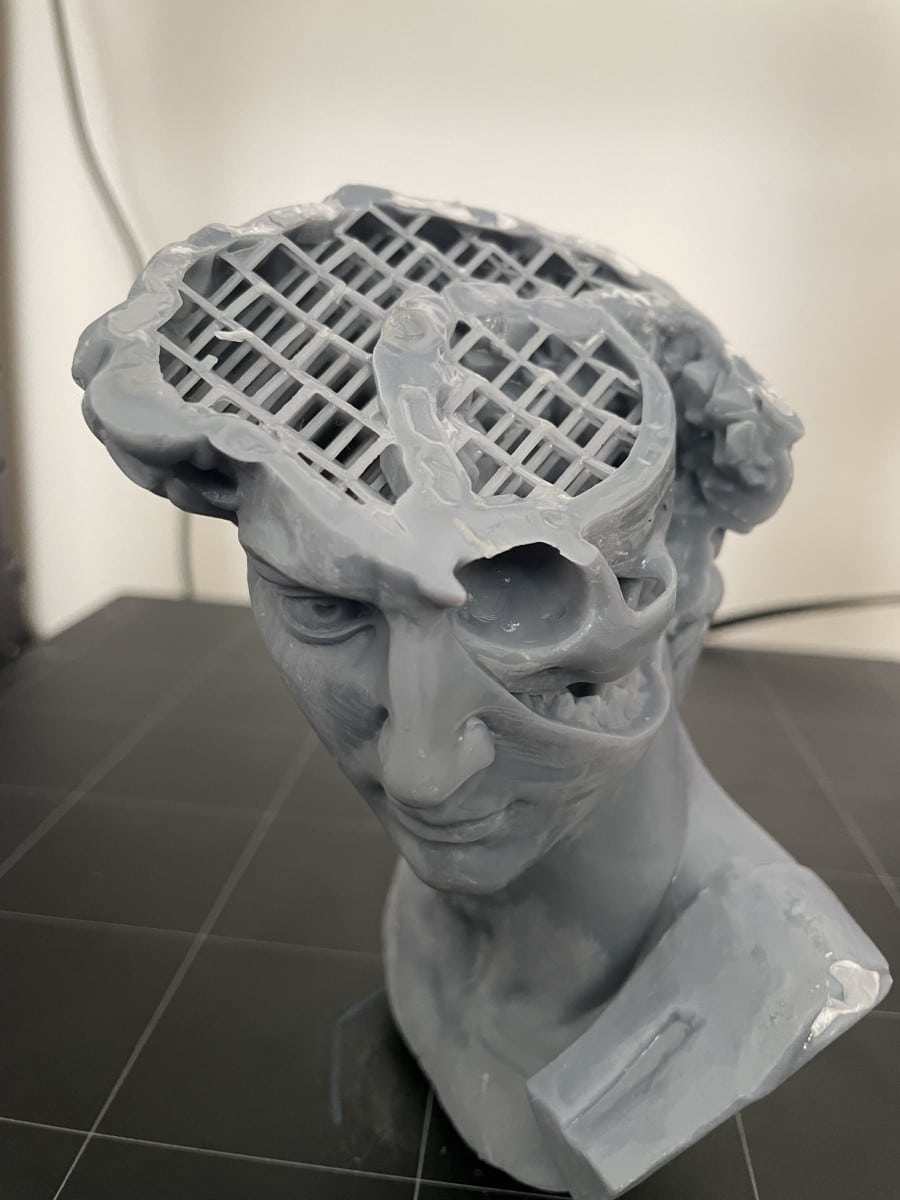
UV resin tends to go brittle after some time, so when it is on the inside of your prints it can actually start to cause cracks in the outer model as it leaks out.
One user mentioned how uncured resin can release gases which increases the internal pressure of your model, leading to a part possibly exploding or cracking open.
This can definitely be dangerous so it’s important you take the time to learn how to create good holes in your prints and clean them out. Good drain holes for hollow 3D prints are essential for safety and good results.
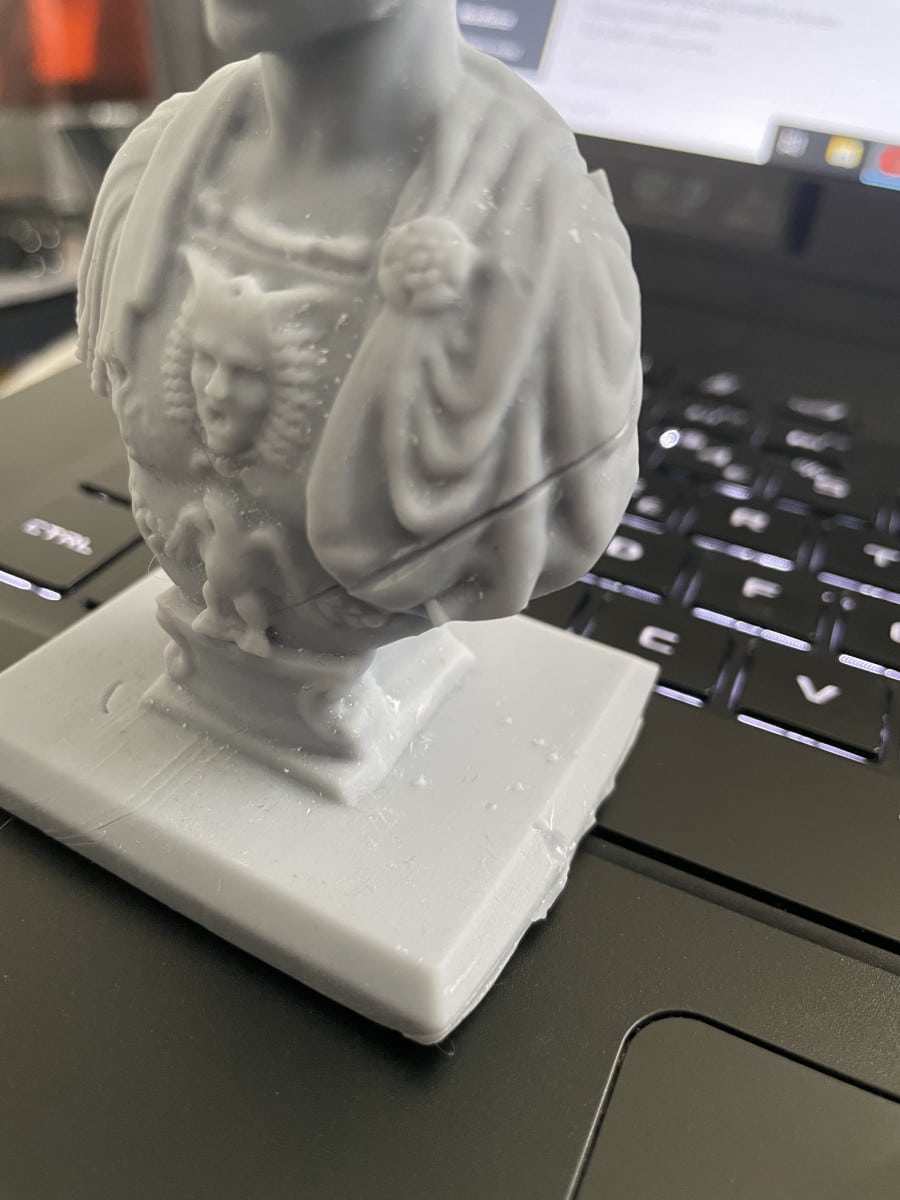
You can see the deep cracks in this model I made, and if you look closely, you can actually see the cured resin seeping through one of the cracks in the second picture.
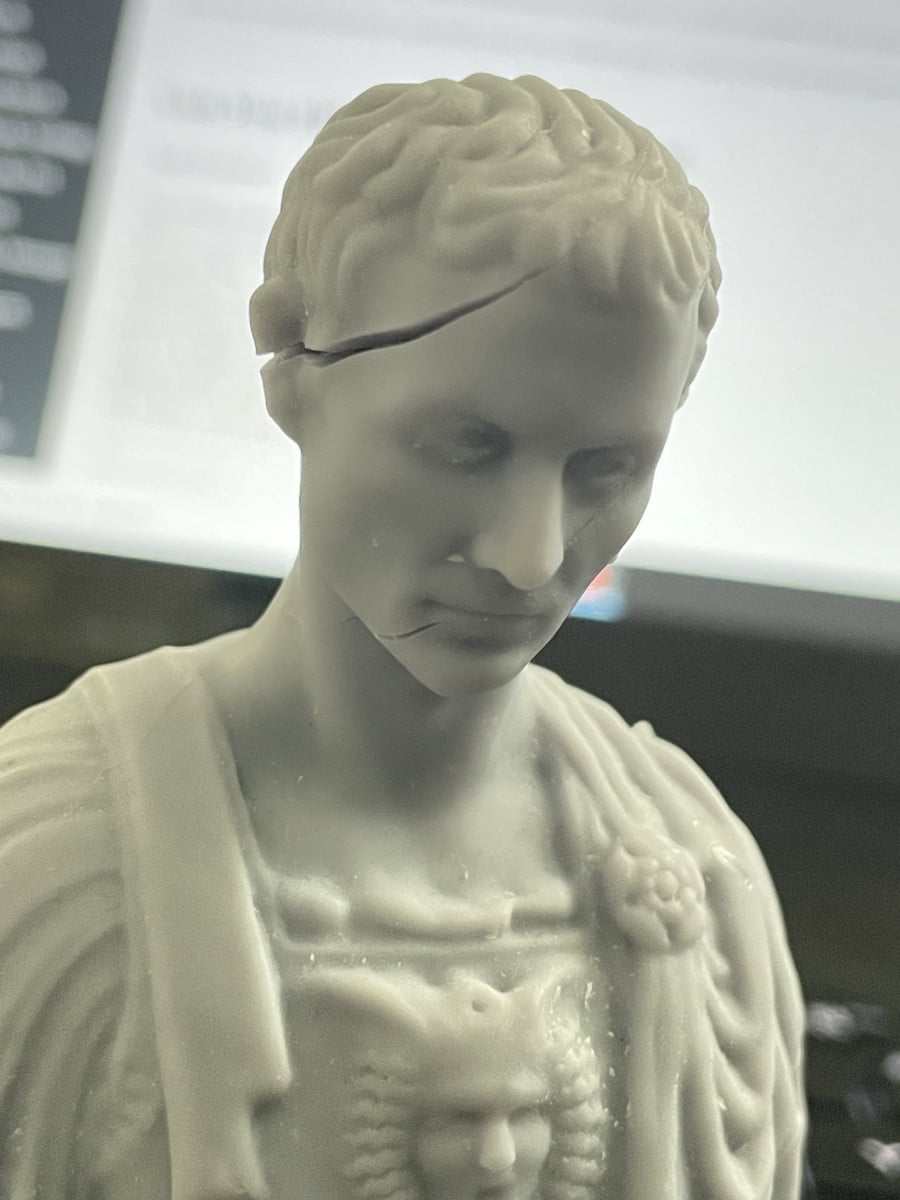
I did have a hole in this model at the bottom, but it may not have reached far enough to all the pockets in this model, so that’s something to watch out for.
Check out this video by 3DPrintingPro to learn an advanced technique with hollowing your models.
Can You Fill Hollow Resin Prints?
You can fill hollow resin prints by using products like expanding foam, epoxy resin, or even fine grain silica sand. After filling your resin model, pour a few drops of your original resin then cure it with a UV light to harden and seal it up properly. This is a great way to save resin and add weight to hollow prints.
Some people have advised to use sand to fill up hollow resin prints. Fine grain silica sand, then seal up the hole with a few drops of resin on the print, then cure it with a UV light to harden it.
This JDiction 16 Oz Epoxy Resin from Amazon is something that can work for filling resin prints cheaply, rather than having 100% infill in your models. It is crystal clear, easy to mix, is self-leveling, has a 40-minute working time, and has low odor with no VOCs.
You can also thin out the mixture by adding 90-99% isopropyl alcohol. Resins do have an exothermic reaction as they harden, and the longer the curing time, the less heat that occurs. A 5-minute epoxy is going to create more heat than a 30-minute epoxy.
Another thing to watch out for is how these epoxy resins can shrink after hardening.

The Red Devil 0912 Expanding Polyurethane Foam Sealant from Amazon is another great choice for filling your resin prints. It can even be sanded or painted as you desire. This foam forms an airtight and waterproof bond.
It’s ideally used for larger models since the nozzle isn’t the largest, so you’ll have to create a hole big enough for the nozzle to fit through.

Here is a great video by Uncle Jessy on YouTube adding expanding foam to a large 3D print.