13 Ways How to Fix Resin 3D Print Supports that Fail (Separation)
I’ve experienced my resin 3D prints separating from the supports and even having layer separation, which ruins important sections of a print. This is an issue that I decided to look into so I could finally solve the problem.
This article will detail the causes of layer separation in resin 3D printing, as well as the fixes to finally get successful resin prints.
To fix support separation in resin printing, you should increase the number of supports and thickness to improve support strength. Increasing your normal and bottom curing times can make supports stronger so they hold together better. I’d recommend using a raft to have a good foundation, and using enough drain holes.
Keep on reading through this article for more details on how to fix this issue properly.
What Causes Support Separation in Resin 3D Printing
The use of supports in 3D printing is one of the basic things that determine how well your print will come out during printing.
There are quite a few reasons why your supports are separating from your model or failing, so it’s important to understand what’s happening before you can properly fix it.
Generally speaking, support separation happens due to weakness of the cured resin or a lack of strength in the foundation of your model. This can happen for a number of reasons, such as the peeling force or suction force being too powerful to the point where it messes up the layers.
To understand this better, I have made a list of reasons why a print can fall off supports:
- Supports are not strong enough to hold model
- Your curing times aren’t long enough
- Not using a good raft to secure the model
- Lifting speed is too fast
- Build plate is not level
- Resin is low quality or old
- FEP film damaged or not installed properly
- Print orientation is not ideal
- Not enough drain holes in the model
- Low temperature environment affecting resin
Let’s move right into how you can potentially fix your support getting separated from the printed model.
How to Fix Support Separation in Resin 3D Printing
1. Make Support Stronger in the Right Places
One of the first things you’d want to do to fix support separation in your printing is to ensure that the diameter of your support tip is thick enough to hold your model. This is because the thicker your support tips are, the more firm the supports will hold your model.
Based on my experience, I have realized that using a support tip with a diameter of at least 0.4mm offers a good amount of strength that your supports can make use of, but increasing this to 0.6mm-1mm is what some users do for more strength.
You want to ensure that you use the right diameter both at the upper and lower end to add more stability to your print.
Below is an example of the difference in changing the tip diameter for your resin supports at 0.30mm, 0.50mm, 0.70mm and 1.00mm diameter.

When you don’t use supports with thicker tips, you can risk having your model fall off the support as a result of insufficient strength from the supports.
Here is what it looks like when you adjust the diameter of the support itself. From left to right you have 1.00mm, 1.30mm, 1.70mm & 2.00mm.

There are Light, Medium, and Heavy supports which give different support settings for strength. You want to use the right level of support strength depending on how heavily supported the model needs to be.
Supports at the bottom of a model need more strength because it’s holding up the whole print. Parts that are not so heavy can do with medium supports, while smaller, flimsy parts can successfully use light supports.
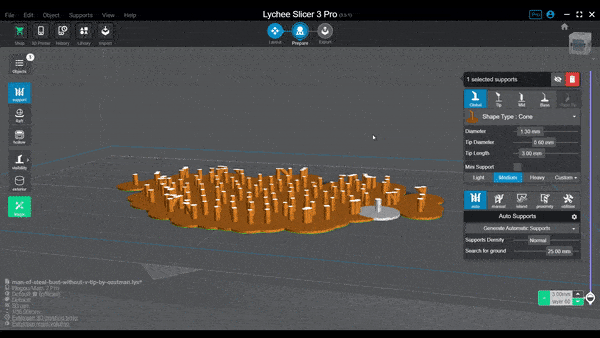
Below are what Light, Medium & Heavy supports look like in Lychee Slicer with their default settings. You can adjust the values after you choose the support type as desired.

You also have the choice to change “Support Density” of the “Auto-Supports” to increase the number of supports.
You want to learn how to differentiate which types of supports to use to ensure your supports don’t fail and separate from the model. Here is a video on easy guides to properly support your resin 3D model.
The angle of the tip is also an important part of the support structure. This part can be easily broken if it is too thin and not properly placed so you may want to make this part thick as it will offer more strength to your print.
If you are starting out with resin printing, I always recommend creating more supports than you think you need to be on the safe side. As you get more experience, you can start to remove supports and craft them more practically.
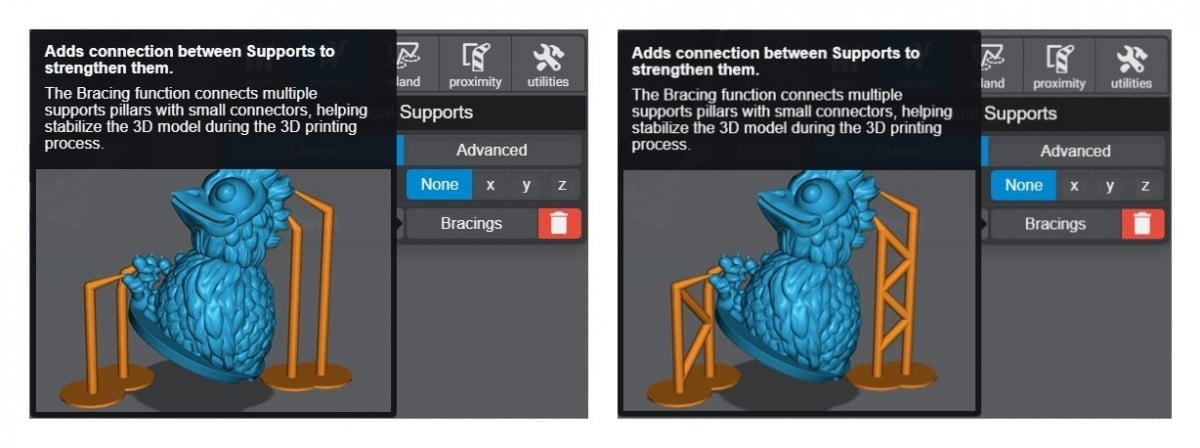
2. Use Support Bridges on Your Model
Another way to prevent support separation in your 3D printing is by using support bridges, similar to the method above of increasing strength to your supports.
Support bridges are common with resin slicer software, and they are usually created if you do auto-supports, but if you don’t you may have to find a button or the option that creates bridges or interconnects your supports for strength.
You should bear in mind that they may require more resin than the normal supports. However, I’d say it can be worth the extra resin. This can go a long way in preventing your model from falling off from your support.
3. Increase Curing Times on Normal & Bottom Layers
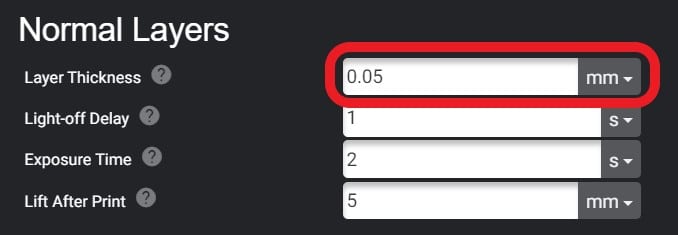
The level to which you cure your resin during the printing process is going to determine the strength of your model, depending on whether it is under exposed or at optimal times.
If you have a curing time for the normal or bottom layers that is too low, you’ll find that supports don’t hold up so well against the weight and gravity forces that are working against you.
I’d recommend increasing your normal exposure times if you find that your supports are failing. You should also probably increase your bottom layer exposure time if you find that the prints aren’t sticking to the build plate so well.
A normal number of bottom layers is usually between 4-6, and bottom exposure times really do vary quite widely depending on your printer, but generally will be around 10-15x your normal exposure time.
You can find some spreadsheets of resin print settings that work for specific 3D printers and brands of resin which is user-generated. I’ve previously cured models are exposure times too low and found that the supports were flimsy and didn’t hold up so well.
4. Use a Good Raft
Similar to having a good adhesion on your build plate, using a raft is one way you can potentially fix your supports failing or separating. The reason this can help is it helps to secure your print and not have it moving around too much.
In the resin printing process, there is a lot of movement, pressures and forces that can negatively affect your print quality or make your print fail altogether.
When you use a good raft on your model, it can improve your printing success rate significantly. I like to use Lychee Slicer Pro rafts, specifically the “Shape” raft which outlines the dimensions of the model and creates a raft around it.
You can scale the size of the raft, the thickness, and plenty other settings that can improve things. If you don’t have Lychee Slicer Pro, you can still use the basic “Square” raft which works very well.
5. Decrease the Lifting Speed
Decreasing the lifting speed can help fix supports separating due to lowering the amount of force that occurs during the printing process. Each time the build plate lifts and lowers, it creates suction pressure.
This usually isn’t the most common fix that helps users, but it’s definitely helped a few people out there who may have lifting speeds or even retract speeds too high.
If your lifting or retract speed is too quick, you can definitely experience print failures. There is a large peel force or separation force away from the FEP film that helps create each layer of your model, and that is increased with quicker build plate movements.
In addition to this, you are more likely to experience increased forces if your resin is quite thick or viscous, similar to the difference between water and cream for example.
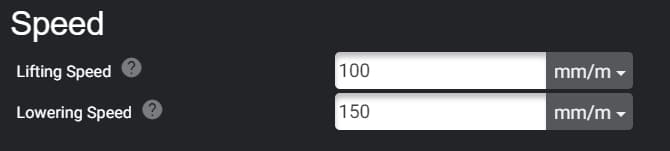
You’ll want to ideally start at a fairly average lifting speed like:
- Lifting Speed: 100mm/s
- Lowering/Retraction Speed: 150mm/s
100mm/s Lifting Speed & 150mm Lowering
There have been videos that show some really high lifting and retract speeds, while still producing successful 3D prints. Check out the video below by Uncle Jessy who demonstrates these high speeds on the Elegoo Mars 2 Pro.
6. Re-Level Your Build Plate
One key reason many people get failures with resin 3D printers is because their build plate isn’t as level as they think it is. Some 3D printer designs are created in a way where once you level the build plate, it stays put, but others aren’t the same.
If your 3D printer gets moved around a little or it hasn’t been leveled for a long time, it could be worth re-leveling it to improve the overall accuracy and precision.
Make sure that you tighten the screws a good amount to keep the build plate leveled for as long as possible.
7. Make Use of Quality and Fresh Resin
If you’ve had resin sitting in your vat or in the resin bottle for a long time without shaking it, there can be a separation of particles that ruins the printing process.
When I mix resin that has been sitting in the resin vat, I noticed how there would be a layer of white residue underneath the actual resin. After you mix the resin together nicely, it goes back to the normal resin form.
The same thing happens when it’s in the bottle, so ensure that your resin is fully mixed, fresh, and not expired.
If you don’t follow this, you may experience support separation or support failures during your resin printing process.
Another thing you can do to improve your printing success is to mix different types of resin that can add flexibility or toughness to your models. Many people recommend mixing either a flexible resin or a tough resin.
Even mixing in 25% of this resin can make a significant difference. It’s a great method to improve strength to your supports and to your overall models, especially with parts that may break easily, like on miniatures.
It can be a bit tricky to identify the best type of resin to buy for your 3D printing which is why I have linked a video on how to find the best resin to print miniature.
This video by 3DPrintFarm includes the review, durability, and even the cost of some resins you can use.
8. Clean Your FEP Film Before Printing A New One
Depending on the settings and how your print came out, you may need to clean your FEP film of residue or bits of cured resin that can float around in the resin vat. That same residue or cured resin can prevent the proper formation of your model, leading to support separation.
You should make sure your FEP film and resin vat is clear, but make sure to take care of your FEP since it is fragile. You don’t want to use any sharp or heavy objects around it.
A plastic scraper with slightly rounded edges should work well. Most resin 3D printers will come with a stock one, but it could be worth buying a higher quality ones.
If you find that your FEP film is scratched up quite a bit or really cloudy to the point that it affects your prints, you’ll want to replace it with a high quality FEP film.
The EPAX nFEP Film Sheet 200 x 140mm from Amazon is a great choice to have for regular-size resin printers.

It’s made with a special formula of Teflon, with an ultimate non-stick surface and makes it so that prints come off easier than standard FEP films. This is a high quality FEP film that is compatible with LCD printers and even high-end DLP and SLA printers.
Each pack has 3 nFEP film sheets.
9. Check That Your FEP Film is Installed Correctly
A lesser known and interesting way to prevent your supports separating during the print is by ensuring your FEP film is installed correctly in the resin vat.
As mentioned earlier, resin 3D printing involves a peel process which plays a huge part in determining how your print will end up.
You want to ensure that your FEP film is neither too loose nor too tight. FEP films that are too tight will affect the peel force of your print thereby making it stick to the film.
The usual strategy that many people teach when installing the FEP film is to have a bottle cap underneath to make sure there is some space or ‘play’ in the FEP. This allows enough room for the FEP to move around and for the cured resin to peel off each layer.
You can always change and re-adjust your FEP film by loosening it a bit if it’s not tight and by screwing it more tightly if it’s too loose. FEP films can also be replaced if it is bent or deformed so as to prevent other printing issues.
I’d suggest watching this tutorial by Inventorsquare on how to replace and tune the FEP film for the Anycubic Photon resin printer. It shows a really cool method of using sound waves on an app to determine the optimal tightness of your FEP.
FEP film is known as a consumable so don’t worry about needing to replace it when it comes to the end of its life. There isn’t really a known rule to follow on when to replace your FEP other than when it starts negatively affecting your print quality.
I’ve seen FEP films with plenty of scratches and even a hole in it that kept going.
You can actually use clear tape if your FEP has a small hole in it, something I’ve successfully tried before. It’s good as a temporary fix but you definitely want to install a new one as soon as possible in those cases.
10. Improve Print Orientation
A good way to prevent support separation is by improving your print orientation. When you place or position your print the right way, your model can be created in a way where the layers aren’t struggling for a good foundation underneath.
Ideally, you want to orient your print in a way to minimize the need for supports in the first place. If you have a large, flat surface on your model, it can be a good idea to orient that flat part straight onto the build plate.
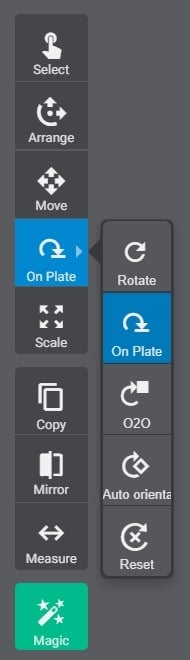
There should be an option in your resin slicer to orient a part of your model flat on the build plate by clicking the “Orient on Plate” option, allowing you to click on the part you want to be flat on the plate.
Here’s an example I did with a great Superman Model by Eastman3D on Thingiverse.
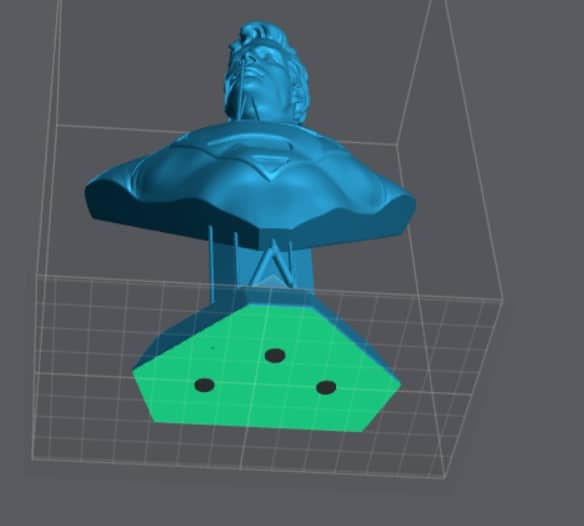
You can see that this greatly reduced the number of supports I would have needed if it was positioned above the build plate or tilted far on another side. There are plenty of ways to orient a model, so it’s a good practice to learn the optimal ways.
I wrote an article How to Orient Models for Resin 3D Printing, so check that out if you want a more detailed explanation.
Do remember that just because a print has a flat area doesn’t mean you can’t still raise it up and add medium/heavy supports underneath.
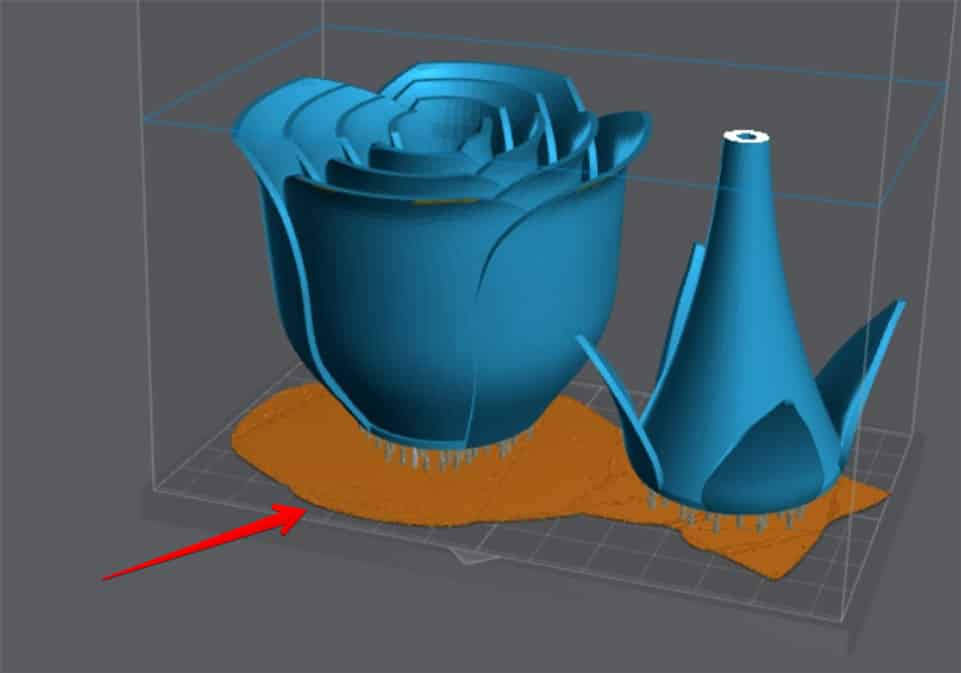
You’ll notice that I have three holes at the bottom of the model, which is very important to allow the suction pressure to be released and to help resin drain out.
If I didn’t put drain holes there, there could be a lot of pressure build up, resulting in thin layers of cured resin potentially breaking, especially if there are closed areas in the resin print that doesn’t allow air to pass through.
The Superman model above was hollowed out and pretty much open until the very top of the model where the hair is, so this allows most of the resin to drip back into the vat easily.
It’s important to check your “Layer View” of the model and ensure there are big enough cavities and air holes to allow for pressure to be relieved, or there will be massive suction pressure on the FEP.
Model orientation can be a good practice that improves stability in your resin 3D printing and can prevent your print from detaching from the support.
Another thing to realize when orienting models is when you print it flat, where you have the model going from the small supports up to a large layer that is full for the actual model itself. It will create a massive suction pressure at once which can’t easily be distributed.
Here’s an example:
You can see how there is one large flat layer that starts building on top of the supports, and this increases the pressure on the FEP, so try to orient a model like this at an angle slightly (20-45 degrees) to reduce how large the layers are.
The weakest point of your print might receive a lot of stress and pressure, resulting in breaks. It will keep on breaking until the foundation is strong enough to offset that weak area, but it can result in warping and a deformed section of your model, whether small or large.
This is the main reason why you want to angle prints in a certain way, especially if there are wide or large areas in the model. You can easily view these layers by using your slicer’s “Preview” features to skim through each layer.
11. Place Drain Holes in Proper Places
As previously mentioned, we need drain holes in resin models so that we can relieve pressure and let resin drain out of a hollowed model. If there is too much pressure build up, it can contribute to your supports failing.
If you know how to place big enough drain holes in your model, you can fix support separation if the suction pressure is your main cause.
The standard workflow for processing resin prints is to:
- Import the model into the slicer
- Rotate the model into a good orientation
- Hollow the model
- Add drain holes, rafts and supports.
It’s a good idea to add some drain holes near the build plate side to reduce that pressure. It also reduces the total surface area that’s in contact with the FEP, helping to prevent cured resin sticking to it, and using less resin.
Check that your holes aren’t getting in the way of any foundational areas or important sections of your prints.
Most SLA slicers have tools to do this, including ChiTuBox, Lychee Slicer, PrusaSlicer, and more.
Do make sure that your “Lift Distance” is enough to fully remove the model from the liquid resin in the tank, especially in the last phases of your print.
12. Make Sure Hollow Doesn’t Make Areas too Thin
The way you hollow a model can contribute to supports separating or failing due to similar reasons above with suction pressure breaking off the thin layers of cured resin.
The model I created below had a printing failure with the model and the supports. After this happened, I did some investigating to see why this occurred.
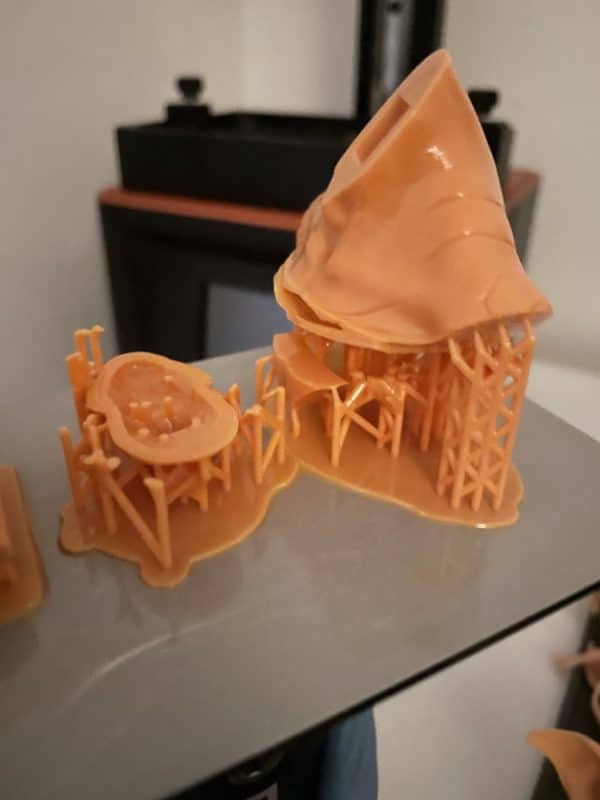
I went back to the sliced model and checked where the failure happened.
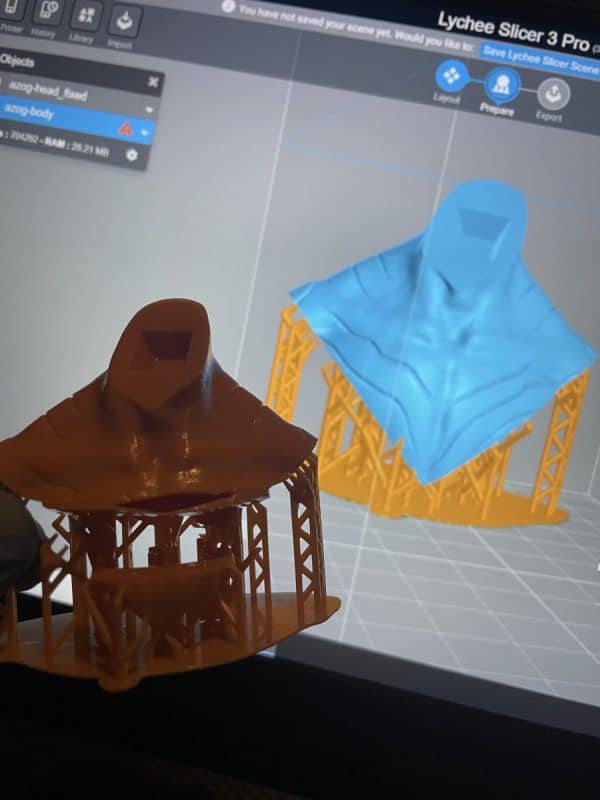
After scrolling through the layers in my slicer, I saw that the hollowed model had a small section where it was solid, then slowly turning into a hollowed model.
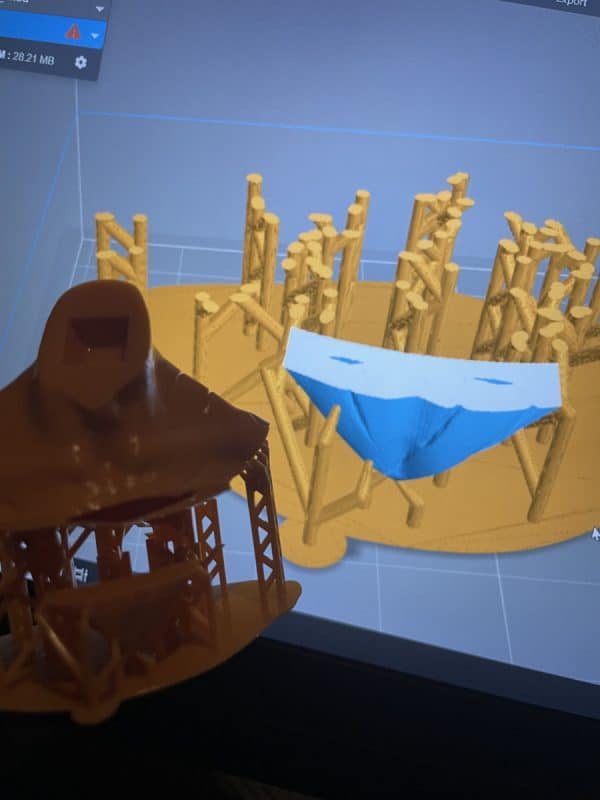
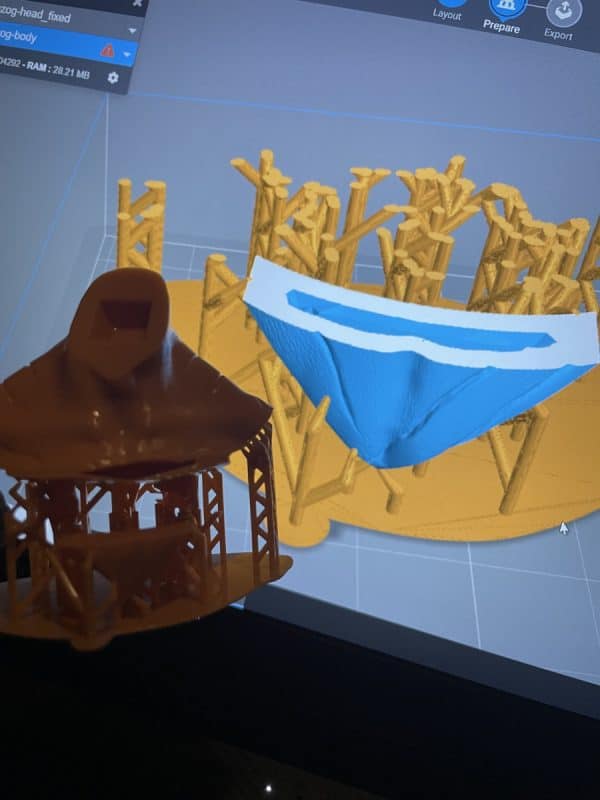
From the perspective of the resin printing process, the suction pressure may have interfered with the layers up to where the hollow part began. I decided to increase the wall thickness of my hollowed model to 3mm instead of 2mm to fill in this section to be more solid.
I printed the model again and both pieces came out great.