9 Ways How to Fix Layer Separation in Resin 3D Printing (Delamination)
A successful resin 3D print should be properly aligned and cured layers should not separate from one another. If you have ever noticed this fault in your print, you are not alone. I have also experienced this at different times while printing.
To fix layer separation in resin 3D printing, you should try to increase your normal and bottom exposure to provide a more stable foundation through the printing process. Increase the number of supports and ensure they are strong enough to hold the model. Using a raft and optimal print orientation helps.
There are more details you’ll want to know to finally solve your layer separation issues with resin printing so keep reading through for more.
Why Does Layer Separation Happen in Resin 3D Printing?
Delamination in prints can occur as a result of different reasons. Below are some of the reasons why your resin 3D print layers may have been unaligned.
- Not curing model for sufficient time
- Non-optimal print orientation
- Uncleaned residue building up on the FEP film
- Built-Up dust or debris on the optical window
- Supports are not strong enough to hold model
- Using low-quality resin
- Printing with a loose build platform
- Unexpected pauses or stops while printing
Having stated the reasons why layers get separated in 3D printing, we can get into the ways that this issue can be potentially fixed.
How to Fix Layer Separation in Resin 3D Printing
1. Increase Normal and Bottom Exposure Times
One of the main fixes that will help solve layer separation is to do with your exposure times. As you should know, you have normal exposure and bottom exposure with resin 3D printing.
Normal exposure is the number of seconds that your resin 3D printer will emit UV light from the screen to cure your liquid resin in the resin vat onto the build plate. Bottom exposure is the same thing but for the initial few layers at the bottom of your print.
When you have normal and bottom exposure times that are too short, it creates cured resin which lacks strength and is quite flimsy.
Since there is a lot of movement and suction pressure during the resin printing process, having flimsy cured resin supports and a foundation can lead to layer separation.
I’ve experienced layer separation, but after increasing normal and bottom exposure times, quickly solved this problem.
If you have layer separation in your resin prints, one of the first things I’d do is increase normal and bottom exposure times, as well as potentially increase the number of bottom layers anywhere between 4-6.
Some people use up to 8 bottom layers, but this is probably too much and doesn’t make much difference according to many users out there.
2. Make Support Stronger in the Right Places
If you don’t have adequate supports in the right places on your model, you are likely to see layer separation or even parts of your print not printing at all.
Supports are very important with 3D printing, especially with resin machines. Similar to increasing exposure times, we can change resin support settings to better assist in building the model up strongly.
There are three main things you can do to improve supports:
- Increase the number of supports
- Create Light, Medium & Heavy supports in the right places.
- Add Bridges to your supports
Increase the Number of Supports
It’s better to over support your model than under support your model because under supporting your model can lead to your print having layer separation and failing altogether.
The best case scenario is to learn how to support models so it’s neither under nor over supported, but if you don’t have a lot of experience, I’d add more supports. This can be done manually or with auto-supports.
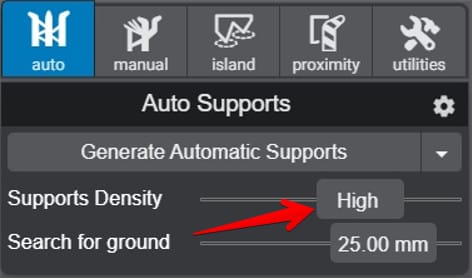
There is an option in Lychee Slicer (my preferred resin slicer) to increase the density of supports with the auto-support generation tool. You can choose between generating a support density that is:
- Low
- Normal
- High
- Ultra
In most cases, Normal works out just fine but if you are having issues with layer separation in your resin prints, you could try High or Ultra and see if it solves your issue.
Uses Light, Medium & Heavy Supports
After increasing the number of supports on your model, the next thing I’d do to fix layer separation is to correctly use Light, Medium & Heavy supports. Some people may choose to use one type of support for everything on the model, but this isn’t optimal.
Heavy supports are important to use at the bottom of the model where it will be holding up a majority of the print. Medium supports are used for your standard areas that need support, while light supports are used for smaller/finer detailed areas.
If you are printing a model that is scaled up pretty large, you’ll want to use more Heavy & Medium supports since gravity and the weight will be working against your model.
Parts that overhang like a sword, spear, bow or other accessories on a model can usually be supported well with Light or Medium supports.
Learning how to properly use these types of supports can help you with solving layer separation because it provides the right amount of strength and foundation to your prints.
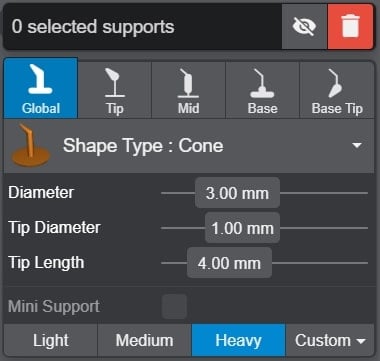
When you are using auto-supports, it does currently only allow you to choose one type of support, but you can edit these afterwards in manual mode. You can select multiple supports by holding SHIFT + clicking the support.
Once you highlight the selected supports, you can select Light, Medium or Heavy to change those supports to that type.
There are also even mini supports that are smaller than Light supports for even finer details.
Add Bridges to Your Supports
Bridges is another way to strength your supports, providing a bridge-like structure between two supports to hold them together better. Auto-supports usually build up bridges for you but if you add supports manually, you’ll need to press the “Bracings” button in “Manual” mode.
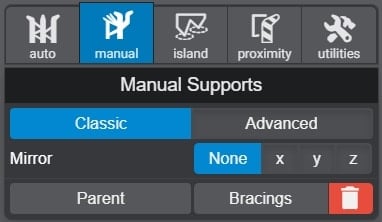
An example of bridges/bracings is seen in the picture below.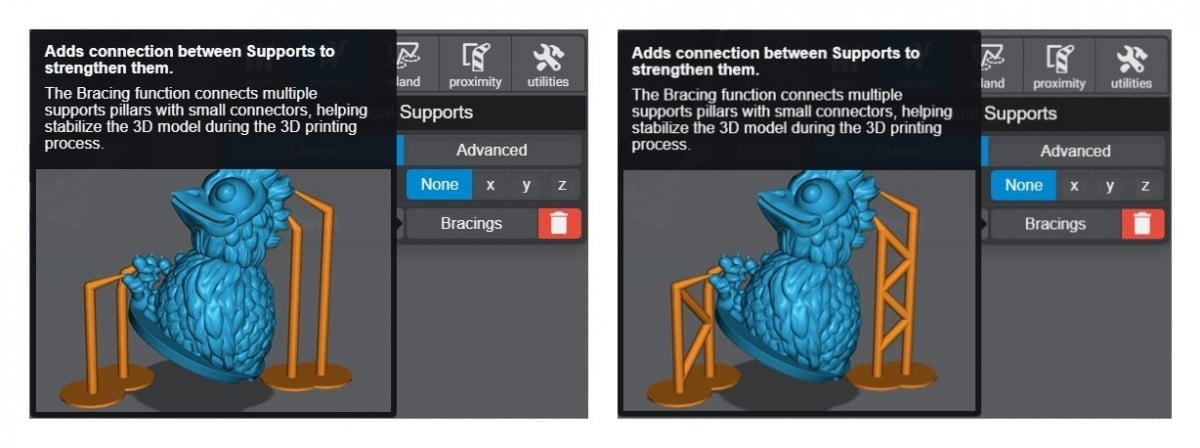
Parts on your resin model that are not adequately supported may end up suffering from layer separation or delamination. It can make layers shift easily and lead to misalignment.
If you are not familiar with support models in 3D printing, I have attached a video that can help you better understand how you can build adequate support for your miniature.
3. Use a Raft
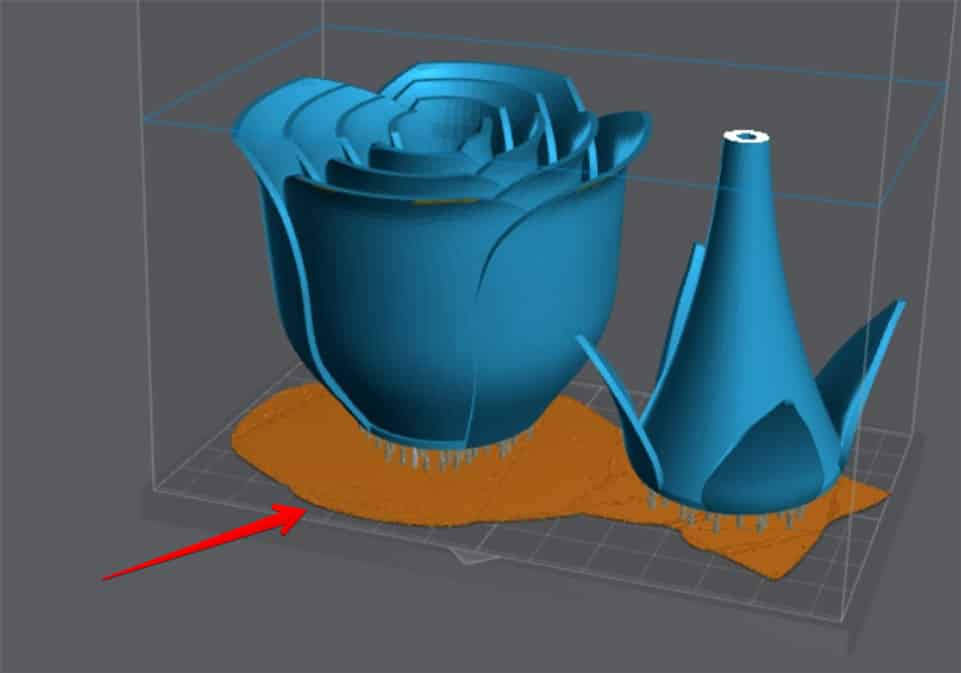
Using a raft in your resin models is a great way to build a stronger foundation for your print to be secure throughout the process. I always try to use a raft in Lychee Slicer when preparing a model.
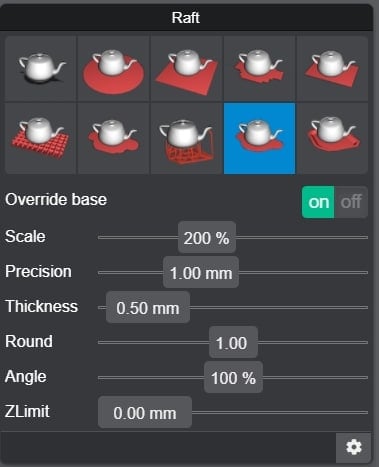
There are plenty to choose from when you sign up to the Pro account. I tend to use the “Shape” raft shape since it has a nice surrounding raft just around the model. You can adjust the raft settings easily such as:
- Scale
- Precision
- Thickness
- Round
- Angle
- Z-Limit
Usually the default works pretty well for me.
4. Improve Print Orientation
The way you orient your print can contribute to layer separation if it isn’t done well. The general rule for print orientation in resin printing is to try to angle your prints between 10-45° to reduce the surface area of each layer.
What this does is reduce the suction pressure that occurs on the FEP sheet as each layer lifts. When your build plate lifts, you’ll hear a suction or popping sound and that is what can work against you if your print orientation isn’t optimal.
Layers with a large surface area have more tendency to detach from layers with small surface areas.
Most times when I print, I orient my print in a way that my model tilts some degrees away from the surface area. You may also try this if you want to prevent delamination in your prints.
I wrote an article about How to Orient Models for Resin 3D Printing, so check that out for more details.
You can also check out the video below about orienting miniatures.
5. Clean Resin Vat/FEP Film of Cured Resin & Residue
If you happen to have slightly cured resin left behind in the resin vat, it can get in the way of the UV light being emitted from your screen. This can then result in layer separation due to your model not building up properly.
You can easily prevent this by using your spatula and running it side-to-side and up and down the resin vat to see if there is any residue left behind. It can be hard to notice residue, but as you move the spatula around, you can feel them around.
In cases of bad print failures, it’s usually a good idea to filter out the whole resin vat and clean it out so you can remove any cured resin. It’s not uncommon to have pieces of cured resin around the FEP film, and I’ve had this happen on many occasions.
I wrote a pretty detailed article on How to Properly Clean Resin Vat & FEP Film on Your 3D Printer so click the link to have a read through. It has some pretty useful tips that should save you time in the long run.
Your 3D printer should come with the plastic spatula, but if you don’t have one, you can easily find one on Amazon like this 12-Piece Plastic Spatula for a great price. There aren’t listings for a single spatula of this type I could find, so you could get a set.
Many reviews have people talking about how these are helpful for resin printing.

6. Check Your Resin Screen for Dust or Defects & Clean
This fix for print layer separation is less common but still, something that has worked for users out there. If you’ve had a resin spill or left the screen in open air to collect dust/debris, it could affect the printing process and lead to issues.
Similar to a 3D printer nozzle on a filament 3D printer being blocked, you want to ensure that your resin screen is clean and doesn’t have anything blocking it from emitting light.
The screen sits below your resin vat so it should be fairly clean for the most part.
I’ve had a few resin spills which seeps through the FEP film then cures onto the screen. Cleaning this can be frustrating but you’ll want to be careful and make sure not to scratch the screen or even the polarizing film on some resin printers.
The usual way to clean your resin screen is to get a paper towel or cloth, spray a little bit of isopropyl alcohol on it, then wipe the surface down. After this, simply wipe the screen dry, so there aren’t any streaks left behind.
Here is a video on how you can clean your optical window while using a SprintRay Pro 3D Printer
I’d recommend getting a screen protector on your resin screen to help protect the actual screen from resin spills. Light can still pass through a screen protector and has helped plenty of users not ruin their 3D print screens.
Here’s a video from True Elite Geek on how to install a screen protector on the Phrozen Mighty 4K, a similar process on most resin printers.
7. Use a Higher Quality Resin
Sometimes you might get print layer separation in your resin prints simply because your resin is low quality or quite old. Most resins you buy should be okay, but if the brand isn’t so reputable or known, you may be using low quality resin that gives users issues.
Make sure you are using a high quality resin like Elegoo, Anycubic, EPAX or the many other reliable ones out there. I personally use Anycubic resin, whether it’s their castable or eco resin since these are fairly low odor and delivers high quality models.
Another thing you can do is to make sure to shake up your resin bottles before you use them. If the particles in your resin has settled to the bottom and you pour it without shaking, you can create issues as particles can separate in resin after some time.
I’ve also heard advice to warm up bottles of resin or use a space heater to warm up the room where your resin printer will be. Many people had print failures through the winter due to resin not printing so well in cooler environments, and solved it by heating the resin.
One thing you may want to do to prevent delamination in your print is to use a resin that has a strong bonding ability. This will help you print layers that align and bond better with other layers.
You can also combine different types of resin such as tough or flexible resin to further strengthen your print.
One of the most popular flexible resins out there has to be Siraya Tech Tenacious from Amazon because it’s easier to print with and works very well.

8. Check for a Loose Build Platform
Another factor that can cause delamination or layer separation in resin 3D printing is when you print with a loose build platform. You want to ensure that the build platform is locked in place before printing.
I’ve definitely started a resin print without securing the build platform with the thumbscrew at the top. You can also check that the screws that secure the platform in place is tightened enough.
There shouldn’t be much movement with your build plate because this can easily translate into a loss of accuracy and layer shifting in your model.
Simply check this by moving the build plate with gloves on and something like a paper towel so you don’t get resin over the gloves. It should be firm and not shaky.
9. Minimize Pauses with Resin Printing
Pauses in your prints can lead to layer separation, especially when these pauses are relatively long. Try to minimize any pauses in the resin printing process.
There usually aren’t many reasons to pause a print, maybe to refill the resin vat or checking on a print, but you can do this while the print is running in many cases. These pauses can cause weakness to the layer adhesion of older and newer layers, leading to delamination.