6 Ways How to Fix Bubbles & Popping on Your 3D Printer Filament
There are many issues that can happen with 3D prints due to various issues. One of those issues is a phenomenon called bubbling or popping, which negatively affects the 3D print quality of your pieces and could result in failures altogether. This article will quickly outline how to fix this problem.
The best way to fix bubbles and popping sounds on your 3D printer is to extract moisture out of your filament before printing. When filament with moisture is heated to high temperatures, the reaction causes bubbles and popping sounds. Prevent this by using high-quality filament and proper storage.
The rest of this article will go into some useful details about this issue and give you practical ways to prevent it from happening in the future.
What Causes Bubbles in Extruded Filament?
During the printing process, it is obvious that filament contains air bubbles, which is practically unstable for 3D printing.
Basically, this can mess up the whole printing process, especially your first and print quality layers.
Moreover, the bubbles in the filaments can make it look non-uniform as the filament diameter will be affected. There are many causes, and I will be discussing the major ones with you.
One of the most common causes of these bubbles is the moisture content, which can affect the first layer and lower 3D printing quality.
The best solution available for this is drying the material before extrusion. However, the possible causes are as follows:
- Moisture content of filament
- Incorrect slicer settings
- Ineffective filament cooling
- Incorrect flow rate
- Printing at height temperature
- Low-quality filament
- Nozzle quality
How to Fix 3D Printer Bubbles in Filament
- Reduce Moisture Content of Filament
- Adjust the Relevant Slicer Settings
- Fix Ineffective Filament Cooling Systems
- Adjust an Incorrect Flow Rate
- Stop Printing at Temperature Too High
- Stop Using Low-Quality Filament
Bubbles occur when air pockets get trapped in print, and this is caused by the temperature of the extruder being too high, resulting in the hot end boiling the plastic.
When it starts cooling, the air bubbles can get trapped in print, and you can notice that it will become a permanent part of the final model. So, let’s start to fix these causes.
Reduce Moisture Content of Filament
Moisture content is one of the main causes that creates bubbles in the filament, which can ultimately be seen in the 3D printing process.
This is because in the filament extrusion process, the moisture content present inside the polymer reaches its boiling temperature and turns into steam. This steam becomes the cause of bubbles, which are seen then on the 3D print model.
Drying before the extrusion process is the best solution for such a problem. It can be done using a special filament dryer or a conventional hot air oven, though ovens aren’t usually calibrated very well for lower temperature.
I’d recommend using something like the SUNLU Filament Dryer from Amazon. It has an adjustable temperature from 35-55° and timer of 0-24 hours. Many users who got this product say that it helped their 3D print quality significantly and stopped those popping and bubbling sounds.
If you get a nozzle popping sound, this could be your solution.


But remember, you must maintain the temperature according to the material you are drying. Almost all filaments absorb moisture content, so it is always a healthy practice to dry them before the extrusion process.
If you are hearing a PETG popping noise for example, you want to dry out the filament, especially because PETG is known to love moisture in the environment.
Adjust the Relevant Slicer Settings
There are a group of settings that I’d advise you adjust to get rid of these bubbles on your 3D prints. The ones that seem to work best are the following:
- Retraction settings
- Coasting setting
- Wiping settings
- Resolution settings
Once you start to adjust these settings, you can see significant differences in your print quality, improving them a lot more than you may have seen in the past.
With retraction settings, you can build up too much filament pressure in your extrusion pathway, leading to filament that actually leaks out the nozzle during movements. When you set optimal retraction settings, it can reduce these bubbles in your 3D prints.
Check out my article on How to Get the Best Retraction Length & Speed Settings, it describes in more detail about these settings and how to get it right.
My article on How to Fix Blobs and Zits on 3D Prints goes over many of these key settings also.
Stefan from CNC Kitchen did a lovely video which goes over the resolution settings, and has received praise from many 3D printer users stating how much it helped them.
Fix Ineffective Filament Cooling Systems
3D print blistering results from an ineffective filament cooling system because if you do not have a proper and fast cooling system, it will take more time to cool down.
Thus, when it takes more time to cool down, the print’s shape’s deformation is noticed, even more so with materials that have a lot of shrinkage.
Add more cooling systems in the printer so that the material is cooled in the required time when it hits the bed. This way, you can avoid any kind of bubbles and blisters.
Something like the Hero Me Fanduct from Thingiverse is a great addition for better cooling.
Adjust an Incorrect Flow Rate
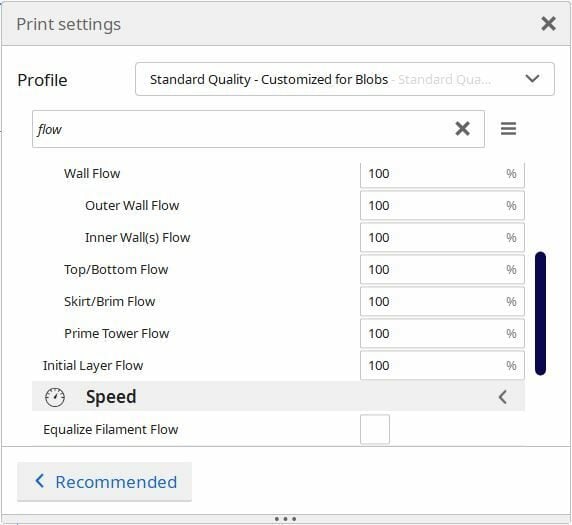
If your flow rates are too slow, the filament spends more time under that hot temperature from the nozzle. It’s a good idea to adjust your flow rate, especially the ‘Outer Wall Flow’ and see whether that clears the issue of bubbles on your filament.
Small 5% increments should be enough to tell whether it helps fix the problem.
Stop Printing at Temperature Too High
Printing at too high a temperature can result in bubbles, especially first layer bubbles because the first layer is slowed down, with less cooling, which compounds the issues of high heat and time under that heat.
When you also have too much moisture in your filament, from absorbing it in the surrounding environment, these high temperatures are even worse in resulting in popping filament and bubbles in your prints.
Try to 3D print at as low heat as you possibly can while the flow of filament remains satisfactory. That is usually the best formula for the optimal printing temperature.
Using a temperature tower is a great way of finding your optimal temperature settings, and can even be done with speed as well. The video below takes you through the process.
Stop Using Low-Quality Filament
In addition to the rest of these factors, low quality filament that doesn’t have the best quality control can contribute to these bubbles and popping of your filament. You are a lot less likely to experience this from high quality filament.
I’d look for a brand that has a great reputation and top reviews for a good period of time. Many on Amazon, even though they are cheap, really are manufactured with care in mind.
You don’t want to waste time, effort and money trying to make a cheap roll of filament work for your 3D printing desires. You’ll save more money in the long run and be happier with the results by using some great filament.
You can avoid PLA or ABS popping sounds by using good filament.
Make Sure to Use a Good Nozzle Material
The material of your nozzle could also have an impact on bubbles and popping of your filament. Brass is a superb conductor of heat, allowing it to transfer the heat easier from the heating block to the nozzle.
If you are using a material such as hardened steel, it doesn’t transfer heat as well as brass, so you’d need to make adjustments in the printing temperature to compensate for that.
An example could be switching from hardened steel back to brass, and not lowering the printing temperature. This could result in you printing at a temperature which is too high, similar to the cause listed above.
Conclusion for Fixing Bubbles & Popping in Filament
The best solution to get rid of the popping and bubbles from filament is a combination of the points above, so to summarize:
- Store your filament properly and dry before using if it has been left out for a while
- Adjust your retraction, coasting, wiping & resolution settings in your slicer
- Implement an improved cooling system using something like the Petsfang Duct or Hero Me Fanduct
- Adjust your flow rates, especially for the outer wall and see if it fixes the issue
- Decrease your printing temperature and find the optimal temperature with a temperature tower
- Use higher quality filament with a good reputation
- Take note of your nozzle material, brass is recommended due to its great thermal conductivity