How to Fix Blobs and Zits on 3D Prints
When it comes to 3D printing quality, we all know there are plenty of issues that can arise. One of them I was thinking about was blobs and zits appearing on the surface of your 3D prints.
It can happen for a number of reasons, so I’ll explain the causes and how to fix blobs or zits on your 3D prints or first layers.
The best way to fix blobs or zits on a 3D print is to adjust your print settings such as retraction, coasting, and wiping to give better instructions to your 3D printer to prevent these print imperfections. Another group of key settings relates to the ‘Outer Wall Wipe Distance’ and Resolution settings.
This is the basic answer so keep on reading through this article to know the causes and a more extensive list of solutions that people have used to fix blobs/zits on 3D prints and first layers.
If you are interested in seeing some of the best tools and accessories for your 3D printers, you can find them easily by clicking here (Amazon).
Causes & Solutions of Blobs/Zits on 3D Prints
The important thing to ask is, what causes blobs or zits on 3D prints, whether it’s the first layer, your nozzle or on corners. They are also even referred to as warts or bumps.
There are quite a few areas where you can get blobs or bubbles, but the common times are either on the first layer or at a layer change. Many people wonder why their 3D prints are bumpy, whether in the middle of the 3D print or on the first layer.
Experiencing the first layer being bumpy on 3D prints or first layer blobs/bubbles can be frustrating, so we want to fix these as soon as possible.
In order to fix these imperfections on our 3D prints, we need to identify the direct cause of them then we can properly tackle the problem with a unique solution.
So first, let’s get into each reported cause of blobs and zits on 3D prints then put the applied solution.
Causes of blobs/zits on 3D prints:
- Retraction, coasting & wiping settings
- Extruder pathing
- Filament under pressure in extruder (over extrusion)
- Printing temperature too high
- Over extrusion
- Printing speed
Retraction, Coasting & Wiping Settings
Depending on where you are finding these blobs, it can mean a different solution is needed. For blobs that happen as soon as the layer change happens, it usually boils down to your retraction settings.
Retraction Settings
If you aren’t familiar with retraction settings, you might have it set incorrectly to a point where it causes these blobs and zits.
This can occur when you are retracting too much for the material, taking into account your speed and heat settings which can also have an affect.
When your nozzle moves, there is a ‘pullback’ of filament back through the Bowden tube which is done so filament doesn’t leak out between each print head movement.
It then pushes the retracted filament back through the nozzle to begin extruding again in the new location.
What happens when your retract settings are too high (retracting too many millimeters), the filament gets retracted along with a bit of air, so when your nozzle tries to extrude the air gets heated and causes a reaction which results in these blobs.
You’ll usually hear a popping sound from the heated air even if your filament is dry, so the blob of filament can occur from this reason.
The less your retraction length, the less heated air can affect your 3D prints.
Coasting Settings
What this setting does is stop extrusion just before the end of your layers so the final extrusion of material is completed using the remaining pressure in your nozzle.
It relieves the pressure built up within the nozzle so it should slowly increase its value until you no longer see imperfections on your 3D prints.
The usual values for coasting distance tend to be between 0.2-0.5mm, but a little testing should get you your desired value.
This has other benefits which can reduce print imperfections when used correctly. The coasting setting can usually be found next to retraction settings and is intended to reduce the visibility of the seam in the walls.
It is more effective in 3D printers that use direct drive and can actually lead to under extrusion if not done correctly.
Wiping Settings
Implement your wiping settings in your slicer to instruct your 3D printer to use retractions that include print head movement. Blobs can occur because the retraction is happening in the same location, so using this setting can fix your issues.
The ‘Wipe Nozzle Between Layers’ in Cura is the option that you should see, where it has a set of default values for other wipe settings. I would give the default a try then if it doesn’t work, slowly tweak the wipe retraction distance.
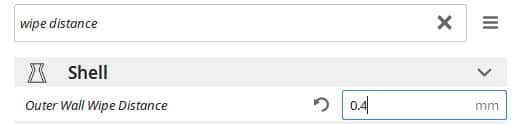
The ‘Outer Wall Wipe Distance’ is another key setting here, which I’ve set to 0.04mm on my Ender 3. Cura explicitly mentions that this setting is used to hide the Z-seam better, so I’d definitely test this variable and see how it affects blobs and zits.
Solution
You should use trial and error for your retraction settings to fix this issue. The default values for retraction settings aren’t always going to be the best for your 3D printer and print quality.
Your retraction should usually sit between 2mm-5mm.
The best way to dial in your retraction settings is to start with a 0mm retraction length, which is going to produce a sub-par model. Then incrementally increase your retraction length by 0.5mm each time until you find which retraction length gives the best quality.
After finding the best retraction length, it’s a good idea to do the same with retraction speed, starting at a low speed like 10mm/s and increasing it by 5-10mm/s each print.
Once you’ve dialed in your retraction settings, you should have eliminated blobs and zits from your 3D prints and also increased your overall printing success rates which should save you plenty of time and money over the years.
Extruder Pathing
There are a number of reasons why you might get a blob, zit, wart or bumps on your 3D print surfaces, one of which is because of the extruder pathing.
In the 3D printing process, your extruder needs to start and stop constantly all while moving to different positions.
It’s hard for it to extrude a uniform layer of material all the way round because there is a certain point where the extruded melted plastic has to join up with the beginning and end point of the layer.
It’s difficult to perfectly have two pieces of melted plastic join together without having some kind of blemish, but there are definitely ways to minimize these imperfections.
Solution
You can manually move the start point of your layers to a less exposed area such as a sharp edge or around the back of your model.
A group of settings that can help here is ‘Maximum Resolution’, ‘Maximum Travel Resolution’ & ‘Maximum Deviation’
This is only found after enabling them in the ‘Custom Selection’ of Cura settings or by choosing ‘Expert’ view for settings.
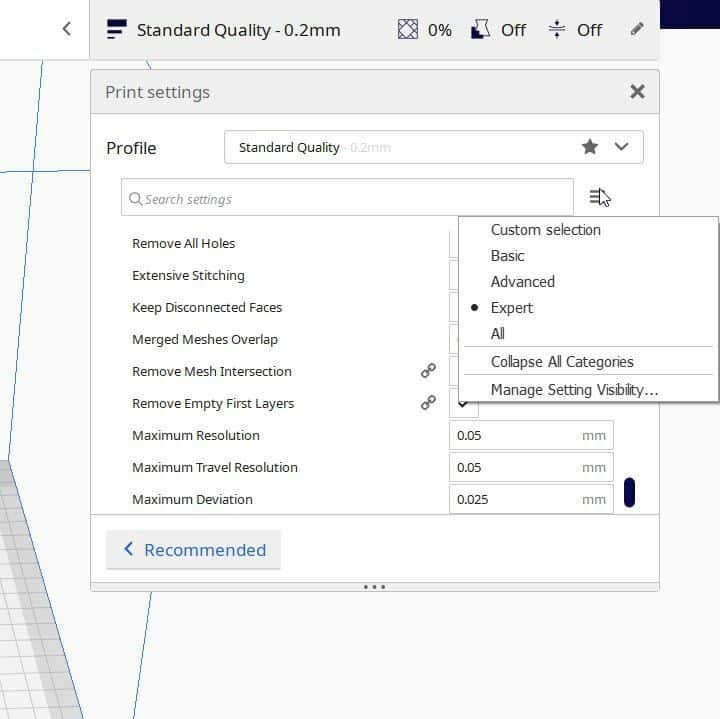
Values that seem to work really well for clearing blobs in your 3D prints are:
- Maximum Resolution – 0.5mm
- Maximum Travel Resolution – 0.5mm
- Maximum Deviation – 0.075mm

Filament Under Pressure in Extruder (Over Extrusion)
This is a little different to the extruder pathing, and more to do with the pressure within the extruder along with the filament pressure within the extruder.
Your printer goes through retraction movements throughout the printing process for a few reasons, one of them being to relieve filament pressure in the extruder. When the pressure can’t be relieved in time, it causes zits and blobs on your 3D prints.
Depending on your retraction settings, you can see blobs on your prints all over, sometimes happening at the start of the next layer or in the middle of a layer.
Solution
As previously mentioned, you can implement the coasting setting on your slicer software (under the ‘Experimental’ tab on Cura) then trial and error some values to see if it corrects the issue. Increase the value until you no longer see blobs on your 3D prints.
This setting reduces the extrusion process by relieving the built-up pressure that is still in the extruder.
Printing Temperature Too High
If you print with temperatures that are higher than recommended, you can definitely end up with blobs and zits throughout your 3D prints. This happens because the heated filament and hot air can produce some reactions that produce pressure and reactions, causing these imperfections.
Solution
Make sure you are using the correct temperature settings for your filament, especially if you are changing over materials. Sometimes even the same type of filament but a different brand can vary in recommended temperature so double check that also.
If you change your nozzle around, say from hardened steel to brass, you would usually have to account for the increased level of thermal conductivity in brass, so a decrease in the nozzle temperature would be my advice.
Printing Speed
This setting can relate to the causes above, where it can be the operating temperature of the material or even the built-up pressure in the extruder. It can also be affected because of the constant change of speed which can result in over and under extrusion.
When you look at your slicer settings, in the more advanced settings which show the details, you’ll usually see different printing speeds for print sections such as the infill, first layer, and outer wall.
Set printing speeds for each parameter to the same or similar values because a constant change of speed can cause these blobs to affect your prints.
An interesting video by Geek Detour was released who found another reason and fix for 3D printer blobs happening. It was actually down to the power loss recovery feature and the SD card.
Since the 3D printer is always reading commands from the SD card, there is a queue of commands that is present. The power loss recovery feature uses that same queue to create checkpoints for the 3D printer to come back to if there is a power loss.
It can happen with models that are high quality which are constantly extruding and have several commands with not a lot of time in between to create that checkpoint, so the nozzle can pause for a second to get the checkpoint.
Check out the video below to see more details, it’s very well produced.
https://www.youtube.com/watch?v=ZM1MYbsC5Aw
How to Fix 3D Printer Blobs/Bumps on Nozzle
If your nozzle has a build up of blobs which, then fall off and cause prints to fail or just look bad, then you need you’ll need to try some solutions.
The best way to fix blobs on 3D printer nozzles is to adjust your retraction, temperature settings, jerk and acceleration settings and implement a fan to regulate heat.
High retraction speeds seem to have the most influence on blobs and zits affecting your 3D prints.
PETG is the most likely material to get stuck onto a nozzle, so keep this in mind.
Some other things that you can try is making sure your first layer height and adhesion is perfect because if it isn’t adequate, some parts can stick back onto the nozzle.
You should also try to clean your nozzle before a print so you can ensure there isn’t any residual plastic from previous prints.If plastic and dust builds up in your nozzle it can build up and cause under extrusion.
One user who had this issue made use of a silicon sock for their hotend and it made a big difference to filament blobs sticking to their nozzle because only the tip of the nozzle becomes visible.
How to Fix Blobs on Corner of 3D Prints
If you are getting blobs on the corner of your prints, this can definitely be frustrating. There are a few solutions that you can try which have worked for many others.
Adjust Printing Temperature
The easiest thing to do is to adjust your temperature, so you can make sure you have the best setting for your materials.
Printing temperature varies across filament, brands, nozzle material and even room temperature can have an effect.
Think about the factors that can affect your heat and try to account for that, as well as using trial and error to find the right temperature.
If your temperature is too low, it increases the pressure of the filament in the hotend, so a movement which is stationary happens, the filament can slip out creating a blob.
The fix for this can be to actually print even cooler because it leaves your filament in a less liquid state, so it can’t drip.
Print Slower
You should also try printing slower so as to decrease the pressure of the hotend so less filament can be released.
So to summarize, print at a lower temperature and print slower for the simple solution.
Balance Printer Settings
Another good solution that works for many is to balance out their print speed, acceleration and jerk values.
When you think about what is happening in the printing process, there is a constant speed that you are extruding material, but different speeds at which your print head is moving.
These speeds tend to change depending on what is being printed, especially at the corners of a print. The key is to use the right print speed, acceleration and jerk settings which can be found using trial and error.
A good speed to use is 50mm/s then change one other setting like the acceleration setting, until you get a print which works well. An acceleration value too high will cause ringing, while a value too low will cause those corner blobs.
If you love great quality 3D prints, you’ll love the AMX3d Pro Grade 3D Printer Tool Kit from Amazon. It is a staple set of 3D printing tools that gives you everything you need to remove, clean & finish your 3D prints.
It gives you the ability to:
- Easily clean your 3D prints – 25-piece kit with 13 knife blades and 3 handles, long tweezers, needle nose pliers, and glue stick.
- Simply remove 3D prints – stop damaging your 3D prints by using one of the 3 specialized removal tools.
- Perfectly finish your 3D prints – the 3-piece, 6-tool precision scraper/pick/knife blade combo can get into small crevices to get a great finish.
- Become a 3D printing pro!

Can’t seem to find “Compensate Wall Overlaps”. I have Cura 5.8.1. Did they, perhaps, rename it or remove it?
Yeah I just looked it up and seen that it got removed from Cura 5.