How to Fix 3D Printing Perimeters Not Touching
There are many possible issues that happen with 3D printing. One frustrating problem that I’ve had is when your perimeters or walls are not touching or there is a perimeter gap due to them not bonding. If you have experienced or are experiencing this problem now, this article will aim to help you prevent this problem in the future.
The best way to fix perimeters not touching is to identify whether your issue is under extrusion, printing too fast, loose belt tensions or bad part design. People who experience this issue solve it by fixing under extrusion, so I would look to checking your extrusion system is working adequately.
This is the basic answer to this problem, so I will go into more detail throughout this post. Keep reading for more useful information.
If you are interested in seeing some of the best tools and accessories for your 3D printers, you can find them easily by clicking here (Amazon).
What Makes 3D Printed Perimeters Not Touch?
It’s hard to put into a quick sentence what makes 3D printed perimeters not touch, but generally it’s due to extrusion problems or a genuine anomaly in the design of your print.
From what I’ve researched all over the net, I noticed a similar trend for people who experience this problem. One of the main issues that kept coming up was the issue of under-extrusion.
This was maybe 60% of the people who asked about this issue.
The rest of the people experiencing 3D printed perimeters not touching had multiple reasons:
- Speed settings too fast
- Extrusion width settings – this is likely if all the gaps you are experiencing are of the same width
- Part design itself
- Uneven filament diameter
- Loose belts
- Specific settings such as ‘Print Thin Wall‘ and ‘Fill Gaps Between Walls’
You can categorize these into hardware issues or software issues. Hardware would be the filament diameter and loose belts, while software would be speed, temperature and other settings, as well as part design.
After identifying all the possible concerns that people have experienced, we can narrow down the solution that should work for most of you out there, so lets get right into it!
Many difficulties in 3D printing do overlap, so keep this in mind as you read through this ‘how-to’ guide.
How Do I Fix 3D Model Perimeters Not Touching?
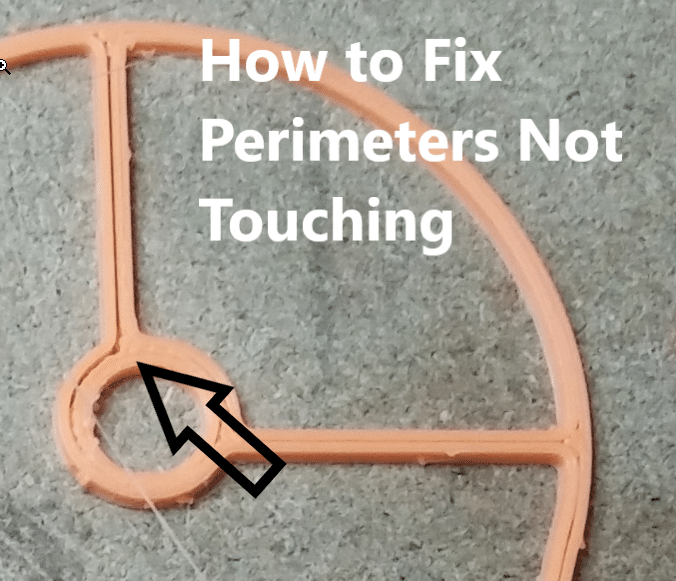
Many people get this issue confused with the walls not touching the infill, but this is actually where each individual perimeter doesn’t properly connect with the one beside it, so your walls have gaps between the perimeters.
These make the walls of your 3D print very brittle because they are not one cohesive wall, but a multitude of single-layered perimeters.
The following are the best ways to fix your 3D model perimeters not touching:
- Reduce printing speed (inner & outer walls)
- Fix under-extrusion
- Increase extrusion width
- Recheck part design
- Check belt tension for looseness
- Use default profile if you recently changed settings
- Check that wall diameter is divisible by nozzle diameter
- Increase printing temperature
- Calibrate your extruder steps/mm
- Enter the correct filament diameter into slicer
Reduce Printing Speed
One 3D printer hobbyist described a problem where they had 4 perimeter shells, where the first outer 2 shells merged well, but the 3rd & 4th didn’t. From observing the prints in action, he found that the printer sped up for each shell that was printed.
If you are getting different speeds for the perimeter, you want to make sure your slicer settings are properly set for printing speeds. Outer wall and inner wall jerk & acceleration settings should be consistent in your slicer.
Cura usually has this as default settings, but double check this by using the search function and typing in ‘wall’. You’ll see settings such as ‘Outer Wall Speed’, ‘Inner Wall Speed’, ‘Outer Wall Acceleration’, ‘Inner Wall Acceleration’ and so on.
Similar issues happened in the Simplify3D slicer quite some time ago, so it could have been a bug that has been patched since. Many of the things I read about perimeters not touching were in slicers other than Cura and also some years ago. Hopefully that means it’s not as much of an issue nowadays.
Under Extrusion
What is Under Extrusion in 3D Printing?
When perimeters do not touch or 3D printer lines aren’t touching, the more common and persistent reason is under-extrusion.
Under-extrusion occurs when the flow of filament is not fast enough to match the speed of printing to create a streamlined object. It can be due to a combination of many factors so there are some things you’ll have to work on.
How Can You Solve Under-Extrusion?
If you are experiencing under extrusion, these are the usual fixes:
- Increase your printing temperature
- Reduce your printing speed
- Balance layer height, temperature and printing speed
- Check & possibly replace PTFE tubing
- Make shell width a multiple of nozzle size
- Unblock your nozzle with atomic cold pulls, manual cleaning etc.
- Check extruder system to see if it can freely extrude filament without friction (check screws, teeth etc.)
- Create a better angle for your filament to enter extruder smoothly
- Calibrate your extruder steps
- Measure & enter correct filament diameter into slicer
Make sure your filament positioning doesn’t negatively effect extruder flow through to the nozzle. This can happen from a poorly wound spool or just a bad pathing from the spool to the extruder. It means your motor would have to use more power which reduces the flow of the filament.
If the diameter of the filament does not match the readings in the software, you should correct software settings. The filament diameter and required temperatures can be found upon the box of the material. With the help of a Vernier calipers, you can easily measure the filament.
If the measurement of your filament matches with the software readings of the filament and you are still facing the same problem, you should at once check the nozzle.
Try manually passing through the filament from the nozzle. If it is clogged or there is dirt inside it, you will have to struggle a bit to get the nozzle clean of this clogging material. You will know it’s blocked if material extrudes thin or not in a straight line.
Extrusion Width Settings
If you can identify other areas of your prints that are also not joining lines up, your issue is likely to be to do with your extrusion width settings. These gaps in 3D print walls tend to be of the same with when this is the problem.
What can happen with your software is, it thinks your printer’s extrusion lines are actually bigger than what it really is, so it results in your 3D printer printing perimeters out with a gap in between.
The fix here would be to change your extrusion width in order to communicate to the software the optimal thickness for the perimeter.
Try increasing your extrusion width by a few millimeters and see if it makes a difference in your prints. If it does get better, you know you just need to optimize this setting to get your perimeters properly bonded together and touching again.
On the other hand, decreasing line width can also be a fix which some users tried out and it worked perfectly.
Check Part Design Itself
It’s a good idea to check the preview mode in your slicer to see your model will be printed as expected. Another trick that may work is by increasing wall thickness by 0.02mm, which has worked for other users. For curved walls, an increase of 0.04mm seems to work better.
After you slice your model, it’s a good idea to check the layer line preview to see whether these gaps exist in your slicer. This should narrow down whether it’s an issue with the actual model or with the way your 3D printer is extruding.
Look for a gap in the wall where there is no infill.
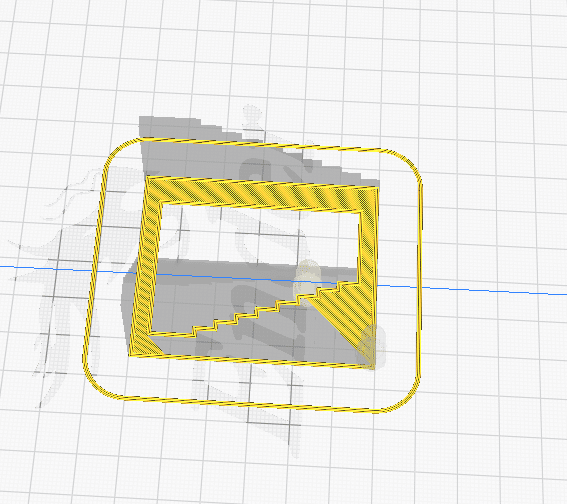
This is a calibration test which is in the middle of previewing a selected layer line.

Check Belt Tension for Looseness
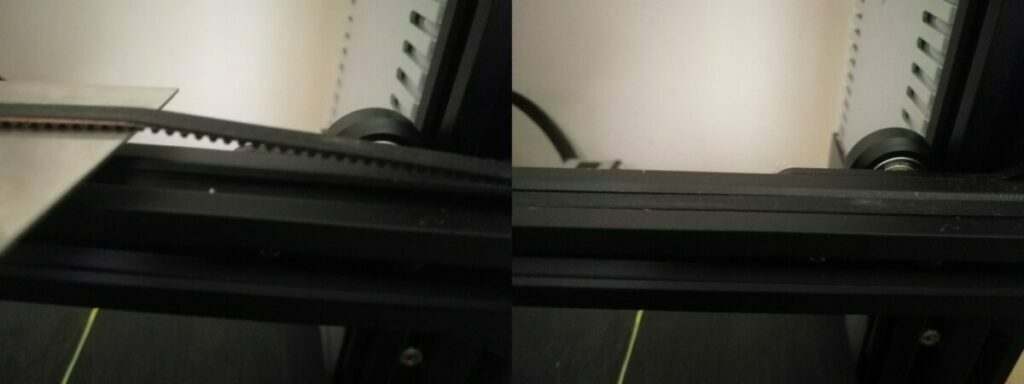
People who experience 3D print walls not sticking together looked all around for solutions, but it ended up being as simple as checking their belts for looseness. Belt tension is important to keep maintained because it is what your 3D printer uses to move around.
Having slack in your belt, reduces the precision of each movement which might not be a big deal for each small movement, but it makes a big different over time. So, to check belt tension, while your printer is inactive, simple push down on the belt on the X & Y axis.
It should feel fairly hard to push down and give a good amount of resistance. If you find your belts have some slack on them, tighten them up.
Depending on what 3D printer you have, you might have belt tension knobs, or you might have to undo the screws that hold the belt up and use an Allen key to pull on the belt while you re-screw it in.
Skip to around 3:00 to see a visual demonstration to tighten up your belts.
Use Default Slicer Profile Settings
If you have made many changes to your slicer profile and have started experiencing the issue of your perimeters not bonding or having gaps in the perimeter, it’s a good idea to go back to square one with your settings.
This is a pretty easy fix so it’s definitely one of the first ones you should try. There are other more advanced settings that you can use to help solve this problem.
Set combing mode on Cura to ‘Not in skin’. What this does is prevent the nozzle from travelling over areas where the skin is.
The ‘Skin Edge Support Thickness’ setting on Cura is the thickness of the extra infill that supports skin edges. This can be adjusted to help fill those gaps in as a quick solution, rather than finding the specific cause to your issue.
It’s more ideal to fix the cause rather than the symptom though, so definitely try other solutions before settling with these advanced slicer options.
Check Wall Diameter is Divisible by Nozzle Diameter
If there is a gap that isn’t big enough for infill, the slicer might just discount these areas and leave them apart. If the wall in your model is 1mm but your nozzle diameter is 0.4mm, there may be a 0.2mm gap that wasn’t properly filled.
You are likely to run into 3D printer perimeter gaps if the gaps represent a width smaller than your nozzle diameter. Cura is usually pretty good at finding and solving these problems by itself, but depending on how bad it is you might still experience the issue.
Your slicer usually has an option to gap fill or has ‘thin wall’ settings. What your slicer will do is give instructions to the nozzle to adjust flow rates to account for this smaller space.
Increase Printing Temperature
This solution ties into the under extrusion fix because it gives your filament less viscosity allowing it to be extruder easier. When your filament is in more of a molten stage, the nozzle has less issue extruding it, rather than when the material is thicker.
It’s a pretty easy solution to try so I would recommend testing it out for yourself. Since filament has a fairly wide range of printing temperature, this shouldn’t negatively affect print quality much with gradual changes.
Calibrate Extruder Steps/mm
The typical E-steps calibration method has you do a 100mm extrusion test to find the ideal step per mm value.
This is where you mark 100mm of filament, tell your printer to extrude 100mm at a specific E step value and see whether it correctly extrudes that 100mm of filament.
If it doesn’t, you increase or decrease the value with trial and error before getting that perfect 100mm extrusion.
When you have found your ideal E step value, make sure to follow up with an m500 command in your Gcode to make sure your settings are saved to the EEPROM.
E-step parameters can be different depending on whether you are using certain microstepping values.
Although we have a set E-step value for certain extruders, like 409 E-steps/mm for the Hemera extruder, the effective microsteps/mm are usually within 94-95% of the nominal value.
Different filaments have difference effective diameters because the teeth of the drive gears bite deeper into softer filament (TPU) compared to hard filament (PLA).
Enter Correct Filament Diameter Into Slicer
Even though 3D printer filament manufacturers have gotten better at making filament, they aren’t perfect. Batches get through which might be borderline at the tolerance level, so if you receive one of these, you might have extrusion issues.
The best way to measure your filament diameter is to use a pair of calipers for great accuracy. You should measure the filament at 3 different spots then put the average of that into your slicer settings.
Every 3D printer hobbyist, at some point needs a good pair of calipers. If you don’t have one, now is a good time so you can use it in your 3D printing journey. The pair of calipers I recommend is the Louisware Digital Vernier Caliper from Amazon.

Not only do they have an extra large LCD screen for easy readability, they have an absolute accuracy within 0.01mm. They are simple and comfortable to use so you don’t need some special expertise to operate them.
You’ll be happy to know, they are backed by a guarantee against water, dirt and oil damage, all while having top-rated customer service.
One of the Amazon reviews even mention how they are perfect for people with 3D printers!
Hopefully after getting this far down in this article, you feel a little more confident in fixing your issue of perimeters not touching, which I understand is a hassle.
Once you go through some of the main causes, I’m sure you’ll be able to get your issue sorted once and for all.
If you found this article helpful, feel free to also check out my article about the 25 Best Upgrades for Your 3D Printer & 8 Ways to Speed Up Your 3D Printer Without Losing Quality.
If you love great quality 3D prints, you’ll love the AMX3d Pro Grade 3D Printer Tool Kit from Amazon. It is a staple set of 3D printing tools that gives you everything you need to remove, clean & finish your 3D prints.
It gives you the ability to:
- Easily clean your 3D prints – 25-piece kit with 13 knife blades and 3 handles, long tweezers, needle nose pliers, and glue stick.
- Simply remove 3D prints – stop damaging your 3D prints by using one of the 3 specialized removal tools.
- Perfectly finish your 3D prints – the 3-piece, 6-tool precision scraper/pick/knife blade combo can get into small crevices to get a great finish.
- Become a 3D printing pro!
