Best Firmware for Ender 3 (Pro/V2/S1) – How to Install
The firmware of a 3D printer is important for unlocking the capabilities of your machine, so many people wonder the best firmware is for the Ender 3 series. This article will guide you on what the best firmware is, as well as how to install it for yourself.
The best firmware for an Ender 3 is the stock Creality firmware if you just want to do some basic 3D printing. If you like being able to change and customize many changes at once, Klipper is a great firmware to use. Jyers is another popular firmware to use with the Ender 3 because it looks great and is easy to use.
This is the simple answer but there are more important details you’ll want to know, so keep on
What Firmware Does the Ender 3 Use?
The Creality Ender 3 printers comes equipped with the Creality firmware, which you can download and update from their official website. However, there is other firmware you can use, such as Marlin, the most popular choice for most 3D printers, TH3D, Klipper or Jyers, and I will explain their benefits in the article.
Different printer models work best with different firmware. Therefore, although they all come loaded with the Creality one, sometimes this is not necessarily the best or more advanced firmware.
For example, many users recommend Jyers for V2 printer, as they consider that the official Creality firmware does not properly cover the needs of the printer, and Jyers is particularly compiled to fill in the gaps that the Creality firmware has.
Should I Update My Ender 3 Firmware?
You do not necessarily have to update your firmware if you are satisfied with its performance. However, it is recommended to do so, since updates come with improvements and fixes to issues that might have been affecting your printer in the background.
One good reason to do so, especially if you are using older firmware, is thermal runaway protection. This feature essentially prevents your printer from heating up too much and potentially causing a fire by detecting unusual heating behavior and stopping the printer to prevent it from heating up further.
Check out my article How to Fix 3D Printer Heating Fail – Thermal Runaway Protection.
Although newer firmware that comes with your printer should have this feature, it can be difficult to tell, so it might be best to periodically update your firmware to have access to the newest safety features.
One other reason for updating your firmware is convenience. For example, most Creality Ender 3 printers do not come with auto-leveling options, so you have to do manual leveling.
Marlin is one firmware that offers Automatic Bed Leveling (ABL), which means that with the help of a sensor that measures the distance of the nozzle from the bed at different points, the firmware automatically adjusts the printer so it compensates for differences in level.
You can read more about How to Upgrade to Auto Bed Leveling.
Best Firmware for Ender 3 (Pro/V2/S1)
The most common and regarded by many users as the best for Ender 3 printers is the Marlin firmware. Klipper and Jyers are two less popular but very powerful firmware options that you can use for your Ender 3. They have plenty of features and optimizations that make 3D printing easier and better.
Let’s take a look at some of the best firmware for the Ender 3:
- Marlin
- Klipper
- Jyers
- TH3D
- Creality
Marlin
The Marlin firmware is a great firmware option for Ender 3 printers because it is free, highly customizable, and widely compatible, which is why many people use it with their Creality 3D printers. It is updated frequently and has many useful features, such as auto-levelling or filament runout sensor.
For Ender 3 printers that come with an older 8-bit motherboard, such as some Ender 3 or Ender 3 Pro models, it is recommended to use the older Marlin 1 versions of the firmware, as the reduced memory of the board might limit the features of newer Marlin 2 versions.
However, these days many Creality printers have the more advanced 32-bit board, which helps you take full advantage of the Marlin firmware.
Marlin is an open-source firmware, which means that many other developers used it as a base for their firmware and customized it so that it is more tailored to different printers (an example of this is the Creality firmware or the Prusa firmware).
Marlin has some cool optimization features, one of which is the Meatpack plugin which compresses G-Code by around 50% as it is sent to the printer.
Another cool one is the Arc Welder plugin which converts curved sections of your G-Code into G2/G3 arcs. This reduces G-Code file size and produces smoother curves.
I wrote an article about How to Reduce STL File Size for 3D Printing which is related.
Have a look at this video that explains Marlin and other similar firmware more in-depth.
Klipper
Klipper is a firmware that focuses on speed and precision. It does so by assigning the processing of the received G-code to a single-board computer or a Raspberry Pi which has to be connected to the printer.
This basically takes away the command pressure from the motherboard, which only has to execute the pre-processed commands. Other firmware options use the motherboard for receiving, processing and executing commands, which slows the printer down.
It allows you to extend the functionality of your Ender 3 since you are adding a second board with a USB cable seamlessly. One user who wanted to add a DIY Multi-Material Unit (MMU) to their Ender 3 could now do this and still have an 8-bit board left over.
People who want to run a good stock firmware, or are building a 3D printer from scratch do find Klipper to be a great option.
I wrote an article about Should You Build Your Own 3D Printer? Worth It or Not?
This distribution of tasks makes Klipper more complex to install, but since you need a single-board computer, as well as a compatible display, Klipper is not compatible with the Ender 3 LCD display.
One user pointed out that, although it can be a challenge to set Klipper up, this is a firmware that can give you many features, especially since it won’t affect the speed of the printing.
A feature that Klipper had that Marlin didn’t was called Direct_Stepping, but now Marlin 2 has this feature where you can command Marlin motion directly through a host like OctoPrint. It’s done by running a helper called “stepdaemon” on your Raspberry Pi.
A feature called Pressure Advance is said to work a lot better on Klipper compared to Marlin.
The video below explains what Klipper is and some of the advantages of using it with your Ender 3.
Jyers
Another free firmware based on Marlin, Jyers was initially created for the Ender 3 V2 printer, since some users considered the Creality firmware to be lacking in the case of the V2 machine. Jyers offers pre-compiled packages, but it also gives you the option to compile it yourself.
For example, Jyers supports filament changes mid-prints, which the Creality incorporated firmware does not, and allows for the full name of the file to be displayed so it is easier to choose the right file, when the Creality one only displays the first 16 characters.
You can read more about How to Use Cura Pause at Height to change filament also.
Jyers therefore adds many very useful features that improve printing using the Ender 3 V2 printers. Many users considers that Jyers is an excellent and essential firmware for the V2 printer, and say it makes up for the parts that the Creality firmware misses.
One user mentioned that he has the Jyers firmware downloaded and it’s a “mandatory upgrade” since it doesn’t cost you anything and you get so much more out of it compared to the stock firmware. Another user described it as like getting a whole new printer.
Another user mentioned that they use the 5 x 5 manual mesh bed leveling and it works really well. Although tuning 25 points on the bed can be tedious, it makes a significant difference for people with a very uneven bed that needs compensation.
Many people are impressed with this firmware since it’s a very beginner-friendly firmware choice. Creality firmware can be quite basic compared to the Jyers firmware.
Check out the video below by BV3D who goes into more details about the Jyers firmware.
TH3D
Another widely used firmware, TH3D offers a less complex and easier-to-configure package than Marlin. Although it was created for a TH3D board, it is compatible with Ender 3 printers.
On the one hand, TH3D is fairly user-friendly, with one user recommending it for older motherboards with limited memory. On the other hand, its simplicity comes from the removal of many customization options from the Marlin software, on which it is based.
If you want a simpler setup process, then users suggest TH3D is a good firmware, but if you would like more features, then other firmware might suit your needs better.
Creality
Creality Firmware is a popular option for Ender 3 printers since it is already pre-compiled for Creality 3D printers. This means it’s the easier choice as a firmware option. It’s actually based on the Marlin firmware and is updated often by Creality to provide you with the latest developments.
Users suggest that the Creality firmware is a good starting point for most 3D printers, as it is stable and safe to use. You can then upgrade to a more advanced firmware once you are ready to step up and compile a more complex one.
However, for some Ender 3 printers, such as Ender 3 V2, people recommend upgrading to other firmware such as Jyers, since Creality does not cover the needs of this model very well.
How to Update Firmware on Ender 3 (Pro/V2)
To update firmware on the Ender 3, download the compatible firmware, copy it onto an SD card and insert the SD card into the printer. For an older motherboard, you also need an external device to upload the firmware onto the printer, and you need to connect your PC or laptop directly to the printer via a USB cable.
Before updating the firmware, you will need to find out the current version of the firmware that your printer is using. You can see this by selecting “Info” on your printer’s LCD screen.
You also need to know what type of motherboard your printer uses, whether it has a bootloader and whether it has an adapter so that you can choose the appropriate firmware version and take the right approach to installing it.
You can see these features by opening the printer’s electronics cover and checking the version written underneath the Creality logo. This is where you will see if you have a bootloader or an adapter as well.
If you have a newer, 32-bit motherboard, the steps you need to take to update the firmware are:
- Go on the firmware’s website and download the package for the version you need.
- Extract the files. You should now see a “.bin” file, which is the file you need for the printer.
- Get an empty micro SD card (you can use the micro SD that came with your printer, but only after you empty it from everything else).
- Copy the “.bin” file onto the card and eject the card.
- Turn the printer off
- Insert the SD card into the printer
- Turn the printer back on
- The printer will now install the firmware and reboot, then go back to the main display menu.
- Check that the correct firmware is installed by going to “Info” again.
Here is a video that explains how to check the printer’s components and how to update the firmware.
For an older, 8-bit motherboard, there are a few more steps you have to take. If the board does not have a bootloader, then you will need to manually connect one to the printer, as illustrated in the video below.
This gives you the option to personalize some features is you would like, such as the written message on the idle display.
You will need to install the firmware using a USB cable in this case. I wrote a more in-depth article on How to Flash & Upgrade 3D Printer Firmware which you can check out.
How to Install Jyers Firmware on an Ender 3
To install Jyers on the Ender 3, you need to download the firmware package or individual files from the Jyers website, copy the “.bin” file onto an empty USB card formatted as FAT32, and then insert the card into the 3D printer. The printer will install the firmware itself and reboot.
Before starting the installation process, you need to find out the Jerk, Acceleration and E-steps/min values. You need these because any custom values entered into the printer will be lost in the firmware installation process, so you want to take note of them now and re-dial them in afterwards.
You find out these from the home screen on your printer’s display by going to Controls > Motion. Go through each of the 4 categories (Max Speed, Max Acceleration, Max Corner/Jerk and Transmission Ratio/E-steps) and write down the X, Y, Z and E values.
You also need your printer’s motherboard version, which you can find out by opening the electronics cover so that you can download the appropriate firmware version.
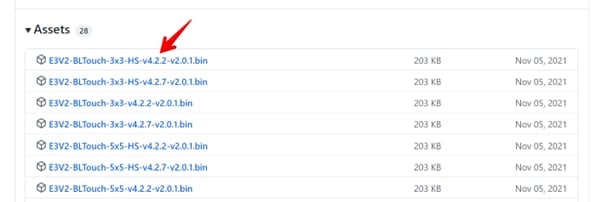
After taking note of these, you will have to choose the best firmware package for your needs. You can find all the Jyers releases on GitHub, with the latest version at the top of the page. You can see the version of the motherboard that the firmware is for in the name of the file.
You can also download a set of Jyers icons for your screen, although this is optional.
Once you have done that, you can start installing (or flashing) the firmware:
- Download the package for the version you need.
- If the files come in a “.zip” format, extract the files. You should now see a “.bin” file, which is the file you need for the printer.
- Get an empty micro-SD card and format it as a FAT32 volume following these steps:
- Insert the SD card into your computer
- Open File Explorer and go to This PC
- Right-click on the USB name and select “Format”
- Select “Fat32” under “File System” and click “Start”
- Click “OK” if you backed up your data, as this process will delete everything on the card
- Click “OK” on the pop-up that announces you that the formatting is complete
- Copy the “.bin” file onto the card and eject the card.
- Turn the printer off
- Insert the SD card into the printer
- Turn the printer back on
- The printer will now install the firmware and reboot, then go back to the main display menu.
- Check that the correct firmware is installed by going to “Info” again.
The video below takes you through these steps in more detail, so check it out.
If you want to update the display icons as well, after updating the firmware follow these steps:
- Turn off the printer and remove the SD card.
- Put the SD card back into the computer and delete the files on it.
- Go to the Marlin folder > Display > Readme (this contains the instructions on how to install the display icons), then go to the Firmware Sets and choose the DWIN_SET (gotcha).
- Copy the DWIN_SET (gotcha) onto the SD card and rename it to DWIN_SET. Eject the SD card.
- Unplug the printer’s screen from the printer and open its case.
- Insert the SD card in the SD card slot visible under the screen case and plug the ribbon cord back.
- Turn the printer on and the screen will update itself from the card.
- After the screen turns orange, signalling the completion of the update, turn the printer off, unplug the cable and remove the SD card.
- Put the screen’s cover back and plug the cable back into it, then place it in its holder.
- Turn the printer back on and see check that the Jerk, Acceleration and E-steps values are the same as the ones you previously had and change them if they are not.