How to Use Cura Pause at Height – A Quick Guide
Cura is a very popular slicing software most 3D printers use to prepare their 3D models for printing. It converts the 3D model into G-Code that the 3D printer can understand.
The main reason behind Cura’s popularity is that it is compatible with most 3D printers out there. It also provides a lot of options for modifying and editing 3D prints.
The Cura software also provides functionality for modifying and editing G-Code. One functionality we’ll be looking at in this article is how to pause prints at a certain point or height.
Being able to pause your 3D print at a certain point between layers is very useful for many reasons, usually for doing multi-color 3D prints.
Keep on reading through to learn how to use the “Pause at height” function properly. We’ll also cover some other tips you can use in your 3D printing journey.
Where Can You Find The “Pause at Height” Feature?
The pause at height features is part of the post-processing scripts that Cura has for users to modify their G-Code. You can find the settings for these scripts by navigating the toolbar.
Let me show you how to do it:
Step 1: Make sure you have already sliced the print before using the “Pause at Height” function. You can do this with the slice button at the bottom right.
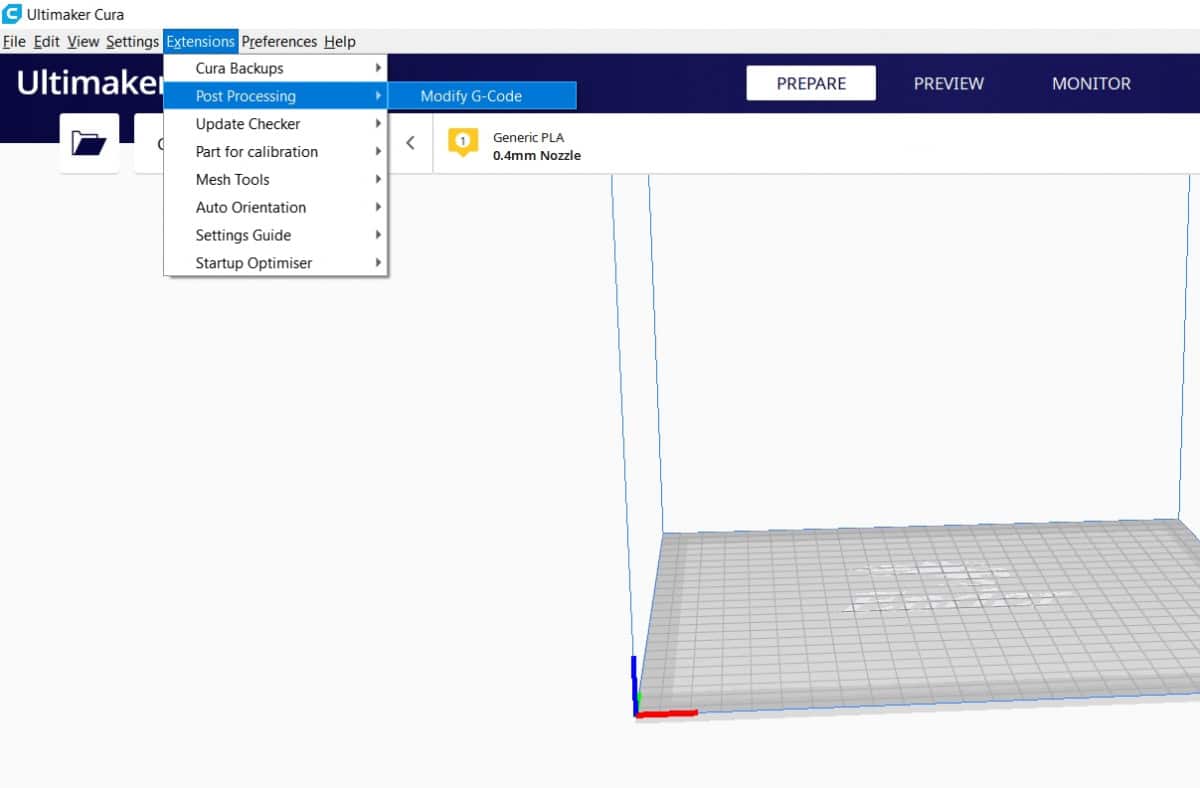
Step 2: On Cura’s toolbar at the top, click on Extensions. A drop-down menu is going to come up.
Step 3: On that drop-down menu, click on Post-processing. After this, select Modify G-Code.
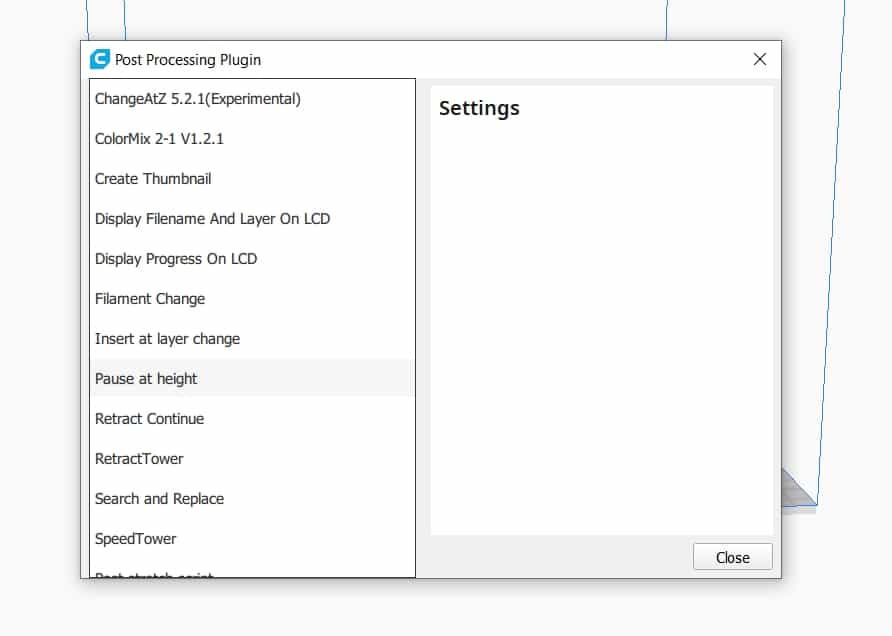
Step 4: In the new window that Pops up, click on Add a script. Here you’ll see various options for modifying your G-Code.
Step 5: From the drop-down menu, select the “Pause at height option”.
Viola, you’ve found the feature, and you can now use it. You can repeat these steps multiple times to add more pauses.
How to Use The “Pause at Height Feature”?
Now that you know where to find the feature, it’s time to learn how to insert a pause in Cura.
The Cura pause at height option takes you to a menu where you can specify the parameters for the pause. Each of these parameters has different uses, and they affect what the 3D printer does during and after the pause.
Let’s look at these parameters.

Pause at
The “Pause at” parameter is the first one you need to specify when using the pause at height feature. It specifies what unit of measurement Cura is going to use to determine where to pause the print.
Cura uses two main units of measurements:
- Pause Height: Here Cura measures the print’s height in mm and pauses printing at the height chosen by the user. It’s very useful and accurate when you know the particular height you require before the print is paused.
- Pause Layer: This command pauses the print at a specific layer in the print. Recall that we said you needed to slice the print before using the “Pause at height command” well this is why.
The “Pause layer takes in the layer number as its parameter to determine where to stop. You can select the layer you want by using the “Layer View” tool after slicing.
Park Print Head (X, Y)
The Park print head specifies where to move the print head to after pausing the print. It might not seem like much, but this is a very important command.
If you need to maybe do some work on the print or change filaments, it’s nice not having the print head over the print. You might need to extrude or run out the leftover filament, and the print head can get in the way or can even damage the model.
Also, the heat coming from the print head can damage the print if it’s left over it for too long.
Park Print Head takes its X, Y parameters in mm.
Retraction
Retraction determines how much of the filament is pulled back into the nozzle when the printing pauses. Normally, we use retraction to prevent stringing or oozing. In this case, it’s done to relieve the pressure in the nozzle while also fulfilling its original function.
Retraction also takes its parameters in mm. Usually, a retraction distance of 1 – 7mm is fine. It all depends on the 3D printer’s nozzle length and the filament in use.
Retraction Speed
As you might have guessed, the retraction speed is the rate at which the retraction occurs. It is the speed at which the motor pulls the filament back.
You have to be careful with this setting because if you get it wrong, it can jam or clog up the nozzle. Usually, it’s best to always leave it at Cura’s default setting of 25 mm/s.
Extrude Amount
After the pause, the printer needs to warm up and get ready for printing again. To do this, it needs to extrude filament to make up for the retraction and also run out the old filament in the case of a filament change.
The extrude amount determines the amount of filament the 3D printer uses for this process. You have to specify this in mm.
Extrude Speed
The extrude speed determines the rate at which the printer will extrude the new filament after the pause.
Note: This is not going to be your new printing speed. It’s just the speed at which the printer is going to run through the extruded amount.
It takes its parameters in mm/s.
Redo Layers
It specifies how many layers you might want to redo after the pause. It repeats the last layer(s) the printer did before the pause, after the pause with the new filament.
It is very useful, especially if you haven’t primed the nozzle well.
Standby Temperature
On long pauses, it’s always good to maintain the nozzle at a set temperature, so it reduces the startup time. The standby temperature setting does that.
It enables you to set a temperature to leave the nozzle during the pause. When you input a standby temperature, the nozzle stays at that temperature until the printer resumes.
Resume Temperature
After pausing, the nozzle has to get back to the right temperature for printing the filament. This is what the resume temperature function is for.
The resume temperature accepts the temperature parameter in degree Celsius and immediately heats the nozzle to that temperature once the printer resumes.
The video below by Technivorous 3DPrinting goes through the process.
Common Problems with The Pause at Height Function
Stringing or Oozing During or After Pause
You can address this by adjusting the retraction and the retraction speed settings. Most users say that the retraction should be around 5mm.
Pause at Height Not Working on Ender 3
Newer Ender 3 printers with the new 32-bit boards may have some trouble using the Pause at Height command. This is because they have a problem reading the M0 pause command in the G-Code.
To solve this problem, after adding the Pause at Height script to your G-code, save it.
Open the G-code file in Notepad++ and edit the M0 pause command to M25. Save it, and you should be good to go. For more information on how to edit G-code in Notepad++, you can check this article here.
The Pause at Height function is a powerful one that gives users a lot of power and creative options. Now that you know how to use it, I hope you have a lot of fun creating 3D prints with it.
Awesome info. Thank you.
Thanks for reading