5 Ways How to Fix 3D Printed Holes Being Too Small
One challenge that you might face when it comes to 3D printing is creating holes that are too small in the model. This may result in a poor fit for mating parts or even cause the end product to be unusable.
To fix 3D printed holes that are too small, you want to calibrate your extruder to ensure you are extruding how much filament your 3D printer says it’s extruding. You can also use the Hole Horizontal Expansion setting. A user used a value of -0.25mm and it fixed the problem for them.
In this article, I will go into detail about each method and how they help fix undersized holes. Keep reading to find out more.
How to Fix 3D Printed Holes Being Too Small
Here are the main ways you can fix 3D printed holes that turn out to be too small:
- Calibrate your extruder
- Use the Hole Horizontal Expansion setting
- Adjust your slicer settings
- Scale up your model
- Better design
1. Calibrate Your Extruder
One method of fixing 3D printed holes being too small is to calibrate the extruder. An incorrectly calibrated extruder can result in over-extrusion of the filament, leading to undersized holes.
The most important parameter when calibrating your extruder is the E-steps value. This is the number of steps the motor makes to extrude one millimeter of filament. If this value is off, your printer will either over or under-extrude.
Extruding a specific length of filament, say 100mm, is required to calibrate the extruder. Measure the length of the filament before and after extrusion to determine how much it differs from the required length.
Check out my article How to Calibrate Your Extruder E-Steps & Flow Rate Perfectly.
After that, you can use a simple formula to adjust your printer’s E-Step value in 3D printing software like Pronterface to correct the under- or over-extrusion.
One user had a persistent issue where his 3D printed parts never fit together because the hole was too small and the pieces were too wide. Someone explained that it was a calibration issue that caused his parts to be dimensionally inaccurate.
As a solution, they advised the user to calibrate the movement of all three movement axes of their printer before calibrating the extruder. This would improve their chances of printing things that fit together.
Check out the video below for a more comprehensive guide on how to calibrate your extruder’s E-steps.
Check out this other video that can provide some very useful tips on calibrating your printer when the holes come out small.
2. Use the Hole Horizontal Expansion Feature
Another method for repairing 3D printed holes that are too small is to use the “Hole Horizontal Expansion” setting in Cura. It is also called “Horizontal Size Compensation” in Simplify3D, “XY Size Compensation” in PrusaSlicer, and “XY Size Compensation for Holes” in IdeaMaker.
This feature accounts for material shrinkage and other factors that cause the size of the 3D printed hole to be too small, such as corner cutting, arc shrinkage, and non-regular filament sections.
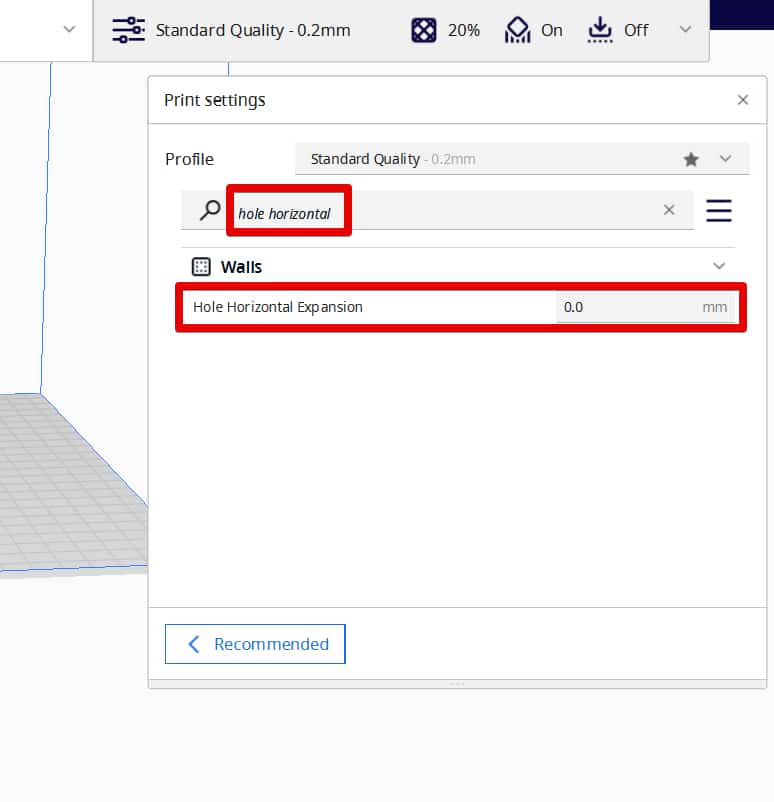
To increase the size of your hole, you should input a positive Hole Horizontal Expansion value.
One user who was experiencing problems with internal features like holes turning out to be smaller than designed found his fix after he was suggested to use the hole horizontal expansion feature.
They suggested test prints for five holes varying the horizontal expansion by -0.01 inches from -0.02 inches to -0.06 inches to see which one adjusted the hole to the proper dimensions.
A 3D printing hobbyist who got undersized circles when printing using a Prusa i2 unsuccessfully attempted various solutions such as tightening the hardware and recalibrating the steppers.
He got suggested by users to use the “Horizontal Size Compensation.” For example, if their holes were 5mm too small, they should input a value of -0.25mm to adjust.
Check out the video below by CHEP to know exactly how the Hole Horizontal Feature works.
3. Adjust Your Slicer Settings
An efficient way of fixing 3D printed holes that become too small is to adjust your slicer settings. These settings control how the model will be printed, so if they are not set correctly, they could affect the size of the hole in your final print.
Here are the main slicer settings that you can adjust to achieve a better hole:
- Print Speed
- Flow Rate/Extrusion Multiplier
- Line Width
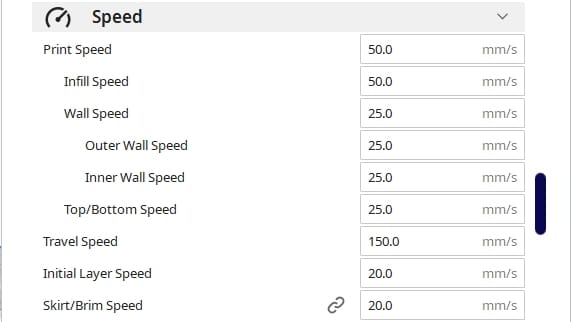
Print Speed
Adjusting the Print Speed will help you print holes with the right dimensions. If the speed is too high, the material may not be able to flow freely through the nozzle, causing undersized holes.
I have an article you can check out called What is the Best Print Speed for 3D Printing? Perfect Settings.
On the other hand, if it is too low, the material may take longer to cool, causing shrinkage. A printer speed of between 30 and 60mm/s should give you good results.
One user who used 3D printing for prototyping and one-off parts complained that he had an undersized hole diameter issue. They wanted a solution that did not involve them modifying every file before slicing.
To solve the issue, another user advised them to slow down the printing speed. They added that a high speed prevents the material from fully adhering to the previous layer, causing the movement to be dragged in and shrinking the hole.
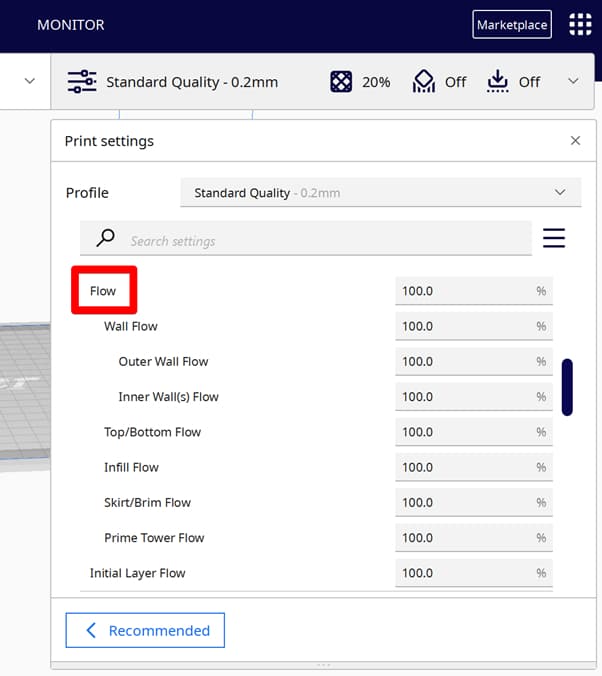
Flow Rate/Extrusion Multiplier
Adjusting the Flow Rate in your filament settings will help to fix 3D printed holes that are too small. Sometimes, setting a very low extrusion multiplier value will cause the printer to deposit less material than is needed to fill the hole, causing it to be undersized.
One user who did a few calibration tests by printing a 20x20x20mm cube found that the dimensions for all sides came out spot on. However, when they printed holes, they always came out 0.4mm too small.
Two other users commented that getting the right dimensions for your 3D printed hole can sometimes boil down to setting the correct Flow Rate value.
Another user was looking for ideas to correct inaccurate dimensions in his prints. Their exterior dimensions were all 0.1mm–0.25mm bigger, while the interior dimensions were too small on the calibration prints.
One 3D printing hobbyist noted that that could be a problem of over-extrusion and advised them to check their filament diameter setting and measure their filament.
If they found everything to be fine, then they were to knock down the extrusion multiplier by 5% to get dimensional accuracy. He was able to solve his issue by going to an 85% Flow Rate/Extrusion Multiplier.
This is usually a setting that fixes a problem temporarily, but doesn’t fix the underlying issue such as under extrusion.
I wrote an article called 7 Ways How to Fix Under Extrusion which you might find useful.
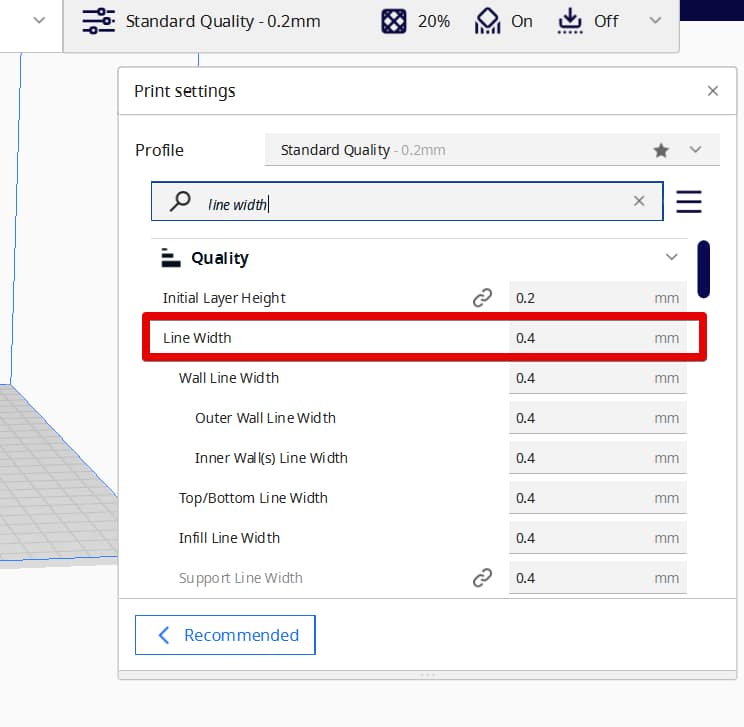
Line Width
Choosing the correct Line Width based on the material you’re using is essential in determining the size of the hole. Like the Flow Rate, setting a high line width deposits more material, which can cause 3D printed holes that are too small.
One user whose 3D printed object had a small inner dimension was advised to tweak the Line Width by decreasing it until they achieved a suitable result.
4. Scale Up Your Model
A method you can use to fix 3D printed holes that turn out to be undersized is to scale up your model. This is an alternative method of accounting for material shrinkage when tweaking the printer settings fails to solve the problem.
One user who 3D printed a 30x30mm box with a 25mm hole at the center found that everything else came out correct except the hole, which measured 24.5mm.
They were advised to slightly scale up their model by 1-3% to fix the issue. Another option would be to create a new model and oversize the hole by a deficit of 0.5mm.
Another user who used a Type A Series 1 Pro to print out prototyping parts always faced the issue of undersized hole diameters, especially when printing parts with non-standard sized holes.
He was advised to figure out the shrink factor of the materials being used and then use it to scale up the prints. This would provide the required dimensions once the print finishes shrinking.
Check out the video below explaining how to 3D print dimensionally accurate parts, including scaling up the model.
5. Better Design
Another way to fix 3D printed holes being too small is to use a better design that allows you to adjust the shape of the hole to allow some deformation or make it more flexible. This usually comes in handy where the normal hole would be too tight for a comfortable fit.
Some ways you could do that include placing a slot along the length of the hole, using teardrop-shaped holes, and using compliant mechanisms.
I have some related information in this article I wrote called How to 3D Print Holes Without Supports.
According to one user, the trick to getting a good-sized hole is to avoid using cylindrical holes and instead use prisms with 8–16 sides so that the middles can deform slightly and the fit is tight. He also recommends combining this with the teardrop method to work perfectly.
Check out the video below by Maker’s Muse explaining the main ways you can use design to get better 3D printed holes.
After trying out these various fixes, you should be able to fix your 3D printed holes being too small.