How to 3D Print Holes Without Supports – Is it Possible?
Many people wonder whether you can 3D print holes without supports since they can either be really hard to remove or result in a hole that has material in the way. This article will take you through some useful tips and advice to create good quality 3D printed holes without supports.
There are definitely some interesting tips that you’ll want to read about so have a read through this article for better details about 3D printing holes without supports.
Can You 3D Print Holes Without Supports?
Yes, you can 3D print holes without supports as long as you have a well-calibrated 3D printer and optimal temperature settings. It can be difficult to get a perfect hole shape in 3D prints due to the layer-by-layer nature of 3D printing, but you can make design adjustments to create better 3D printed holes.
If you’re trying to create complex models with big holes, you might be needing support structures, depending on how well your 3D printer can handle the overhangs of the holes.
Now that you know that the idea is definitely possible, let’s get into the process of 3D printing holes without supports.
How to 3D Print Holes Without Supports
To 3D print holes without supports, try reducing your layer height, use an optimal printing temperature, so the material above the holes don’t sag, use good fan settings with a fan duct to blow cool air on the parts, and design the part with a teardrop shape to create clearance for the top of the hole.
The video below by Maker’s Muse goes through some great design tips that you can implement to 3D print better holes and without supports.
One of the first tips he mentions is how you can create “teardrop” holes rather than circular holes in your 3D models, mainly for horizontally-aligned holes.
Due to the way 3D printers create objects layer-by-layer, the top of a circle would be a flat layer of extruded material rather than the rounded shape we are looking for, so creating a teardrop hole helps to account for this by adding more of a clearance to the top of the circular hole.
It should reduce the need for you drilling out the hole and removing any flat spots from the surface. The video shows you how this looks in Fusion 360, a CAD software. It’s more important for larger holes and you may be able to get away with not doing this for smaller holes.
The second tip he walks us through is to use a slot to create some movement for the hole to open up and insert your chosen object, which can then be clamped up afterwards.
He does this by inserting a rectangular part within the circular hole which gives it space to open and close up.
The third tip for designing better 3D printed holes that don’t need supports is similar to the slots, but using “fingers” that are small open spaces just above the holes you want to 3D print.
They allow for the plastic to slightly deform and fit the object you want to put in the hole.
The good thing about this is how it still holds the object tightly since it doesn’t have a lot of space to move around. He mentions that it’s a lot easier to create than it looks, so definitely try it out if you are designing a 3D print with holes in it.
I’d recommend also looking into using good part orientation, or rotating your model sideways so the hole is built up vertically rather than horizontally. Your 3D printer would just be extruding material around the hole, making it a lot easier with gravity working in your favor.
It works best with smaller holes, but can still work well with larger ones.
If you’re an advanced user, it might be worth looking into the following video that talks about 3D printing floating holes without supports.
The idea explained in this video is all about making bridges right below the hole. You can create two rectangular and square-shaped layers before the hole to create a bridge and let them act as support structures for the hole.
This is definitely a complicated technique and only advised for those with fairly decent design skills in software such as AutoCAD or Fusion 360. If you think this is something that you can handle, the video above can surely help you out.
Furthermore, it’s also possible to print holes in 3D prints without supports by changing the shape of the holes.
It’s reported that diamond-shaped holes instead of regular rounded ones in 3D prints can actually give you self-supporting angles. This takes away the need to place support structures around the holes.
Other benefits of using diamond-shaped holes include reducing the print time and the material used, although it will depend on your print for the most part.
You can look into doing this as well, although you will need to design the diamond holes yourself in a CAD software. Again, this is an involved process that does warrant a basic level of design skills.
A unique method that was recently released in Cura is to use a support that extends out from the side, called the “Arch Buttress” under Custom Supports.
The video below by CHEP goes through exactly how to create these supports using a plugin from the Cura Marketplace called Cylindric Custom Support. You can orient your print as normal, then create these supports that can be removed without being troublesome.
This is mainly directed towards filament 3D printing, but if you were to create similar objects with a resin 3D printer, creating holes would be a lot easier since the layer heights are very small.
With a 0.05mm or 50 micron layer height, along with the accuracy of resin printing, creating holes would be more feasible.
How to 3D Print Spheres Without Supports
If you want to 3D print a sphere without supports, consider splitting it into two for the best results. You can use any splitting tool to divide the sphere into two parts.
I really recommend referring to my “How to Split and Cut STL Models for 3D Printing” guide for an in-depth tutorial on how to do that.
After you print the two parts of the sphere together, you will need to attach them together. 10-15 minutes of post-processing will do the trick here.
The following video by My Tech Fun actually talks about a brilliant way of 3D printing spheres and that too without having to use supports.
What you basically do to create some really perfect spheres is to first divide them into two hemispheres and make holes in each hemisphere.
You can then use a set screw that can fit inside the holes painlessly and allow you to screw the two hemispheres together. The best part is that you can 3D print the set screw too in accordance with the diameter of the holes.
However, this is only suitable in cases where it doesn’t matter in what way your sphere can rotate. For example, if you want to print the globe of the earth, the screwing technique might not be very suitable.
Instead, you can use drilling as a technique.
While we’ll get into the process of drilling more in-depth in the next section, it’s worth mentioning here that you can drill four holes in each hemisphere, fill it with glue, and use a piece of filament in each hole to connect the two hemispheres together.
You can see how it’s done in the video above. It’s really an intellectual way of 3D printing spheres without supports.
Can You Drill a Hole in PLA & 3D Prints?
Yes, you can drill a hole in PLA and 3D prints, but you have to be careful not to overdo it and damage the print. ABS can handle being drilled better as it is less brittle than PLA. In addition, it’s better to have holes in your part designed already so they can be drilled easily and give you the best results.
There are a couple of things to be aware of before getting into drilling PLA and other 3D printer filaments. People often ask the question, “Can you drill a hole into 3D printed plastic?” but the answer isn’t always straightforward.
It’s definitely possible to drill holes in PLA, but you have to make sure not to drill parallel to the layers as it can cause layer-splitting in your parts, which is also known as layer separation. Try drilling perpendicular to the layers for the best results.
Moreover, a firm part is more likely to be drilled nicely as compared to a brittle one. Even if you’re working with PLA, heating it up to about 48-50°C using a hairdryer or anything similar can definitely help.
Another useful tip, in this case, is to place a hard block of something like wood to avoid breaking your part and preventing the drill bit to jam.
Speaking of which, I recommend picking sharp bits over dull ones when drilling 3D printed parts for better performance. There’s definitely a learning curve here that you’ll overcome with experience, but you’ll get there eventually in due time.
The following YouTube video actually shows how to drill 3D printed parts. Do give it a watch for a thorough visual explanation.
How to 3D Print Without Supports
To 3D print without supports, you can lower your layer height, decrease the print speed, and reduce the temperature to achieve better overhang angles, so you won’t need supports. You can also try changing the part orientation to see if it can print without supports. Splitting the print into parts is also favorable.
3D prints that don’t need supports are usually the best ones because they eliminate a very time-consuming and often harmful-to-the-print part of the post-processing phase.
However, some parts are impossible to create without supports, but you can always implement some techniques to minimize the number of supports used, or remove the need to do so altogether.
One of the first things that you can do to 3D print without supports is to tweak your slicer settings. The following parameters need to be tuned in order to achieve higher overhang angles without needing supports.
- Layer Height
Generally, a higher layer height, about 0.3mm as opposed to a 0.1 or a 0.2mm layer height will allow your print layers to go longer lengths without being supported.
- Temperature
As for the temperature, it’s recommended to reduce the extrusion temperature by 5-10°C than what you’re using for the best results. You can either do this or increase the cooling on your part for achieving better overhang angles.
- Outer Shell Wall Speed
The Outer Shell Wall Speed can be set at somewhere around 5mm/s, so the overhangs can be printed slow and given enough time to cool down, but you can actually keep this setting high by implementing another useful setting, mentioned below.
- Overhanging Wall Angle
- Overhanging Wall Speed
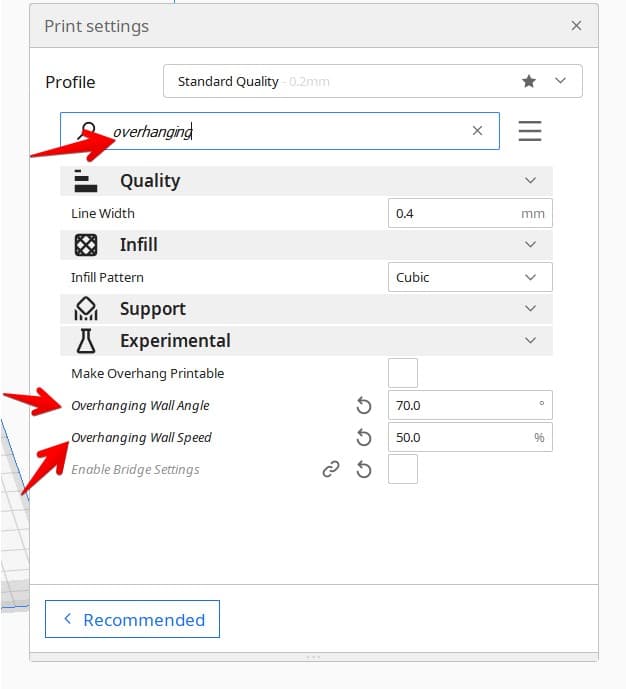
These are settings within Cura that allows you to adjust wall speeds only for a specified overhang angle. Cura defaults the Overhang Wall Angle at 90° which is turned off, while 0° would be every wall being treated as an overhanging wall.
When you lower this angle, it will start reducing your Wall Speed in those angled areas, at a set percentage.
You can find these settings under the “Experimental” tab, or by searching for “Overhanging”.
An example of an Overhanging Wall Angle would be 70° and an Overhanging Wall Speed of 50%, so that any angles that are 70° and above would slow down the print speed by 50%.

One person who made use of this setting mentioned that they had great success with these features for printing unsupported walls at up to 70° without sagging.
Another user mentioned that they had an idea to use an Overhanging Wall Speed above 100% because they had tiny overhangs that would print better at higher speeds, so it can really be used to your advantage as you desire.
The Massive Overhang Test on Thingiverse is a 3D printer calibration test that you can use to really dial in your 3D printer’s settings and print overhangs better, so I’d definitely recommend that for practice and trial and error.
On a side note, check out the 20 Best & Most Popular 3D Printing Calibration Tests to dial-in your printing machine like never before.
The following video by The 3D Print General goes over these slicer settings in detail by utilizing the aforementioned Massive Overhang Test, so check it out for a more visual explanation.
https://www.youtube.com/watch?v=nP_t-DVtqMw
Another point worth noting is that supports connected to the base of the model are relatively easier to deal with as compared to the supports used somewhere on the body of the print.
You can orient your parts in such a way so that their overhangs don’t go very far, like beyond 45°. That way, you would only need to put some supports at the base of the model, which is not only easy to remove but also very doable as a whole.
In addition, if you’re struggling to print parts with supports, you can try searching for their support-free versions online.
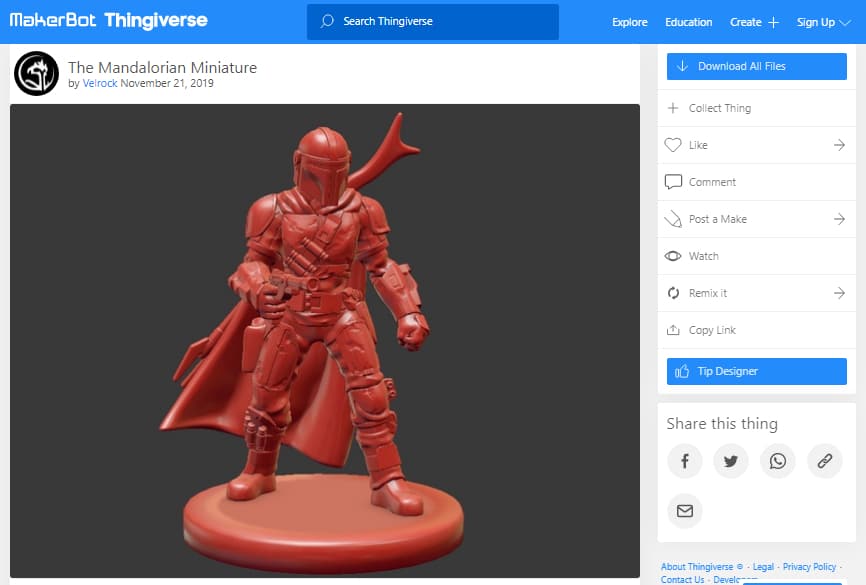
The Mandalorian Miniature by Velrock on Thingiverse is a fairly complicated model that requires Cura’s Tree supports to be printed effectively.

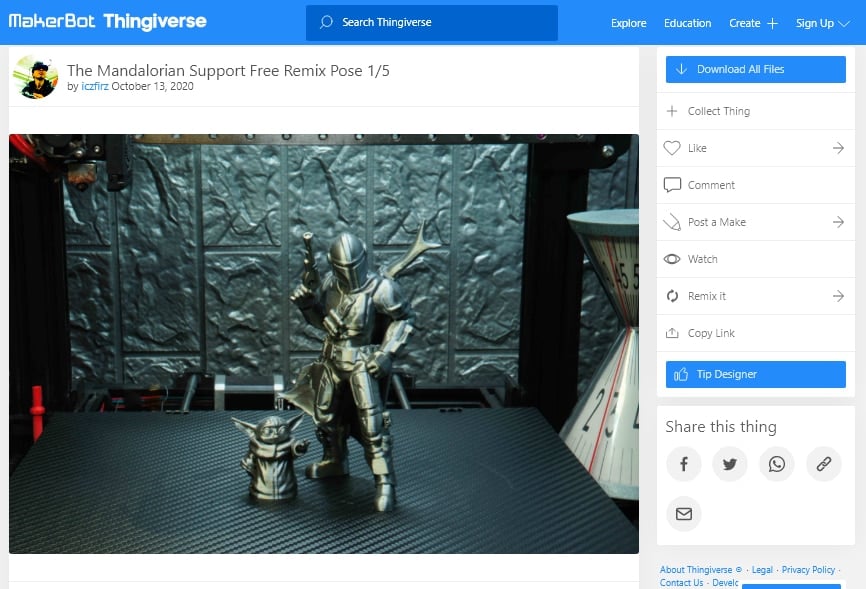
Another Thingiverse user called icfirz has actually created a remix of the model and made it support-free, so you really don’t have to trouble yourself with printing supports for The Mandalorian Miniature.

If you’re someone with good design skills, you can actually modify a model in a CAD software like Blender to make it support-free.
If that isn’t a possibility, it’s always worth looking up for any remixes of your specific model to see if anyone has made a version of it that doesn’t need supports.
The following video by Maker’s Muse also goes over some ways of designing 3D prints that don’t need support material.
He talks about using a technique called Sacrificial Bridging. This is when you print a small, yet rigid layer of material beneath the part where support would usually be required thereby forming a solid foundation for the rest of your print.
Although the bridge acts as support, it combines nicely with the rest of the part and doesn’t appear to be a proper support structure. The video above goes more in-depth on this, so do check it out.
