What Do Colors Mean in Cura? Red Areas, Preview Colors & More
Cura is the most popular slicing software that works effectively for creating 3D prints. One thing that users wonder is what the red areas in Cura and other colors means, so I decided to write this article to answer that question.
Keep on reading for information about colors in Cura, red areas, preview colors and more.
What Do the Colors Mean in Cura?
There are separate sections in Cura where colors mean different things. First, we’ll look at the “Prepare” section of Cura which is the initial stage, then we’ll look at the “Preview” section of Cura.
What Does Red Mean in Cura?
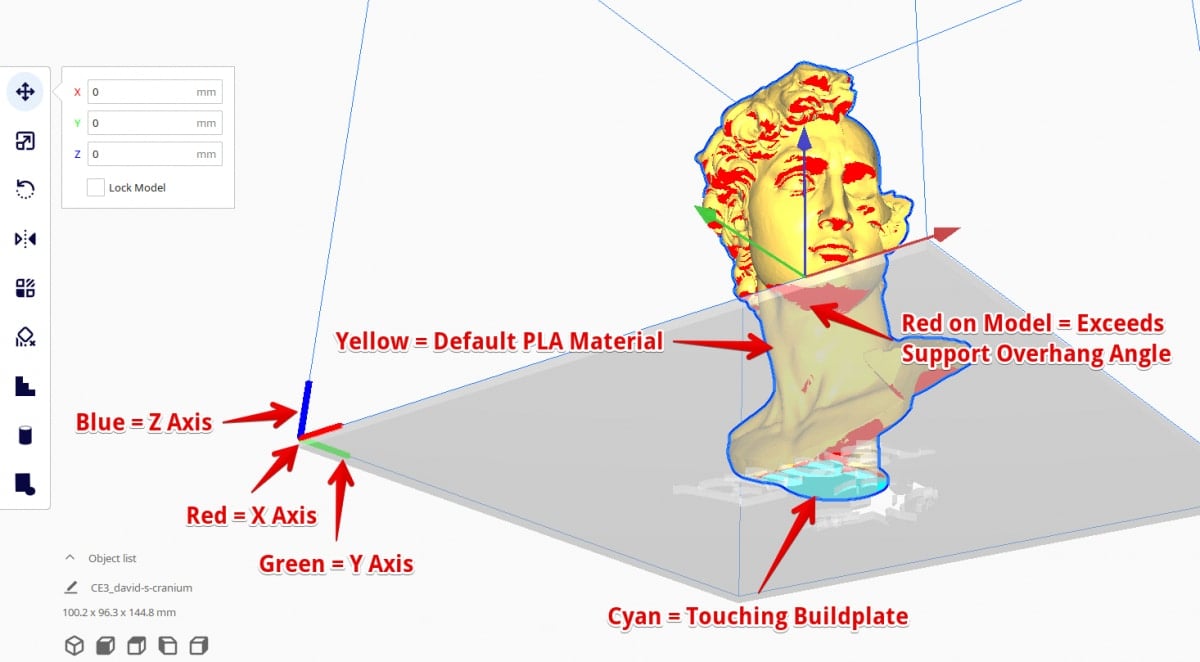
Red refers to the X axis on your build plate. If you want to move, scale, rotate a model on the X axis, you’ll use the red colored prompt on the model.
Red on your model in Cura means that there are overhangs in your model, specified by your Support Overhang Angle which defaults at 45°. This means that any angles on your 3D model that exceed 45° will show up with a red area, meaning that it will be supported if supports are enabled.
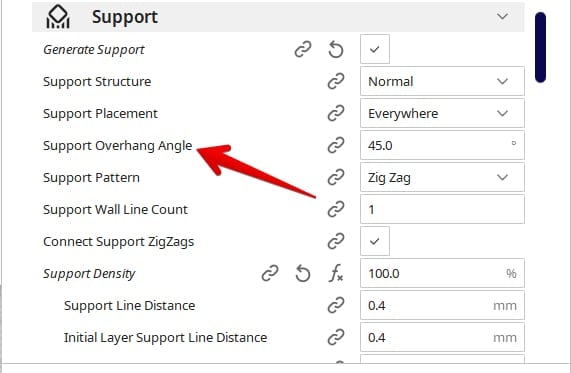
If you adjust your Support Overhang Angle to something like 55°, the red areas on your model will decrease to show just angles on the model that exceed 55°.
Red can also refer to objects in Cura which are non-manifold or not physically possible due to the geometry of the model. I’ll go into more detail on this further in the article.
What Does Green Mean in Cura?
Green in Cura refers to the Y axis on your build plate. If you want to move, scale, rotate a model on the Y axis, you’ll use the green colored prompt on the model.
What Does Blue Mean in Cura?
Blue in Cura refers to the Z axis on your build plate. If you want to move, scale, rotate a model on the Z axis, you’ll use the blue colored prompt on the model.
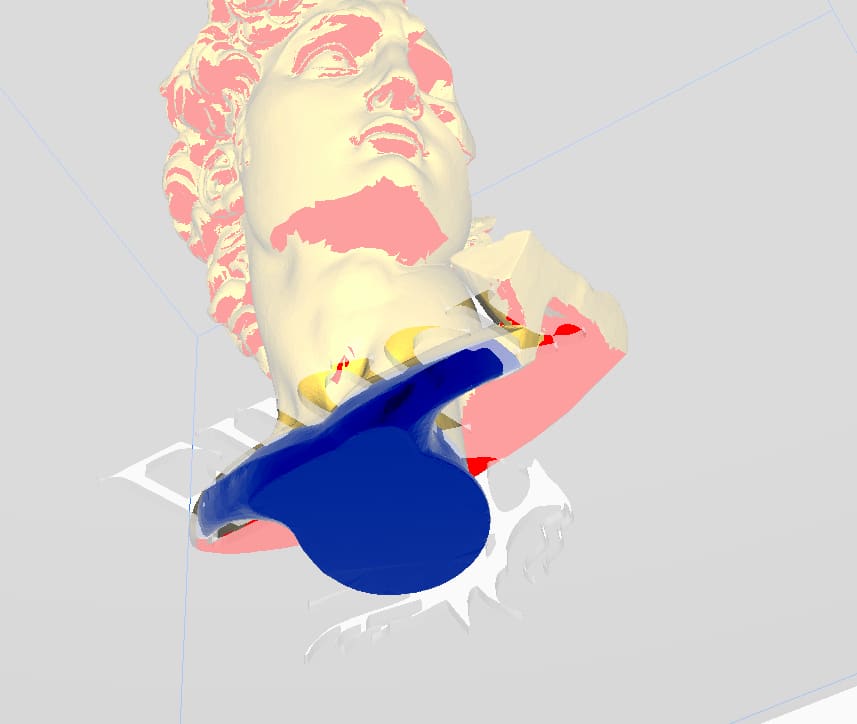
Dark blue in Cura shows that part of your model is below the build plate.
Cyan in Cura show the part of your model that is touching the buildplate, or the first layer.
What Does Yellow Mean in Cura?
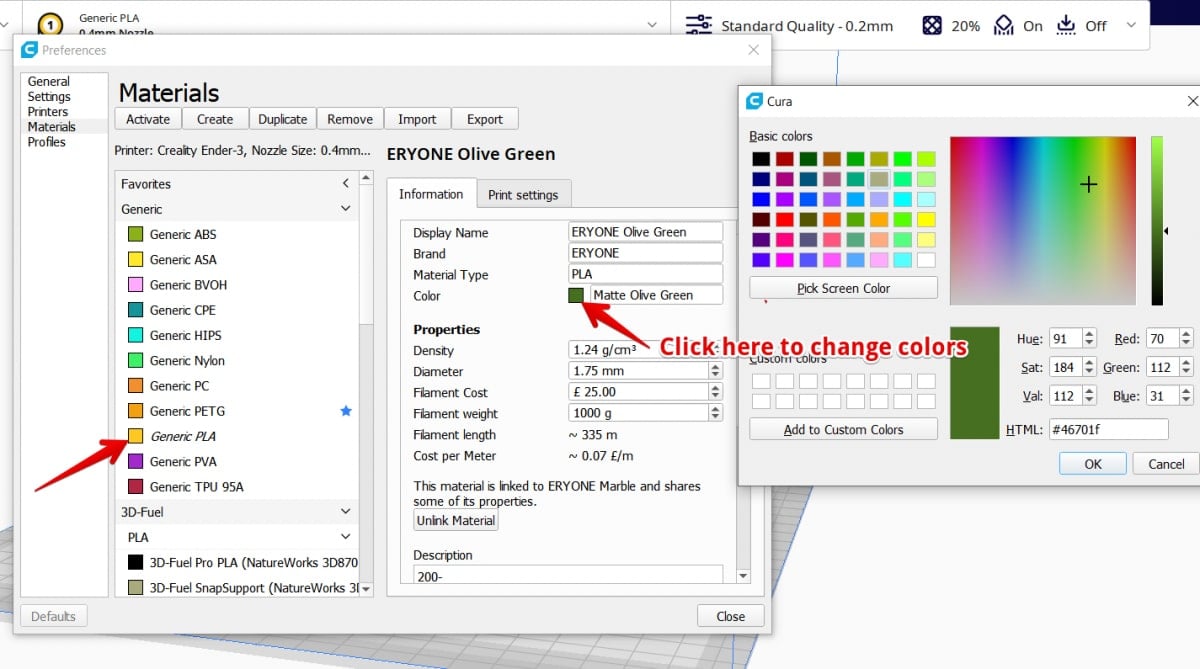
Yellow in Cura is the default color of generic PLA which is the default material in Cura. You can change the color of custom filament within Cura by pressing CTRL + K to go to Material Settings and changing the “color” of the filament.
It’s not possible to change the colors of default Materials that are already within Cura, only new custom-made filament that you have created. Simply press the “Create” tab to make a new filament.
What Does Gray Mean in Cura?
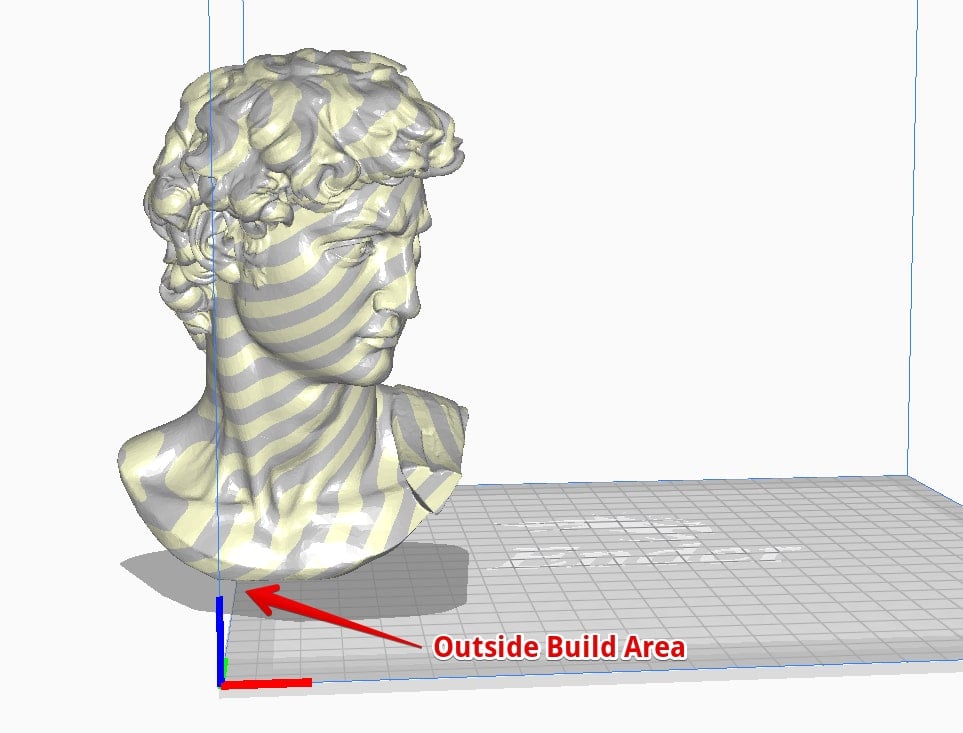
The gray & yellow stripes color in Cura is the signal for your model being outside of the build area, meaning you can’t slice your model. You’ll need to place your model within the build space to slice the model.
Some people have also seen gray colors in models due to using a CAD software like SketchUp to create their models because it doesn’t import to Cura so well. TinkerCAD and Fusion 360 usually work better for importing models to Cura.
SketchUp has been known to create models that look good but have non-manifold parts, which can show up as gray or red in Cura depending on the type of error. You should be able to repair the mesh so it can 3D print properly in Cura though.
I have methods on how to repair meshes later in this article.
What Does Transparent in Cura Mean?
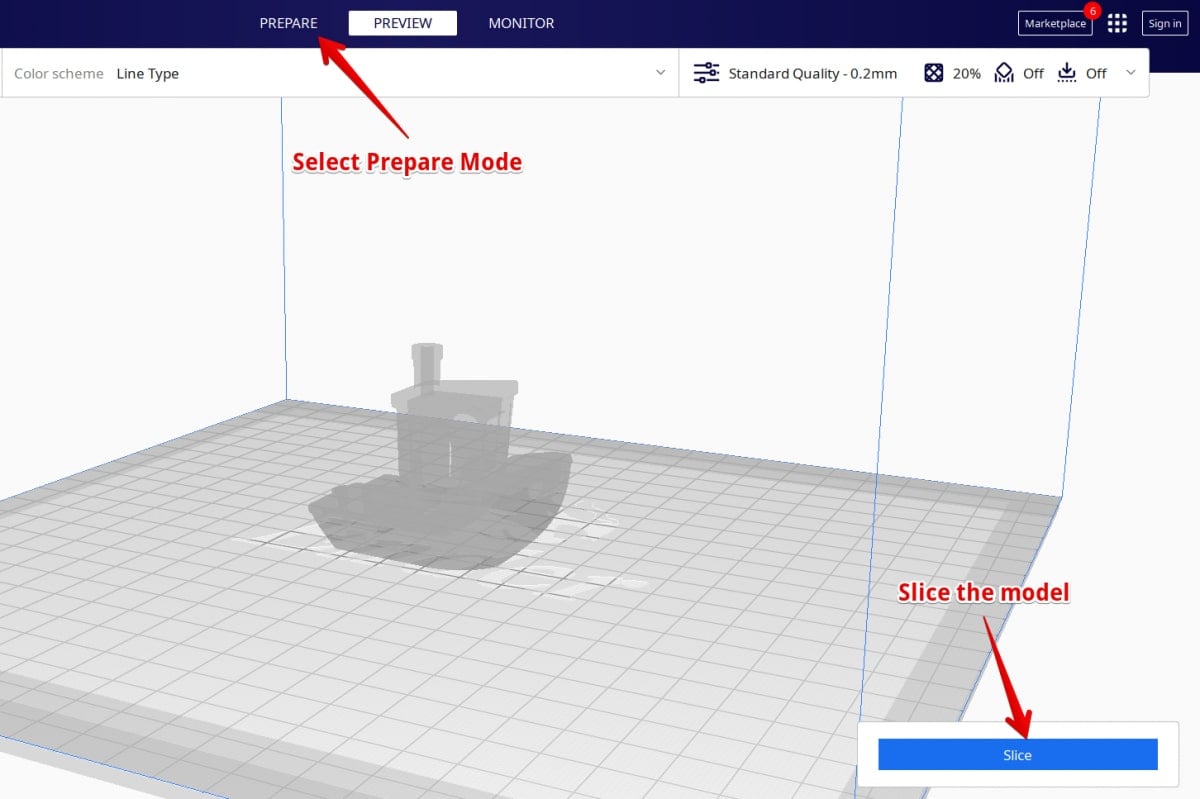
A transparent model in Cura usually means you have selected the “Preview” mode but you haven’t sliced the model. You can either go back to the “Prepare” tab and your model should turn back to the default yellow color, or you can slice the model to show up the model preview.
I found this really useful video that explains in more detail what the colors in Cura mean, so check that out if you want to know more.
What Do Cura Preview Colors Mean?
Now let’s look into what the Preview colors mean in Cura.
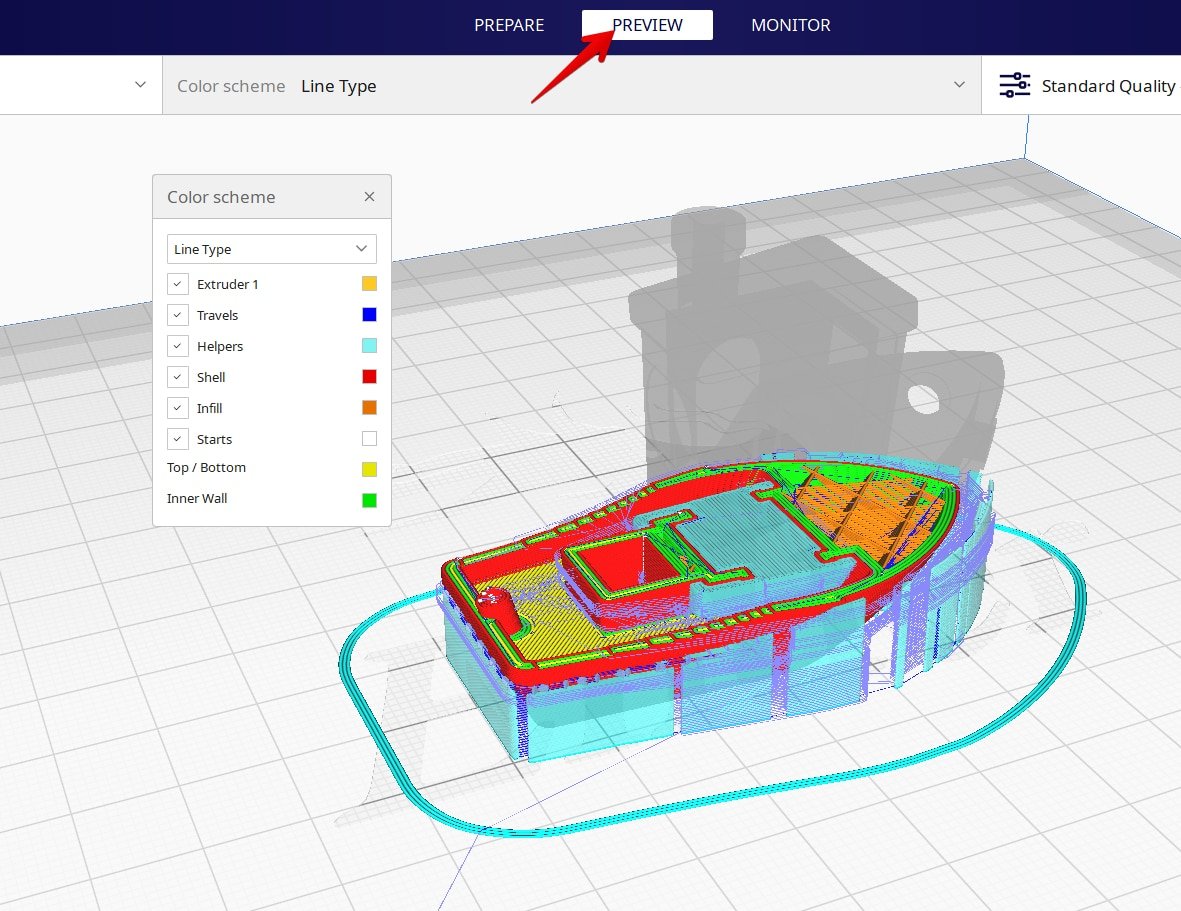
- Gold – Extruder When Previewing Layer Extrusion
- Blue – Travel Movements of the Print Head
- Cyan – Skirts, Brims, Rafts and Supports (Helpers)
- Red – Shell
- Orange – Infill
- White – Starting Point of Each Layer
- Yellow – Top/Bottom Layers
- Green – Inner Wall
In Cura, to show travel lines or other line types, simple check the box beside the line type you want to show, and remove as well.
How to Fix Cura Red Bottom Areas
To fix red areas in Cura on your model, you should reduce the areas that have overhangs or increase the Support Overhang Angle. A useful method is to rotate your model in a way that makes angles in your model not be too large. With a good orientation, you can significantly reduce the red bottom areas in Cura.
Check out the video below to see how to beat overhangs in your 3D models.
Cooling is probably the most important factor to getting good overhangs. You want to try different cooling ducts, use better fans on your 3D printer, and try higher percentages if you aren’t already using 100%. A really good fan would be a 5015 24V Blower Fan from Amazon.
One user bought these as an emergency replacement for his 3D printer and found that they worked better than what it was replacing. It produces great airflow and is quiet.

How to Fix Non-Manifold Geometry – Red Color
The mesh of your model may have issues with the geometry which leads to Cura giving you an error. This doesn’t happen often but it can happen with badly designed models that have overlapping parts or intersections, as well as interior faces on the outside.
The video below by Technivorous 3D Printing goes into methods to fix this error within Cura.
When you have self-intersecting meshes, they can cause issues. Usually, slicers can clean these up but some software might not clean it up automatically. You can use a separate software like Netfabb to clean up your meshes and fix these issues.
The usual way to do this is to import your model and run a repair on the model. Follow the video below to do some basic analysis and mesh repair in Netfabb.