The 45 Degree Rule in 3D Printing – Optimal Orientations
There is a rule in 3D printing you may have heard of called the 45-degree rule, and it has some significance to it. I decided to write an article to provide a better understanding of what this rule is, as well as ways to figure out just how much you have to follow this rule for yourself.
Keep reading through this article to finally get some useful information about the 45° rule.
What is the 45 Degree Rule in 3D Printing?
The 45-degree rule in 3D printing is a rule that states you can 3D print layers successfully, as long as the angle of the model doesn’t exceed 45 degrees. Since 3D printing is a layer-by-layer activity, it requires a good foundation for the next layer of around 50% contact, which is 45 degrees.
It’s a general rule but it’s possible to 3D print past the 45° angle using a series of calibrations and optimizations to your 3D printer which I’ll explain in this article.
A really cool phenomenon that allows people to 3D print in some cases is called bridging. It actually gives you the ability to 3D print some parts at a 180° angle or a straight line across without anything support it underneath.
Check out the video below for a really cool visual.
What is Overhang in 3D Printing?
Overhangs in 3D printing is simply parts of your model that exceed the 45° rule so it hangs past what you can usually 3D print with ease. It’s still possible to 3D print overhanging angles but usually to a certain point. An example of an overhang would be an action figure with a sword or spear pointed out horizontally.
Not enough of the previous layer can support the next layer since the angle is starting to exceed that diagonal 45° angle.
Usually, you’ll require supports of some kind to support overhangs but there are ways to improve the angle your 3D printer can handle. It can sometimes come at the cost of print imperfections underneath due to sagging or the material, or might end up causing a failure altogether.
How to Improve Overhangs in 3D Printing
- Lower the printing temperature
- Decrease printing speed
- Improve cooling
- Decrease layer height
- Improve wall settings
There are various settings you can adjust to make sure the above-mentioned issues are avoided or at least reduced.
Some steps you can take to ensure overhangs will be printed well without support are cleaning the nozzle and build plate, making sure the printer is well calibrated and making sure the filament is dry.
1. Lower the Printing Temperature
Lowering your printing temperature around 5-10°C can be a good method to improve overhangs.
The idea behind this is to make sure the filament solidifies as fast as possible in the position in which it was extruded, by reducing how soft or “liquid” the filament gets.
This way, drooping, warping or collapsing can be avoided.
2. Decrease the Printing Speed
Similar to the method of lowering your printing temperature, a slower printing speed means that your filament has enough time to cool down nicely before more material is extruded.
The filament should harden quicker and result in a better overhang.
An additional step here would be to decrease printing speed, but you have to make sure this will not lead to under-extrusion.
In some cases, increasing the printing speed can benefit with overhangs since the material has less time to sag or droop.
Adjusting these may even help you print midair in some cases. For example, have a look at this article discussing the making of coil springs.
Check out the video below to see some midair 3D printing, using a slow printing speed, a relatively low printing temperature, and some great cooling.
3. Improve Cooling
For the same reason mentioned above, you may consider adding additional cooling hardware, such as an extra fan.
The quicker your filament cools and hardens, the more stable it will be while moving around. An efficient cooling system can significantly improve overhangs and bridging.
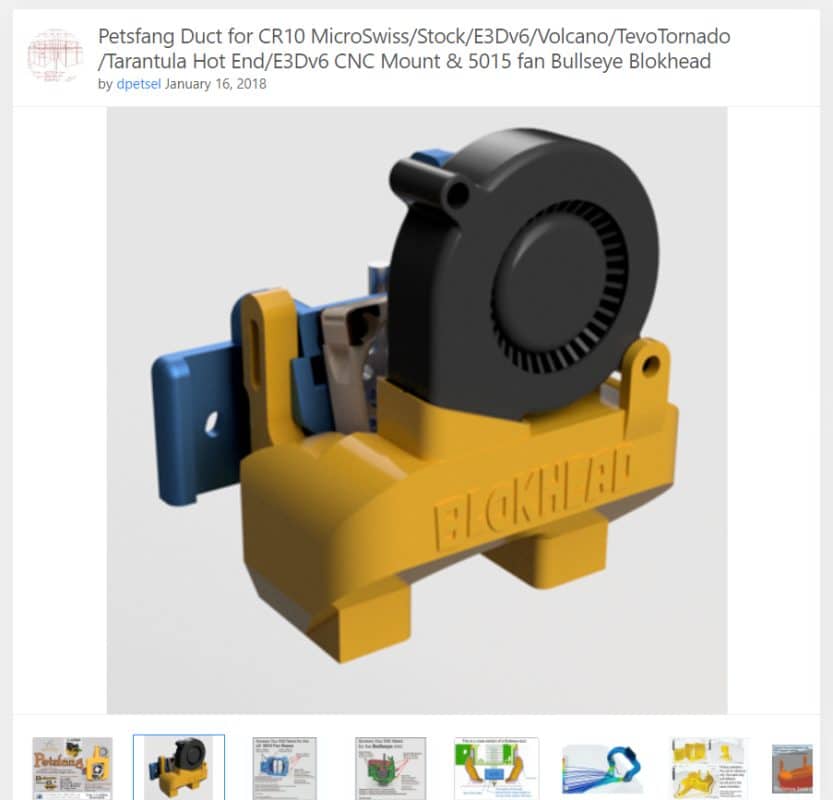
If your 3D printer doesn’t already have one, I’d highly recommend creating a fan duct so that the air is blowing more efficiently on the model.
A popular fan duct that 3D printer hobbyists use is the Petsfang Duct on Thingiverse.
4. Decrease Layer Height
One of the key steps you should take to ensure a better quality and overhangs is to adjust the layer height. In most cases, decreasing the layer height to a finer quality is the best way to go, although it can significantly increase printing time.
Going from the standard 0.2mm layer height to a 0.12mm resolution can definitely help improve overhangs.
A smaller layer height will not only make the overhang section look better and more consistent, but also improve the strength of the model. The reason for this is that with a smaller layer height, each individual layer overhangs less than with a bigger height.
I have pictures of an overhang test further in this article so you can get a nice visual of it.
For some prints, increasing the layer height might be a solution. Although this might cause drooping due to the bigger overhang, it can be that it gives an overall cleaner and more stable look.
A bigger layer height paired with more cooling may help reduce drooping, so always adjust layer height based on what works best for your printer.
Here is a video explaining the three solutions above in more detail.
5. Improve Wall Settings
You can adjust your wall settings within your slicer for better overhang results. For example, Cura lets you choose whether you print the inner or outer walls first or choose the number of paths in the shell.
In this case, you should print the inner walls first, so that the outer walls can attach to them, and increase the shell paths.
These are advanced settings, and most of the time are not the first changes you should make; however, they can improve the overhangs quality, depending on your settings and model.
Here is a video explaining the Cura shell settings in-depth, if you want to know more about them:
Drying your filament is also important because any moisture caught within your filament can pop after being heated to high temperatures, having a negative effect on overhangs.
In conclusion, the key to successfully 3D printing without supports is finding the right combination of settings that make your overhangs stable and good-looking, as well as using a few orientation and tilting tricks when printing.
There are many more methods, so check out my article 10 Ways How to Improve Overhangs in Your 3D Printing.
Can You 3D Print Overhangs Without Supports?
Yes, you can 3D print overhangs without supports by orienting your model in a way to reduce the number of overhangs present. You can also actually split your model at a certain angle to significantly reduce overhangs and stick the model back together. Using chamfers to reduce steep angles is useful.
I will go through some of these methods and solutions people have come up with to respect the 45° rule in 3D printing.
1. Tilting or Orienting the Model
Tilting your model allows you to have control over where the support material will be attached to the print.
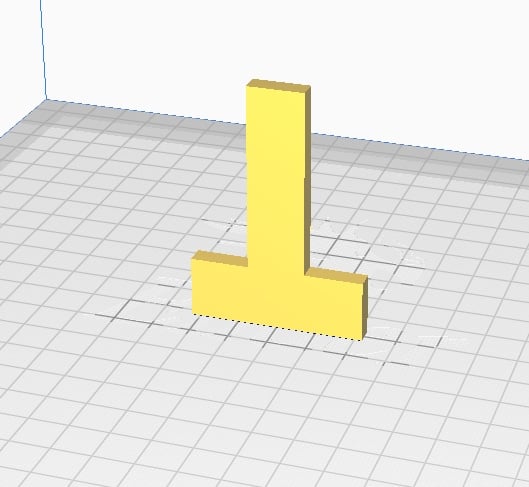
One basic example of orienting your model to decrease the need of supports is with the letter T. As you can see below, there are overhangs with the red-shaded areas.

We can essential eliminate the need for supports by tilting the model at a 45° angle as shown below. You can no longer see any red areas since there aren’t any angles that exceed 45°.
You can significantly reduce overhangs with the appropriate orientation.
There’s another benefit of tilting a model past requiring fewer supports which is durability. You can also create wider layers rather than narrow layers by orienting your models diagonally.
You can visualize this on the same “T” model where it would create larger cross-sections across the vertical part of the T since the layers would be wider.
2. Splitting up Your Model
This can also be a useful trick in the case of complex models. You can then print each part at the angle that works best to avoid any angles bigger than 45°, as explained in the method above, and attach them together. You may find that this gives you better quality prints.
If you were to 3D print this T shape model, you could split the model into two parts, one vertical and one horizontal part. This would create two objects that can easily lie on the build plate and be 3D printed.

You can learn How to Split & Cut STL Models For 3D Printing by checking out my article.
3. Using Chamfers
This greatly depends on your model, but chamfers might be a great way to reduce the angle and respect the 45° rule.
Chamfers are straight sloping surfaces used to round edges and corners. They are solutions for avoiding steep 90° angles rather than helping to print them out. This means that these are surfaces you can use when designing a model, so they will inhibit the shape options of your model.
Still, chamfers may be a good solution if you have a loose idea of what you want to create and are looking for manageable ways to model it.
Here’s a great video showing you just how well chamfers work.
Best PLA Overhang Angle for 3D Printing
In accordance to the 45° rule, best overhang angles are the ones up to 45°. These won’t need supports and will print cleanly enough.
However, some models simply require steeper angles. If you have a model in mind, but are unsure which angle would print best, I suggest printing some overhang tests. Here are a couple of more popular ones:
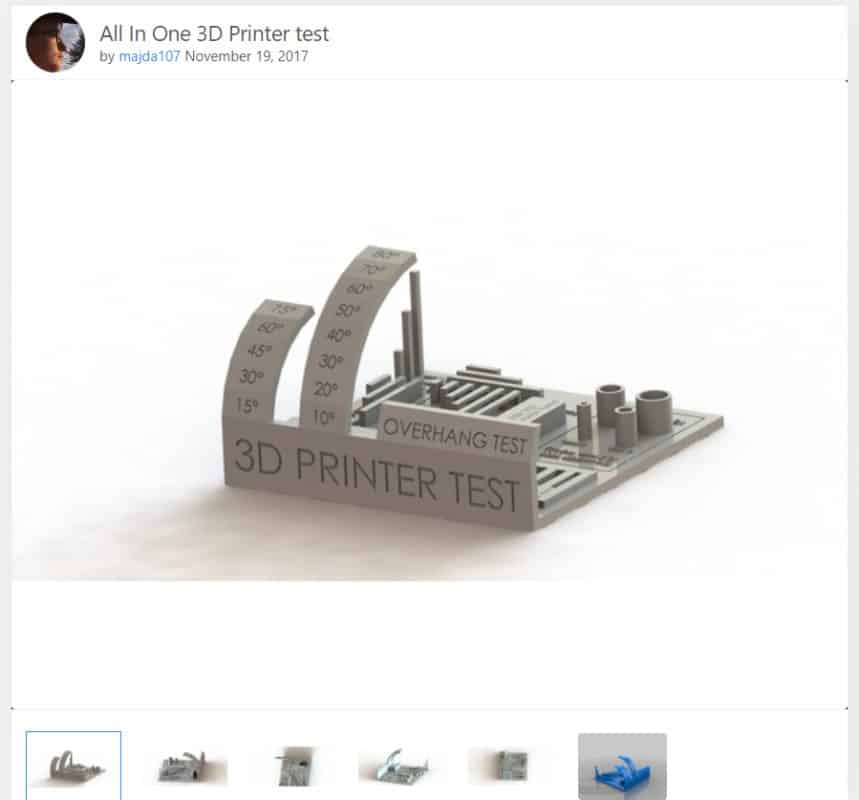
- All In One 3D Printer Test – this is a complex test for overhangs, support, holes, scale, diameter and bridging; it can help with calibration and figuring out the best settings and angles for overhangs
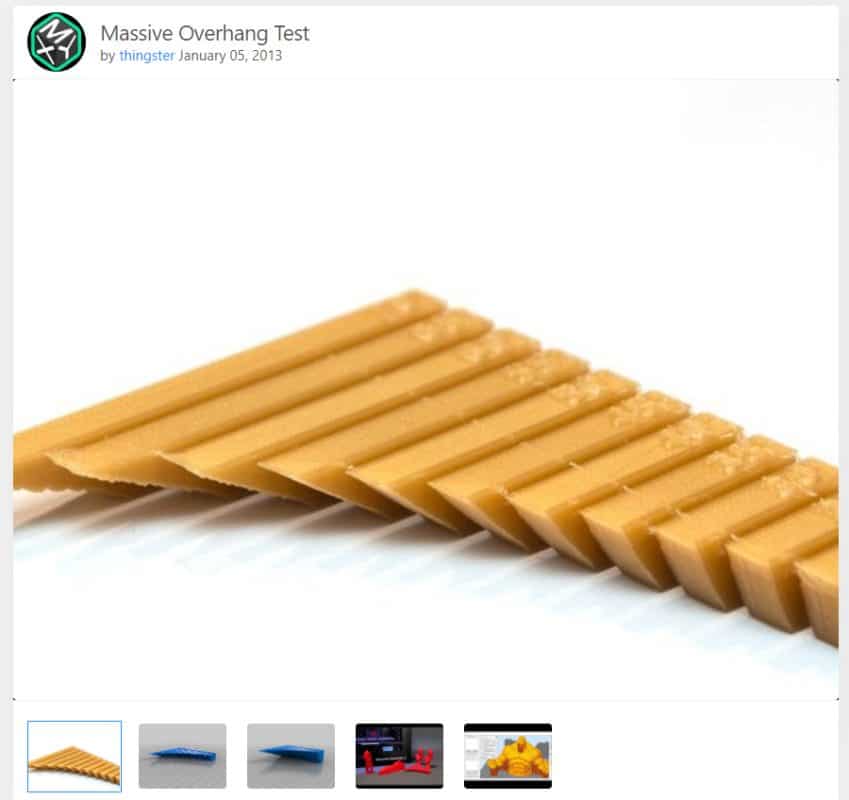
- Massive Overhang Test – this is the test used in one of the videos above. It has a variety of angled overhangs, so you can have an idea on how well you can 3D print them
There is, however, a way to calculate a maximum overhang angle depending on your existing settings.
This is a more complicated formula, and in the case of 3D printing, it might be best to work on a trial-and-error basis but knowing the maximum overhang angle for your type of settings can give you an idea on the limitations you have to consider.
Here is an article that details the maximum overhang angle calculation.
The formula is: α = tan-1 d*(1-f) / h
α – maximum overhang angle,
d – width of the printed path,
f – percentage overlap of the printout outlines (suggested default of 33%),
h – layer height.
Check out the video below on methods to avoid needing supports.
https://www.youtube.com/watch?v=nP_t-DVtqMw
What Does Overhang Support Angle in Cura Mean? How to Use It
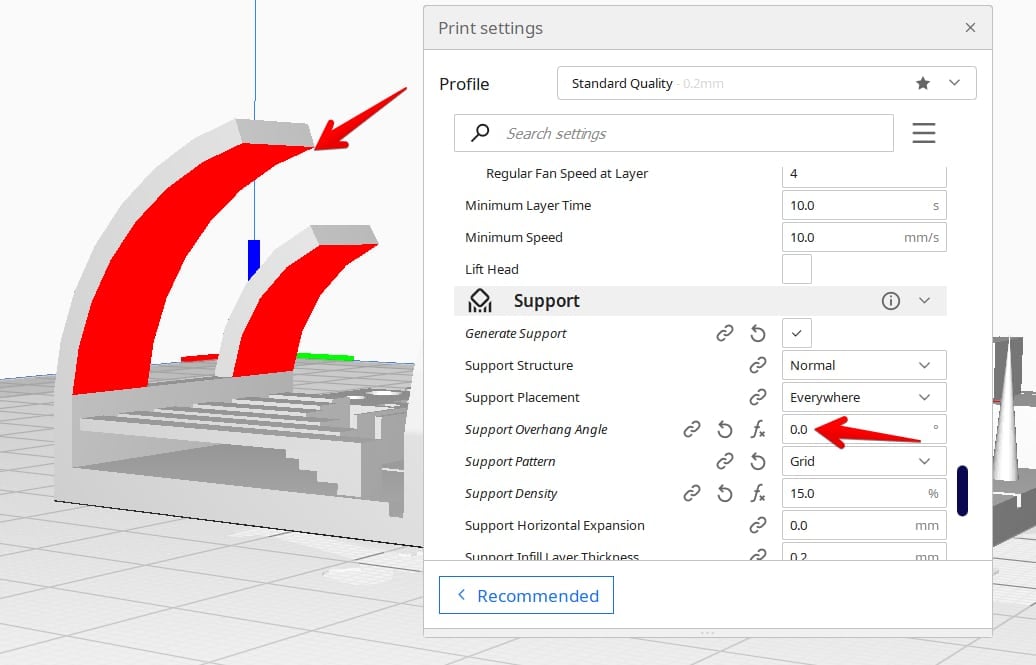
The Overhang Support Angle in Cura is a setting that determines the minimum angle that gets supported in your models. An Overhang Support Angle of 0° would support every single angle, while an angle of 90° would create no supports.
Basically, increasing this setting translates to fewer supports being created.
The default value is 45° which means that all angles that are steeper than 45° will create support material as long as “Generate Supports is enabled”.
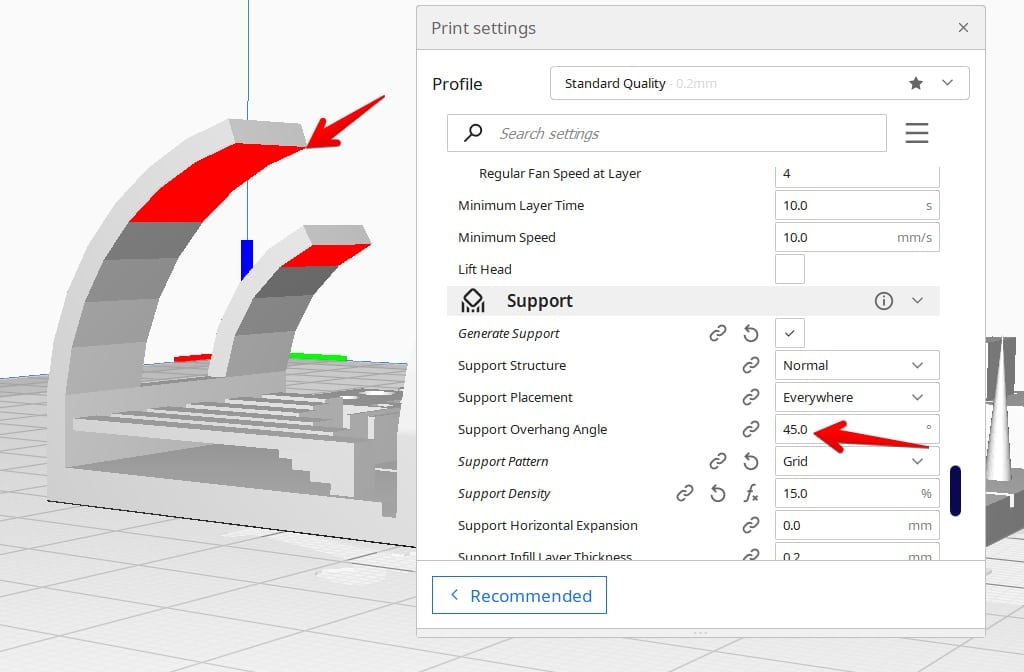
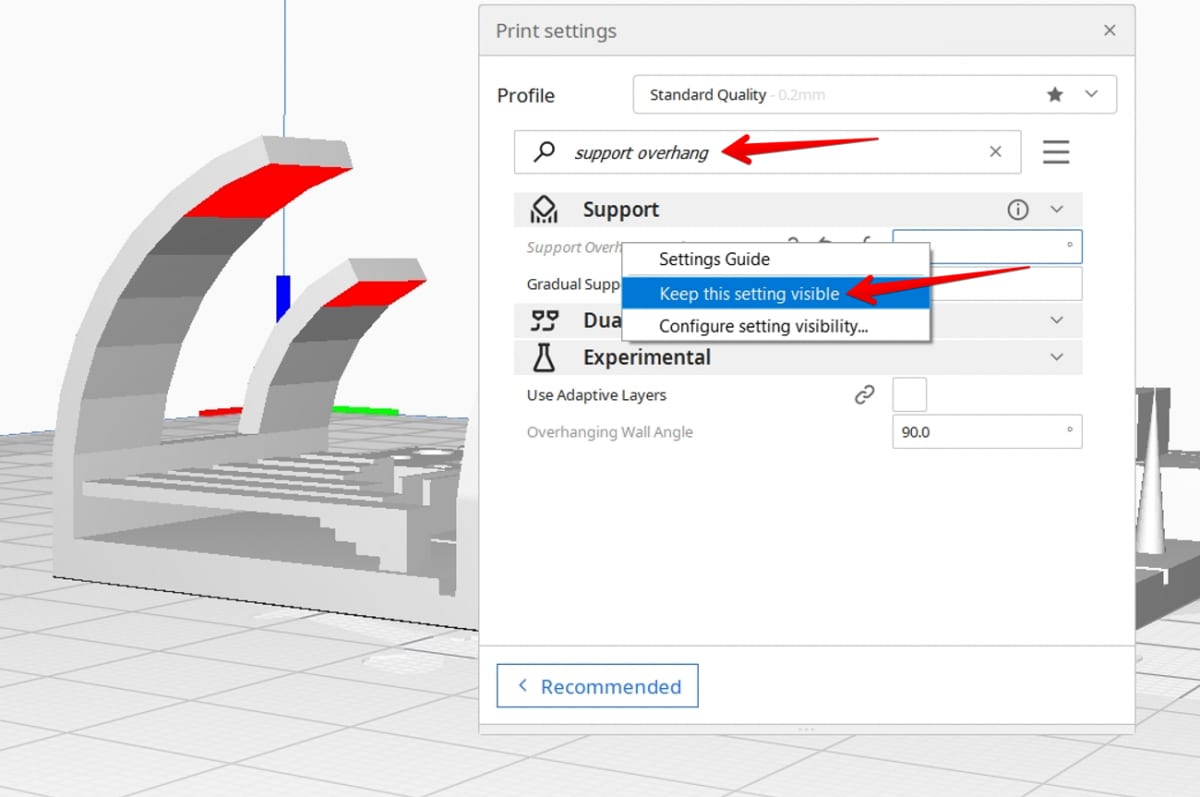
In Cura, these areas are represented by the red color on your model. When you increase your Overhang Support Angle, you’ll see the amount of red decrease since there are fewer supports needed according to your settings.

I see users increase this setting beyond 50° and still get successful prints, so it’s really trial and error depending on your 3D printer and setup.
Personally, I use 55° and get pretty good results, while I’ve seen people go above 60°.
A good balance is needed for this setting because you don’t want to create more supports than you need, but you also don’t want to create a model where there is sagging or drooping due to a lack of supports.
I’d highly recommend slicing your model and manually checking the Preview to see just how well your model is being supported with your chosen Overhang Support Angle setting.
You can find this setting in Cura simply by using the search box. When you find the setting, right-click it and select “keep this setting visible”.