How to Use Ironing in 3D Printing – Best Settings for Cura
Ironing in 3D printing is a setting that many people use to improve the top layers of their models. Some people do get confused on how to use it so I decided to make an article to help users out with it.
Keep on reading for more details on how to use ironing to improve your 3D prints.
What is Ironing in 3D Printing?
Ironing is a slicer setting that makes your 3D printer’s nozzle do a pass over the top surface of your 3D print to melt any imperfections and make the surface smoother. This pass will still extrude material but in a very small amount and slowly to fill any gaps and get the desired effect.
The main advantages of using ironing in your 3D prints are:
- Improved top surface smoothness
- Fills in gaps on the top surfaces
- Better assembly of parts due to dimensional accuracy
The main disadvantages of using ironing are:
- Significant increases in printing time
- Certain ironing patterns can cause visible lines – Concentric is best to avoid this
- Curved or detailed top surfaces aren’t good when ironing is enabled
Whether you want to enable Cura ironing settings on an Ender 3 or similar 3D print, you can get some great results.
One key limitation for Ironing is that it’s mostly effective on top layers that are flat since the nozzle repeatedly moves forward and backwards over the same spots to ensure a smoother surface.
It’s possible to iron slightly curved surfaces but it usually doesn’t yield great results.
Ironing can be considered experimental by some but most slicers do have some form of it such as Cura, PrusaSlicer, Slic3r & Simplify3D. You’ll get the best Ironing results by initially calibrating your 3D printer properly.
I wrote an article about How to Use Cura Experimental Settings for 3D Printing, that goes through some interesting settings you might not know about.
How to Use Ironing in Cura – Best Settings
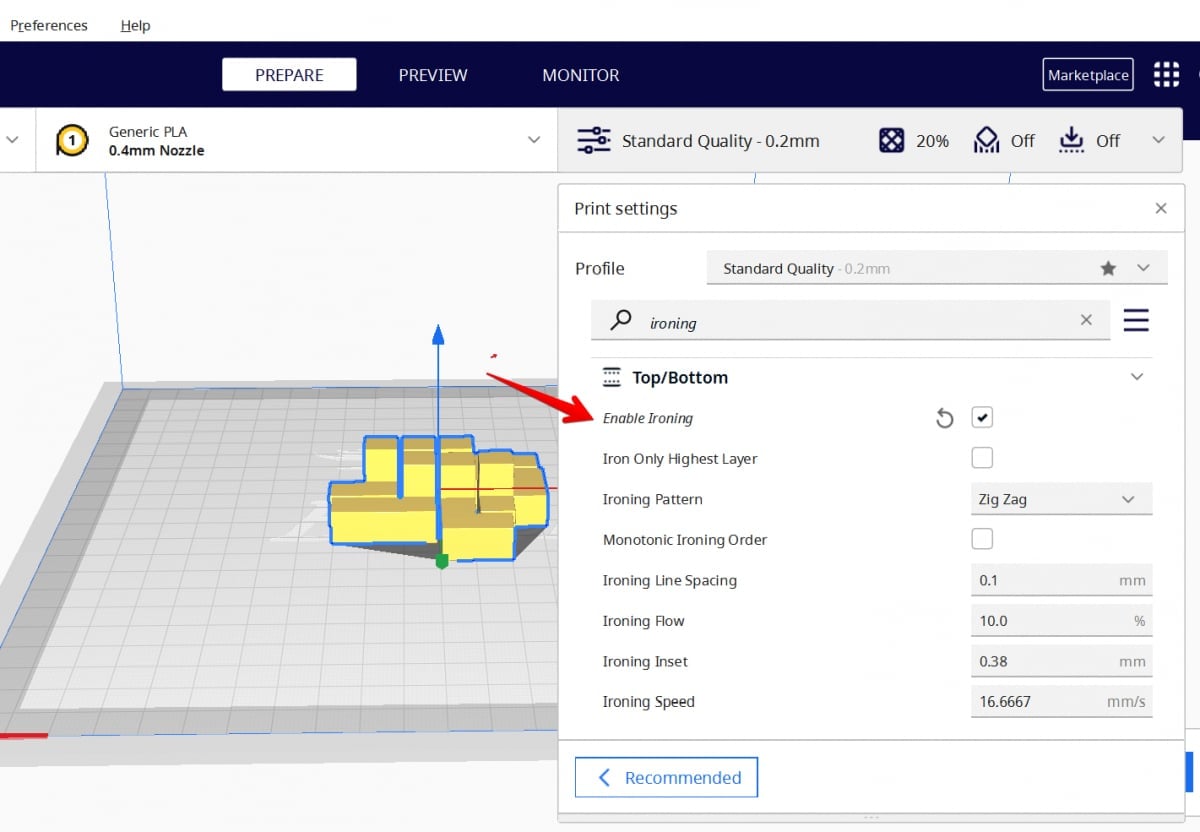
To use the ironing setting in Cura, you need search “ironing” in the search bar to find the “Enable Ironing” setting and check the box. “Enable Ironing” is found under the Top/Bottom section of the print settings. The default settings usually work pretty well, but you can dial in the settings better.
There are a few additional ironing settings you can use here, and I will go through each of them below:
- Iron Only Highest Layer
- Ironing Pattern
- Monotonic Ironing Order
- Ironing Line Spacing
- Ironing Flow
- Ironing Inset
- Ironing Speed
You can right-click any of the ironing settings during the search, and set them to “Keep this setting visible” so you can find them without searching again by scrolling to the Top/Bottom section.
Iron Only Highest Layer
The Iron Only Highest Layer is a setting you can enable to only iron the very top layer of a 3D print. In the example above with the cubes, only the top faces of the very top cubes would be smoothed, not the top surfaces of each cube.
This is a useful setting to enable if you don’t need any other top layers on different parts of the 3D model to be ironed, which saves a lot of time.
Another use of this setting would be if you have a model that has top layers that are curved and a highest layer that is flat. Ironing works best on flat surfaces, so it depends on the geometry of your model whether you enable this setting or not.
If you are printing multiple models at the same time, the highest top layer of each of the models will be ironed.
Ironing Pattern
The Ironing Pattern is a setting that lets you control what pattern the ironing moves in across your 3D print. You can choose between Concentric and Zig Zag patterns.
Many users prefer the Zig Zag pattern, which is also the default one since it works for all kinds of shapes, but the Concentric pattern is also quite popular.
Each pattern has its advantages and disadvantages:
- Zig Zag is said to be the mostly very reliable, but can result in some visible borders due to the frequent change in direction
- Concentric does not normally result in borders, but it can result in a spot of material in the center if the circles are too small.
Choose the pattern that works best for your particular model. For example, Cura recommends the Concentric pattern for long and thin surfaces and the Zig Zag pattern for surfaces of similar length and height.
Monotonic Ironing Order
The Monotonic Ironing Order is a setting that can be enabled to make the ironing process more consistent by ordering the ironing lines in a way that adjacent lines are always printed overlapping in the same direction.
The idea behind the Monotonic Ironing Order setting is that by having this consistent overlapping direction, the surface doesn’t have slopes like the usual ironing process creates. This then results in light being reflected the same way over the entire surface, leading to a smooth and consistent surface.
When this setting is enabled, the length of travel moves slightly increase, but at a very minimal level.
Cura recommends to also pair this setting with Z Hops for a smoother surface.
Cura has another setting called Monotonic Top/Bottom Order which is not linked to Ironing, but works in a similar way but affects the main printing lines and not the ironing lines.
PrusaSlicer also offers a Monotonic Infill setting which creates some very nice results, according to users.
I love the new monotonic infill option. Such a huge difference in some of my prints.
byu/IKROWNI inprusa3d
Check out the video below by ModBot that explains the Monotonic Order for ironing, as well as the general monotonic order setting in Cura.
Ironing Line Spacing
The Ironing Line Spacing setting controls how far apart each line of ironing will be. With regular 3D printing, these lines are spaced further apart compared to ironing lines which is why ironing works well to improve the top surface.
The default Cura ironing line spacing is 0.1mm, and this works well for some users, such as this one:
A smaller line spacing will result in a longer printing time but will give a smoother result. Many users suggest 0.2mm, which strikes a balance between smoothness of the surface and speed.
One user got great results by using a 0.3mm Ironing Line Spacing in his model.
Another user who tried a 0.2mm Ironing Line Spacing got a lovely smooth top surface in his 3D print:
I’d recommend trying out different values to see how much of a difference it makes in your 3D prints. You can also check the printing times in Cura to see if they increase or decrease significantly.
Ironing Flow
The Ironing Flow setting refers to the amount of filament that is extruded during the ironing process and is expressed as a percentage. The default value is 10%. One user suggested that 10-15% works well for their prints, while another recommended going all the way to 25%.
One person pointed out that 16-18% is a good value, since going over 20% might cause issues but this can vary based on model and 3D printer.
Depending on your model, you should find the settings that work best for you. For example, if you have a lot of visible gaps in your top layer, you can increase your Ironing Flow to fill those gaps in better.
Many users suggest that the first way to try and fix ironing issues is to adjust your Ironing Flow value, either an increase or a decrease. The example below is one user mentioning that Ironing was making his 3D print’s top surface look worse.
Increasing the Ironing Flow was the main suggestion to fix this problem.
In this next example, decreasing the Ironing Flow made the most sense since there looked like over extrusion in the top surface of the 3D print. They suggested to decrease the Ironing Flow by 2% until the results looked good.
Why am I getting bumbs and not smooth ironing layer? 205 degree 0.2 late height. Ironing line spacing .1 ironing flow 10% ironing inset .22 ironing speed 17mm/s
byu/OliverjwDawson inFixMyPrint
The Ironing Flow shouldn’t be too low though because it needs to be high enough to maintain a good pressure in the nozzle so it can fill any gaps properly, even if the gaps aren’t very visible.
Ironing Inset
The Ironing Inset setting refers to the distance from the edge that ironing starts from. Basically, a value of 0 would mean that ironing starts directly from the edge of the layer.
Generally speaking, ironing doesn’t smooth out models all the way to the edge since material would flow over the edge of the model due to continuous pressure of filament.
The default Ironing Inset value in Cura is 0.38mm, but many users suggested using 0.2mm instead, maybe due to the standard layer height of 0.2mm. This value does depend on the model you are printing, as well as the material you are using.
Another way to use this setting is to stop thin strips of your model from being ironed, by increasing the setting, but this would also cause bigger parts to not get ironed close to the edge depending on how high the setting is.
This setting does automatically adjust when some of your other settings are changed such as the Ironing Pattern, Ironing Line Spacing, Outer Wall Line Width, Ironing Flow and Top/Bottom Line Width.
Ironing Speed
The Ironing Speed is simply how fast the nozzle will travel while ironing. Generally speaking, the Ironing Speed is much slower than your normal printing speed so the lines of the top surface can properly fuse together, though at the cost of a higher printing time.
The default value for Ironing Speed is 16.6667mm/s, but many users choose to take it higher.
One user suggested values between 15-17mm/s, while others have recommended speeds of 26mm/s and one user said he got good results with a speed of 150mm/s, even mentioning that Cura would highlight the value as yellow.
It’s also possible to adjust Ironing Acceleration and Ironing Jerk, though these shouldn’t be too necessary to get the best results. The default values should work pretty well – these are only found by enabling Acceleration Control and Jerk Control, as well as enabling Ironing.
Check out the video below for a great explanation of Ironing in Cura, along with some suggested values.
If you are using PrusaSlicer, then this video explains the Ironing settings more in-depth: