How to Use Cura Experimental Settings for 3D Printing
There are plenty of settings within Cura that many people don’t use, even though they can be very helpful.
An example of these settings is a section of Cura settings called “Experimental”. So, I decided to write an article about them so people could try it for themselves.
Keep on reading through this article for some detail on what experimental settings are out there, as well as how to use them for your 3D prints.
What Experimental Settings Are There in Cura?
There are plenty of experimental settings within Cura that showcase some concepts and ideas that have been introduced but not fully optimized and tested out.
These are put into the Experimental tab within Cura’s settings for users to beta test them and provide feedback on how well they work and how to improve them. Plenty of settings that started in the Experimental settings have been incorporated into Cura’s normal settings.
This means that some Experimental settings will change over time, so the settings you see here are current at time of writing. I’ll try to provide updates to these as time goes on to keep them more current.
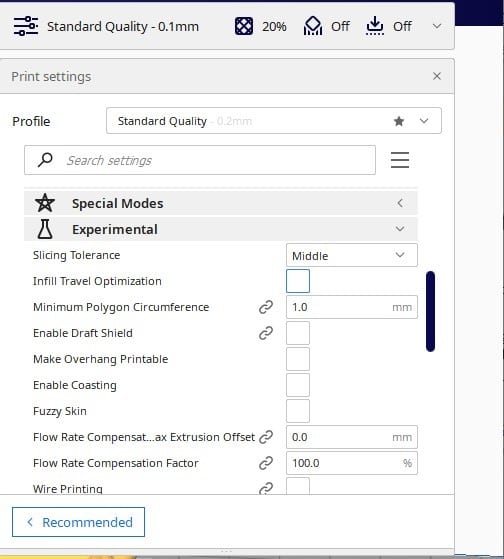
Here are the Experimental settings at the time of writing.
- Slicing Tolerance
- Infill Travel Optimization
- Minimum Polygon Circumference
- Break Up Supports in Chunks
- Enable Draft Shield
- Make Overhang Printable
- Enable Coasting
- Enable Conical Support
- Fuzzy Skin
- Flow Rate Compensation Max Extrusion Offset
- Flow Rate Compensation Factor
- Wire Printing
- Use Adaptive Layers
- Overhanging Wall Angle
- Overhanging Wall Speed
- Enable Bridge Settings
- Wipe Nozzle Between Layers
- Small Hole Max Size
- Small Feature Max Length
- Small Feature Speed
- Small Feature Initial Layer Speed
How to Use Cura Experimental Settings in Cura
How to Use Slicing Tolerance
It controls the vertical tolerance (accuracy) while the printer slices the model, especially in sloped sections. In essence, it determines how the slicer creates the outer surface of the model using the layers.
* Slicing Tolerance is a setting that controls the level of accuracy your slicer will slice an object regarding the mesh or external angles of a model. You can choose whether to have your layers sliced in a way that closely approximates the surface, stays bounded by the surface, or includes the surface completely.*
There are three main options for this.
- Inclusive: The slicer slices at the topmost part of the layer. Here, the layers contain all parts of the model’s original surface, leading to slightly bigger layers.
This prints out the model slightly larger, making it perfect for prints that you’re going to post-process.
- Middle: This option slices at the middle of the layer. Middle is the default setting and produces a compromise between inclusive and exclusive.
- Exclusive: Exclusive slices from the lowest part of the layer. This results in some parts of the model’s surface, especially if they’re sloped, lying outside the sliced layers.
It is the best option for producing dimensionally accurate parts you want to fit them in an assembly without post-processing.
How to Use Infill Travel Optimization
As its name says, the Infill Travel Optimization setting optimizes the distance the print head travels through while it prints the infill. When you enable it, the setting calculates the optimal order for printing infill lines to reduce the travel time.
This results in a shorter printing time for the model. However, you should note that it can be ineffective when used on multiple parts or a part with multiple shells.
How to Use Minimum Polygon Circumference
This setting defines the minimum size of a polygon that the slicer will recognize. Any polygon with a circumference smaller than the set value will be phased out of the model.
If you have a high-resolution printer and want to print highly detailed models, you can set this value to a much lower one. However, you should note that lower values come with an increase in slicing and printing times.
Conversely, a higher value will lead to faster printing times but a lower resolution 3D model.
How to Use Break Up Supports in Chunks
The Break Up Supports in Chunks settings is a useful way to make your supports easier to remove, specifically when using the ZigZag pattern for supports. It produces supports that are wide enough to provide a strong foundation to your 3D print, but they are broken up into pieces.
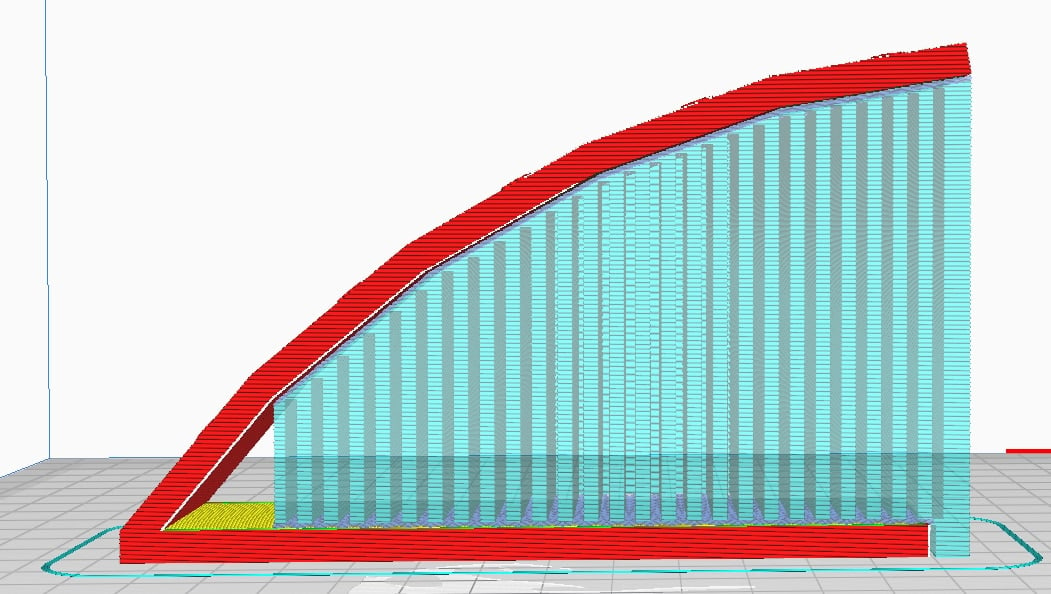
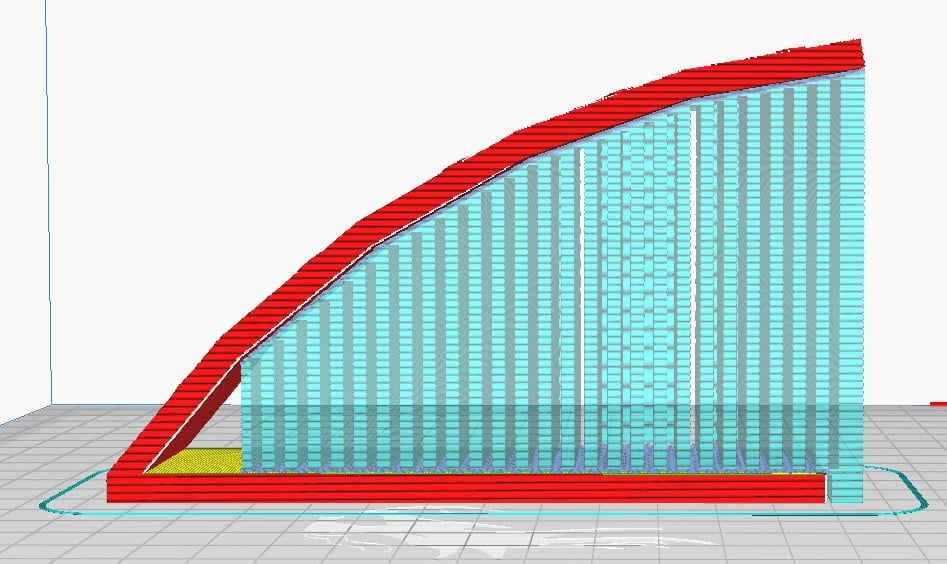
Rather than your supports being attached as one larger piece, this makes your supports a lot easier to remove since you can break off pieces at a time. It does result in a decrease in strength and stability from the support, especially if you set your Support Chunk Size fairly low.
In some situations, this might cause the support to fail/fall over which would cause stringing and bad overhanging on your model.
Make sure the “Support Wall Line Count” setting is 0 while using this because they can work against each other. When the supports have an extra line around it, that will connect the supports up into one piece again.
![]()
There are some further settings when you enable “Break Up Supports in Chunks”:
- Support Chunk Size – determines the size of the support, default of 20mm. Smaller chunks are going to be easier to break off, but provide less stability, while larger chunks are harder to break off but provide more stability.
- Support Chunk Line Count – determines how many lines of support will be created per “Chunk”, default of 10.
How to Use Draft Shields
A draft shield is a separate 3D print that is created around your model to protect it from drafts, as well as significant temperature changes. It’s basically a 3D printed enclosure which helps to reduce cooling and warping by trapping hot air in and keeping cooler air out.
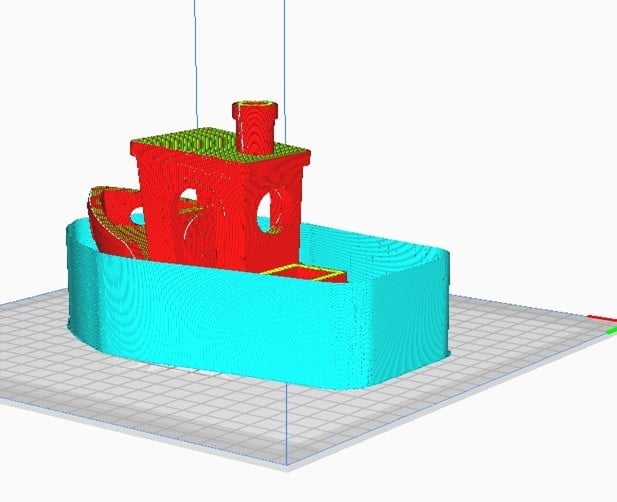
When you tick the Enable Draft Shield box, some sub-settings show up. Here is what they do:
- Draft Shield X/Y Distance: The X/Y distance is the distance between the draft shield and the object in both directions. They share the same value.
If you want the draft shield farther from the object, you can increase the default X/Y distance of 10mm. Conversely, if you want it closer, decrease the distance.
- Draft Shield Limitation: It controls the draft shield’s height. You can set it to Full, which prints the draft shield to the object’s height. Conversely, you can set it to Limited, which prints the draft shield to a preset height.
- Draft Shield Height: If you set the draft shield limitation to Limited, this is where you put the height you want. For example, the draft shield in the picture above is set to limited and printed to a height of 10mm.
How to Use Make Overhang Printable
The make overhang printable setting reduces the steepness of overhanging features so the printer can print the model with fewer supports. It adds additional material under sharp overhangs to reduce their angle, thereby making them easier to print.
* The make overhang printable setting identifies overhanging angles in your 3D model and actually changes the shape of your model to reduce the angle of the overhangs. This allows you to 3D print models with fewer supports, at your specified overhang angle.*
Here are some of the settings under it.
- Maximum Overhang Angle: This is the steepest overhang angle that will be left untouched by the slicer. For reference, at 90⁰, the model will be unaltered.
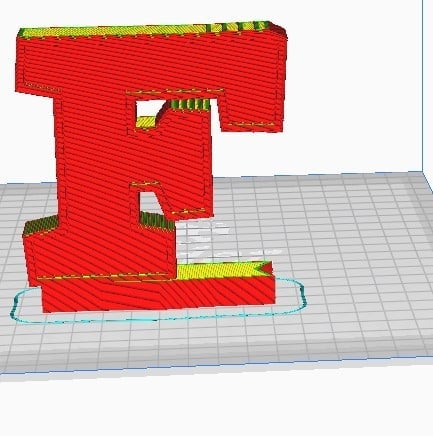
While at 0⁰, all it’s overhanging parts will print straight up from the build plate.
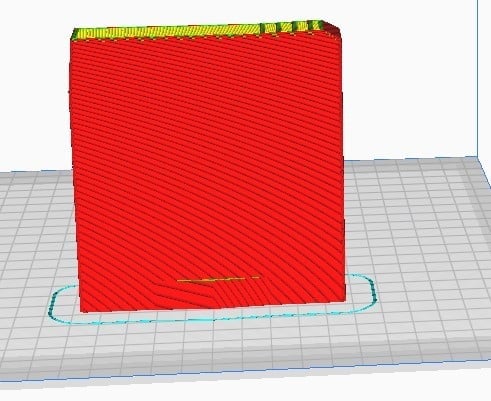
As you can see, the model is unrecognizable. So, you want to keep the angle at a decent value.
The default value for Maximum Model Angle is 50⁰, which is slightly above the standard 45⁰ rule of being able to 3D print successfully. In many cases, you can 3D print above these angles, but you’ll need to dial in your 3D printer and settings properly.
- Maximum Overhang Hole Area: The Max Overhang setting fills holes in the model’s base larger than this value when slicing. Holes smaller than this value will be left in.
Note: This setting is excellent for reducing printing time and material in aesthetic models. However, you shouldn’t use it when printing functional or engineering models.
How to Use Coasting
Coasting turns off the extruder feed to the nozzle just before the printer completes a layer. So, the printhead completes the layer with only the filament left inside the nozzle.
As a result, there is no material left in the nozzle for oozing or stringing at the end of the layer. When you enable coasting, some sub-settings come up.
They are:
- Coasting Volume: The coasting volume represents the volume of materials the nozzle would’ve been fed into the nozzle, if you didn’t enable coasting. Cura recommends using the nozzle diameter cubed for this value.
- Minimum Volume Before Coasting: This is the smallest volume an extrusion path (layer or line) should have before enabling coasting. Cura recommends using a volume of 0.8mm3.
Be careful not to take it too low to avoid under-extrusion.
- Coasting Speed: It is the speed at which the nozzle moves during coasting. You can use a value of around 90% of the normal speed to ensure the filament is laid down correctly.
This is because the pressure in the nozzle is lower than usual during coasting.
How to Use Conical Support
Conical Supports is a support adjusting setting that changes your standard supports into a support that has a cone shape. It can either be smaller at the bottom and larger at the top, or larger at the top and smaller at the bottom.
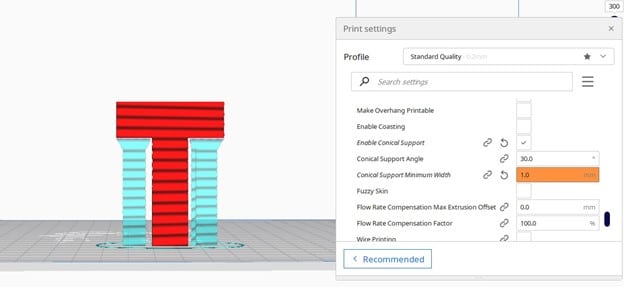
You can set your preferred angle and minimum width for the support. These supports can help in reducing material usage and printing time for supports.
They can also help in creating a better, more stable base for the support if the support angle is negative.
Cura describes it as a less extreme version of Tree Supports, allowing you to save significant amounts of printing time and support material.
It’s a great setting to use when you have your supports set to “Only on the Build Plate” because it can reach areas that are overhanging, that normal supports wouldn’t be able to reach.
Note: You can only use the Enable Conical Support setting with Normal Supports.
Here are some of the sub-settings under it:
- Conical Support Angle: It’s the angle of the conical expansion at the top of the support. Using a positive angle will make the support taper down from the overhang, with the size of the angle determine how steep the support tapers.
A negative angle makes the supports extend outwards.
- Conical Support Minimum Width: This is the minimum width allowable for the base of the supports. Be careful not to take it too low to avoid weak supports.
How to Use Fuzzy Skin
The fuzzy skin setting randomly jitters the nozzle as it’s printing the outer shell to create this effect. You can use the fuzzy skin setting to give your model a unique rough texture on the outside.
You can use this texture to print features like fur, spooky hair, etc., on your models. Wooden models could look cool with this setting also.
Check out the video below for a cool visual of this setting.
Here are some of the settings under it:
- Fuzzy Skin Outside Only: This restricts the fuzzy skin to the outermost surfaces. It won’t be generated on inner surfaces.
- Fuzzy Skin Thickness: This is the width or thickness of the rough texture or fuzzy effect. Cura advises you to keep this below the outer wall’s width.
Cura recommends a value of 0.3mm, but you can increase or decrease it to get various textures.
- Fuzzy Skin Density: This value controls the resolution of the roughness effect. A higher value than the 1.25mm default will provide a rougher, more detailed surface.
It increases the amount of times the nozzle changes direction per mm when jittering to achieve the effect.
- Fuzzy Skin Point Distance: This setting is inversely related to the skin density setting. It is the distance between points taken on the rough surface.
A higher value will lead to a smoother surface, while a lower value will increase roughness.
How to Use Flow Rate Compensation Max Extrusion Offset
This setting increases the extruder filament feed by the set amount to compensate for differences in the flow rate. It is the maximum value the filament can move to compensate for the inaccurate flow.
The setting is similar to the Linear advance setting in Marlin. It helps compensate for over and under-extrusion when the nozzle’s flow rate changes.
How to Use Flow Rate Compensation Factor
This setting also compensates for inadequate flow by modifying the current flow rate. It does this by moving an extra specified percentage of filament for each second of extrusion.
It is limited by the max extrusion offset, which sets a cap on how much filament can be used to compensate for the flow rate.
How to Use Wire Printing
The wire printing setting converts and prints the solid model to a hollow wire structure in the shape of the model’s outer surface. It does this by printing rings of material with saw toothed structures in between.
These saw-toothed structures provide a foundation for the next layer to rest on.
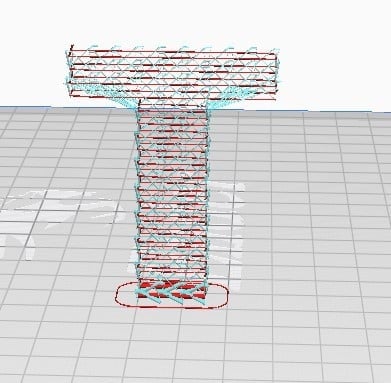
It’s a fun feature that you can use for several aesthetic projects. However, you can’t use it for functional projects The wire structure is fragile, and it is not very dimensionally accurate.
Once you enable it, it has several sub-settings, including.
- WP Connection height: The distance between two horizontal layers or lines in the net structure. You can decrease the value for a finer net, while you can increase it if you want more spacing in the net.
- WP Speed: This is the distance at which the printer prints the net structure in all directions. It is usually far slower than the speeds used in normal printing because the filament needs time to solidify.
You can modify the speed for other directions in the sub-settings.
- WP Flow: This is like an extrusion multiplier setting for wire printing. If your printer’s flow rate is calibrated correctly, you don’t need to modify this value.
However, if you want to make the lines thinner or wider, you can decrease or increase them respectively. WP connection flow controls the vertical lines, while WP flat flow controls the horizontal line thickness.
- WP Delay: This option stops the nozzle from moving for a specific period after completing a line. This gives the newly printed material enough time to solidify before printing resumes.
- WP Ease Upward: This reduces the speed of the nozzle when printing upward for a particular set distance. It ensures the filament adheres to the previous layer properly.
- WP Fall Down: Some features may fall or sag due to gravity after printing upwards. This setting compensates for the sag using the value set in the box.
- WP Strategy: Strategy controls how the printer connects the horizontal planes in the net. There are three main ways; Compensate, Knot, and Retract.
Compensate tries to make up for the sagging of the top line when connecting them. Knot prints a knot at the end of each upward line to have a larger area for connection.
Retract does nothing and hopes that the next plane is perfectly aligned for a perfect connection.
One thing you should note when using wire printing is that you cannot see the model preview in the preview mode. You have to save the model’s G-Code and re-import it into Cura to be able to view it.
How to Use Adaptive Layers
Adaptive layers is a setting that helps you vary your layer height depending on the geometry of the model you’re printing. For example, it can use large layer heights for smooth unchanging surfaces and smaller ones for curved, detailed surfaces.
This helps reduce printing time, material usage, and time spent on post-processing. Here are some of the additional settings under it.
- Adaptive Layers Maximum Variation: The maximum deviation allowed from the set layer height. For example, if you select a layer height of 0.2mm and a max variation of 0.1mm, your thinnest layer height will be 0.1mm, while the thickest layer height would be 0.3mm.
- Adaptive Layers Variation Step Size: This setting specifies the maximum change in height allowable between two adjacent layers. It helps ensure the transition from thinner to thicker layers (or vice-versa) is smooth to avoid over and under-extrusion.
- Adaptive Layers Topography Size: This is the horizontal distance between the edges of successive layers. Smaller values result in a thinner layer bringing the edges together, while larger values result in thicker layers.
Below is an example of how using Adaptive Layers can help you out with 3D prints.
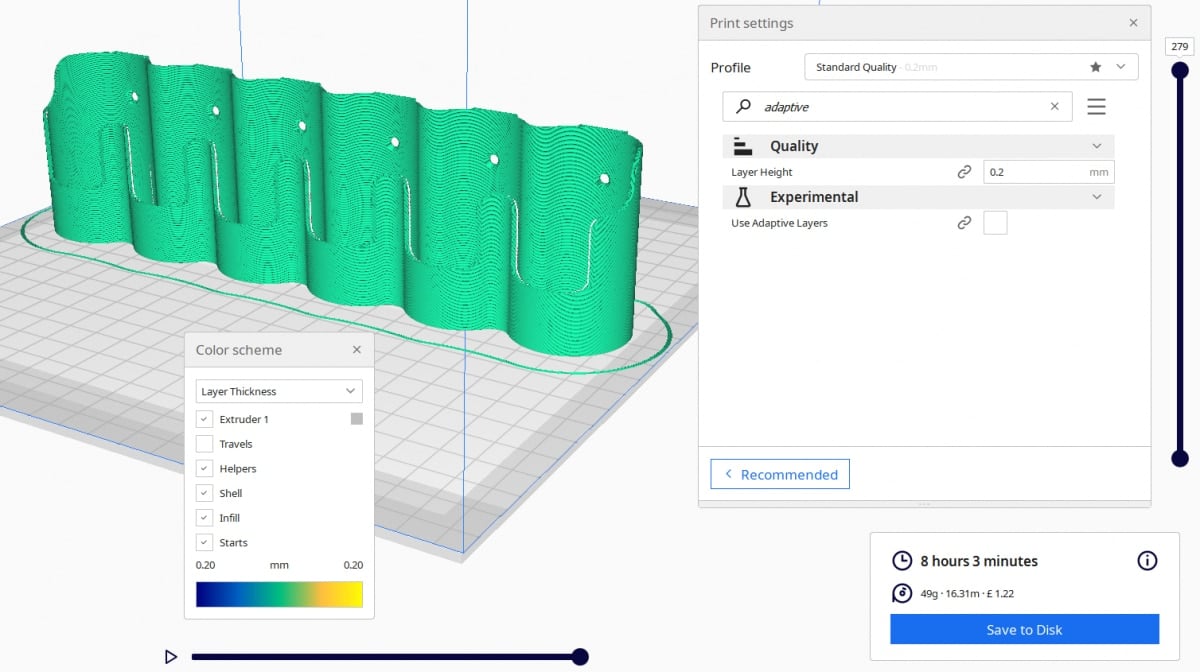
Here is a Preview of a Spice Rack in Cura, showing a 0.2mm layer height. This is with the Adaptive Layers turned off.
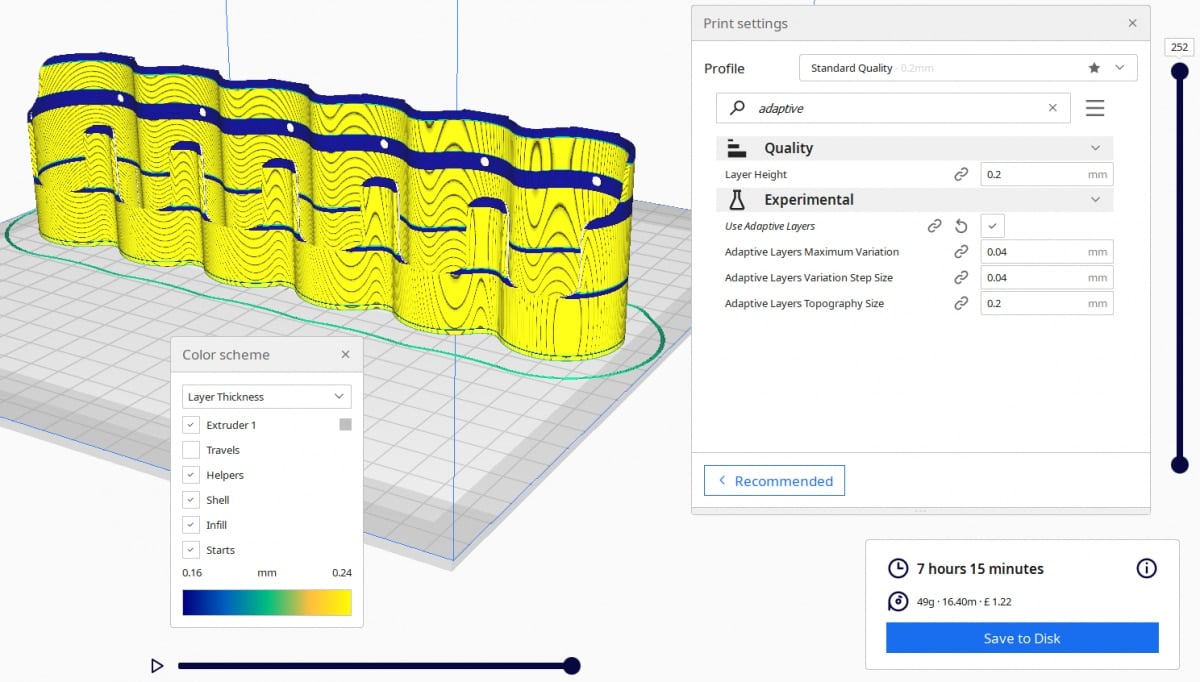
Here’s the same model with the Adaptive Layers turned on with the default settings. You can see the different in the layers in colors based on the geometry of the model. This is a simple model with flat surfaces, so layer height isn’t needed for details.
The printing time went from 8 hours a 3 minutes to 7 hours and 15 minutes.
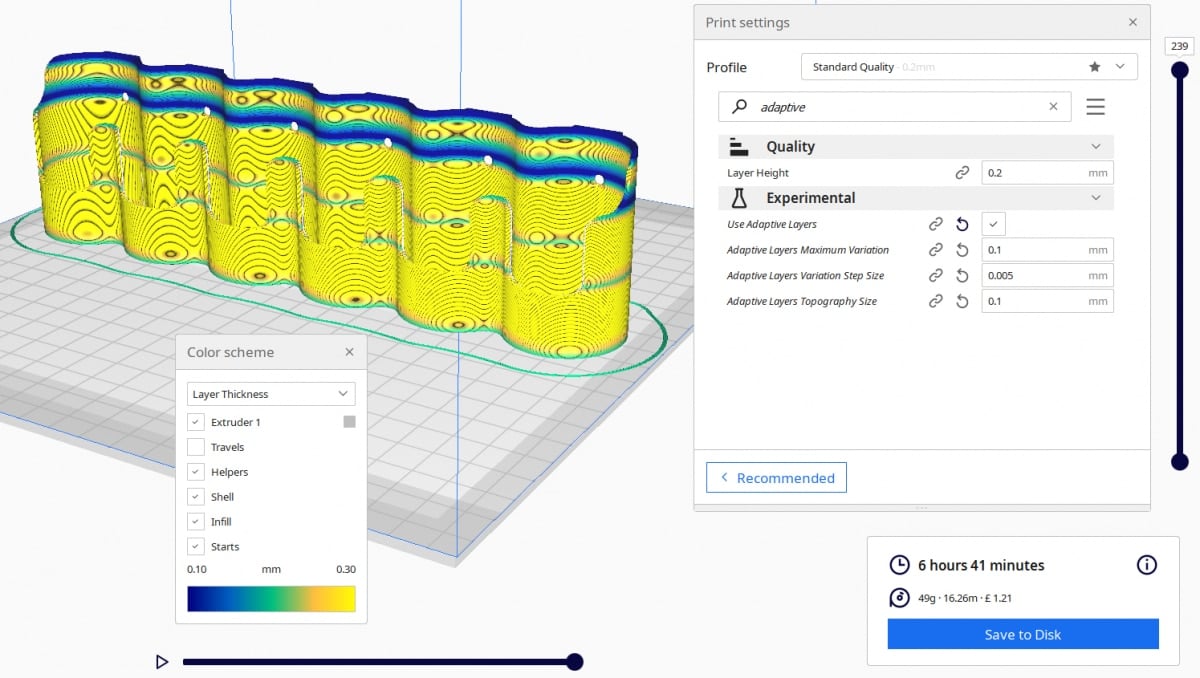
After making some adjustments to the settings such as:
- Adaptive Layers Minimum Variation: 0.1mm (default 0.04mm)
- Adaptive Layers Variation Step Size: 0.005mm (default 0.04mm)
- Adaptive Layers Topography Size: 0.1mm (default 0.2mm)
The printing time went down even further to 6 hours and 41 minutes.
Check out the video below for a cool visual example of Adaptive Layers.
How to Use Overhanging Wall Angle
The Overhanging Wall Angle is the minimum wall angle that will be treated as an overhanging wall and printed with the Overhanging Wall Speed. These walls are printed slower than normal walls to give them a better final print quality and to avoid sagging.
Note: Walls that already have supports are excluded by this setting. They are printed at the normal speed.
If the value is 90⁰, no walls will be treated as overhanging walls. Conversely, if it’s set to 0⁰, all walls are treated as overhanging walls and printed with the overhanging wall speed.
The default value is 90⁰.
It allows you to treat overhangs in stages rather than a section to either have supports or not. Some areas are at a point where they almost need supports, so printing these at slower speeds can help create a better 3D model, with fewer imperfections.
For example, you might have a Support Overhang Angle of 45⁰ so that all overhangs of 45⁰ are supported, then an Overhanging Wall Angle of 60⁰ so that angles between 45-60⁰ are slowed down to your chosen Overhanging Wall Speed percentage.
How to Use Overhanging Wall Speed
This is the percentage of the normal print speed at which the printer will print the overhanging walls. For example, you can use a value like 25% to ensure the walls print slowly and have enough time to set.
Also, some users are currently trying to get a feature that allows you to specify the print speed you want depending on overhanging wall’s angle. Hopefully, we might see that in a future Cura version.
One user mentioned that he had a situation where he had tiny overhangs that would print better at higher speeds, so you could actually enter a value above 100% for better results.
The default value is 100%.
How to Use Bridge Settings
A bridge is an unsupported horizontal beam between two adjacent features. Bridge settings are a group of settings the 3D printer uses to detect and print a bridge.
Here’s an example of a bridge test from Cura’s calibration parts.
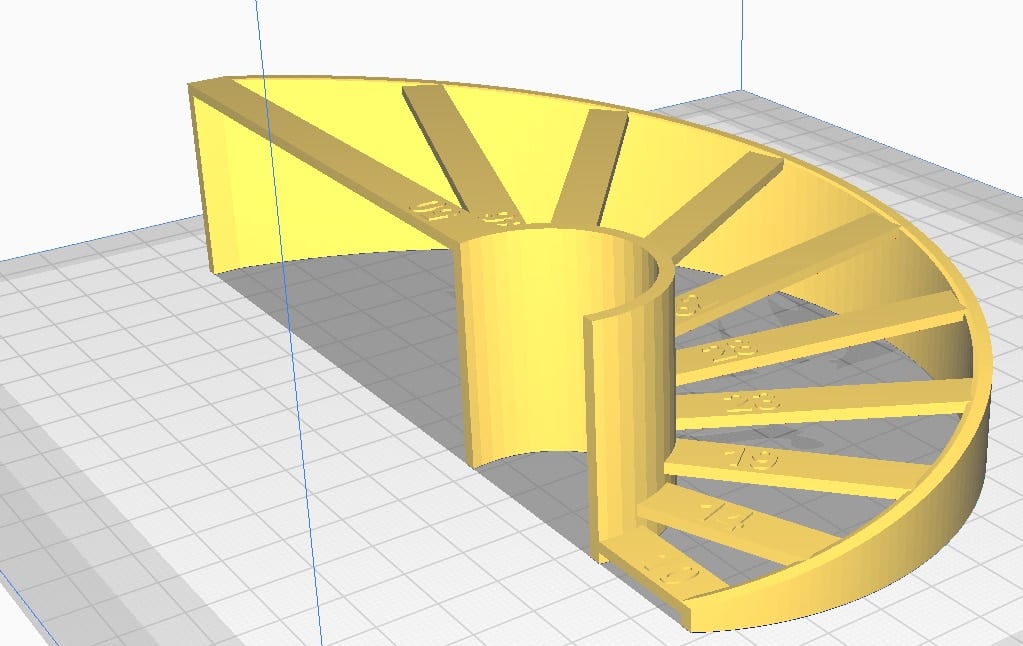
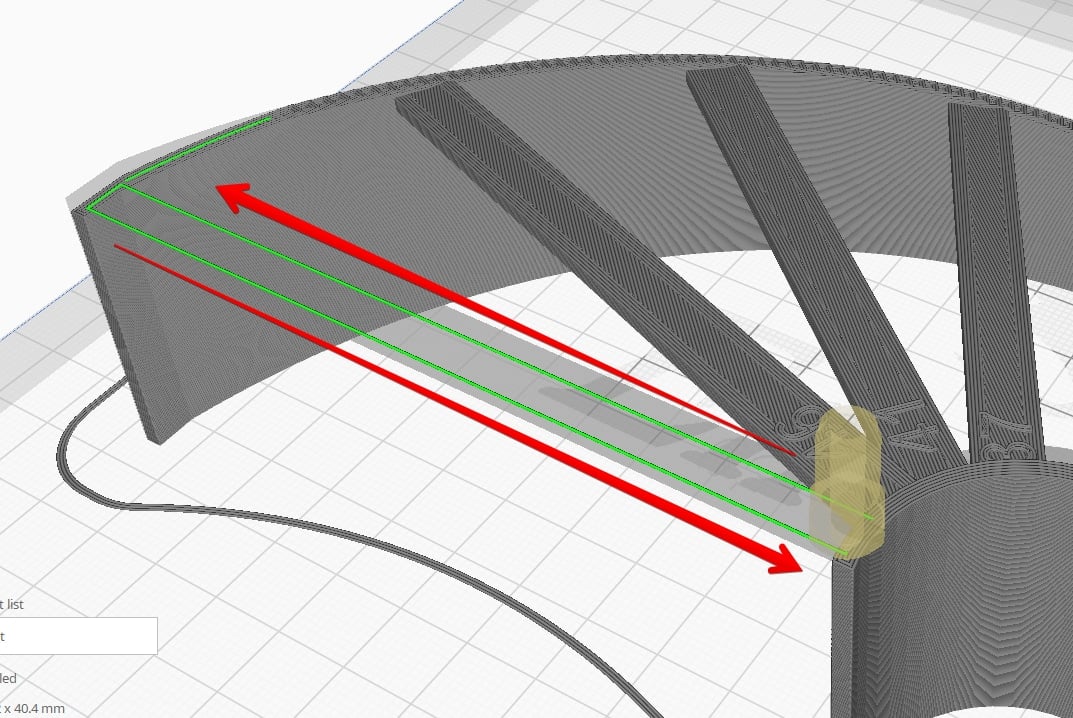
Once you enable bridge settings, there are several individual settings you can adjust. Below are some selected options you have available:
- Minimum Bridge Wall Length: Bridges shorter than this value will not be printed with bridge settings. They will be printed like standard walls. If you want to print all bridge features with bridge settings, you can set this value to 0.
- Bridge Skin Support Threshold: If the percentage of the supported skin is less than this value, the printer will print the skin with bridge settings. Otherwise, it will be printed with normal skin settings.
- Bridge Sparse Infill Max Density: If the infill density is below this value, the slicer treats the skin over the infill as a bridge. So, the slicer prints it using bridge settings.
- Bridge Wall Speed: This is the speed at which the printer prints bridge walls. You should keep it at its slow default speed to give the bridge enough time to cool and harden.
- Bridge Wall Coasting: The percentage of the bridge’s distance that the extruder should coast through after the bridge begins. Its important coasting starts when the bridge starts to avoid over and under-extrusion.
- Bridge Wall Flow: It is an extrusion multiplier that sets the flow rate for printing the bridge’s first layer. You should keep it low because higher values mean heavier bridges, which can sag and fail.
- Bridge Skin Density: This controls the size of the gaps between the skin lines. At 100%, there are no gaps. However, as it decreases, the gap sizes increase.
- Bridge Fan Speed: It is the cooling fan’s speed when printing the bridges. You should set it to 100%, so the bridge cools and hardens quickly for the best results.
- Bridge Has Multiple Layers: You can use this setting to modify the settings of the successive layers printed above the first layer. For example, you can change their print speed, flow rate, etc., once you enable it.
How to Use Wipe Nozzle Between Layers
The wipe nozzle between layers moves the nozzles to a specific position after printing each layer to wipe the nozzle. You can have a brush or any other cleaning device installed to wipe the nozzle.
Wiping the nozzle helps address print defects like stringing, blobs, oozing, etc. Once you activate it, additional settings appear.
Here are some of them.
- Material Volume Between Wipes: This is the maximum amount of material the nozzle extrudes before it wipes itself. If this volume isn’t reached before the end of the layer, the nozzle will still wipe itself at the end of the layer.
- Wipe Retraction Enable: This setting draws the filament back from the nozzle during wiping, like the standard retraction setting.
- Wipe Pause: This setting pauses the nozzle’s movement for the set time after the filament is drawn back into the nozzle It is necessary to get this time right because if it’s too short, it can cause under-extrusion.
- Wipe Z-Hop: The Z-Hop setting puts some distance between the nozzle and the build plate to avoid the print being knocked over during wiping.
- Wipe Brush X Position: This is where you set the location of the print brush on your print bed. The wiping motion starts from this coordinate.
- Wipe Repeat Count: This is the number of times the nozzle goes over the wiping brush. For materials like PLA, 5 is enough. However, for tougher materials like PETG, you’ll need more wipes.
- Wipe Move Position: The specific distance the nozzle moves back and forth over the brush. It depends on the size of your brush.
How to Use Small Hole Max Size
The small hole max size setting defines a minimum hole size. The printer will print any hole with a diameter under this size with the small feature speed.
One of its sub-settings – Small Feature Max Length – defines a minimum length for print features. The printer will also print any feature smaller than this with the small feature speed. They both have a default of 0mm.
Printing these features slowly at the recommended speed of about 40-50% of the normal print speed should result in an increased accuracy of the part. This helps ensure the small circular features like screw holes are dimensionally accurate and do not come out distorted.
How to Use Small Feature Speed
The Small Feature Speed is the speed at which the printer will print features smaller than the previously defined thresholds. It is expressed as a percentage of the normal printing speed. The default value is 50%.
How to Use Small Feature Initial Layer Speed
The Small Feature Initial Layer Speed is the speed at which the initial layer is printed at the set percentage of the normal speed to improve build plate adhesion.
Small features on the initial layer are printed at the set percentage of the normal speed to ensure proper build plate adhesion. The default value is 50%.
The 3D Print General created a series of 4 videos that explain the Experimental settings in Cura which you should find pretty useful.
Video 1 – Cura Experimental Settings – Coasting, Fuzzy Skin, and Tree Support
https://www.youtube.com/watch?v=nLJf343xnqQ
Video 2 – Cura Experimental Settings – Adaptive Layers, Spaghetti Infill, and Molding
https://www.youtube.com/watch?v=JK3ur5wCwQI
Video 3 – Cura Experimental – Draft Shields, Support in Chunks, Conical Supports, and Printable Overhangs
https://www.youtube.com/watch?v=OCcwXF5Z40A
Video 4 – Cura Experimental Settings – Bridging, Alternate Skin, Infill Travel Optimization
https://www.youtube.com/watch?v=B5W6Rmq1yvg
How to Find Experimental Settings in Cura for 3D Printing
You can find the experimental settings in Cura under the print settings tab. There are two main ways to find the settings you’re looking for.
The first way involves using the search tab. Once you enter the name of the setting you’re looking for in the search tab, it should show up below the “Experimental” tab.
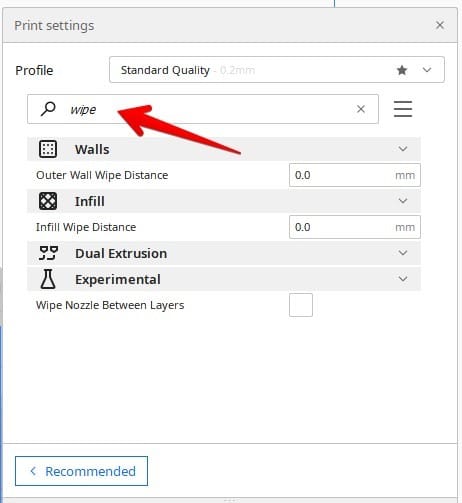
If you want to keep it visible in your custom selection, right-click the setting and click “keep this setting visible”.
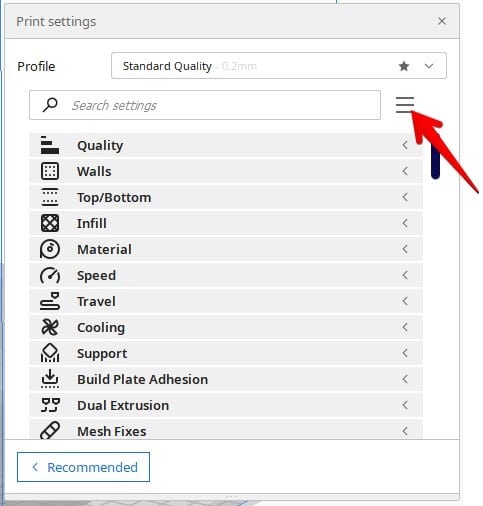
Another way you can find and use the Experimental settings features is to make all of them visible. Here’s how you can do this.
- Click the three bars at the top of the print settings menu.
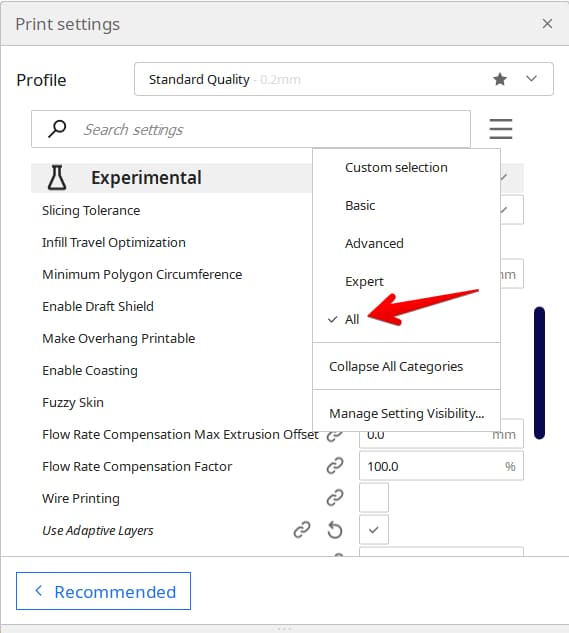
- In the menu that pops up, select “All” to show all the experimental settings
- You can select “Expert” to bring up a majority of the selection of experimental settings.
So, these are all the experimental settings that Cura provides. Hopefully you find them useful in your 3D printing journey.
Good luck and happy printing!
