How to Speed Up Slow Slicers – Cura Slicing, ChiTuBox & More
When I first started 3D printing, I remembered how long it used to take for me to slice some models, with some having to be canceled because it would take forever. So, I decided to look into why slicers like Cura take so long to process and speed it up.
You can speed up a slow slicer by reducing the model’s resolution, scaling the model down in size, optimizing its support structures, and print settings such as infill and layer height. On the software side, you can also speed up the slicer by updating it to the latest version and disabling unused network plugins.
You’ll want to know more information to speed up slow slicers, so keep reading through this article to try and solve this issue.
Why Is Slicing Taking So Long with Cura & Other Slicers?
Slicing is usually a pretty quick part of the 3D printing process – at least when compared to designing, printing, and post-processing the model. However, during slicing, you can run into several bugs that can slow down the process.
- STL file too large in memory
- Model is large physically
- Too many supports structures
- Too much infill
- Low layer height creating many layers
- Slow computer or laptop
- Buggy plugins or too many plugins
- Network drive mapping issues
Let’s look at some of these in more detail.
Large STL files
The size of the STL file is usually the primary determiner of how long the slicing process is going to take. The file size will be huge if the model has a high resolution with many details or ‘triangles‘ in industry-speak.
This large size can slow down the slicer as it tries to create layers from the highly detailed mesh on the surface. In addition, as the PC creates layers from the detailed surface, it takes a lot of computing power, thus increasing the slicing time.
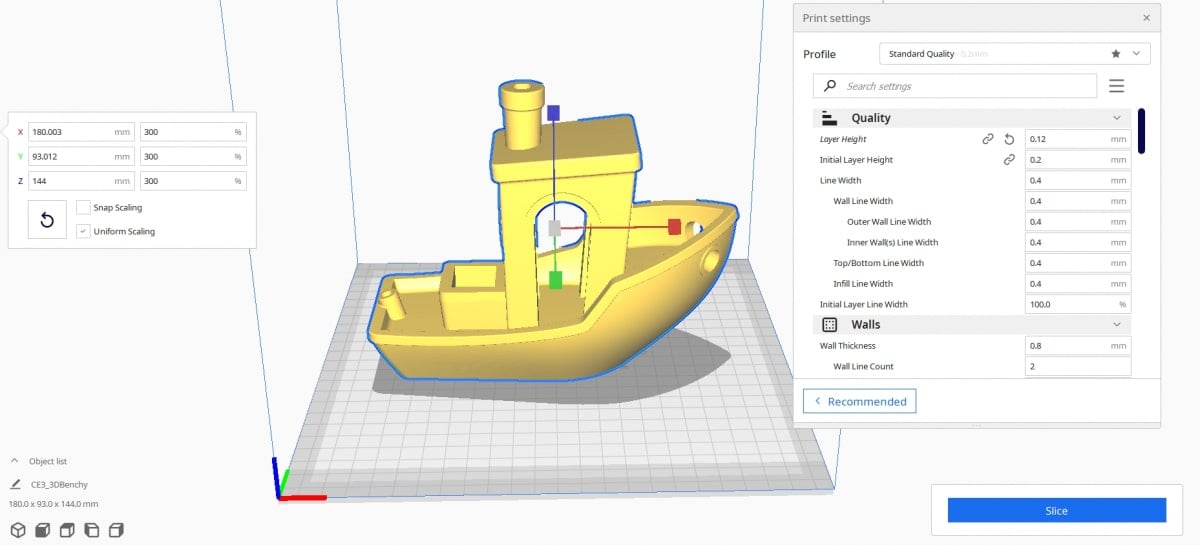
The actual physical size of the STL file in your slicer is a significant cause of long slicing times. If you’ve ever put a 3D Benchy in your slicer at normal size and tried to slice it, the timing should be pretty fast.
Now scale up that 3D Benchy 3X and try slicing it, then you’ll see a massive difference in how long it takes to slice.
Complex Support Structures
In the slicer, we often add many features to improve the printability of the 3D models. One significant example of these features is supports.
A relatively recent addition to the supports menu, Tree Supports, can be the cause of your slicing woes. Tree supports are notoriously hard to generate, especially if the model is large and tall.
Many users have reported long slicing times and even failed slicing when generating tree supports in Cura.
Infill and Layer Heights
The infill percentage and the layer heights you select can also influence slicing times. Therefore, if you need more detail and more strength, it will also come with additional slicing times.
Let me explain.
If you select a layer height smaller than the standard layer height for higher print detail, the slicer will slice the print into more layers. These additional layers increase the load on the software and add to the time needed for slicing.
Also, the infill percentage and the type of infill you select can slow down slicing. High infill densities and patterns like Gyroid and Cross can take a lot of time to process.
Slow PC and Outdated Software
The specs of your PC play a significant role in how fast your slicer processes your 3D model. As long as you have a fairly standard mid-range PC or laptop, you should be able to handle most STL files just fine.
However, having a PC with a slow processor, many background programs running, and not enough RAM will slow down the slicer.
Also, if your slicer isn’t updated to the latest version, bugs can slow down the printing process. Cura developers are usually great at fixing these bugs in the newer versions, but it can still affect you in certain situations.
Buggy Cura Plugins
Cura plugins are a suite of add-ons that extend the program’s functionality by bringing additional features to the base offerings. These plugins make printing much easier with the features they offer. However, sometimes, the opposite might happen.
Some users have experienced problems with plugins, especially the network-related ones slowing down their prints. Plugins like Octoprint, USB printing, or the UWM3 network plugins have been associated with slower slicing times by a few users.
These plugins scan the wireless network the printer is connected to, looking for wireless printers and other accessories. The USB plugin is also guilty of scanning the PC’s ports looking for a connected printer.
The scanning can significantly slow down Cura and results in performance lags.
Bad Network Drive Mapping
Alright, this is a pretty weird one. If your PC has a network drive mapped to X:, it might be the root of all your Cura issues.
When the software developers at Ultimaker were building Cura, they used a network drive labeled X: to store the source files. So, the program automatically looks for its files in a drive or network drive labeled X: before going to the program files folder where the PC it’s installed.
If you have a drive labeled X:, which is inaccessible to the Cura slicer, then the program can freeze or take a long time to load.
How Long Does It Take Cura to Slice a Model?
To slice a standard-sized 3DBenchy at a 0.2mm layer height, it takes around 5 seconds with a normal computer system. However, slicing the same model at a 3X scale with a 0.12mm layer height, and 50% infill, can take around 25 seconds with a decent computer system or laptop. A more complex file would take longer.
Here’s how long it took to slice the 3D Benchy file above.
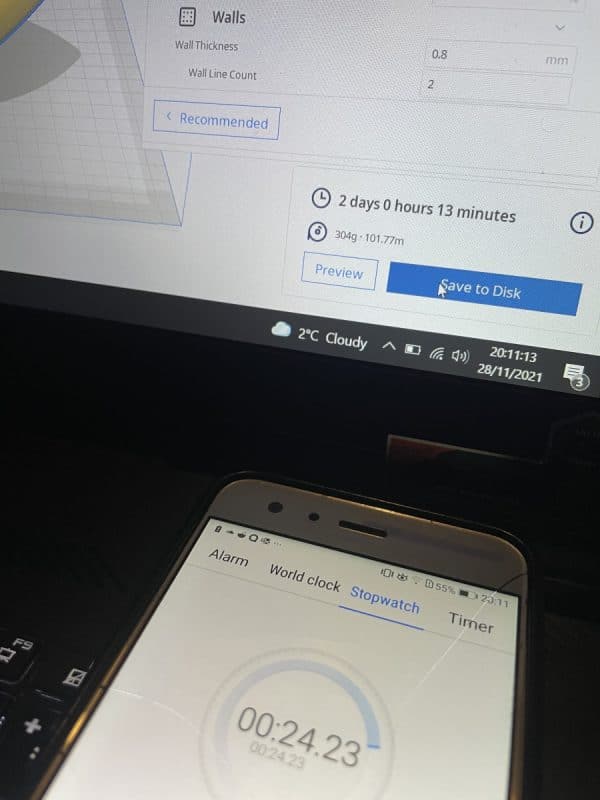
There is no definite time for a model to finish slicing in Cura as it varies from model to model and computer to computer, but in my experience, most models slice in under 30 seconds.
In addition, the slicing time depends on the model’s size, its resolution, PC capabilities, and print settings (layer height, supports, infill).
However, it should be reasonably quick for a decently sized model with a standard layer height of 0.2mm and a medium resolution.
The only time I had really long slicing times over 1 minute is when I had my older, slower laptop and was slicing large files in memory and in size at lower layer heights.
I think the biggest factor in slicing times is the performance of your PC or laptop.
How to Speed Up Cura Slicer & Other Slicers
As we’ve seen, there are a lot of factors that can slow down Cura while slicing a 3D model. However, there is some good news ahead, as you can many of these problems by simply applying a few fixes.
Let’s go through these fixes.
Reduce the File Size of Your Model
Reducing the size and resolution of your model will significantly decrease your print’s loading and slicing times. However, you have to be careful when lowering the print’s resolution, as you can end up losing fine details in your print if you reduce it too much.
There are plenty of software available for reducing the size of your STL model. For simple and easy size reduction, you can try using the inbuilt 3D builder software in Windows.
It is straightforward to use and doesn’t require much expertise. However, if you need more functionality and features, you should switch to Meshmixer.
Meshmixer provides many more features for accurate size reduction. I wrote an article about Repairing STL Files in Meshmixer & Blender which includes how to reduce the file size, so feel free to check that out.
Reduce the Physical Size of Your Model
As mentioned previously, larger models take longer to slicer than smaller models in terms of physical size. This is because there are more layers to slice and more area to process such as print head movements, supports, infill, and so on.
You can reduce your slicing times by scaling your models down in Cura.
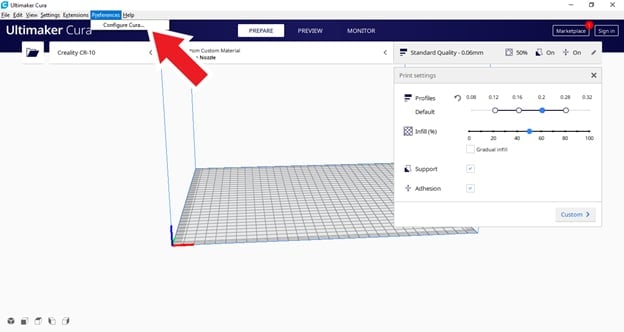
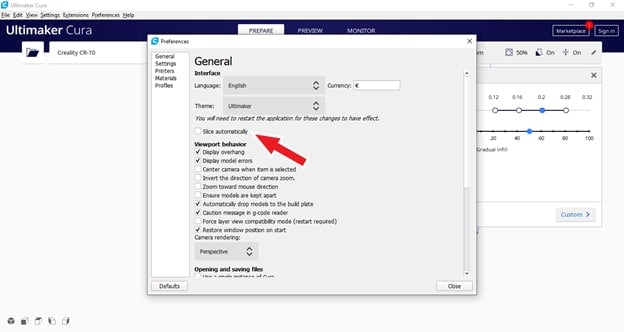
Disable Automatic Slicing
Automatic slicing is an option that re-slices the model each time you change the print settings. Unfortunately, this can cause slow down Cura on your PC because it requires a lot of processing power.
For the best performance, make sure you disable it. This way, Cura waits until you’re done with all the changes before slicing. You can disable it by going to Preferences > General > Slice automatically and untick the box.
Avoid Tree Supports & Try Custom Supports
Tree supports are handy, and they have significant advantages over other supports. However, the additional loading and printing times they bring might not be worth it.
If Cura slows down while you’re using Tree supports, try using another type of support and see if the model slices faster. If it does, then the Tree supports might be the root of the issue.
Examine your model and see if you really need the Tree supports. If you don’t, then switch back to using either Normal or No supports.
You can also use custom supports, which I recommend that enable you to place the supports right where you need them, as well as the size of each support, saving you the hassle of using several supports.
It even has the benefits of leaving less marks on your model because I’ve definitely broken parts off 3D models just because there were so many supports to remove.
Another great feature is the Support Overhang Angle setting in Cura where you can reduce the number of supports by changing the angle at which supports are created.
An angle like 45⁰ is the default, while normal values range from like 45-60⁰.
Optimize Your Print Settings
Print settings like low layer heights, high infill densities, and complex infill patterns make for a solid, detailed print. However, these add a lot of time to the slicing and printing process, especially if it’s a large model.
Therefore, you have to balance quality and speed for a much quicker slicing (and printing) time. You can try to optimize some of these settings to speed up your slicing process.
You can use the normal layer height of 0.2mm for a balance of speed and quality while not having Cura need to process too many layers. Also, an Infill density of between 10-25% works in most cases unless you really need a strong internal build for your 3D prints.
Finally, use a simple infill pattern like Lines or Grid to speed up slicing. Although, a pattern like Cubic is a great all-rounder, but may slightly increase slicing times.
Update Your Software
The Cura developer team is quite active on a lot of forums and technical sites. They often respond to user feedback and collect crash logs and bug reports to optimize the software better.
So, there is a high chance the problem affecting your slicer might’ve been fixed in a new version of the software. For this reason, make sure you are running an up-to-date version of Cura for the best performance.
You can download the latest version of Cura here.
Improve your PC Performance or Get a Better Computer System
If several processes are running at once on your PC, hogging up all the RAM and processing power, Cura is bound to be slow.
To improve Cura’s speed, make sure any program not currently in use is shut down once you’re done with it. Also, putting your PC on high-performance mode can give it an extra boost.
Finally, you can try restarting your computer to see if it clears up some memory, so your system runs faster.
The biggest improvement would be to get a new computer or laptop, so if you have been wanting to make the change, it may be a good time to do so. I definitely understand the frustration that can come about with using a slow computer or laptop.
Disable Network Plugins
Disabling the network plugins can also increase speed, especially if your PC is on a large network of connected devices. If you are not printing wirelessly, you most definitely will not need them.
To disable them, click on ‘Marketplace > Installed’, look for UM3 network printing and Octoprint network plugins. Then, untick the boxes next to them to disable them.
I’m not sure how much difference this would make in slicing times since I don’t personally use these plugins, but some users have mentioned it could help.
Rename the Network Drive
This one isn’t that common, but it might be the solution to your woes. Try and remap any network drive that starts with X: to boost Cura’s speed.
Go to file explorer, click on Network drive, and see if any drive is mapped to the letter X. Right-click on it, select the map options, and change it to a different letter.
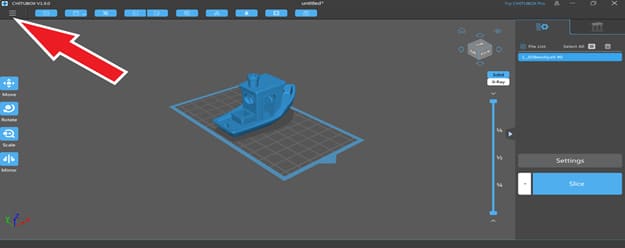
How to Speed Up ChiTuBox Slicer Process
ChiTuBox is a slicing software that SLA printers use in preparing 3D models for printing. Usually, the software is fast, but some users have reported problems with slow slicing and saving of the model.
You can use some of the previous methods stated above such as reducing the file size in terms of memory, then scaling the size of the physical model down. Also reducing the layer height, so there are fewer layers to process should speed up your ChiTuBox slicing process.
Let’s look at some fixes for this issue.
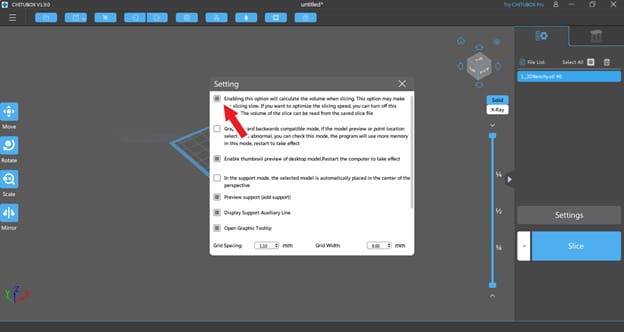
Turn Off the Volume Calculation Setting
This fix speeds up slicing, especially in old versions of ChiTuBox. The volume calculation setting calculates the print’s volume while slicing so you can get an estimate of the resin required.
The calculation can slow down slicing. So, to disable it, click on the three horizontal bars in the top-left corner. Select ‘Settings’.
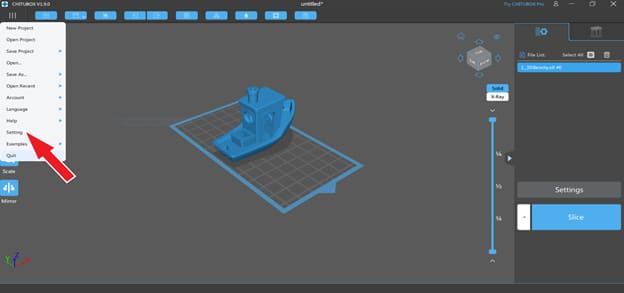
You’ll see an option saying ‘Enabling this option will calculate the volume when slic…’. Untick the box next to it.
Turn off Anti-Aliasing
Anti-Aliasing increases the file size of sliced files in ChiTuBox, making them take longer to save. By turning it off, you reduce the file size and potentially decrease the saving time.
To turn off Anti-Aliasing, click on the settings button just above the slice option. Next, go to ‘Advanced > Anti-Aliasing’ and uncheck the box.
Ensure ChiTuBox is Using Your GPU
If you have a dedicated graphics card, you can force ChiTuBox to use it instead of your integrated GPU. This speeds up processing and save time.
You can enable this option by searching for ‘Graphics settings’ in the windows search bar. Next, select ‘Desktop app’ from the dropdown menu and click browse to choose ChiTuBox from its installation location (“C:\Program Files\ChiTuBox64 1.9.0\CHITUBOX.exe”).
Once you’ve selected ChiTuBox, click on the ‘Options’ button, select ‘High Performance’ and click ‘Save’.
Try Using a Different Version
Many users have said that their problems with the ChiTuBox app started once they updated or changed versions of the app. Therefore, if all the above fixes do not work, try uninstalling the app and changing the version back to a previous version.
Recent versions of ChiTuBox have gotten a lot better at releasing stable updates, but still worth looking into. I’ve seen reports of many users saying slicing has been very slow even though they have computer systems with high specs.
Try Using a Different Software
There are some great pieces of software out there for resin printing that you can use as an alternative to potentially slice your resin files faster.
Many people recommend going with PrusaSlicer or Lychee Slicer. I wrote a little bit about the 4 Best Slicer/Software for Resin 3D Printers, so check that out for more details.
Change the Machine in the Slicer
Some users have gotten faster slicing results by changing the actual 3D printer that is listed in the slicer, then changing the settings to match up with the 3D printer they have.
One example was a user who had issues with very slow slicing of files with the EPAX X1K. They ended up using the EPAX X1 machine definition, then modified the resolution and other settings to match the X1K and it started working a lot quicker, and prints came out perfectly.
How to Fix Cura Freezing or Taking too Long to Load
Even after applying some of the fixes above, Cura can still freeze occasionally or take long to load. So, let’s look at some ways we can resolve these problems and speed it up.
As mentioned above, you may be able to get Cura to start by making sure it opens up with a specific GPU rather than the on-board graphics card.
A lot of times, Cura can freeze or take too long to load because of the specific model you are importing.
If you open up Cura by double-clicking a file, then you might run into loading issues, so try opening up just the Cura application without the file and import a model you know that loads okay.
If that loads fine and another file doesn’t it may be because the file it too large, or there are too many triangles in your STL file (each file is made up of small triangles).
Remove Old Cura Configuration Files
When you install a new version of Cura, some configuration files are left behind from the previous versions. These files can slow down the new installation.
To delete them, go to the Cura app data folder (“C:\Users\<User name>\AppData\Roaming\cura). Look for older versions of config files and delete them.
For example, if your current installation is 4.10, delete any folders labeled 4.7, 4.8, etc.
One user mentioned that Cura 4.9 would freeze when trying to load “initializing build volume”, which was apparently due to the Ultimaker account sign in. You can fix this by deleting the row “ultimaker_auth_data = …” from the cura.cfg file, then re-signing in on application launch.
If you have trouble finding the config files, try using something like “%APPDATA%\cura\4.9” in the file explorer. This may be fixed in future versions of Cura.
Check Your Antivirus, Firewall, and VPN
Cura users have had problems with these software blocking Cura from connecting to the internet to download plugins and other needed files.
Check your antivirus, firewall, and VPN to see if they aren’t actively blocking Cura. If they are, then you have to add Cura.exe and curaengine.exe to their excluded lists for Cura to run without any hassle.
Some users have had issues with a software called Kaspersky and trying to load Cura, so you may have to try shutting off these types of softwares and trying to load Cura again to see if it makes a difference.
Reinstall the Software and Restart Your PC
If all these fixes do not work, then you might have to go with a fresh installation. First, uninstall Cura, reboot your PC, and reinstall it (preferably to the latest version).
Hopefully, by installing a new, fresh version, all the bugs would’ve been taken care of.
Well, this is all I have for you on slow slicers. All software have their bugs, and slicers are no exception. However, I hope you’ll be able to resolve the bugs with the tips I’ve given you.
Try Unplugging External Devices
One user who was having issues with Cura not loading properly unplugged everything from their laptop and got it to run smoother than usual, but still not perfectly. It may have been from a USB port or the displays that they use.
They mentioned having something like a 3rd party USB-C docking station plugged in that runs 2 monitors, as well as a USB 3.0 hub splitter and other devices. Emptying up your desktop or laptop of external devices may help Cura not freeze and start loading better.
The reasons this happens is because Cura can start looking for an active 3D printer on the USB ports to connect to. You may be able to disconnect the USB ports, start Cura, then reconnect them for it to work.
Good luck and happy printing!