How to Improve 3D Printing Quality – 3D Benchy – Troubleshoot & FAQ
The 3D Benchy is a staple object in the 3D printing community, definitely being one of the most 3D printed models out there. When you’ve dialed in your 3D printer settings, the 3D Benchy is the perfect test to ensure your 3D printer is performing at a good quality level.
There are many ways to improve the quality of your 3D prints and 3D Benchy, so stick around for tips on how to do this, as well as other common questions that people have about it.
How Do You Improve Your 3D Print Quality – 3D Benchy
Being a benchmark test for 3D printing, hence the name, the 3D Benchy isn’t the easiest model to print. If you’re finding it difficult to print or you are confused on what settings can provide you with the best quality, you’ll want to go through this article and take action.
The reason people 3D print the 3D Benchy is because it can help solve several printing issues such as:
- First layer quality – with the text at the bottom
- Precision & detail – text on the back of the boat
- Stringing – all over the main model, cabin, roof etc.
- Retraction – requires a lot of retractions
- Overhangs – top of the cabin has most of the overhang
- Ghosting/Ringing – tested from the holes at the back of the boat and edges
- Cooling – the back of the boat, overhangs on cabin, smokestack at the top
- Top/Bottom Settings – how the deck and roof of the cabin looks
If you can overcome these printing factors, you’ll be on your way to 3D printing a high quality 3D Benchy like the pros.
Here’s what you need to do to improve your 3D printing and 3D Benchy quality:
- Reduce your layer height
- Calibrate your printing temperature & bed temperature
- Adjust your print speed (slower tends to be better quality)
- Calibrate your retraction speed and distance settings
- Adjust your line width
- Potentially adjust your flow rate
- Calibrate your e-steps
- Hide the seams
- Use a good bed surface along with bed insulation
- Level your bed properly
Let’s get into each of these in detail so you can understand how to print a 3D Benchy the correct way.
Reduce Your Layer Height
After getting the right filament, we should start looking into our actual 3D printer settings. The layer height is simply how tall each layer is and this directly translates to the level of quality for your 3D prints.
The standard layer height for 3D printing is known to be 0.2mm which works great for most prints. What you can do is reduce the layer height to improve the overall look and quality of your Benchy.
When I first decreased my layer height to 0.1mm instead of 0.2mm, I was amazed by the change in quality that a 3D printer could produce. Most people won’t ever touch their layer height setting because they are comfortable with the results, but you can definitely do better.
It will take longer since we are essentially doubling the number of layers that the model needs, but the benefit in the improved 3D Benchy quality is worth it in many cases.
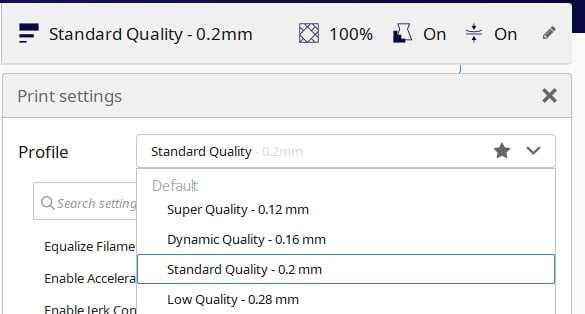
Don’t forget, you can choose a layer height in between these values like 0.12mm or 0.16mm.
Another thing that I learned with more experience is about a thing called “Magic Numbers.” These are incremental layer height values that help for a smoother movement in the Z-axis or with upwards movements.
Several 3D printers like most of the Creality machines are known to work better with increments of 0.04mm, meaning rather than having a layer height of 0.1mm, you want to use 0.12mm or 0.16mm.
Cura has now implemented this within their software to have their Default options move in these increments depending on what 3D printer you have (the screenshot below is from the Ender 3).
Balancing your layer height or quality with the overall time it takes to 3D print is a constant battle with 3D printer hobbyists, so you really have to pick and choose with each model.
If you want to 3D print a high-quality Benchy to showcase, I’d definitely look into using a lower layer height. It’s one of the best methods that you can do right now to improve your 3D Benchy quality.
Calibrate Your Printing Temperature & Bed Temperature
Another setting that plays a key role in 3D printing is temperature. You have two main temperatures to adjust which is your printing and temperature. This doesn’t have the same level impact as reducing the layer height, but can definitely produce cleaner results.
We want to figure out which temperatures work best for our specific brand and type of filament. Even if you only 3D print with PLA, different brands have different optimal printing temperatures, and even one batch from the same brand may be different from another.
Generally speaking, we want to use a temperature that is on the low side, but high enough to extrude smoothly without having trouble getting out the nozzle.
With every spool of filament we buy, we want to calibrate our nozzle printing temperature. This is best done by 3D printing a temperature tower in Cura. You used to have to download a separate model to do this, but Cura now has an in-built temperature tower.
In order to get this done, you’ll first have to download a plugin called “Calibration Shapes” from Cura’s marketplace, found on the top right. Once you open this up, you’ll have access to a whole host of useful plugins.
For the purpose of the temperature tower, down Calibration Shapes and once it’s installed, it will prompt you to restart Cura to start using the plugin.

To start using these calibrations, you want to go up to “Extensions” > “Part for Calibration”.
As you open this lovely built-in function, you can see that there are many calibration tests such as:
- PLA TempTower
- ABS TempTower
- PETG TempTower
- Retract Tower
- Overhang Test
- Flow Test
- Bed Level Calibration Test & more
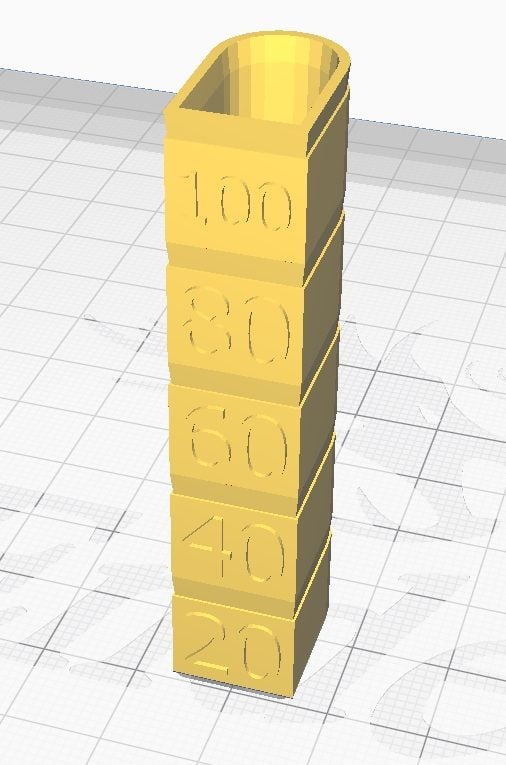
Depending on what material you are using, you can select the correct material temperature tower. For this example, we’ll go with the PLA TempTower. When you click on this option, it will insert the tower right onto the build plate.
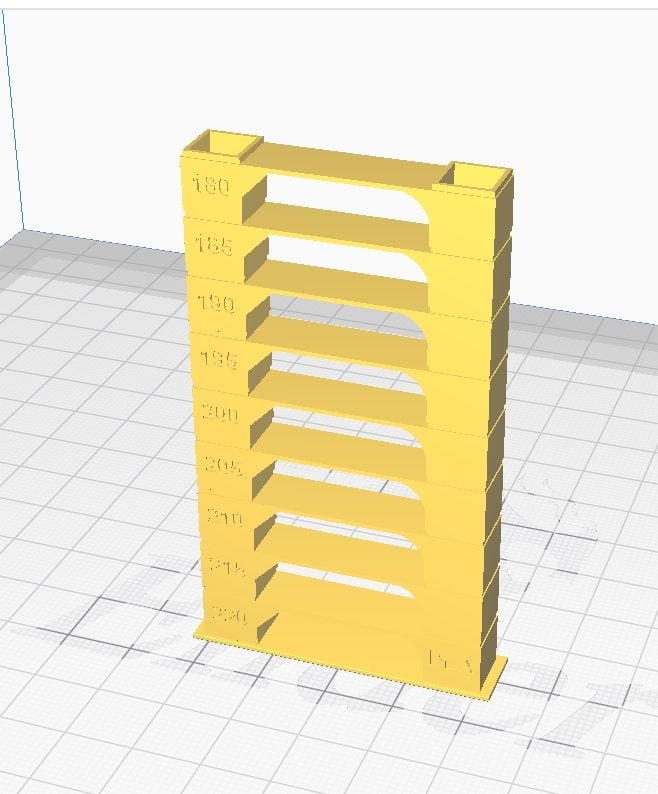
What we can do with this temperature tower is process it to automatically adjust your printing temperature as it moves up to the next tower. We can set where the temperature starts at, as well as how high to move up per tower.
As you can see, there are 9 towers, giving us a starting value of 220°C, then decreasing in 5°C increments down to 185°C. These temperatures are the general range you’ll see for PLA filament.
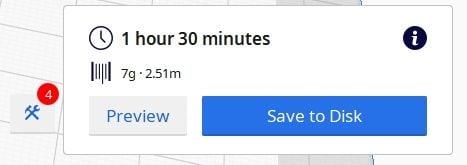
You should be able to print a PLA TempTower in around 1 hour and 30 minutes, but first we need to implement the script to make it automatically adjust the temperature.
Cura has a built-in custom script especially for this PLA TempTower that can use which saves us plenty of time.
In order to access this script, you want to “Extensions,” and hover “Part for calibration” again. Only this time, you’re going to click on the third-last option called “Copy Scripts” to allow more scripts to be added.
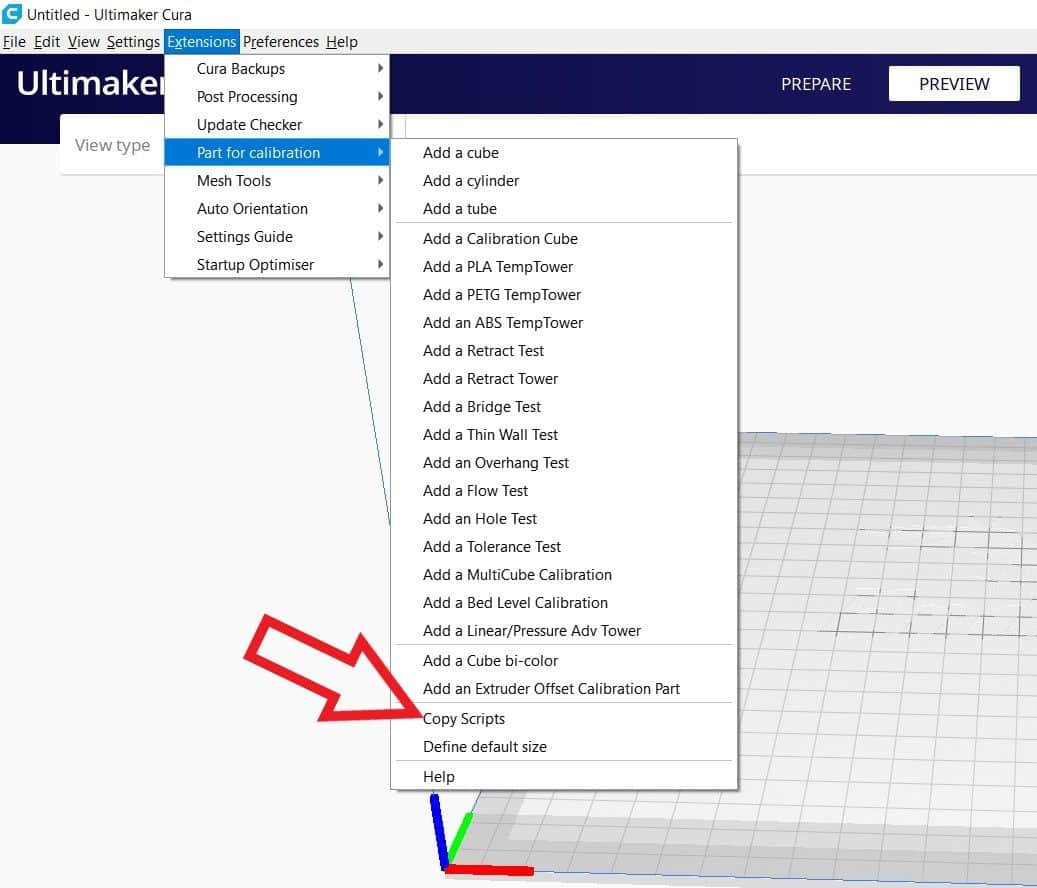
You’ll want to restart Cura after doing this.
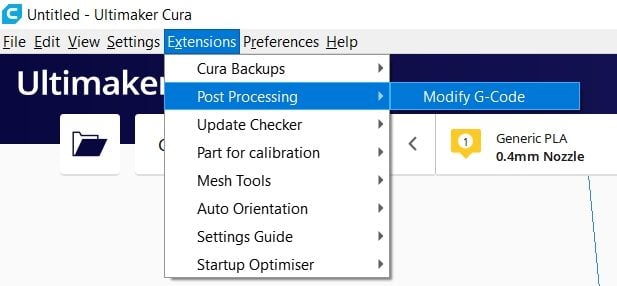
After that, go to “Extensions,” click on “Post-Processing,” and select “Modify G-Code.”
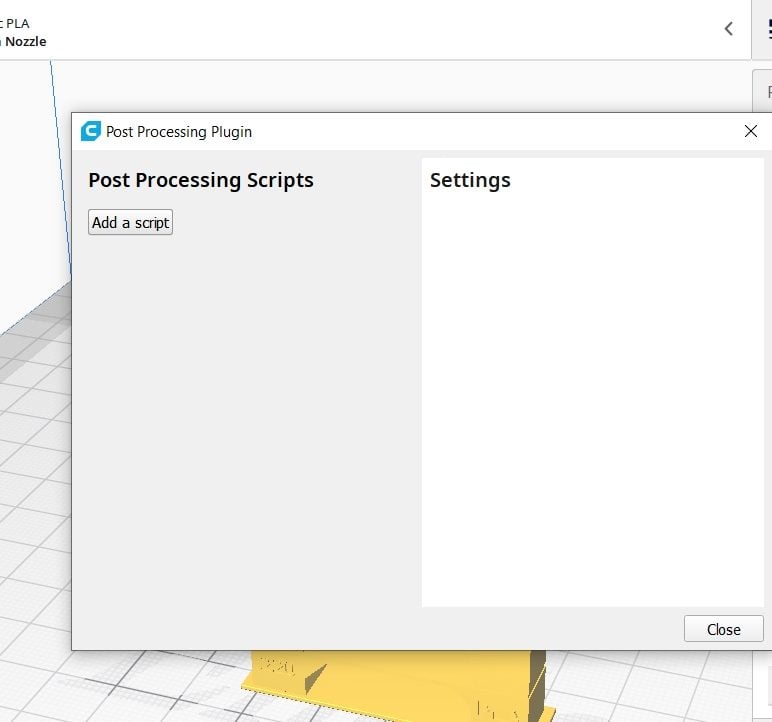
Another window will pop up as soon as you do that, allowing you to add scripts.
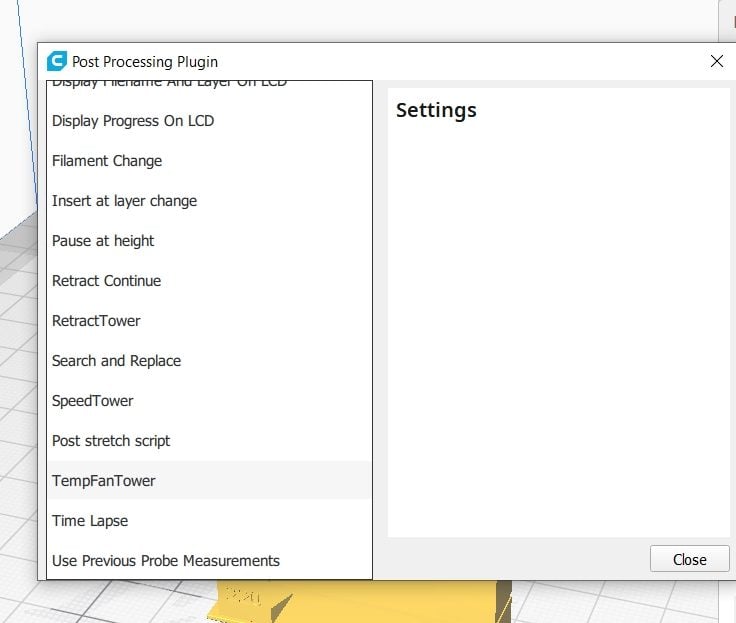
Here is the list of custom scripts that you can add. For this one we will select “TempFanTower”.
Once the script is selected, it brings the following pop-up.
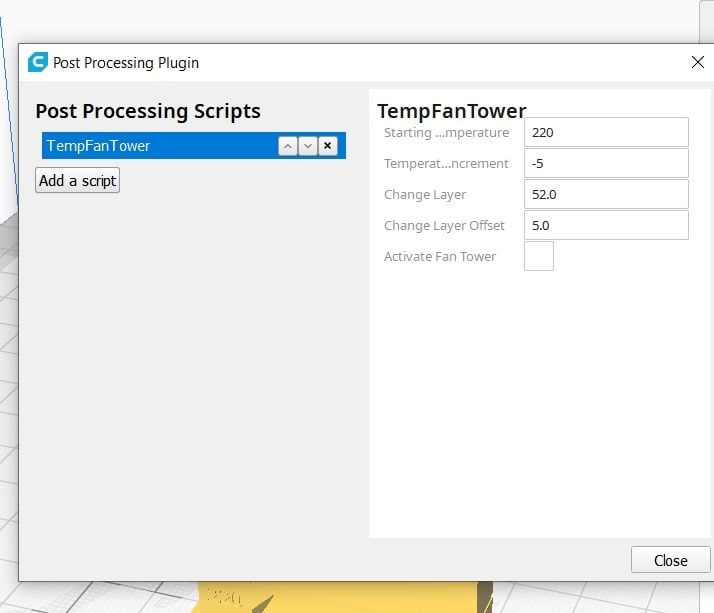
You’ll see some options that you can adjust.
- Starting Temperature – The starting temperature of the tower from the bottom.
- Temperature Increment – The temperature change of each block of the tower from bottom to top.
- Change Layer – How many layers that get printed before the temperature changes.
- Change Layer Offset – Adjusts Change Layer to account for base layers of model.
For the starting temperature, you want to leave this at the default 220°C, as well as the 5°C Temperature Increment. What you do have to change is the Change Layer value to 42 rather than 52.
This looks like an error made in Cura because when you use 52 as a value, it doesn’t line up properly with the towers. This PLATempTower has 378 layers in total and 9 towers, so when you do 378/9, you get 42 layers.
You can see this by using the “Preview” function in Cura and checking where the layers line up.
The first tower is at layer 47 because the base was 5 layers, then the Change Layer is 42, so 42+5 = 47th layer.
The next tower up from 47 would be 89 because the Change Layer of 42 + 47 = 89th layer.
Once you print the tower, you’ll be able to determine which printing temperature works best for your specific material.
What you want to look out for is:
- How well the layers have bonded
- How smooth the surface looks
- The bridging performance
- The detail in the numbers on the print
After you’ve done the temperature tower, you can even dial in your settings a second time, by using a tighter temperature range between the best towers from your first print.
If, for example, your first tower has great quality from 190-210°C, then you print another temperature tower with new increments. You would start with 210°C and since there are 9 towers and a range of 20°C, you would do increments of 2°C.
It’s going to be difficult to find the differences, but you’ll know down to a lot more detail which printing temperature works for your filament in terms of quality.
If you find that your prints are not adhering to the bed properly, try increasing the bed temperature in increments of 5°C. Keep doing it until you find the temperature that works for you. 3D printing is all about trial and error.
Adjust Your Print Speed Settings
Your printing speed can have a pretty large impact on your 3D printing quality, especially if you tend to use higher speeds. If you stick to default speeds, the change in quality might not be so drastic, but it’s worth calibrating for the best quality.
The slower your 3D print, the better your printing quality tends to be.
The best quality 3D Benchys are ones where the print speed is at a level where your 3D printer can comfortably handle it. The thing to remember here is that not all 3D printers are the same, so they have different capabilities when it comes to handling print speed.
The default Cura print speed is 50mm/s, but if you’re experiencing certain problems with your Benchy, such as warping, ringing, and other print imperfections, it’s worth lowering your speed to see if it fixes these issues.
You can also look into reducing your Travel speed and activated Jerk & Acceleration Control to lower the mechanical pressure and movement of your 3D printer.
A suitable print speed range is between 40-60mm/s where you are using PLA or ABS to print a 3D Benchy.
Similar to the temperature tower we used above, there is also a Speed Test Tower you can find on Thingiverse.
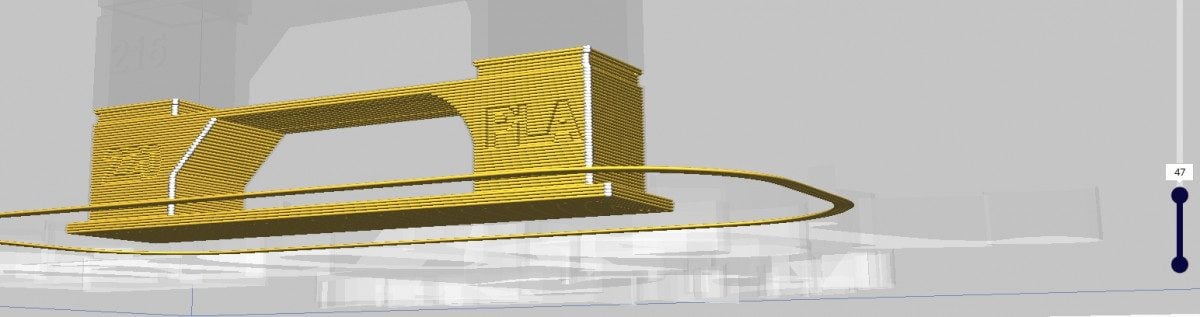
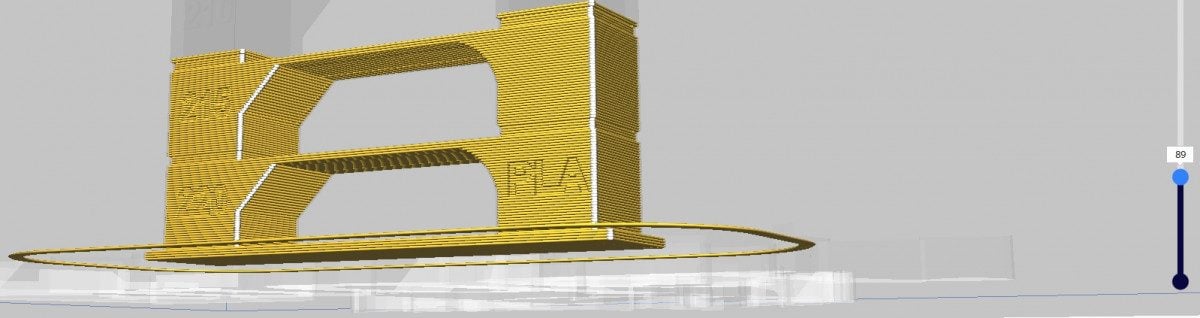
You have the instructions on how to successfully complete these speed test on the Thingiverse page, but generally, we are using a similar script as above in the “Modify G-Code” section and the “ChangeAtZ 5.2.1(Experimental) script.
You want to use a “Change Height” value within this script of 12.5mm because that is when each tower changes and make sure to “Apply To” the “Target Layer + Subsequent Layers” so it does multiple layers above rather than just the one layer.
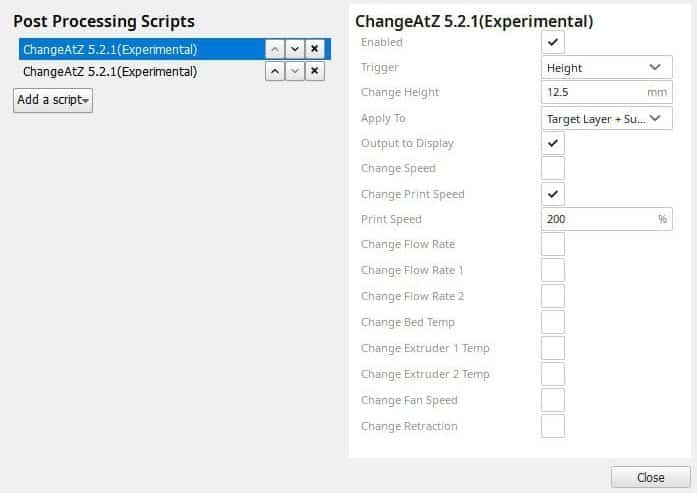
The creator advises to start the print speed at 20 mm/s. Select “Height” as the “Trigger” and change height at 12.5mm. In addition, you can start from 200% Print Speed and go all the way up to 400%.
However, you’ll have to print different speed towers, and not just one.
Subsequently, each print tower will have its own script where you’ll make changes to the values. Since the tower has five towers and the first is 20mm/s, you’ll have four Change at Z scripts to add.
In this form of trial and error, you’ll determine the best speed for your 3D printer. After careful inspection of each tower, you’ll have to determine the one that has the best quality.
The same way we can do multiple tests to dial in our optimal speed settings, we can do this with the Speed Tower, but you’ll have to adjust the original Print Speed and the percentage changes to reflect your ideal values.
For example, if you want to test values from 60-100mm/s with 10mm/s increments, you’d start with 60mm/s for your Print Speed.
We want to work out the percentages to take us from 60 to 70, then 60 to 80, 60 to 90 and 60 to 100.
- For 60 to 70, do 70/60 = 1.16 = 116%
- For 60 to 80, do 80/60 = 1.33 = 133%
- For 60 to 90, do 90/60 = 1.5 = 150%
- For 60 to 100, do 100/60 = 1.67 = 167%
You’ll want to list down the new values so you remember which tower corresponds to the specific Print Speed.
How to Improve 3D Benchy Retraction Settings – Retraction Speed & Distance
Retraction settings pull the filament back from the hot end when the print head moves during the print process. The speed at which the filament is pulled back, and how far it’s pulled back (distance) come under retraction settings.
Retraction is an important setting that helps with providing you with higher-quality 3D prints. In terms of the 3D Benchy itself, it can definitely assist with creating a model that turns out flawless rather than average.
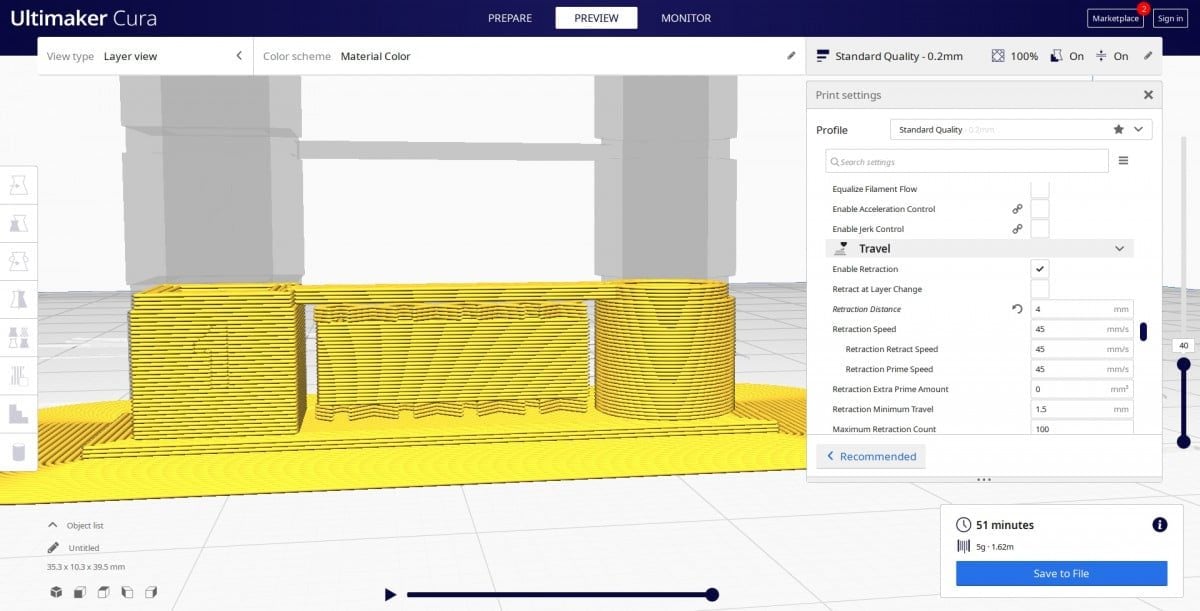
This setting can be found under the “Travel” section in Cura.
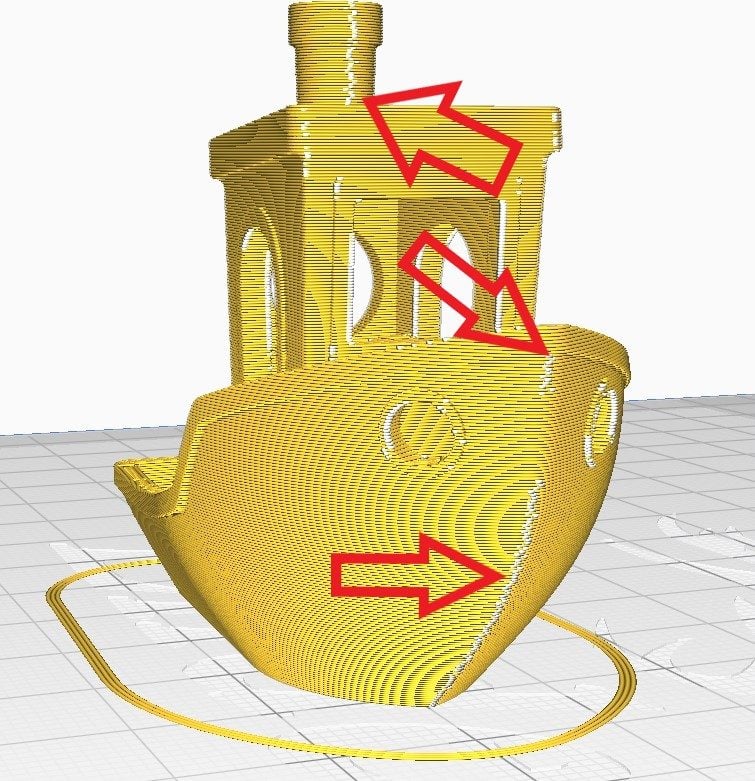
It will help you with the stringing that you get in your models which decrease the overall quality of your 3D prints and 3D Benchy. You can see some of the stringing in the 3D Benchy I printed below, although the overall quality looks pretty good.

The first thing you can do to dial in your retraction settings is to print yourself a retraction tower. You can do this directly within Cura by going to “Extensions” on the top left menu, going to “Part for Calibration,” and adding a “Retract Tower.”
It provides you with 5 towers where you can customize your retraction speed or distance to change automatically as it starts printing the next tower. This enables you to test very specific values to see which one provides the best results.
You should be able to print one in less than 60 minutes. In the picture below, you can see how each layer looks by first slicing the model, then going to the “Preview” tab that you see in the middle.
What you used to do was check which layer would give a good separation of the towers which happened to be around layer 40, and put in these values yourself. Now Cura has implemented a specific script to do this for you.
The same process as above, go to “Extensions,” hover over “Post-Processing,” then hit “Modify G-Code.”
Add the “RetractTower” script for this retraction tower.
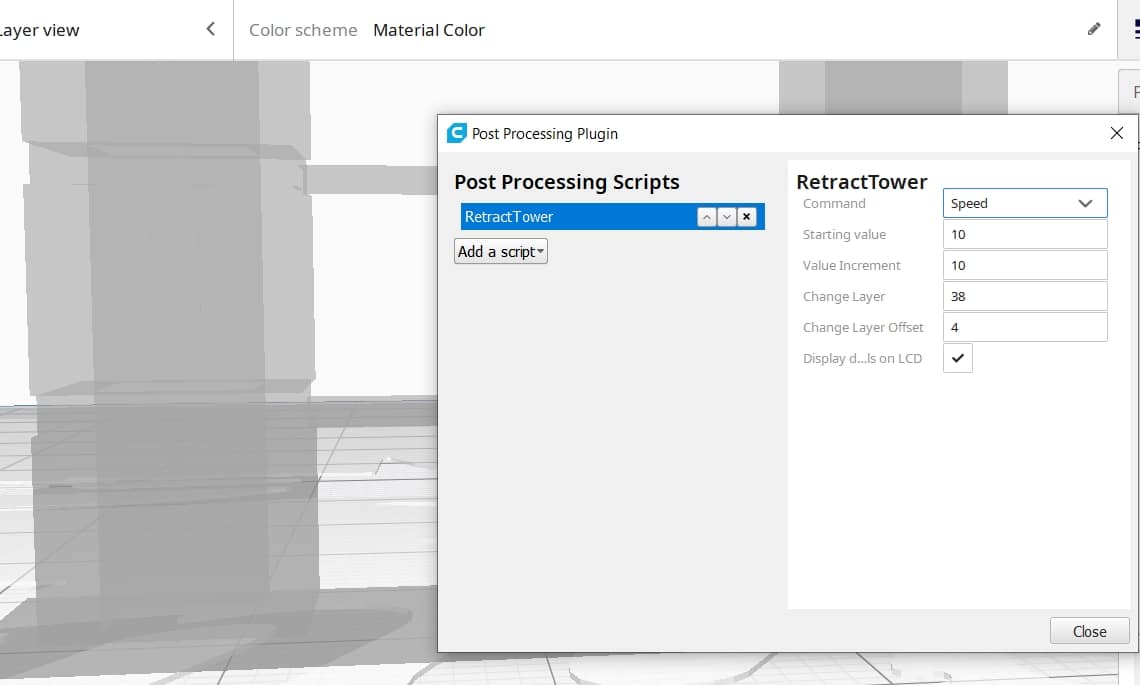
As you can see, you have options:
- Command – Choose between Retraction Speed & Distance.
- Starting Value – Number for your setting to start at.
- Value Increment – How much the value increases every change.
- Change Layer – How often to make incremental changes per layer value (38).
- Change Layer Offset – How many layers to account for with the base of the model.
- Display Details on LCD – Inserts an M117 code to display modification on your LCD.
You can start with Retraction Speed. The default value in Cura usually does pretty well which is 45mm/s. What you can do is start off with a lower value like 30mm/s and move up in 5mm/s increments, which will take you up to 50mm/s.
Once you print this tower and figure out the best retraction speed, you can pick the 3 best towers and do another retraction tower. Let’s say we found that 35mm/s up to 50mm/s worked pretty well.
We would then input 35mm/s as the new starting value, then go up in 3-4mm/s increments which would take you up to either 47mm/s or 51mm/s. Shining a flashlight on the tower may be necessary to really inspect the model.
You can easily calculate which Retraction Speed is which by adding the input increments for each tower number. For a starting value of 35mm/s and 3mm increment:
- Tower 1 – 35mm/s
- Tower 2 – 38mm/s
- Tower 3 – 41mm/s
- Tower 4 – 44mm/s
- Tower 5 – 47mm/s
The tower number is shown on the front of the tower. It could be a good idea to note this down beforehand so you don’t confuse your numbers.
After we have our Retraction Speed, we can move on to dialing in the Retraction Distance using the same process. The Retraction Distance default in Cura is 5mm and this also does fairly well for most 3D prints.
What we can do is change our “Command” within the RetractTower script to Retraction Distance, then input a starting value of 3mm.
You can then input a value increment of just 1mm which will take you up to testing a 7mm retraction distance. Do the same process with inspection and see which Retraction Distance works best for you.
After doing this process, your Retraction settings will be optimized for your 3D printer.
Try Adjusting Your Line Width Settings
Line Width in 3D printing is basically how wide is each line of filament when extruded. It’s possible to improve your 3D printing and 3D Benchy quality by adjusting your line width settings.
When you need to print thinner lines with specific models, using a lower line width is a great settings to adjust, though you want to make sure it’s not so thin that you are under-extruding.
Within Cura, they even mention that a smaller line width can make your top surfaces look even smoother. Another thing it can do is prove strength if it’s smaller than your nozzle width because it allows the nozzle to fuse adjacent lines together when it extrudes over the previous line.
Your default line width in Cura will be 100% of your nozzle diameter, so I’d recommend printing some 3D Benchys at a 90% and 95% line width to see how it affects your overall quality.
To work out 90% and 95% of 0.4mm, simply do 0.4mm * 0.9 for 0.36mm (90%) and 0.4mm * 0.95 for 0.38mm (95%).
Try Adjusting Your Flow Rate
Another setting that can help to improve the quality of your 3D Benchy is the flow rate, though this one isn’t usually something people recommend to change.
The Flow, or Flow Compensation in Cura is a percentage value that increases the amount of material extruded from the nozzle.
Flow Rates are best used in cases such as when you may have a clogged nozzle and require your nozzle to push out more material to compensate for the under extrusion you may experience.
When it comes to normal adjustment, we want to try and fix any underlying issues rather than adjust this setting. If you want your lines to be wider, it’s better to adjust your Line Width setting as described above.
When you adjust Line Width, it also adjusts the spacing between the lines to prevent overextrusion and underextrusion, but when you adjust the Flow Rate, this same adjustment isn’t made.
There is a pretty cool test that you can try out to see how the Flow Rate effects your prints.
Head over to the “Extensions” section, click on “Parts for Calibration,” and choose “Add a Flow Test.” This will insert the model straight onto your build plate.
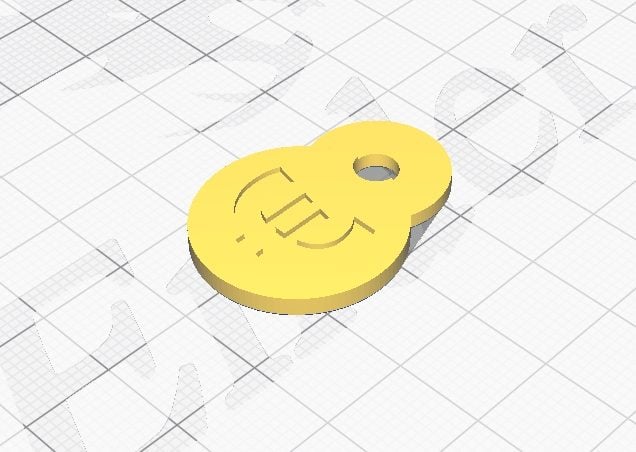
The model will consist of a hole and an indent to test how precise the extrusion is.
It’s a pretty quick test to 3D print, taking only around 10 minutes so we can do a few tests and see what changes are made when we adjust our Flow Rate. I’d recommend starting from a value of 90%, and working your way up to around 110% in 5% increments.
Once you find the 2 or 3 best models, what you can do is test values in between them. So if 95-105% was the best, we can be more precise and test 97%, 99%, 101% and 103%. It isn’t a necessary step, but it’s worth doing to get a better understanding of your 3D printer.
Getting the best quality improvements is mainly down to knowing how your 3D printer moves and extrudes with different settings, so it’s a good way to see just how much these small changes can make.
Calibrate Your Extruder Steps
Many people can benefit from a quality improvement by calibration their extruder steps or e-steps. Simply put, this is making sure that the amount of filament you tell your 3D printer to extrude actually gets extruded.
In some cases, people tell their 3D printer to extrude 100mm of filament, and it only extrudes 85mm. This would lead to underextrusion, worse quality, and even low strength 3D prints.
Follow the video below to properly calibrate your extruder steps.
Your overall 3D printing quality and 3D Benchy can benefit greatly after doing this calibration. Many beginners that have printing issues usually don’t realize that it’s their badly calibrated extruder which is giving them problems.
Hide the Seams Properly
You may have come across a weird looking line going down your 3D Benchy which takes away from the overall quality of the print. It can be pretty annoying at the start but it’s something that you can fix easily.
It looks something like this (on a 3D Benchy):

Within Cura, you want to search up “seam” and you’ll come across the relevant settings. What you can do is actually show the setting in your normal list of settings by right-clicking the setting you want, then clicking “keep this setting visible”.
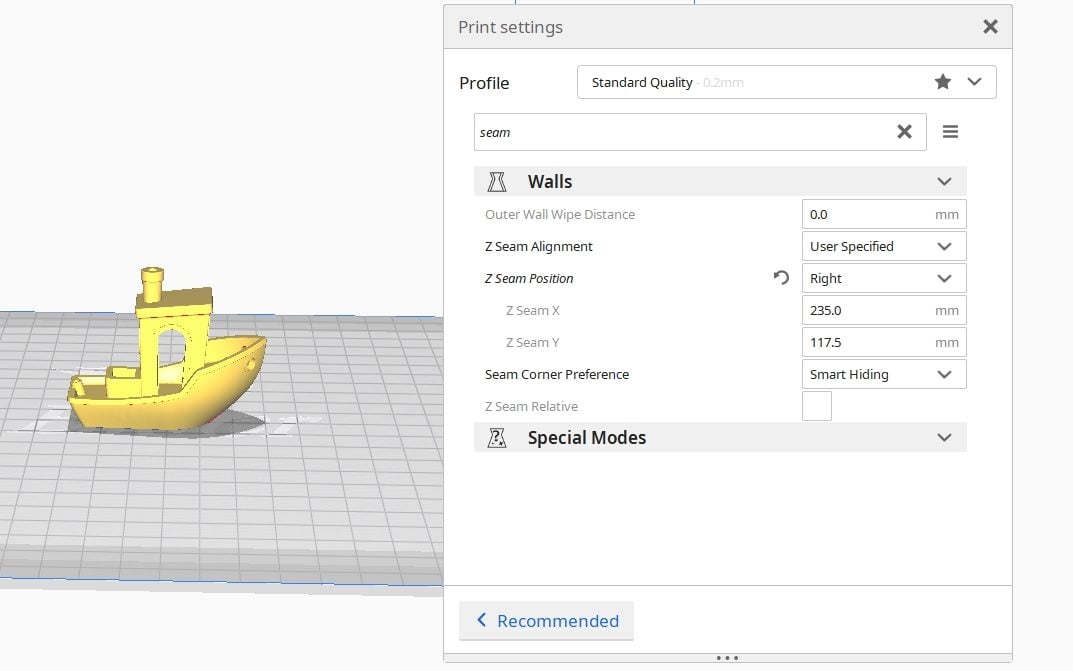
You have two main settings that you want to adjust:
- Z Seam Alignment
- Z Seam Position
For the Z Seam Alignment, we can choose between User Specified, Shortest, Random, and Sharpest Corner. In this case, we want to select User Specified.
The specific Z Seam Position is from how we are viewing the model, so if you pick “Left”, the seam will be set to the Left of the model in relation to where the red, blue and green axis in the corner is.
When you view the 3D Benchy you can try to figure out where the seams would best be located. As you can probably tell, it would be best hidden on the front of the Benchy, or in relation to this view, the right side where the sharp curve is.
The seams can be seen clearly on our model in white in the “Preview” mode after slicing the model.
Can you see which 3D Benchy has the seams hidden at the front of boat?

The 3D Benchy on the right has the seam located at the front. We can see the one on the left looks better, but the right one doesn’t look too bad, does it?
Use a Good Bed Surface Along with Bed Insulation
Using a good bed surface is another ideal step we can take to improve our 3D Benchy quality. It mainly has the biggest impact on the bottom surface, but it also helps with overall print when the bed is nice and flat.
Glass bed surfaces are the best for smooth bottom surfaces and for maintaining a flat print surface. When a surface isn’t flat, there is more of a chance of print failure because the foundation won’t be as strong.
I’d recommend going with the Creality Ender 3 Upgraded Glass Bed on Amazon.
It is labelled “Amazon’s Choice” with a 4.6/5.0 overall rating at time of writing, and 78% of the people who bought it have left a 5-star review.
This bed has a “microporous coating” on it that looks and works great with all kinds of filament. Customers say that purchasing this glass bed made all the difference in the world for their prints.
Users have confirmed that after dozens and dozens of hours of printing, many didn’t even have a single failed print due to adhesion issues.
It’s recommended to also use something like Blue Painter’s Tape on your glass bed to help prints adhere to the surface, or to use Elmer’s Disappearing Glue.
Another thing we can do for a slight improvement to our 3D printing quality and success is to use a bed insulation mat underneath our 3D printer.
This can give you multiple benefits like heating up your bed a lot quicker, distributing the heat more evenly, keeping the temperature more stable, and even decrease the chances of warping.
I’ve done this for my own Ender 3 and managed to cut the heating time down about 20%, as well as keep a more stable and consistent bed temperature.
I’d recommend going with the Befenbay Self-Adhesive Insulation Mat from Amazon.
I even wrote a 3D Printer Bed Insulation Guide that you can check out for more information.
Level Your Print Bed Properly
In addition to have a good, flat build surface, making sure the bed is properly leveled is another factor that can help with overall quality. It helps give your 3D print that higher level of stability throughout the print so it doesn’t move slightly further in the process.
This is similar to using a Brim or Raft for your prints for stability. A nice flat, leveled bed with a good adhesive product on it, along with a raft (if needed) can help with your overall 3D print quality.
You won’t need a raft for the 3D Benchy though!
I’d recommend getting stiff bed springs so your bed stays level for longer. You can go with the FYSETC Compression Heatbed Springs from Amazon for that high quality.
This First Layer Adhesion Test on Thingiverse is a great way to see your leveling skills or flatness of your bed. Many users mention just how useful this method of leveling is for your 3D printer.
They have a really in-depth explanation about how you properly implement this test, which includes first layer Flow Rate, Temperature, Speed etc.
Bonus Tip – Get Rid of Blobs on Your Prints & 3D Benchy
Stefan from CNC Kitchen has stumbled upon a setting in Ultimaker’s Cura that has reportedly helped many users get rid of blobs and similar imperfections in their prints.
This is the “Maximum Resolution” setting that you can access from under the “Mesh Fixes” tab in Cura. For older versions of the software, this setting can be found under the “Experimental” tab.
It’s best to find this setting by typing “Resolution” into the settings search bar.
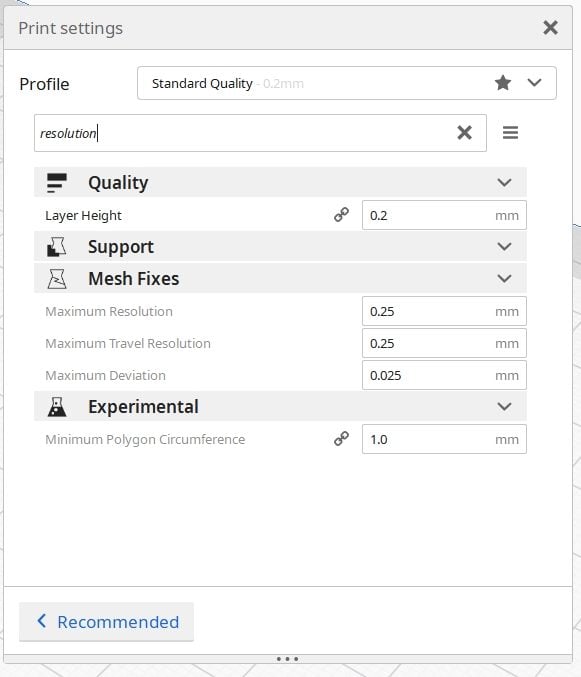
Enabling this setting and inputting a value of 0.05mm is suitable enough to get rid of blobs in your 3D Benchy. Stefan has explained how this works in the video below.
As a bonus, you can do this and see if it improves the quality of your 3D Benchy. One user commented that they had tried tweaking retraction, temperature, flow and even the coasting setting, but nothing worked for them.
As soon as they tried this, the problem of blobs on their 3D prints was solved. Many people have mentioned how these settings helped improve their print quality straight away.
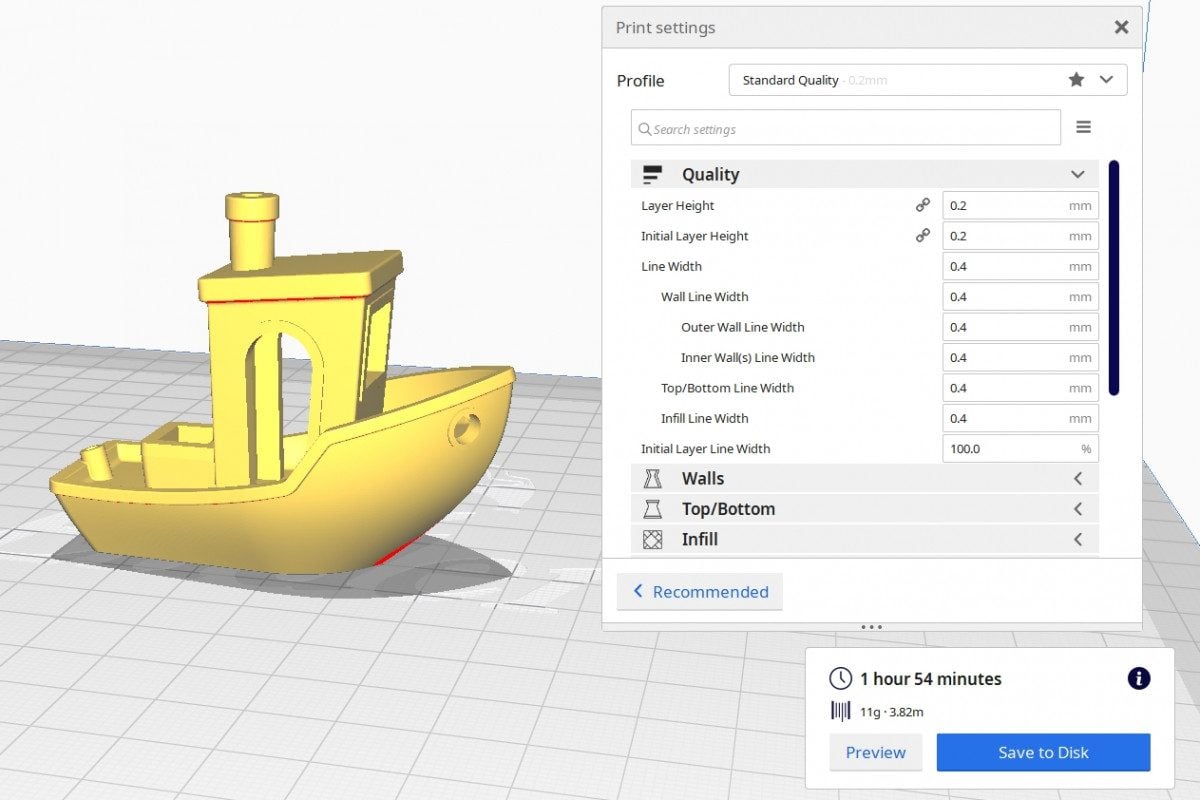
How Long Does it Take to 3D Print a 3D Benchy?
The 3D Benchy takes around 1 hour and 50 minutes to print at default settings with a printing speed of 50mm/s.
A 3D Benchy with 10% infill takes around 1 hour and 25 minutes. This requires Gyroid Infill because 10% infill with a normal pattern doesn’t provide enough support underneath to build upon. It may be possible to do 5%, but that would be stretching it.

Let’s look into Print Speeds with the default 20% infill.
- A 3D Benchy at 60mm/s takes 1 hour and 45 minutes
- A 3D Benchy at 70mm/s takes 1 hour and 40 minutes
- A 3D Benchy at 80mm/s takes 1 hour and 37 minutes
- A 3D Benchy at 90mm/s takes 1 hour and 35 minutes
- A 3D Benchy at 100mm/s takes 1 hour and 34 minutes
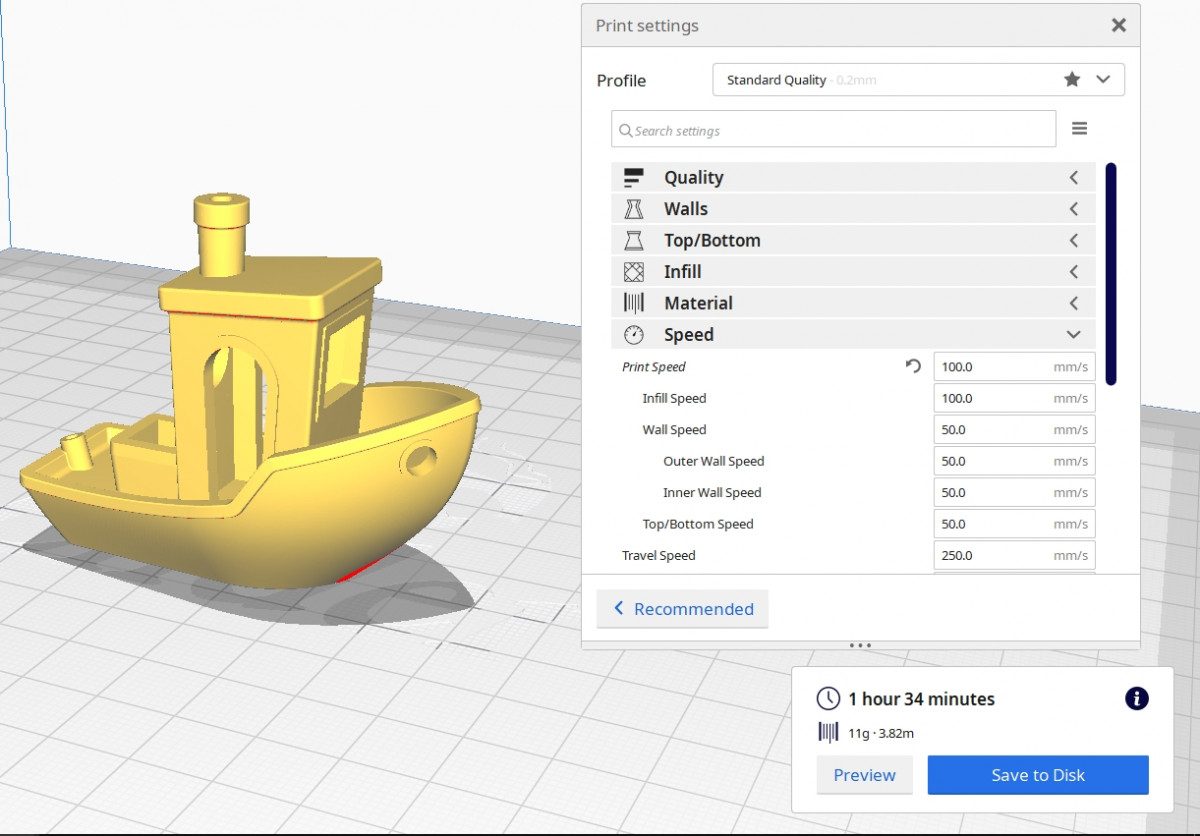
The reason why there isn’t much of a difference between these 3D Benchy timings is because we won’t always reach these high print or travel speeds, due to the small size of the Benchy.
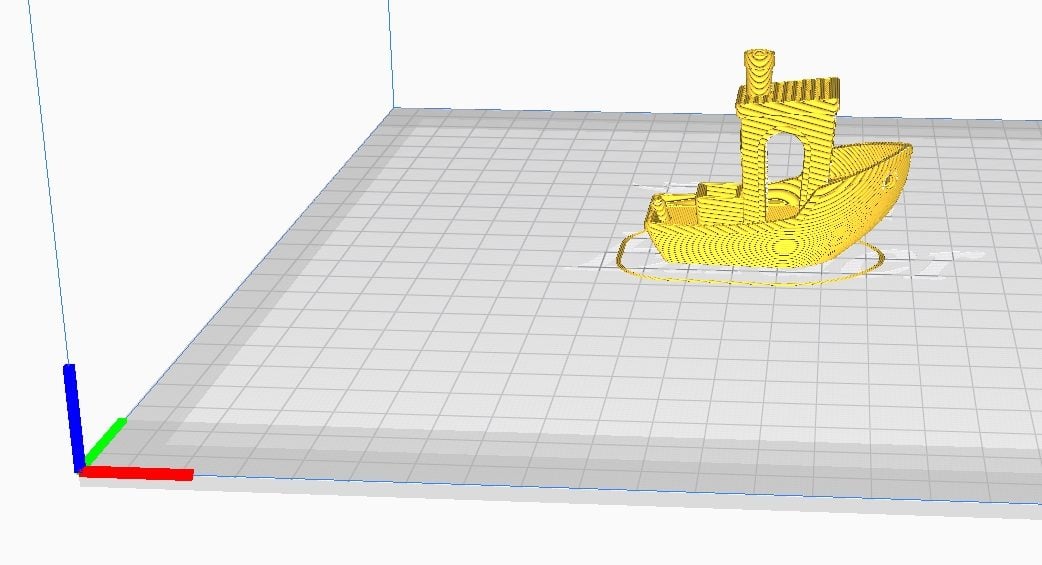
If I were to scale this 3D Benchy to 300%, we would see very different results.
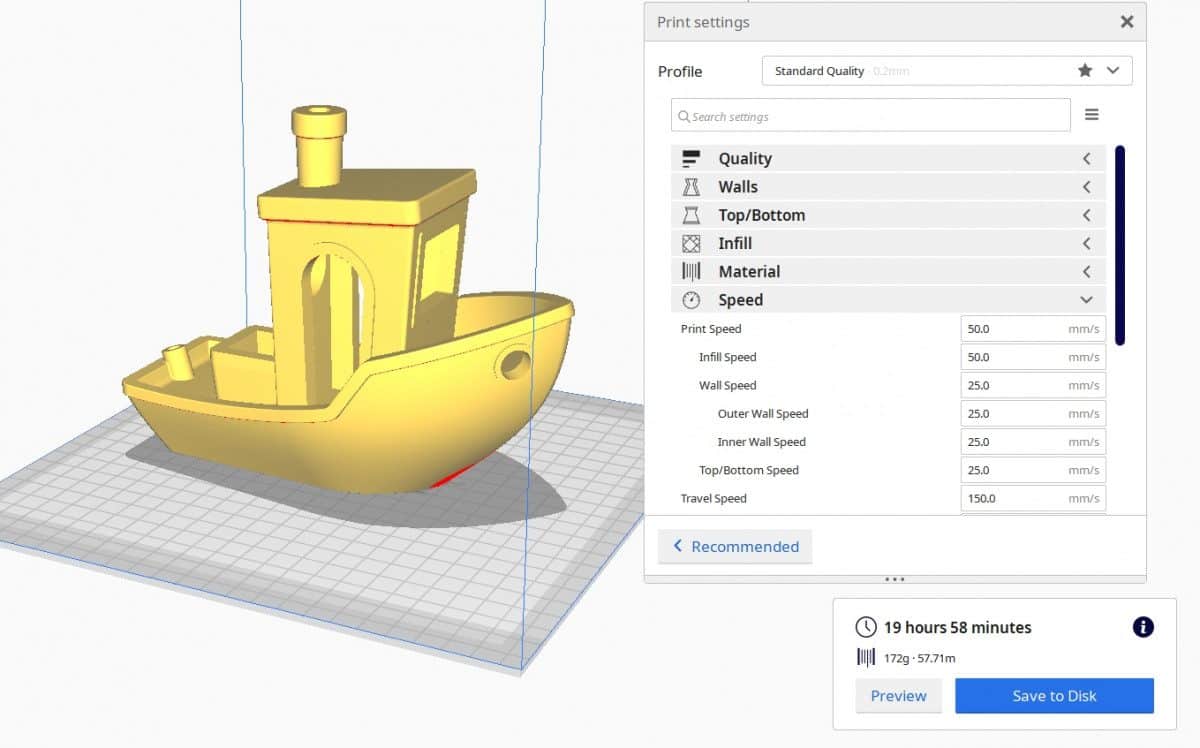
As you can see, a 3D Benchy scaled to 300% takes 19 hours and 58 minutes at a 50mm/s print speed.
- A 300% scaled 3D Benchy at 60mm/s takes 18 hours and 0 minutes
- A 300% scaled 3D Benchy at 70mm/s takes 16 hours and 42 minutes
- A 300% scaled 3D Benchy at 80mm/s takes 15 hours and 48 minutes
- A 300% scaled 3D Benchy at 90mm/s takes 15 hours and 8 minutes
- A 300% scaled 3D Benchy at 100mm/s takes 14 hours and 39 minutes
As you can see, there is a significant difference between each of these print times since the model is large enough to actually reach these higher speeds. Although you change your print speed in some models, it won’t actually make a difference because of this.
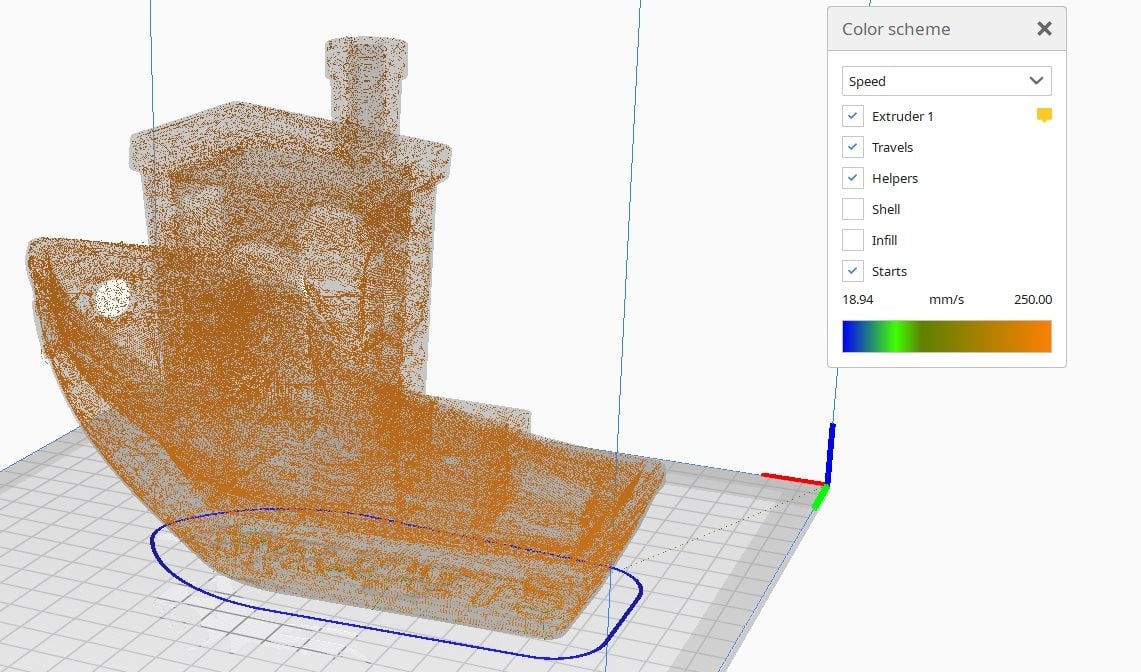
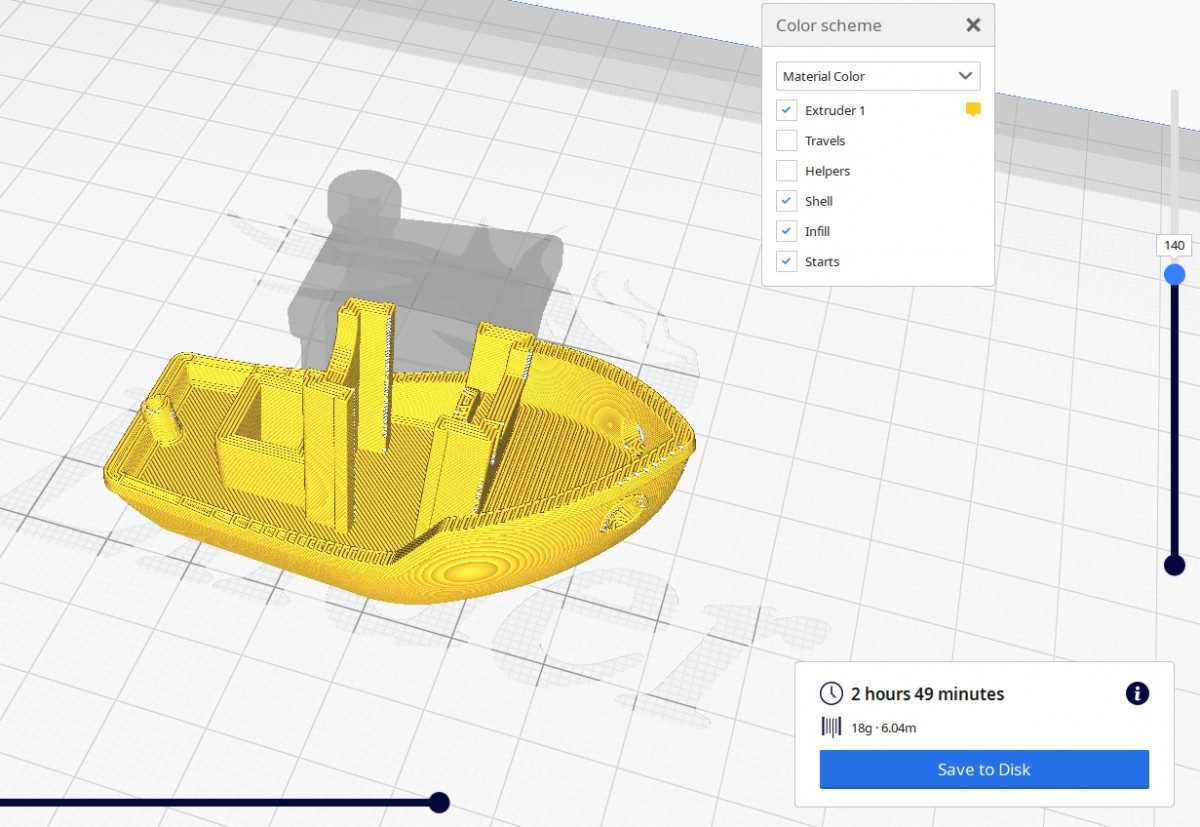
A really cool thing you can do in Cura is to “Preview” the Travel Speed of your model and how fast your print head travels while not extruding.
You can see how the Print Speed lowers with the smaller part at the top, as well as the skirt and initial layer (blue on the bottom layer also).

We are mainly seeing the Travel Speed of the Shell in this greenish color, but if we highlight the other parts of this 3D print, we can see the different speeds.
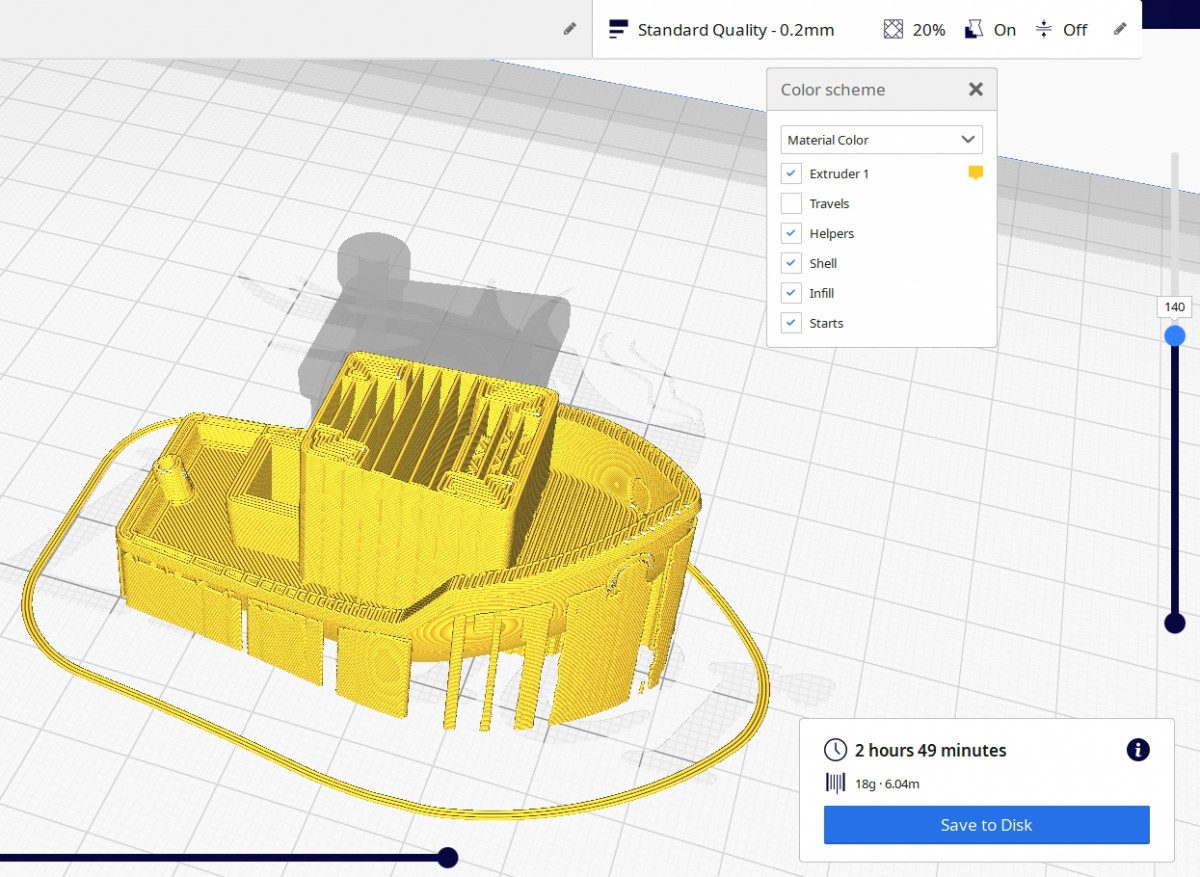
Here is just the travel speed within the model.
Here are the travel speeds along with the infill speeds.
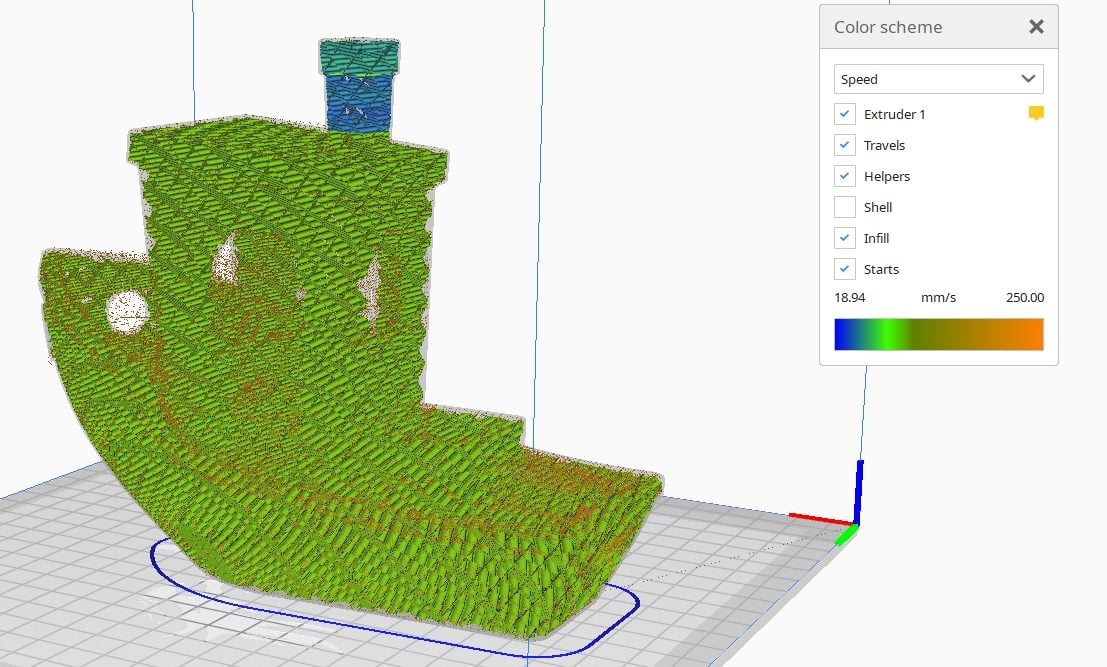
We can usually increase our infill speeds since the quality of it doesn’t necessarily effect the outer quality of the model. It may have an effect if there is little infill and it doesn’t print accurately for the layer above to be supported.
One user showed the power of 3D printing speed by printing a 3D Benchy in just 25 minutes, shown in the video below. He used a 0.2mm layer height, 15% infill, and a print speed that automatically adjusts according to the model.
Something like this is going to take a very fast 3D printer like a Delta machine.
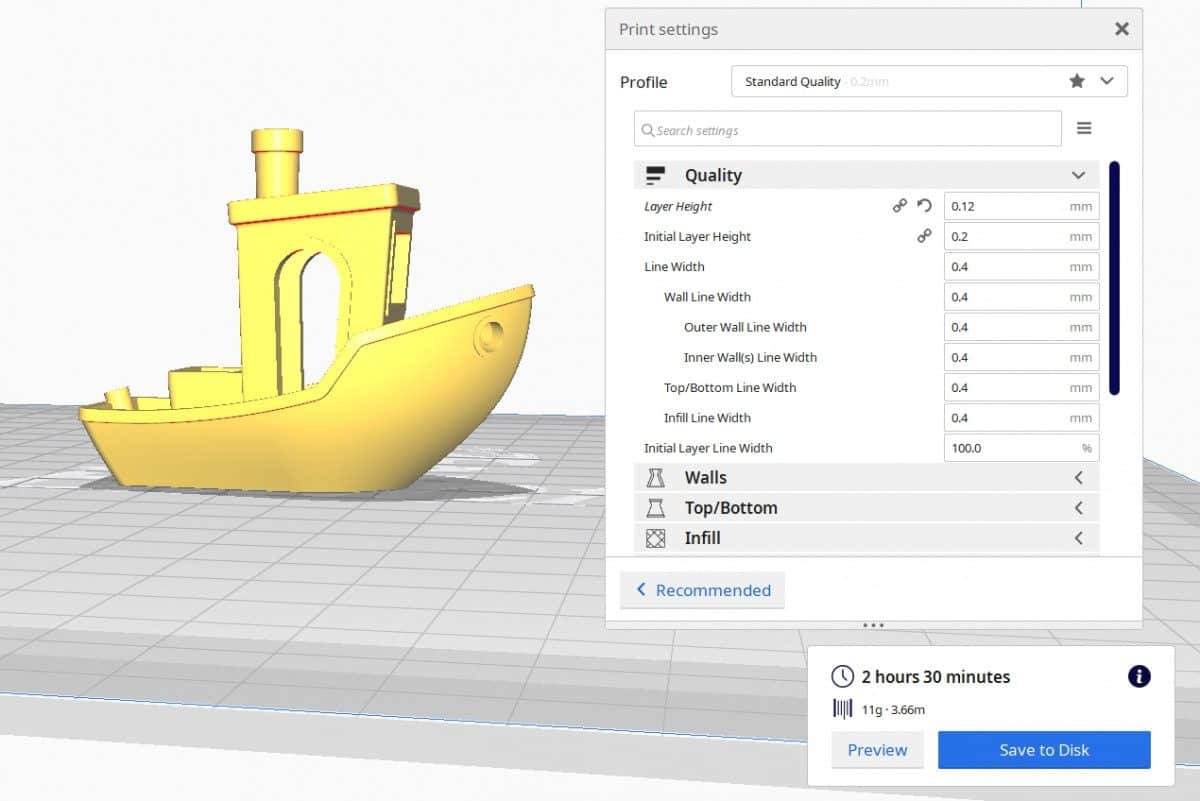
As previously mentioned, the best method of improving print quality is to reduce layer height. When you reduce your layer height from 0.2mm to 0.12mm for the 3D Benchy, you get a print time of around 2 hours and 30 minutes.
Although it takes a lot longer to produce, the quality differences are significant when you inspect the model closely. If the model is at a distance, you probably won’t notice too much of a difference.
When it comes to print speed, there are multiple ways to print faster. I wrote an article on 8 Different Ways to Increase Print Speed Without Losing Quality that you may find useful.
Who Created the 3D Benchy?
The 3D Benchy was created by Creative Tools back in April 2015. It is a company based in Sweden that specializes in providing software solutions for 3D printing and is also a marketplace for purchasing 3D printers.
The 3D Benchy enjoys the reputation of being the world’s most downloaded 3D printed object.
As the creator calls it, this “jolly 3D printing torture-test” has over 2 million downloads on Thingiverse alone, not to mention other platforms for STL designs and tons of remixes.
You can download the 3D Benchy file Thingiverse to test your 3D printer’s capabilities and quality. You can also check out Creative Tools’ Thingiverse designs page for more cool models that they have made.
This model has seemingly made a name for itself over the years and is now the go-to object that people print to test their 3D printer’s configuration.
It’s free to download, easily accessible, and is a well-established benchmark in the 3D printing community.
Does the 3D Benchy Float?
The 3D Benchy does not float on water because it lacks the center of gravity to stay stable, though there are accessories that people have created which allows it float on water.
One user has created a 3D Benchy print file on Thingiverse that adds a few accessories to the Benchy, plugs some holes, and helps with buoyancy in general. All these tweaks make the Benchy float.
Check out the Make Benchy Float Accessories page on Thingiverse. It consists of five parts that you can print and attach to a normal 3D Benchy to make sure it floats on water.
You want to use a layer height of 0.12mm and an infill of 100% to print the plug. The tyres can be printed either at 0% infill or 100% infill. The hole port plug may have to be sanded a little because it is intentionally very tight.
PLA filament should work well for this 3D print.
CreateItReal did an article about tackling the “issue” of the 3D Benchy not floating.
Since the problem was to do with the center of gravity and weight being heavier at the front of the Benchy, they implemented an infill density modifier to shift the center of gravity nearer to the center and back of the model.
Should You 3D Print Benchy With Supports?
No, you should not 3D print the 3D Benchy with supports because it is designed to be printed without them. A filament 3D printer can handle this model just fine without supports, but if you use a resin 3D printer, you would have to use supports.
As long as you have a good level of infill which is around 20%, you can successfully 3D print the Benchy with no supports. It would actually be detrimental to use supports because there would be supports in hard to reach places, meaning you would have a hard time removing them afterwards.
Here is what the 3D Benchy would look like without supports.
Here is what the 3D Benchy would look like with supports.
As you can see, not only would the inner section of the 3D Benchy be full of filament, it would be almost impossible to remove since the space is so tight. On top of that, you are increasing your printing time by double when using supports.
Why is the 3D Benchy Hard to Print?
The 3D Benchy is known as a “torture test” and was designed to be hard to print. It was developed to test and benchmark the capabilities of any 3D printer out there, giving parts and sections which are difficult for a badly-tuned machine.
You have parts such as overhanging curved surfaces, low-slope surfaces, tiny surface details, and overall symmetry.
Since it can be printed in an hour or two at best and doesn’t take up much material, the 3D Benchy has gradually become the go-to benchmark for those looking to test their 3D printer.
After printing it, you can measure particular points to determine how well and accurate your 3D printer has performed. This involves dimensional accuracy, warping, print imperfections, and details.
You’ll need some Digital Calipers to measure up these exact dimensions, as well as the 3D Benchy Dimensions List that you can get all the necessary values from.
Getting results similar to Benchy’s original dimensions can be hard, but it’s definitely possible when you follow the right steps.
What Are Some Reasons Why the 3D Benchy Fails to Print?
A lot of the failures that happen with 3D Benchys are from bed adhesion issues or from the roof failing to print the overhangs.
If you follow the tips above by using an adhesive substance or using Blue Painter’s Tape on the bed, it should solve your bed adhesion issues. For glass beds, they have really good adhesion as long as the bed is clean and free of grime or dirt.
Many people report that after cleaning their glass bed with dishsoap and warm water, their 3D prints stick down strongly. You want to try avoid getting marks on the bed by handling it with gloves or making sure not to touch the top surface.
Make sure your printing speed is not too high for the overhang to print nicely. You also want to make sure your cooling is set to 100% for PLA and is working nicely. A good overhang test on Thingiverse can help you identify this issue.
This All-In-One Micro 3D Printer Test on Thingiverse has a great section for overhangs, as well as many other tests built into it.
With updates in slicers like Cura, 3D printing failures happen a lot less often because they have fine-tuned settings and fixed problem areas.
One other cause of many fails is when the nozzle gets caught on the previous layer. This can happen when that are drafts which affect the cooling of the filament.
When your filament cools too quickly, the previous layer starts to shrink and curl, which may end up curling upwards into a space where your nozzle can catch on it. Using an enclosure or slightly lowering your cooling can help in this regard.
As long as you follow the information and action points in this article, you should have a good experience with getting the best 3D printing quality.