6 Ways How to Fix Weak Infill in 3D Prints
Many people who have 3D print have experienced weak infill, where their models break easily. I’ve had this happen to myself before. Luckily, there are some pretty simple solutions to fix weak infill in 3D prints.
To fix weak infill in 3D prints I would alternate my infill pattern, lower my infill print speed, and increase infill line width. This ensures strength in your infill.
Keep reading on for a detailed answer on how to fix weak infill once and for all.
Why Do I Have Weak Infill in my 3D Prints?
Weak infill is a bad problem because infill is the backbone of the 3D print, and it plays a fundamental role in strengthening the whole structure. It gives support to the final robustness of the printed model and provides support to the layers.
Having weak infill is a problem that you definitely want to avoid, so before we get into the solutions, I want to quickly go through why it happens in the first place. There are several possible causes, some being more likely than others.
It usually comes down to your settings, so a few quick changes could solve this problem with ease.
So, the list is as follows:
- Using a weak infill pattern
- Infill printing speed is too high
- Using bad infill settings
- Incorrect filament diameter set
- Using low quality filament
- Bad print orientation
Now that we have a list of causes, lets get into fixing them, one by one.
How to Fix & Strengthen Weak Infills in 3D Prints?
1. Alternate Your Infill Pattern
Some types of infill only print one angle on one layer then a different angle on the next layer. This effective means that it is printed with 50% as much infill on one angle, so every second layer would be empty at the specific angle.
The ‘Lines’ pattern especially is one that prints those angles every other layer. I’d recommend changing to the ‘Grid’ pattern, which is similar to lines, but it prints out the whole pattern on each layer.
- Avoid using infill patterns which are designed for aesthetics (looks)
- Implement strong, reliable patterns like honeycomb, triangular or the grid pattern.
2. Adjust the Printing Speed
If the speed at which your infill is extruder is too fast, you may see that the extruder can’t keep up with the printing speed. You may start to face under extrusion at this point then.
This will cause weak and stringy infill, and the nozzle will be having trouble extruding plastic.
- You can slow down the printing speed, I would use 50% print speed and see the results
- Specifically lower the infill print speed, so it has time to be built up properly.
- If this works you can slowly work your way back up to find the optimal
Print speed goes hand in hand with a whole host of other 3D printer settings, so adjust this may require further adjustments to your settings, as well as what nozzle size you are using.
The important settings that complement print speed are the printing temperature, layer height, line width, as well as nozzle diameter.
The standard defaults that are recommended for most FDM 3D printers are a 0.4mm nozzle and a 0.2mm layer height. The higher your printer speed, the higher the temperature you want to use so the increased flow rate of material can still melt at the same rate.
It’s going to be harder to melt filament using the same temperature when there’s more of it coming through, which can lead to printing 3D prints with weak infill and under-extrusion.
One user who decreased their print speed to 60mm/s from 90mm/s said it helped out a lot with fixing this issue.
Another user who had an Ender 3 which experienced underextrusion at the infill said that doing an extruder calibration helped out also.
3. Adjust Infill Settings in Slicer
There are a number of settings which relate directly to how your infill will be printed, and this has a direct effect on having weak infill.
- Increase ‘Infill Density’ – 20% is a good infill density
- Increase ‘Infill Line Width’ – Try a 50% increase and run a test print
- Use the ‘Connect Infill Lines’ setting
If the extrusion infill width is small, this will ultimately bring a weak outline perimeter. You will be using a default width of 0.4mm, and to get better results, you should try to shift to a 0.8mm extruder infill width.
Basically, doubling your infill line width will strengthen your overall infill so that it prints with material in the right places.
Note: If you have increased the size of the extrusion infill width, you need to increase the infill percentage because now the infill lines will be spaced further apart. If the speed is high, it will get to the distance in time.
The basic aim of increasing the infill percentage is to increase the density of the print model’s connection, which will increase its strength overall.
Another thing to remember is that an increased infill density doesn’t translate linearly to infill strength. So, the increase from 10% to 30% won’t be the same increase from 30% to 50%, it generally gives back less strength as you get into those higher numbers.
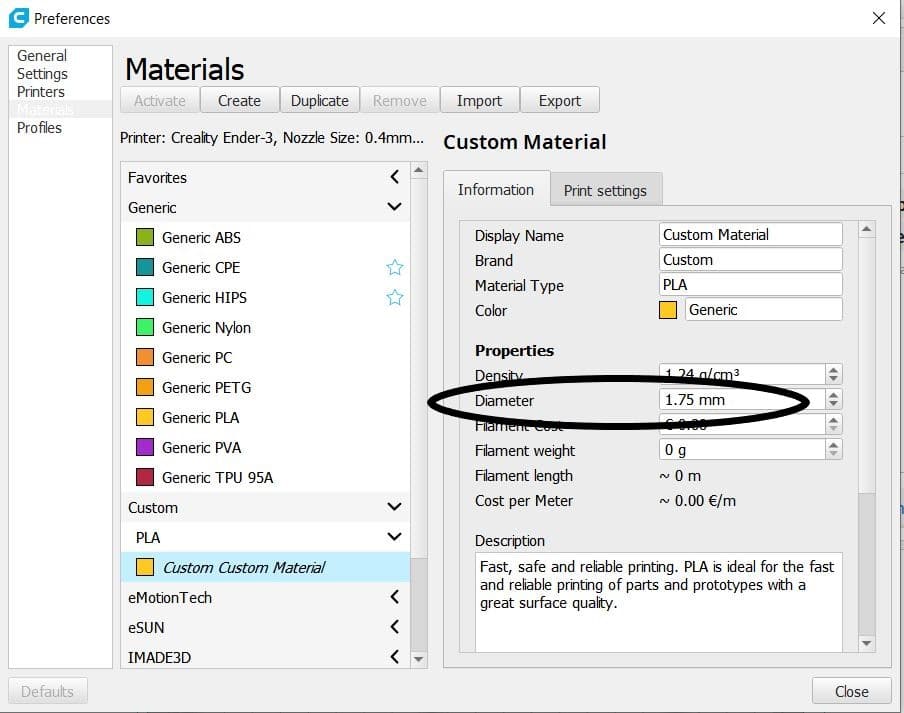
4. Use the Correct Filament Diameter Settings
Sometimes you might find that your filament diameter settings are incorrect, so I would double-check that in your slicer software. Within Cura, you can check that by using the Ctrl + K shortcut and checking what diameter your profile is set at.
5. Using a Higher Quality or Stronger Filament
You can maximize the strength of the infill by:
- Using a high-quality filament such as going from PLA to PLA+ or using PETG, which is known to be stronger.
- This higher quality filament should provide a layer to layer adhesion and build more prints’ strength.
6. Adjust Print Orientation
This is a simple way but mostly overlooked because of its simplicity.
The term anisotropic comes in use, which means that an object has more strength in its XY axis than in the Z-axis. What you need to do is:
- Rotate your part 45 degrees on the printer bed, and it gives you the necessary strength; actually, it would double it.
Overall, I have covered a lot about the weak infill, and it will help you overcome this problem and fix it and strengthen your 3D print model.