4 Ways How to Fix Over-Extrusion in Your 3D Prints
Over-extrusion is quite a common problem that you find 3D printer users experience, and it results in print imperfections and poor printing quality. I’ve experienced over-extrusion myself and I find some great ways to fix it.
Most people fix over-extrusion by decreasing their nozzle temperature, since it makes the melted filament less viscous or runny. Lowering your extrusion multiplier or decreasing the flow rate in your slicer also works quite well. Double check that your slicer has the correct filament diameter input.
There are some fairly quick fixes to solve the problem of over extrusion, as well as some more detailed solutions, so stay tuned to learn how to fix over extrusion.
Why Do You Have Over-Extrusion in Your 3D Prints?
We can tell from the term over-extrusion, that the printer would be extruding too much material, which could be ruining the quality of your prints. There are multiple reasons for over-extrusion, such as the dimensional inaccuracy and high flow rates.
Let’s get into the detail of certain factors which are causing over extrusion in the printer and causing the problem in the printing process.
- Print Temperature Too High
- Extruder Steps Aren’t Calibrated
- Incorrect Filament Diameter
- Mechanical Issue with Z-Axis
If the flow rate of the printer is too high, along with a high temperature, your whole project could go south and end up as nothing but a messy, low quality 3D print, all because of over-extrusion.
Now comes the main point, how to fix these issues. Whether you have an Ender 3 that’s experiencing over extrusion on first layers, on corners, on one side, or on the top layers, you can solve it.
How to Fix Over-Extrusion in 3D Prints
1. Lower the Printing Temperature to an Adequate Amount
Sometimes the simple fix of lowering your printing temperature works a treat for fixing over-extrusion. You don’t always have to get into some complicated solution and tinkering to solve this problem.
The higher your printing temperature, the more your filament will melt into a runny substance, so it has the ability to flow more freely out of the nozzle.
Once the filament starts flowing freely, it’s harder to control, and your layers can start getting uneven because of this over extrusion.
- Control the temperature by lowering it in your slicer settings or directly on your 3D printer.
- Adjust temperature gradually because if it gets too much lower, you can face under extrusion, which is another problem.
- You should go by decreasing the temperature with intervals of 5°C
- Every filament has a different level of ideal temperature; make sure you are doing trial and error.
2. Calibrate Your Extruder Steps
One key method of fixing over extrusion in your 3D prints is to calibrate your extruder steps or e-steps. Your e-steps are what tells your 3D printer how much to move your extruder, leading to the amount of filament that moves.
When you tell your 3D printer to extrude 100mm of filament, if it extrudes 110mm of filament instead, that would lead to over extrusion. Many people don’t know about calibrating extruder steps, so if you’ve never done it before, that should be something you do on all your 3D printers.
If you ever change your extruder, you’ll definitely want to calibrate your e-steps before you start 3D printing.
I’d recommend following the video below to calibrate your e-steps.
Once you do this, your over extrusion issues should most likely be fixed if it was the main cause.
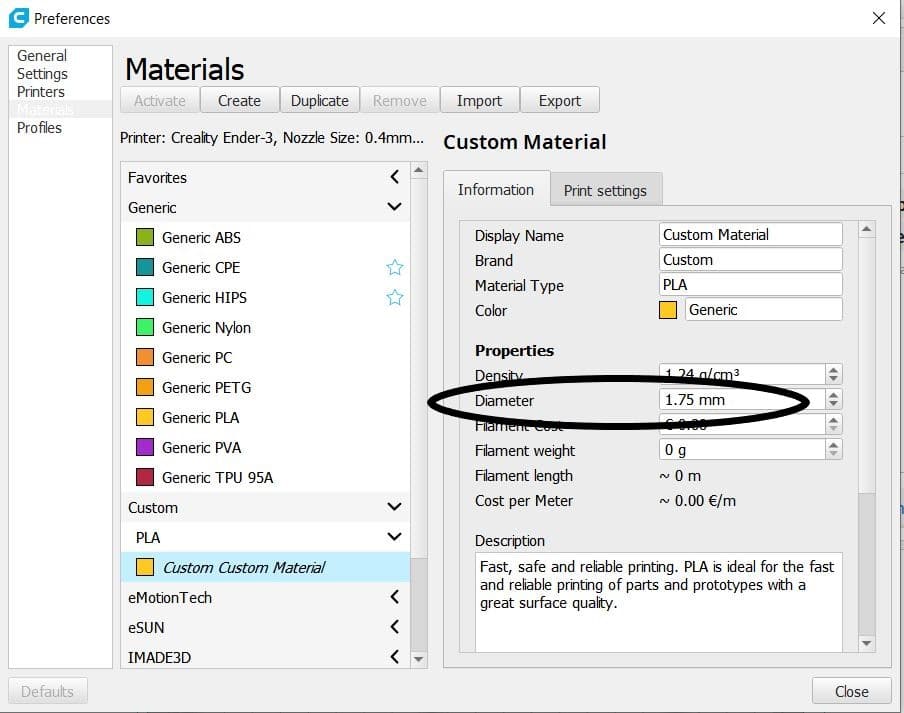
3. Adjust the Diameter of the Filament in the Slicer Software
This is another problem of misjudgment, which means that if your slicer is getting the wrong filament diameter, it will start extruding the material at a higher rate leading to the same over extrusion problem.
It will cause more material loss to you, and the surface of the layers will also be inconsistent.
This isn’t a common issue since filament tolerance has definitely improved over time, but it’s still possible. In Cura, you can actually manually change the filament diameter to reflect a lower or higher measured diameter in your filament.
- You can use a caliper to measure the width of the filament from different places
- Verify whether the diameter differences are within a good tolerance (within 0.05mm)
- After getting all the measurements you can take out the average to get the right diameter of the filament
- When you get the average number, you can put it into the slicer software
To get to this screen, you can use the shortcut Ctrl + K or Settings > Extruder 1 > Material > Manage Materials. You’ll have to create a ‘Custom Material’ to be able to change this setting.
In all honesty, you are probably better off using a new, high quality roll of filament rather than printing successful models.
4. Loosen the Rollers on Your Gantry
This is a less well-known solution that can cause over-extrusion usually in the bottom layers of your 3D prints. When the roller assembly on your 3D printer is too tight, there is only movement when enough pressure has built up to get it rolling.
The video below starts at 4:40 and shows the tightening of the roller assembly on a CR-10.
If you tightened this roller on the right side of the gantry too tightly you want to loosen up the eccentric nut so, there isn’t slack behind it, and it rolls with a bit of firm pressure.
Your bottom layers can bind on the Z if the gantry roller is too tight against the rail on the opposite side of the lead screw. It snags until the Z axis is high enough to relieve tension on the wheel.
How to Fix Over Extrusion on First Layers
To fix over extrusion on first layers, calibrating your extruder steps is important. Lower your bed temperature as well, since your fans don’t run with the first few layers, so it might cause those layers to get too hot and over extrude. Make sure you level your bed properly so your nozzle isn’t too close or far from the print bed.