How to Fix Grinding & Squeaking Noise in Y & Z-Axis – Ender 3
3D printers are mechanical machines that have many moving parts, which can unfortunately create grinding noises in some cases. This article will help you to understand why these noises can happen and how to fix them.
To fix grinding or squeaking noises in your Y & Z axis, make sure your stepper plugs are plugged in fully in the motors. Lubricate your moving parts such as the leadscrew and loosen any belts or bolts that are too tight. Ensure your 3D printer isn’t accumulating too much dust and adjust your eccentric nut if too tight.
There’s more information that you’ll want to know about fixing this issue so keep on reading for more.
Why Do Grinding Noises Happen in the Y & Z Axis on a 3D Printer?
There are quite a few reasons why you might get grinding noises in your Y & Z axis, as well as around your 3D printer. Here’s a list of causes that many users have experienced:
- Stepper plugs not seated correctly in motor
- Lack of grease or lubrication in moving parts
- Motor cables damaged or crimped at the ends
- Belts are too tight
- Bolts & screws are too tight
- Issues with motors
- Uneven parts such as extruder idler arm
- Significant accumulation of dust within the 3D printer
How to Fix Grinding Noises in Y & Z Axis on a 3D Printer
- Seat the plugs and cables of the stepper motor properly
- Apply oil or grease to moving parts
- Check any damaged cables and replace them
- Loosen any belts that are too tight
- Loosen any bolts & screws that are too tight
- Change your motor cables around to identify faults in specific motors
- Check the frame of your 3D printer is level as well as other parts
- Clean out any accumulation of dust and debris
Seat the Plugs and Cables of the Stepper Motor Properly
One fix for grinding noises in your 3D printer’s Y & Z axis is to simply push in the plugs/cables into your stepper motors. Sometimes these cables aren’t inserted properly or might get caught on something and slightly come out, leading to grinding noises.
A user who had grinding noises mentioned that one of his stepper plugs wasn’t seated correctly in the motor. One of the motors was moving fine but the other wasn’t turning correctly until the movement of the bed drove it, so after sorting this out, the problem got fixed.
Make sure your cables aren’t loose and are fully inserted into the port.
Check out the video below by clicking the title for the sound a stepper makes when it’s not getting the right signals (it’s pretty loud).
Z axis not moving 🙁 makes a horrible grinding noise and then does not move anymore. z axis is stock parts. The stls are piling up and I can’t print anything D:
byu/wishaybug inender3
Apply Oil or Grease to Moving Parts
Some people might experience a grinding noise in their 3D printer due to a lack of lubrication in moving parts. One of the key parts you want to lubricate is your leadscrew and any rods on your 3D printer since there is metal to metal contact.
You can use something like DuPoint Teflon Non-Stick Lubricant Aerosol Spray from Amazon or the Super Lube Silicone Grease with PTFE. You should be lubricating your 3D printer around every 3 months for maintenance.

Check the video below for a simple guide on lubricating your 3D printer.
There may be a build up of dirt and grime on your leadscrew which you’ll want to clean up properly.
For some of your linear bearings that ride on the leadscrew, you want to ensure it has a good amount of grease on it, and you might even want to take it apart, lubricate the bearings, then put it back together.
Check Any Damaged Cables and Replace Them
Another fix that has worked for some users is to check any damaged cables that connect to your motor and motherboard, then either fix them or replace them.
One user described how one of his motor cables was badly crimped at the motherboard end, so he soldered the broken wire on the crimp and solved his grinding issues.
The connection between your board and the motors should be satisfactory.
Loosen Any Belts That are too Tight
Your belt could be causing your grinding noise issue, so loosening up any belts that are too tight can be your fix. For example, someone described how their X-axis pulley system was too tight which caused movement issues.
They ended up loosening the belt significantly and it worked to fix the grinding noise. He mentioned that there wasn’t the greatest instruction for tightening his belt so he said it should be just tight enough where there is no slack.
Check out my article called How to Properly Tension Belts on Your 3D Printer for more info.
Loosen Any Bolts & Screws That are too Tight
Many users mentioned that they fixed their grinding noise by loosening up bolts and screws in certain places on their 3D printer. One example on a Prusa is the U-bolts that hold the bed to the bearing. If you overtighten these, they can create a lot of noises while printing.
They should be just tight enough where your bed doesn’t wobble and is loose enough where there isn’t extra pressure on the linear bearing. Even if it’s a little too tight, it can deform your bearing and cause a grinding noise, so make sure you have this right.
Another area where tight bolts can cause a grinding noise is with the leadscrew. On the bracket where the rod or leadscrew goes through, there will be two screws at the top of the bracket. When these are too tight, it can cause a binding in the system leading to a grinding noise.
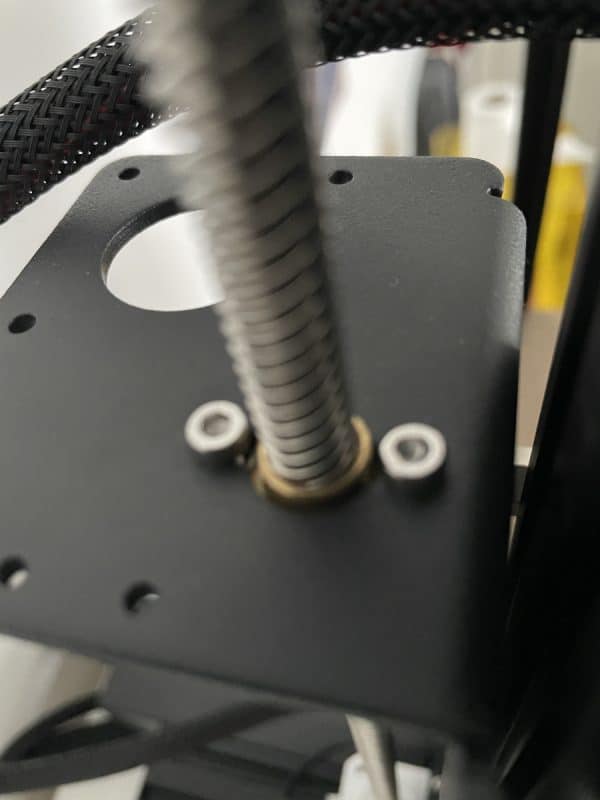
One user that loosened these two bolts slightly (about one turn) fixed the issue of the grinding noise in their 3D printer.
You should also make sure that other bolts around the printer aren’t loose, so tighten those up. Check that your wheels can move freely and aren’t stuck, creating more pressure on the motor to turn.
Check out the video below by YouTuber NK3D who solves this issue by loosening the screws with an Allen Key to solve this.
The video below is what the user recorded to show the sound.
They got told by Prusa Support to loosen the four screws that hold the fan in place and it actually solved their noise issue.
Change Your Motor Cables Around to Identify Faults in Specific Motors
The issue could be with your motor or motor cables. Many users have described how they switched the cables between two of their motors like the Y & Z ports to identify if the motor cables had an issue.
One user turned the 3D printer off, did the cable switch of the Y & Z axis, turned on the printer, moved the Y position from the control screen, turned the 3D printer off then switched the cables back. This actually fixed their issue of a grinding noise in their 3D printer.
It really depends on what your cause is but this could be your potential fix. Here’s a basic video showing a visual on switching the cables around.
Try to figure out exactly where the grinding sound is coming from. If the Z-axis is working fine for example, then you know the Z motor and Z wire is working, then you can check if it’s coming from the Y motor, Y wire, or if it’s related to the mainboard Y controller.
If you connect the Z-axis wire to the Y-axis stepper motor, then send a command to move the Z-axis, if you notice the issue happens still, then you know the issue is with the motor since we know the Z-axis wire works fine. You’ll probably need a new motor in this instance.
You can get something like the Creality 42-40 Stepper Motors from Amazon.

If you find that the Y-axis motor moves fine without the grinding noise, it means that the problem is either coming from the Y wire or there is an issue with the mainboard-related Y controller.
To check what the specific issue is, you want to open up the mainboard case and swap the wires between Y & Z on the mainboard. This means your Z-wire is connecting the Y motor to the Y port.
You can then control the Y-axis movements on the control screen, and if the Y motor still doesn’t work properly, it means you have a mainboard issue since the Z wire is still okay.
Vice versa, if the Y motor is working properly, it means you have a Y wire issue which you want to look into. The three main things to check is the wires, the motors, and the mainboard which you want to check one after the other.
Sometimes your motor might not be getting enough power so if you have a multi-meter, you can check the potentiometer carefully to see how much output you are getting. This can be quite dangerous if you haven’t got experience, so be cautious.
Check the Frame of Your 3D Printer is Level as well as Other Parts
Another reason for the grinding noise in your 3D printer could be to do with the hardware, especially the leveling of the frame and other parts.
A user who has the Artillery Sidewinder X1 V4 had an issue with their extruder idler arm being higher on one side, creating extra force and pressure which created a grinding noise. They basically balanced the level of the arm and noticed that a lot of the sound was reduced.
After that, they re-adjusted the arm along with putting the belt back on properly and the noise got fixed.
Another thing you want to look into is the frame of the 3D printer, ensuring it is level on both sides.
Why Do Screeching Noises Happen in the Y & Z Axis?
- You don’t have a silent mainboard or silent stepper drivers
- Filament had bad curves or bends in the extrusion pathway
- Your printing temperature is too low
- Eccentric nut is creating a tight connection with the frame
- Z-axis is not lubricated well enough
- Not using noise dampeners to reduce sound
- There is loose debris caught in your fan or extruder
- Low current on your stepper motor
- There’s metal-to-metal contact somewhere
- Bad linear bearings
How to Fix Screeching & Squeaking Noises in 3D Printer
- Get a silent mainboard
- Use a filament guide to fix bad filament pathing
- Raise your printing temperature
- Screw in eccentric nuts if they are too tight
- Lubricate the Z-axis so it can move more freely
- Use feet dampeners to reduce noise
- Clean out loose debris from your fan
- Increase the current on your stepper motor
- Adjust any parts where metal rubs against metal
- Replace linear bearings with better ones
Get A Silent Mainboard
One of the key reasons why your 3D printer might have a squeaking or screeching sound is due to the stepper motors running when you don’t have a silent mainboard. This happened to me when I got my first 3D printer which was an Ender 3.
These have quite outdated motherboards that don’t have a silent driver, meaning the stepper motors get really noisy. This one is simply fixed by getting yourself a silent mainboard like the BIGTREETECH SKR Mini E3 V2 with TMC2209 Drivers from Amazon for example.

Use A Filament Guide To Fix Bad Filament Pathing
Another key reason that many users figured out for the squeaking noise in their 3D printers was due to friction from the filament moving through the extruder.
One user mentioned it could be from your filament rubbing on the sides of the extruder tensioner as it feeds through. They said it doesn’t happen constantly, but when they push the filament to the side, it starts to happen again.
A few different things could be happening here. One is where there is added pressure needed to pull the filament through the extruder since the filament is bending at difficult angles, so the stepper motor has more stress, causing these noises.
It could also be due to your printing temperature not being high enough so filament isn’t getting soft enough to extrude nicely.
To fix this, make sure your filament doesn’t have any sharp bends or curves while going into the extruder and through the PTFE tubing to the hotend.
I’d recommend 3D printing a filament guide to help your filament feed through nicely.
Someone else mentioned that it happened when they 3D printed with PLA rather than ABS, so it would have been a friction issue between the extruder and the filament.
After updating their 3D printer’s firmware to Klipper, one user started to have this creaking noise issue. They figured out that it was filament scraping against the edge of their aluminum extruder arm hole.
You can try putting pressure on your extruder lever to see if it quietens the noise, and if it does, you know it’s happening at the extruder.
They had a poorly positioned filament guide (the one to stop filament hitting the leadscrew) which forced their filament in at a weird angle.
They ended up 3D printing this filament guide instead to fix the issue.
Raise Your Printing Temperature
As previously mentioned, you can potentially fix this noise issue by raising up your printing temperature if your filament extrusion is the cause.
One user who had this issue said that the fix in his case was raising their printing temperature by a few degrees, so this is definitely worth trying since it’s a fairly quick fix.
Screw In Eccentric Nuts If They Are Too Tight
You could be getting your squeaking and screeching noises from the bed moving around on the Y axis.
It may be an issue with the eccentric nuts being too tight which is causing a lot of pressure on the axes when moving around.
Try to manually move all your axis to see if they move freely, trying different heights for the X axis carriage. The video below shows you the experience of someone who had the same issue. They fixed it by adjusting the eccentric nut below the print bed.
Lubricate The Z-Axis So It Can Move More Freely
These noises can definitely happen due to a lack of lubrication, meaning the 3D printer parts can’t move freely. Simply apply some lubricate to the Z-axis leadscrew and move it up and down a few times so the oil or grease can travel throughout.
As previously mentioned, you have two great options:
Use Feet Dampeners To Reduce Noise
It’s possible to significantly reduce the sounds your 3D printer is making by simply upgrading it with feet dampeners, which can be 3D printed.
Many comments mention that it’s their best inexpensive upgrade they’ve done on their Ender 3, reducing noise significantly. Another person said they were skeptical about them, but after putting it on their 3D printer, it made a massive difference in noise.
Someone was thinking about getting a silent board, but with these, they reconsidered since it helped out so much with the noise.
Clean Out Loose Debris From Your Fan & Extruder Gears
One cause of a squealing sounds could be if the fan catches some loose debris or filament from the print.
One user was experiencing a squeaking noise in their extruder and figured out that it was due to loose pieces of filament being cause in the extruder gears.
Simply clean out loose filament or debris in extruder gears, as well as in the fan. I’ve had some weird noises from my 3D printer’s hotend, only to find out that there was a piece of filament getting caught between the fan blades. After cleaning it out, the noise was gone.
Another user who was doing some cold pulls and ended up indirectly cleaning out pieces of filament from the extruder. After looking at the extruder housing by loosening it up, they found more pieces of filament there which they cleaned. After doing this, the squeaking noises stopped.
Increase The Current On Your Stepper Motor
This fix is quite similar to the bad filament pathway since it increases the load on the stepper motor. When you have a low current travelling through your stepper driver, it can create a screeching noise, though a less common reason.
Again, check out the video below for adjusting your stepper voltage, but be very cautious because doing this can be dangerous if safety precautions aren’t taken.
Adjust Any Parts Where Metal Rubs Against Metal
One user figured out that the squeaking noise from their 3D printer was happening due to a bed adjustment bolt that rubbed against the frame. You want to identify where the sound is coming from then try to resolve it.
They simply adjusted the bolt so that the metal wasn’t rubbing against another metal part, leading to the solving of their noise issue.
Replace Worn Out Fan Bearings & Fan Blades
A less common reason that I found out was from your fan’s bearings being worn out. If you find that this is your issue, simply replace the fan bearings with some new ones and this should solve the problem.
Sometimes you might get a damaged fan blade which will have to be fully replaced.
If you are 3D printing in a fairly dusty place, your fans are more likely to die out quickly, so keep this in mind. Luckily, fans are pretty cheap and simple to replace.
Some people have actually recommended adding some thin sewing machine oil to the fan’s bearing to increase the life of the fan. They mentioned that they have done this as a solution to computer fans for over 10 years.
Replace Linear Bearings with Better Ones
One user who noted the issue of screeching in the linear railings and bearings in the Prusa i3 stated they found that replacing their stock linear bearings with Igus Drylin Bearings did the trick.

They also recommended using white lithium grease, and only a tiny amount on the linear bearings to completely eliminate the possibility of screeching.