How to Fix Cura Errors – Non-Manifold, Watertight, Overlaps
Cura is one of the most popular slicers available for 3D printing users, so it can be a big problem dealing with different Cura errors, such as non-manifold models, missing surfaces and more.
That’s why I wrote this article, to teach you how to fix these Cura errors. Keep reading for more information.
How to Fix Non-Manifold Error in STL Files – Cura
One of the errors that can come up when slicing models on Cura is having non-manifold models or models with abnormal geometry.
Non-manifold error indicates a problem with your file. Quite possibly, there is a surface outside your model that is not printable or a surface inside the model where the mesh isn’t continuous, meaning there is a hole somewhere.
Here’s how to fix non-manifold error on Cura:
- Edit the model on Blender
- Use Meshmixer auto repair and erase and fill
- Use 3D Builder auto repair
- Reinstall Cura
1. Edit the Model on Blender
To fix the model, you’ll need to import it into a 3D modeling software that allows you to fix its geometry. One popular option is Blender, which is a free software available online.
An easy way to fix non-manifold errors is importing your file into Blender, hitting the option “Select All”, going to “Mesh” and then “Normals” and finally “Recalculate Outside”
.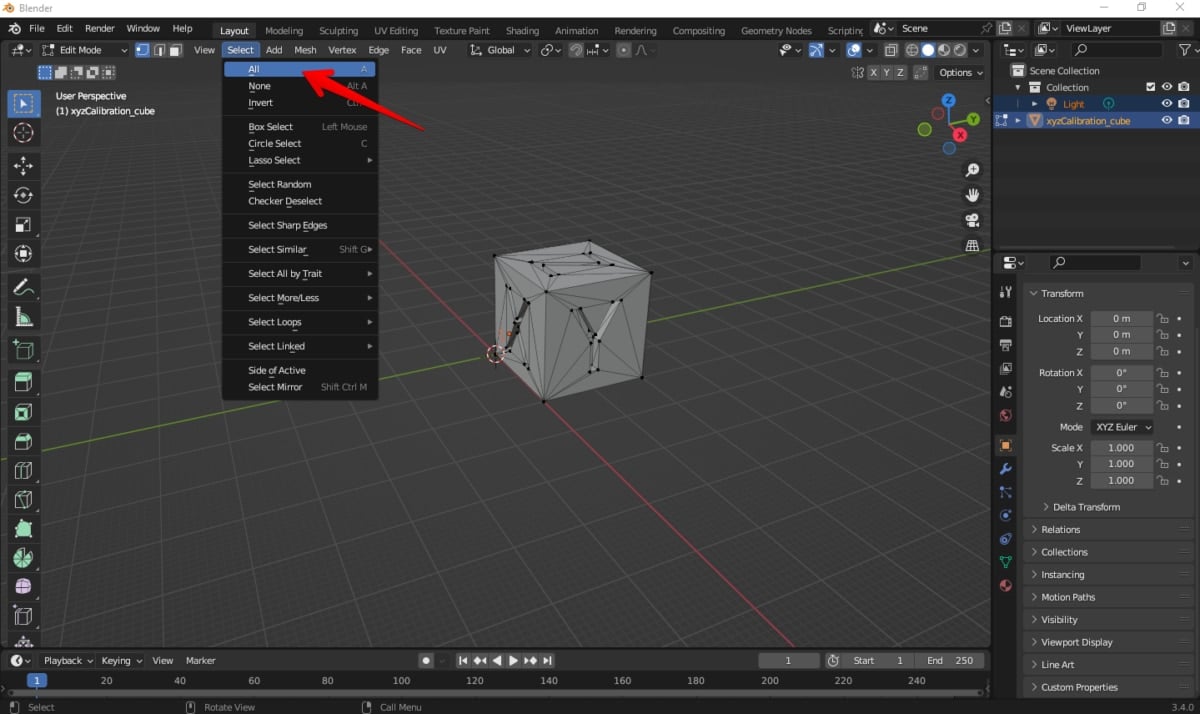
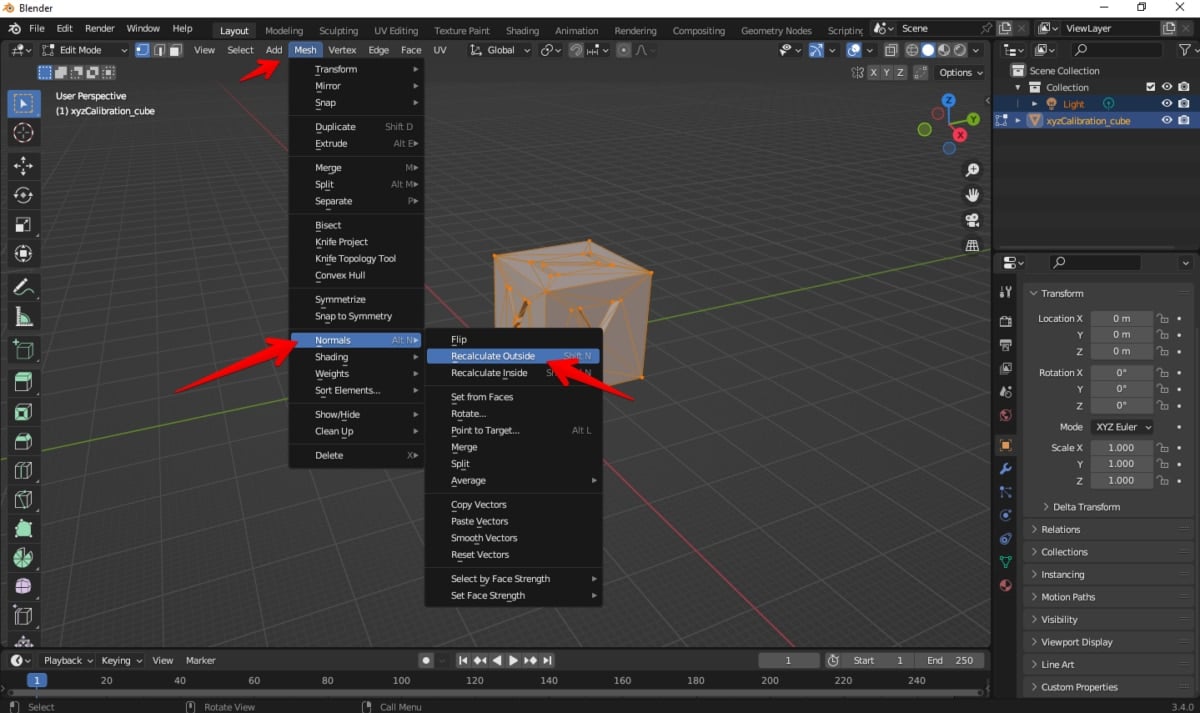
This helped a few 3D printing hobbyists fix the non-manifold errors they were getting on their models over at Cura.
Another way to fix it would be to import your STL file into Blender and go into “Mesh Edit Mode” with nothing selected and hit F3 to search for “Select Non-Manifold”. It should show up after typing just a few words.
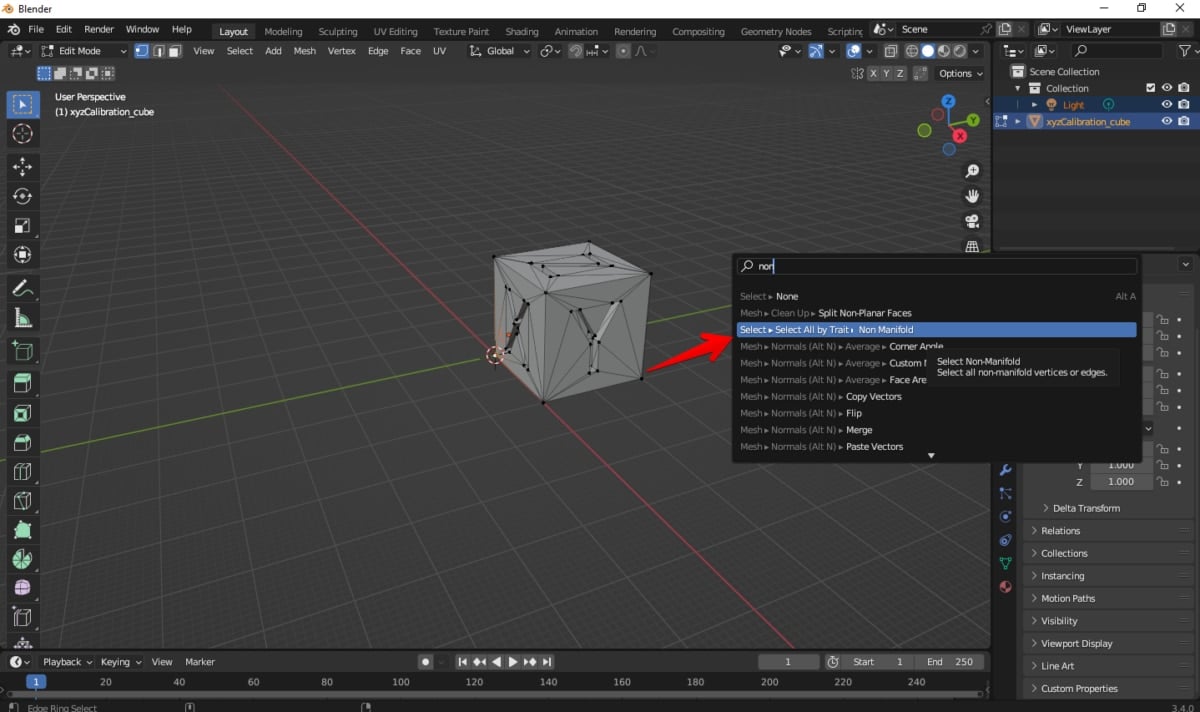
This will select all the problematic parts of your model. Then you can use different Blender cleanup tools to fix non-manifold edges, vertices and any other abnormal geometry present in your model.
Just be aware, as pointed out by users, cleaning each non-manifold error one by one can be a tedious task.
Check out the video below for detailed instructions on how to fix the non-manifold errors using Blender.
2. Use Meshmixer Auto Repair and Erase and Fill
Another option to fix non-manifold errors on Cura is using Meshmixer, which is a great 3D modeling software you can find to be downloaded for free.

You’ll need to go to “Analysis”, follow to “Inspector” and then you’ll see the software indicating where there are holes in the mesh.
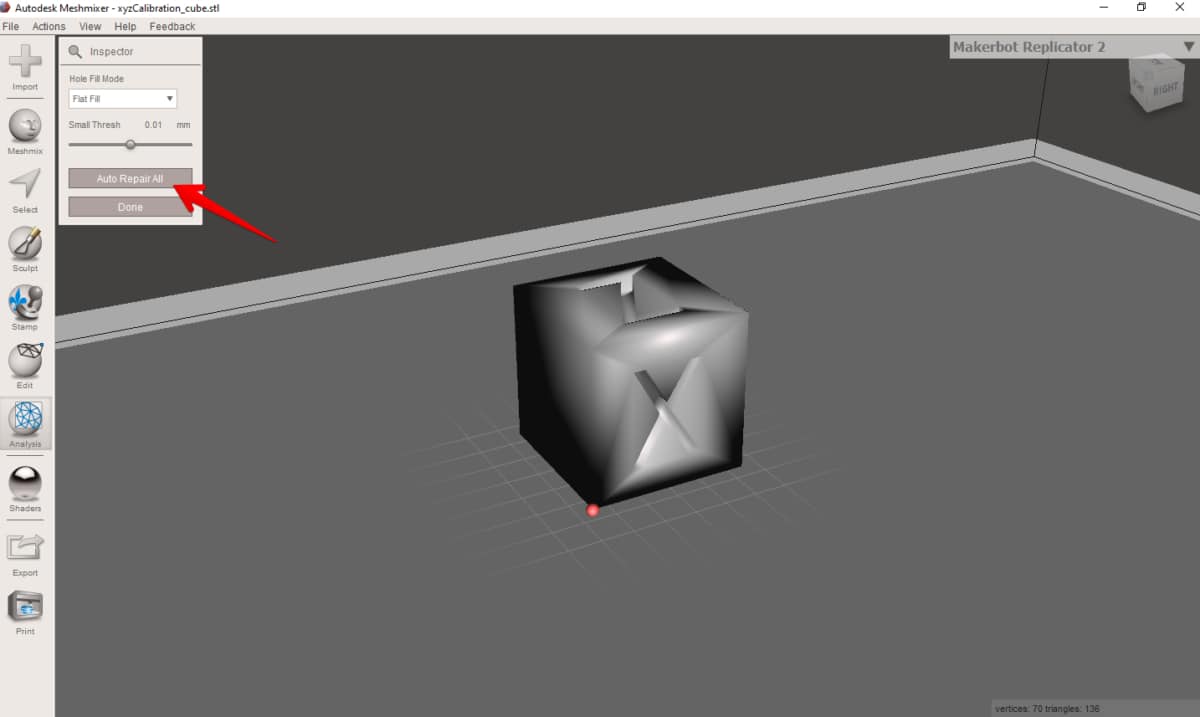
Now just hit “Auto Repair All” and the non-manifold will be repaired.
Another way to fix non-manifold errors using Meshmixer is using the “Erase and Fill” function.
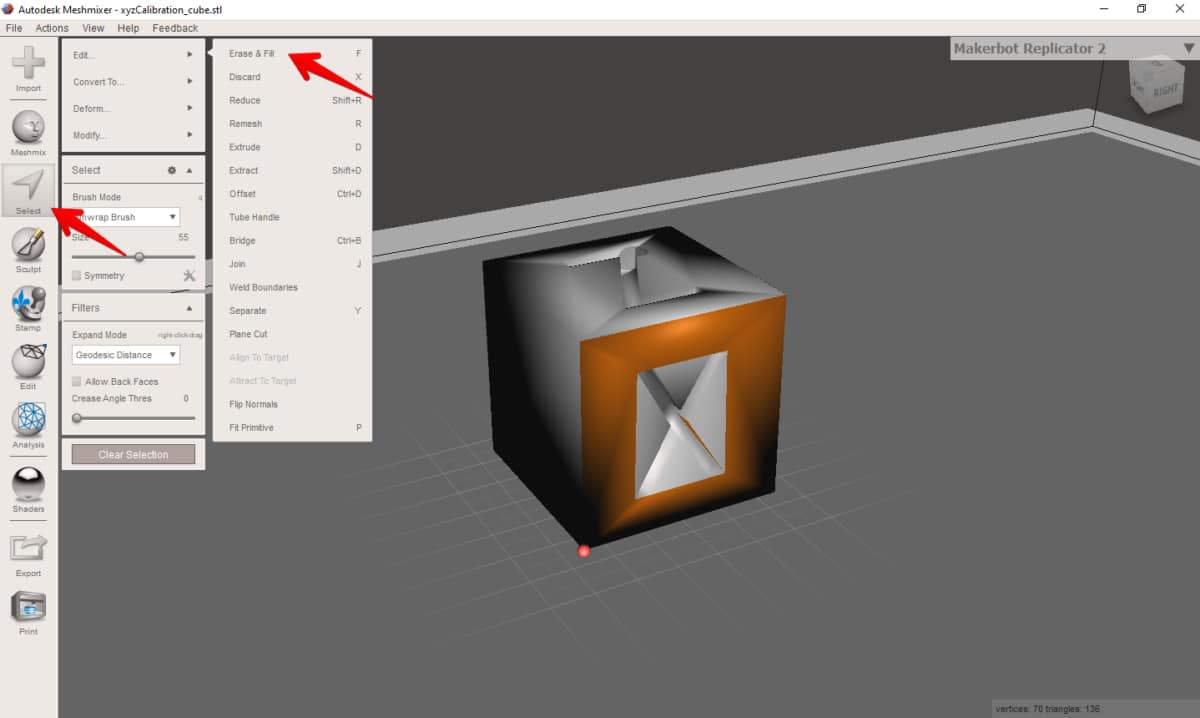
You will need to select the perimeter around the non-manifold areas, you can go to “Select” and click on the option “Erase and Fill”. You can then change a few parameters to make sure the option will fill the holes in your model in the best way possible.
A lot of users have used the methods above to repair their non-manifold issues, as it is an easy and fast way to solve these problems.
Many users think Meshmixer is the best option to repair non-manifold errors, as there are different possible fixes within one software.
Check out the video below for details instructions on how to use Meshmixer to fix your non-manifold errors.
3. Use 3D Builder Auto Repair
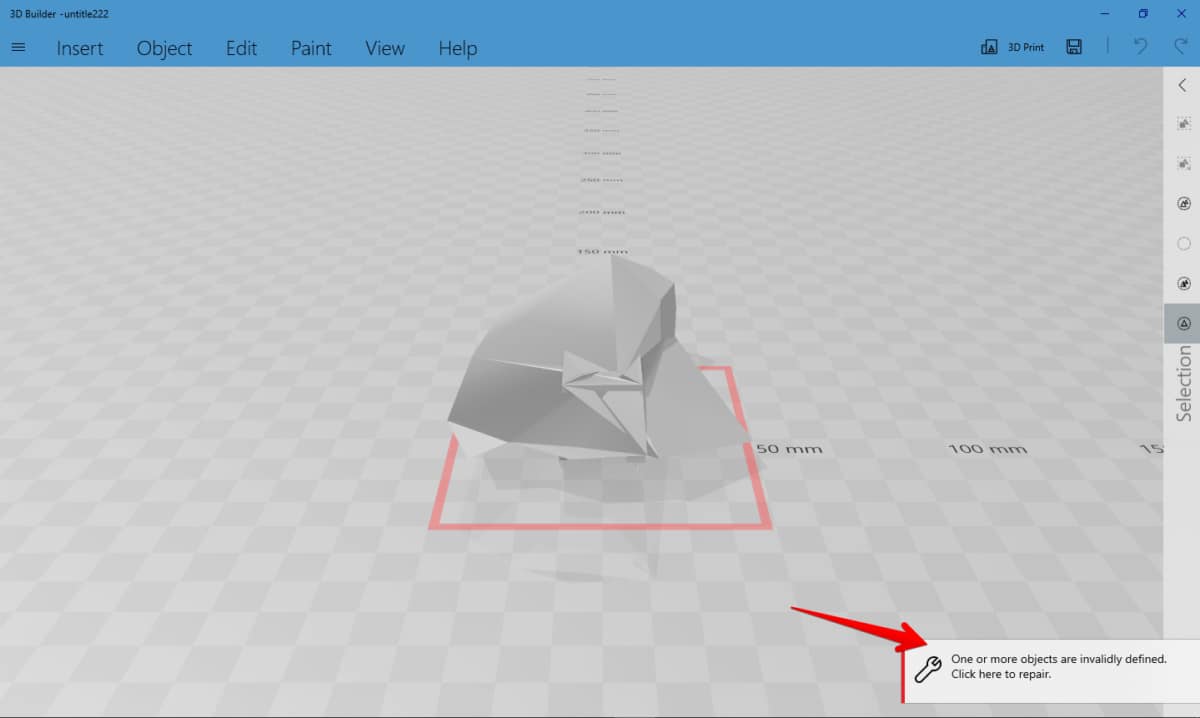
If you’re running Windows 10, you can use the 3D Builder to repair your non-manifold models. You can find the 3D Builder software on Microsoft Store App and it’s free to be downloaded.

When opening an STL file that has non-manifold issues on it, 3D Builder will automatically ask if you want to repair the file. After selecting to repair, you can save the file and then load it back into Cura.
Many users recommend 3D Builder as the best software to repair STL files as it is simple and features automatic functions that make fixing such errors really easy.
Another user who was getting a “Model is Not Manifold” error on Cura, solved his issue by importing his STL into 3D Builder and letting the software automatically detect non-manifold errors on the model.
After 3D Builder fixed his issues he just saved the model and imported it back to Cura.
Check out the video below to see in detail how to fix non-manifold errors using 3D Builder.
4. Reinstall Cura
Another possible fix you should try in case you keep getting non-manifold errors with multiple models is reinstalling Cura. You can find the latest Cura version to be downloaded online for free.
Sometimes Cura can give non-manifold errors after an update as one user experienced when he updated to version 4.6.1. It was only after reinstalling his 4.6 version that he was able to get rid of the non-manifold error that kept showing up for him.
Check out below the video with detailed instructions on how to properly install Cura.
How to Fix Missing or Extraneous Surfaces in Cura
Another common error that users experience in Cura is your model having missing or extraneous surfaces. That can affect your results and cause failed prints.
Here’s how to fix missing or extraneous surfaces in Cura:
- Use Meshmixer Make Solid option
- Use 3D Builder auto repair
- Ignore the message
1. Use Meshmixer Make Solid Option
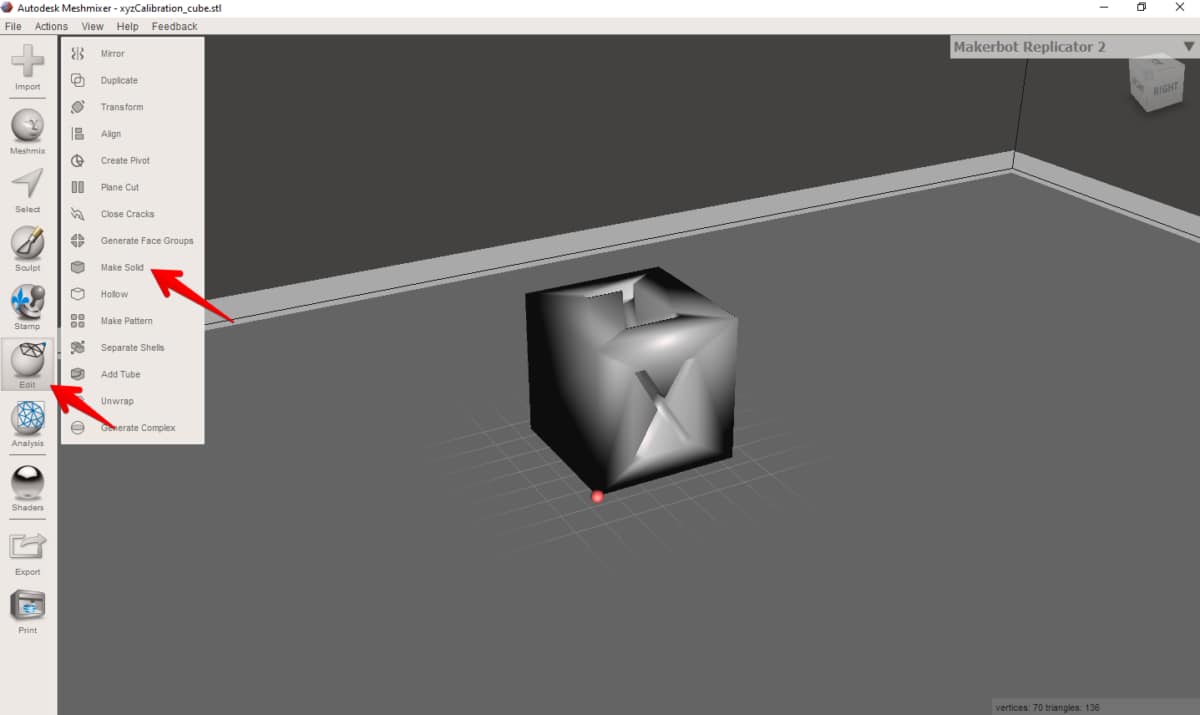
One way to fix missing or extraneous surfaces in Cura is using Meshmixer’s “Make Solid” option. Meshmixer is a free to download 3D modeling software.
You can find this option under “Edit” menu and there will be a few different parameters that you can change depending on your model.

One user was able to fix the missing or extraneous surface error he was getting on Cura by following this method. He was trying to 3D print a model from the Destiny STL Generator website.
After importing his STL file into Meshmixer he realized it was divided into two pieces, he then made both of them solid with the “Make Solid” feature, combined them and made the whole model solid using the same feature again.
After importing the file back into Cura, he no longer got that error message.
Check out the video below to see detailed instructions on the “Make Solid” function from Meshmixer.
2. Use 3D Builder Auto Repair
Another recommended fix for when Cura is showing the missing or extraneous error message is using the auto repair function from the 3D Builder software.
You can find the 3D Builder software available for free download on the Microsoft Store App. This software features an auto repair function that many users recommend for solving this type of problem.

Simply load your file into 3D Builder and the software will automatically detect any mesh issues that may be causing that error message over at Cura.
Then just let the software repair any problems it has detected, save the file and import it back to Cura. One user recommends this as the fastest and easiest way to fix these problems.
Check out the video below which features a 3D printing hobbyist using the Auto Repair function from 3D Builder.
3. Ignore the Message
Sometimes, Cura will give the missing or extraneous surface error message with areas that won’t affect your print. One option you can also make is to ignore the message and print your model anyway.
One user who was trying to 3D print a model he created himself in SolidWorks was getting this error on Cura, he then tried to print while just ignoring the message and found no problem at all.
Another user stated that not all error messages will actually cause bad prints and sometimes, depending on your model, you can ignore them.
He also reminded other users that you don’t have to fear damaging your machine just by printing a bad model.
How to Fix Model not Watertight in Cura
Many users experience the error message of your model not being watertight in Cura. That can lead to different problems when printing.
Here’s the main ways to fix model not watertight in Cura:
- Use 3D Builder auto repair function
- Use Meshmixer Make Solid function
- Use Netfabb repair function
1. Use 3D Builder Auto Repair Function
One way to fix a model not being watertight is using 3D Builder to auto repair it. 3D Builder is a free software that can be found on Microsoft Store App.
With it, you can import your STL file and the software will automatically detect any mesh problems and you can just hit the “Repair” option and wait a bit.
One user experienced two failed prints because of this error before downloading 3D Builder and using the auto repair function to fix his models.
After using the auto repair function on 3D Builder, just save your file and import it back to Cura.
2. Use Meshmixer Make Solid Function
Another possible method of making your models watertight is to use a function on Meshmixer called “Make Solid”.
Meshmixer is a free 3D modeling software you can download online. The “Make Solid” option may be found in the “Edit” menu, where you can modify a few different parameters according to your model.
One user really recommends using this function to make your models watertight. He suggests increasing the resolution, which is one of the parameters you can modify until you are fully satisfied.
Another user has been helped by this method several times in the past but dislikes the way that Meshmixer gives an ugly texture to the fixed models.
3. Use Netfabb Repair Function
Using the repair function on Netfabb, a 3D modeling software, is another possible fix you can try in order to make your model watertight.
Users really recommend Netfabb as one of the best software when it comes to making models watertight as you can do it in few clicks and it features a free version which you can download online.

To repair your model using Netfabb just import your model to the software and then click on the red cross symbol that’s on the top bar.

That’s the icon for repair, after clicking it you can go to “Automatic Repair”, then choose “Default Repair” and finally “Apply Repair”.

Then the software will you ask you to remove or to keep your old part, allowing you to keep only the fixed part.
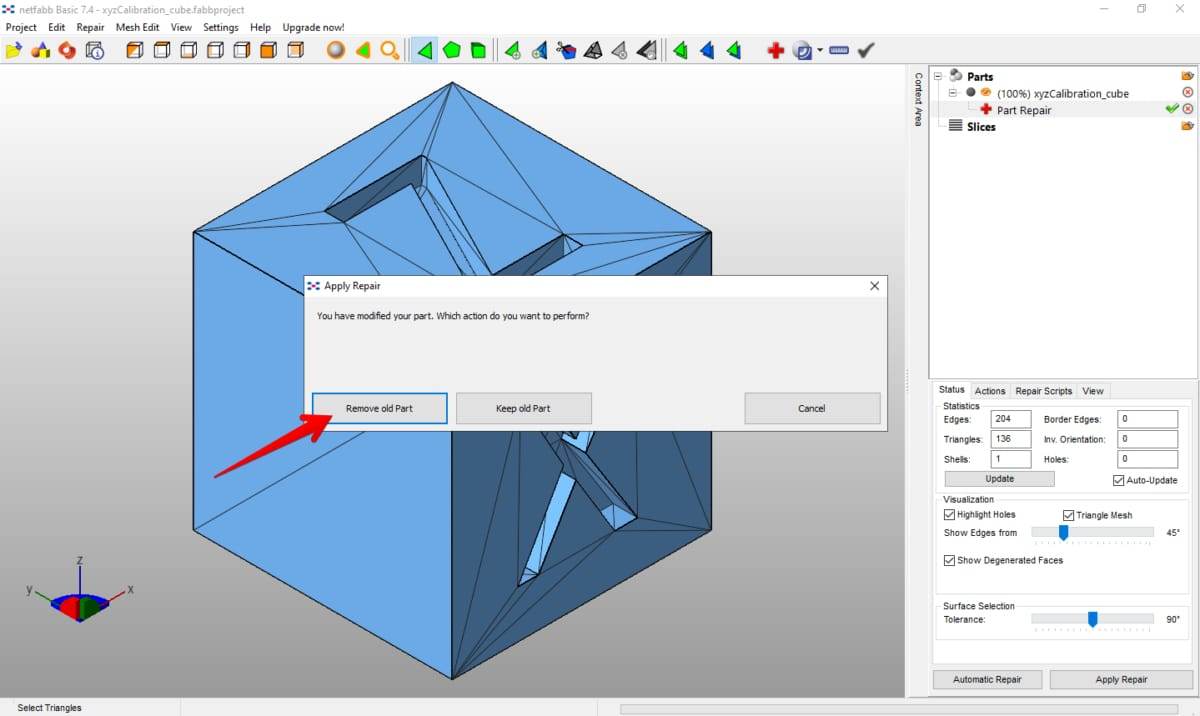
After removing the old part you should have only the fixed one and you’ll be able to export it as an STL by giving the part a right-click and going to “Export Part”.
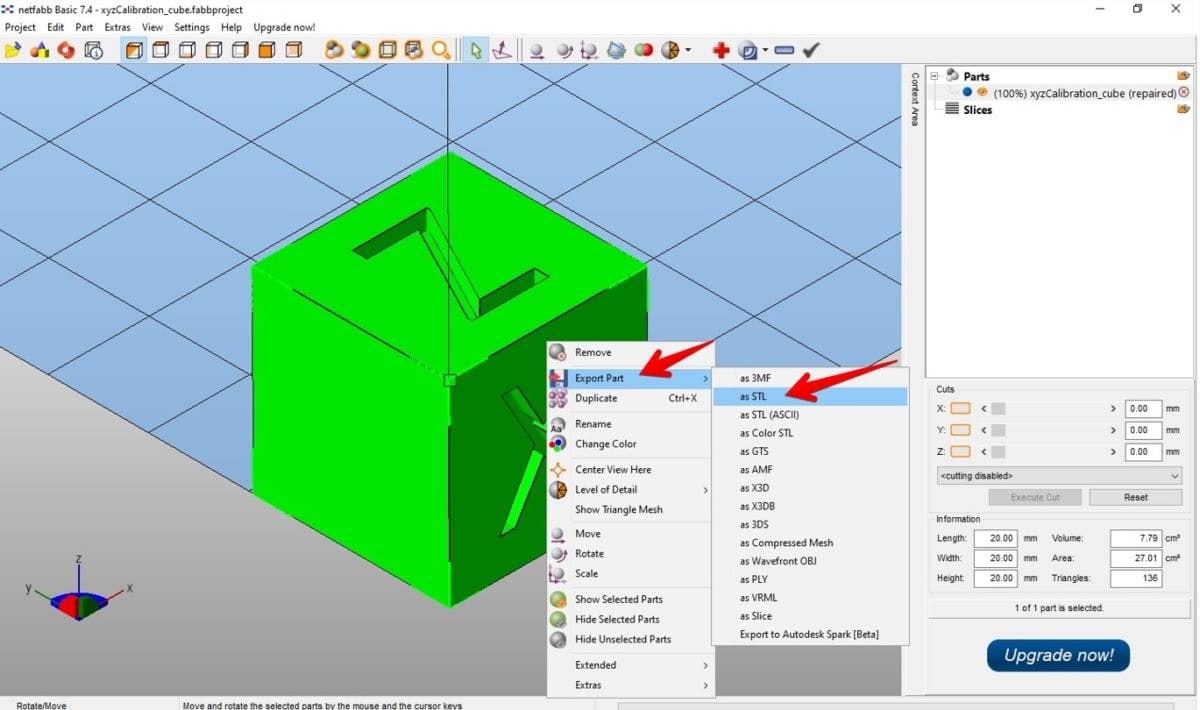
Check out the video below for detailed instructions on how to fix a model not being watertight using Netfabb.
How to Fix Not All Set as Modifier Meshes in Cura
The error “not all set as modifier meshes” is very common among Cura users and it can cause a lot of trouble when trying to 3D print a model.
Removing your build plate adhesion settings, such as a skirt, should work as a fix to the “not all set as modifier meshes” error in Cura.
One user had this problem when he attempted to 3D print something at 100% scale. However, it wasn’t experienced when he changed the scale to 99%.
He was able to print and slice his model after removing the skirt from it.
Another user was only able to fix this issue after unchecking the brim and raft function and getting the whole bed available to print.
Users warned him to check his print constantly as unchecking this function may cause warping on the print.