How to Fix 3D Printing Raft Problems – Best Raft Settings
3D printing rafts are a very useful tool that can help you print different objects, but sometimes they can be the cause of issues as well, so I wrote this article to help you fix any of these problems.
Keep reading to find out more about it.
How to Fix 3D Print Sticking to Raft
One of the most common issues when 3D printing with rafts is having them stick too tightly on the object, in a way that it won’t come out.
Here’s how to fix 3D prints sticking to the raft:
- Increase Raft Air Gap
- Lower Bed Temperature
- Lower Printing Temperature
- Use Higher Quality Filament
- Heat Up the Bed
- Don’t Use a Raft
1. Increase Raft Air Gap
The first method to fix a 3D print sticking to the raft is to increase the Raft Air Gap in your slicer. Cura has a setting called the Raft Air Gap which you can find it under the “Build Plate Adhesion” section.
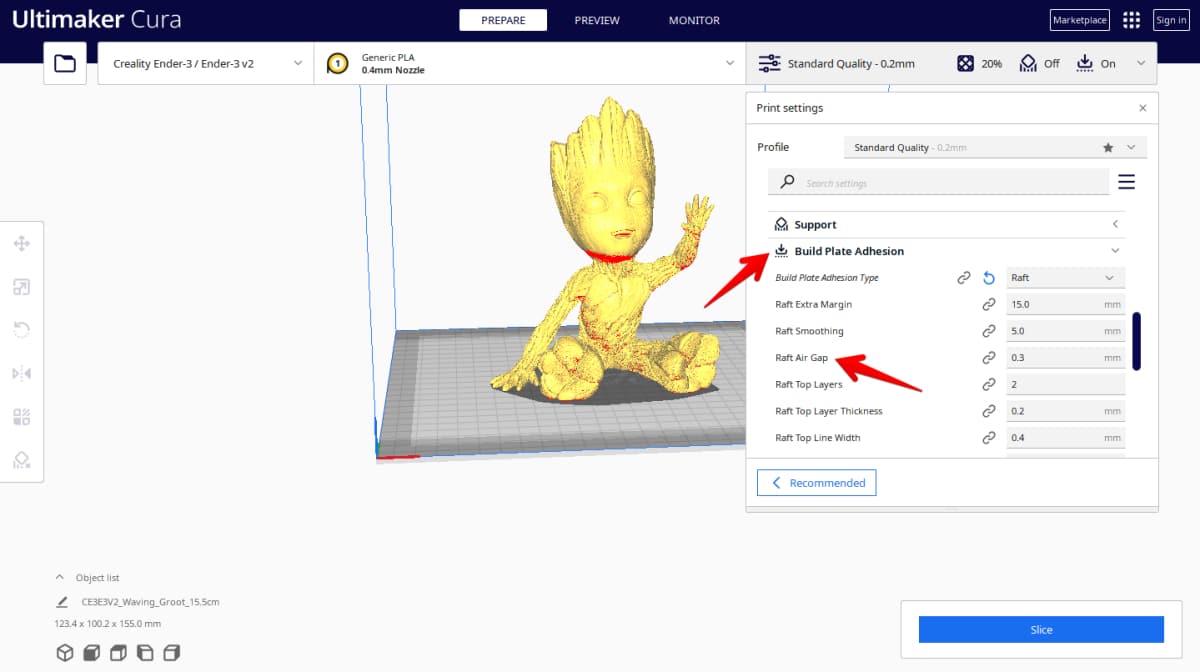
This setting will allow you to increase or decrease the distance between the raft and the print. If your 3D print is sticking to the raft, you should try increasing it.
The default value for that setting in Cura is 0.2-0.3mm and users will usually recommend it to increase it to 0.39mm in case your rafts are sticking to the model. That way your rafts won’t be printed too close to the object, in a way that will be difficult to get them out.
One user recommends printing with a gap of .39mm, with a low build plate temperature, and using a blade knife.
You can use one such as the MulWark Precision Hobby Knife Set, which is made of stainless steel and perfect to remove any leftover raft remaining on the object.

Users really recommend this hobby knife set as it is really helpful when cleaning up 3D prints with unique shapes and hard to reach areas. You also have the choice of multiple handles and blade sizes for extra convenience.
Another user fixed his problem by changing the Raft Air Gap from 0.2mm to 0.3mm, which stopped the rafts from sticking to his print.
Just be aware that sometimes, increasing the Raft Air Gap may result in a worse bottom layer.
Check out the video below by SANTUBE 3D, in which he goes through all the raft settings, including the Raft Air Gap.
2. Lower Bed Temperature
Another recommended fix for when your rafts are sticking to the print and don’t want to come off is lowering your bed temperature.
That can be a good fix, especially for users who are having this problem while 3D printing with PLA.
One user who was experiencing this problem got recommended to lower his bed temperature to 40°C, so that way the raft won’t stick too much into the final object.
Another user also recommended lowering the bed temperature as a way to fix rafts sticking to the print, since the raft gets really hard to remove when at higher temperatures.
After lowering his bed temperature, the raft peeled off easily in one entire piece.
3. Lower Printing Temperature
If you’re having problems with the raft sticking to your object, you should try lowering your printing temperature, as that can help solve this issue.
That’s because when the temperature is too high, it makes the filament softer, making it adhere more.
To find out the best printing temperature for any situation, it is recommended to print a temperature tower. They are a 3D model designed to help you find the best settings for your print.
Check out the video below to learn how to print one.
4. Use Higher Quality Filament
If none of the steps above work and this problem continues on, you should consider 3D printing with a higher-quality filament.
Sometimes it may be a problem with the filament you are using, as noted by a few users.
One user says he had problems with his rafts sticking to the print, and the only way he could solve it was by changing his filament and getting a new one. This can be down to using branded filaments with a good reputation.
Another thing you can do is to dry your filaments to take out the moisture from inside.
If you’re interested in learning which filaments are the best, check out the video below which does a filament comparison that is really interesting.
5. Heat Up the Bed
Another possible fix that can help you detach the rafts that are sticking to your model is to peel them off when the bed is still hot. Even if your print has already cooled down, you can try heating up the bed for a few minutes, and then the raft should peel off a lot easier.
One user recommends heating up the bed as an easy fix for when the rafts are stuck to the object.
Check out the video below to understand more about raft settings.
6. Don’t Use a Raft
The last thing you can try is to just not use a raft at all, especially if your 3D print has enough of a contact point with the bed surface. The user below had issues with his raft sticking to the print.
If you use a good adhesive product like glue stick on the bed and have a good printing & bed temperature, your models should stick to the bed nicely without a raft. A raft is mostly recommended for larger models that don’t have a good amount of contact on the bed, but still useful in many cases.
Work on getting good first layers, bed adhesion, and dialing in your settings to improve your 3D printing experience.
How to Fix 3D Print Not Sticking to Raft
Another common issue when 3D printing with rafts is having them not stick to the object, causing the print to fail.
Here’s how to fix 3D prints not sticking to the raft:
- Lower Raft Air Gap
- Level the Bed
- Decrease Initial Layer Height
1. Lower Raft Air Gap
If your issue is that the rafts are not sticking to your 3D prints, then you should try lowering the “Raft Air Gap”.
That’s a setting you’ll find over at the Cura slicer, under the “Build Plate Adhesion” section, and will allow you to change the distance between the raft and the model.

The default value will usually be at 0.2-0.3mm and it is recommended to lower it to around 0.1mm if your print is not sticking to the raft. That way your raft will be closer to the model, and it will stick firmly to it. Just be careful not to lower it too much and end up not being able to remove it.
A lot of users recommend this method in case your raft is not sticking to your model, as most of the raft issues have to do with the Raft Air Gap.
Another user who was printing with ABS was also having the problem of the rafts not sticking to his models, but solved this issue by lowering the Raft Air Gap.
2. Level the Bed
Another possible reason for your rafts to not be sticking to your models is having a bed that isn’t properly leveled. It is a common practice to manually level your bed and there are a few different ways you can do it.
Check out the video below to learn how to level a 3D printer bed manually.
You might also have an issue if your bed is warped or not flat. I wrote an article about How to Fix Your Warped 3D Printer Bed that teaches you about dealing with a warped bed.
One user stated that if the problem is not solved by lowering your Raft Air Gap, then it probably means you got an uneven bed.
3. Decrease Initial Layer Height
Another possible fix for your rafts not sticking to your models is decreasing your Initial Layer Height.
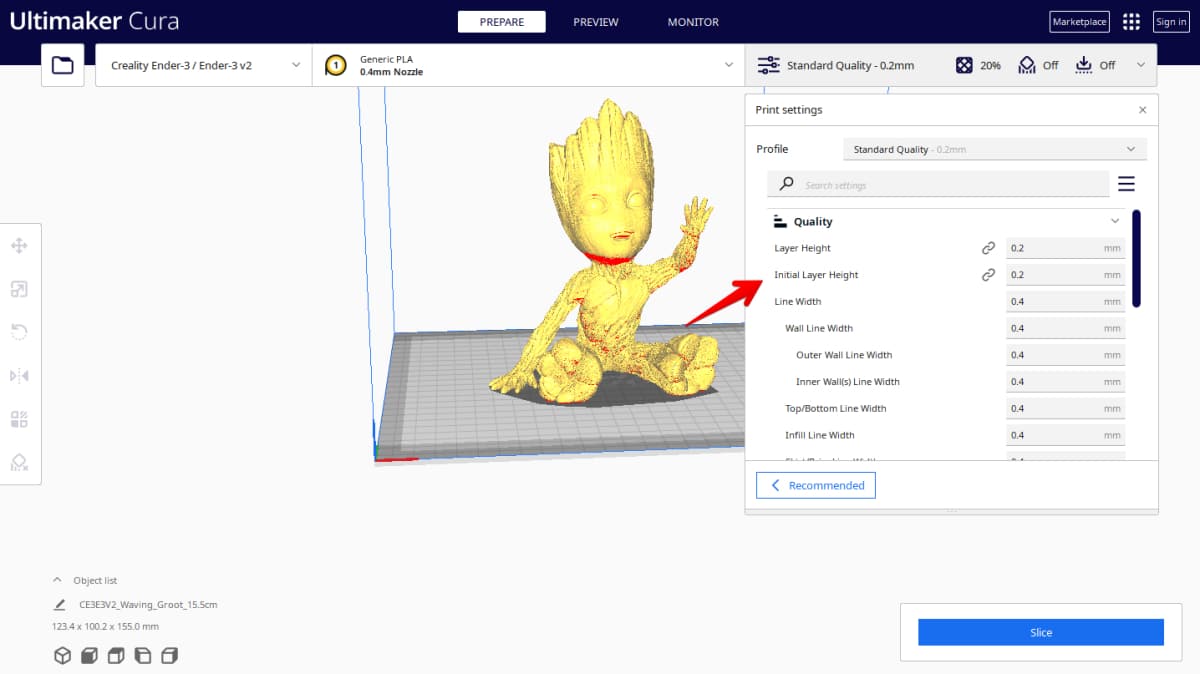
That may solve the issue, especially if the raft is not sticking to the first layer you’re trying to print.
One user who was experiencing this issue got recommended lowering both his raft air gap and his initial layer height, which was at 0.3mm.
That way, the raft will have more room to connect to the model and the chances of the raft not sticking will be a lot fewer.
Check out the video below for more information on how to use rafts when 3D printing.
How to Fix Raft Warping
Having raft warping is another issue commonly experienced when 3D printing with rafts.
Here’s how to fix rafts warping in your 3D prints:
- Level the Bed
- Increase Bed Temperature
- Prevent Ambient Airflow
- Use Adhesive Products
1. Level the Bed
In case you are experiencing warping of the rafts during your printing, the first fix you should try is making sure your bed is level.
If your bed is uneven, it can contribute to your model or raft warping since it doesn’t have good adhesion to the bed surface. Having a level bed can help to fix warping issues with rafts.
One user considers it the most important step in fixing any raft warping that your print may be having.
Another user recommends checking really well if your bed is level, as sometimes just a simple check won’t be enough to notice. If the bed is just a little bit off, that can be enough to cause rafts to warp.
Check out the video below to see more information about leveling the bed.
2. Increase Print & Bed Temperature for Initial Layer
Another possible fix to prevent your raft from warping is increasing the print & bed temperature for the initial layer. These settings are known as the Printing Temperature Initial Layer and Build Plate Temperature Initial Layer in Cura.
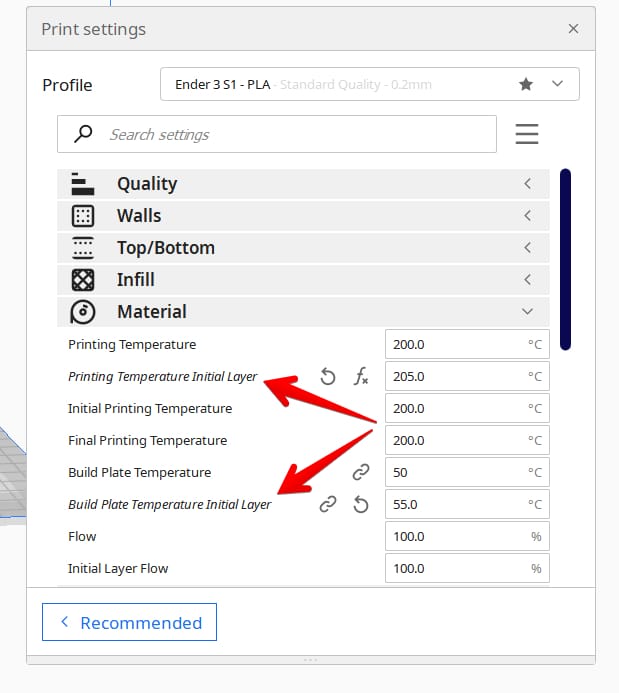
Warping is usually down to the changes in temperature between the filament, so when the bed is hotter, that temperature difference is decreased. You only need to use a higher temperature of around 5-10°C.
One user recommended to do this, as he normally prints at a bed temperature of 60°C, with the first layer being at 65°C.
3. Prevent Ambient Airflow
In case your rafts are experiencing warping, that may be caused by ambient airflow, especially if there’s a window open with drafts, or your printer is running near a fan/AC.
Depending on the conditions around your 3D printer, you should think about purchasing or creating an enclosure, which can help to provide a controlled environment for your printer.
One of the most popular enclosures is the Comgrow 3D Printer Enclosure, which is a perfect fit for printers such as the Ender 3 and has flame-retardant material.

Users really enjoy the Comgrow Enclosure as it will surely keep it warm inside so that the printer operates more effectively even if your bedroom is chilly. Additionally, it lessens noise and keeps out dirt and dust that might harm your print.
I wrote an article about the 6 Best Enclosures Available, which you can check if you’re interested in buying one.
For many 3D printing hobbyists, the air is the main reason for any warping, especially in rafts. They recommend getting an enclosure or making sure your printer is in a very controlled ambient.
Check out the awesome video below that teaches you how to build your own enclosure.
4. Use Adhesive Products
Another possible fix for any warping on the rafts is sticking them to the bed with the help of adhesive products.
Users recommend Elmer’s Purple Disappearing Glue from Amazon, which dries clear and is a decent price. This glue helped one user fix his problem with rafts warping during his printing.

He really recommends it as he tried all methods listed above but the glue was the only fix he could get working to stop his warping issue.
Check out this video below to understand more about the issue of warping in general.