5 Ways How to Fix 3D Printer Running Out of Filament – Ender 3
You can now easily produce objects of different sizes and complexities thanks to 3D printing. However, one common issue many 3D printing users face is running out of filament mid-print. There are several ways to fix this issue anytime you experience it.
To fix a 3D printer running out of filament, you can install a basic filament sensor on your 3D printer or use a 3D printer that already has one installed. You can also pause and manually change out the filament. Some people choose to use larger filament spools or even weigh filament before printing.
Continue reading to learn more about these methods in more detail to help you fix a 3D printer running out of filament.
How to Fix 3D Printer Running Out of Filament
Here’s how to fix your 3D printer running out of filament:
- Use a filament runout sensor
- Pause and manually reload the filament
- Use a larger filament spool
- Weigh your filament spool before printing
- Print the unfinished section separately
1. Use a Filament Runout Sensor
One method of fixing a 3D printer running out of filament is to use a filament runout sensor that comes with your printer. A filament sensor is designed to detect when the filament runs out.
It is easy for your printer to run out of filament without you noticing, especially during long prints. So, if the sensor detects that your filament is about to run out, it will pause the print and give you a heads-up.
This allows you to load a new filament spool manually to resume printing. However, not all printers have a filament runout sensor, so you might have to purchase one and install it as an add-on accessory. Check out the Creality Ender 3 V2 Filament Sensor that most users recommend.
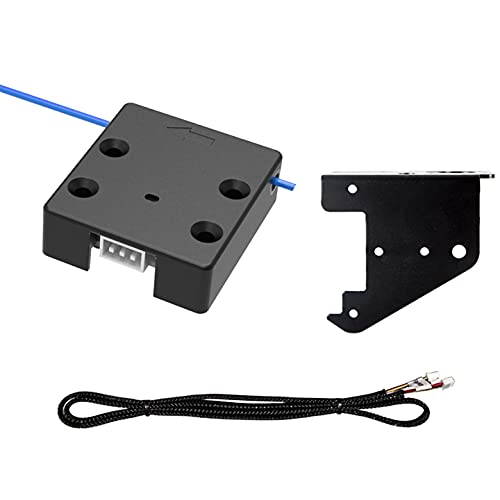
- Only used for 32bits motherboard like version 4.2.2, 4.2.7. Suitable for Ender 3/ Ender 3 V2/ Ender 3 pro / Ender 6 / CR-10S PRO/ CR-10 V2 V3/ENDER 3 MAX. But the installation bracket is only used for Ender 3 series, as Ender 6 and cr10s pro printer already have the sensor installation holes or bracket
Prices pulled from the Amazon Product Advertising API on:
Product prices and availability are accurate as of the date/time indicated and are subject to change. Any price and availability information displayed on [relevant Amazon Site(s), as applicable] at the time of purchase will apply to the purchase of this product.
Many users love the Creality Ender 3 V2 filament sensor because it fits and looks good. Additionally, the sensor is not optical; it’s a micro switch that touches the filament.
Someone else commented that the item was a nice upgrade that works well when doing long prints. This is because it stops the program if your filament breaks until you fix it, and it will resume the print from that spot.
One user wanted to leave his Ender 3 printer overnight but feared that his filament would run out mid-print. Someone suggested installing a filament runout sensor to stop the print and resume when the filament has been reloaded.
However, you will need to install it and enable it in the firmware as shown in the video below.
Another user suggested that if you want to rely on a filament sensor, ensure that you cut the far end of the filament square. This is because the end of the spool has a kink that can get stuck, so the filament sensor would never see the end.
2. Pause and Manually Reload the Filament
Another way of fixing a 3D printer running out of filament is to pause the print and manually reload the filament. Here is a step-by-step guide on how to go about it:
- Step 1: Pause the Print
Immediately your filament is about to run out, you should pause your print on your slicer or your printer’s LCD menu. That is if your 3D printer does not have a filament runout detection sensor.
You should use the “Change Filament” setting to pause the print and prevent the print head from moving further to allow you to switch out filaments.
- Step 2: Replace the Filament
Get rid of the remaining filament from the extruder and manually load a new filament roll. You can heat the extruder to remove the remaining filament easily. To prevent any mismatch, use the same type and color of filament as the original one.
- Step 3: Prime the Extruder
Priming the extruder will help eliminate air gaps that might ruin your print. You can do this by pushing the filament through the extruder until the printer consistently extrudes it through the nozzle.
- Step 4: Clean the Nozzle
Clean the nozzle carefully using a wire brush, tweezers, or needle to remove filament residues. Do it gently to avoid damaging it.
I wrote an article called How to Change Filament On Your 3D Printer – Ender 3 & More, which you can check out to learn about improving the quality of your prints.
- Step 5: Resume the Printing Process
Once you’ve loaded the new filament, use your slicing software or printer’s control panel to resume printing. Your 3D printer should pick off from where it left off.
One user said they could successfully get multicolored prints after their filament ran out by switching it out mid-print. He followed the procedure below:
- Paused the print
- After that, he moved the print head a few units to the side and noted the number of units.
- Retracted the filament until it could be removed
- Removed the excess extruded filament, then moved back the print head the same number of units in the opposite direction.
- Then, he resumed printing.
A user suggested keeping some spare Teflon tubing to weld together filament ends inside without messing up the filament diameter too much.
Someone commented that he just fed the new filament in while the printer was running, and it fused to the old one in the extruder melt zone and continued to print seamlessly.
Someone was inquiring how to pause and change filament mid-print for his Bambu Lab P1P. In response, he was told to pause the print from the P1P control screen, and the print head will move to the purge bucket.
After that, he was supposed to go to the feeding menu, unload the old spool, load the new spool, and unpause for the printer to pick off from where it left. However, he paused while the extruder laid the infill to hide any layer shift.
Another user stated that you don’t need to pause and change when mid-print: you can simply push up the new filament to the old one and keep gently pushing until the extruder gear grabs it. He also warned that using the unload function can introduce layer shifts.
Here’s a video on how to load 3D printer filament into an Ender 3 V2.
3. Use a Larger Filament Spool
Purchasing a larger spool might be the best option if you run out of filament regularly. A larger filament spool holds more filament, reducing the number of times it gets depleted.
However, you should check your printer’s specifications to see the maximum spool size it can accommodate. The following are the available spool sizes available for 3D printers:
- 500g (1.1 pounds): This filament size is often chosen by people undertaking projects requiring low filament usage or for smaller prints. You can use something like the 500g Flashforge PLA Filament.
- 1KG(2.2 pounds): The 1kg is the most commonly used filament spool size for most 3D printers. It provides a good balance between a substantial amount of filament and ease of handling. Check out the 1KG Polymaker Matte Army Beige PLA Filament on Amazon.
- 2KG (4.4 pounds): For larger prints or longer-duration projects, the 2kg filament spool may be preferred, like this 2KG Sunlu PLA Filament you can find on Amazon.
- 5KG (11 pounds): Like the 2KG spool, the 5KG spool is used for large prints that consume a lot of filament. It reduces the frequency of carrying out filament changes. If you need a large filament spool, I would go for the Black 5kg Polymaker PLA Filament from Amazon.
While the 1kg spool sizes are the most common for 3D printers, the ability to accommodate larger spools may vary depending on individual printer modifications and personal preferences.
Check out the Spool Holder – Fat Tracks Edition by Wavexx available on Thingiverse that can enable you to support filament spool sizes greater than 2kg firmly.
One user who got his son a 3D printer said it ran out of filament while he was carrying out a test print and wanted to know how to proceed. Another user commented that they would need enough filament to complete the job if their printer didn’t have a filament sensor.
He suggested good deals for filaments on Amazon, adding that he previously bought 1 kg rolls for $12.
Here’s an example of a custom spool holder for larger filaments.
4. Weigh Your Filament Spool Before Printing
Another method of fixing a 3D printer running out of filament is to weigh the filament before printing and use a calculation to estimate the approximate amount of filament that will be required.
You could measure the filament’s weight using a tool like the Amazon Basics Stainless Steel Digital Scale with LCD Display from Amazon.
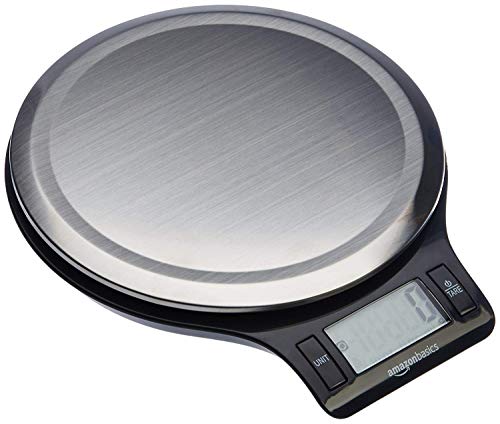
- Stainless steel digital kitchen scale with widescreen LCD screen
Prices pulled from the Amazon Product Advertising API on:
Product prices and availability are accurate as of the date/time indicated and are subject to change. Any price and availability information displayed on [relevant Amazon Site(s), as applicable] at the time of purchase will apply to the purchase of this product.
Many slicers can provide you with an estimate of the length of filament that you will require for a print. This length will help estimate the volume and weight of the filament so you can determine if you have the correct quantity of material to finish the print.
A user was inquiring what he should do if he ran out of filament and his printer didn’t have any sensor. Another user suggested that a potential solution would be to slice the original file in a program like Cura to estimate how much filament the print would take.
After that, you need to weigh the spool using a postage scale or something similar to see how much filament you have left. Take out the weight of the spool and if you can’t find the weight online, use 300g as a conservative estimate.
You can then calculate if you have enough filament to complete your print using the formula below:
Total Weight – Weight of Spool = Weight of Filament > Weight Estimate (weight needed to complete print)
Check out this video that explains how you can determine how much filament is on the spool and if it will be enough for your next print.
5. Print the Incomplete Section Separately
The last method you can resort to is to print the incomplete section separately. The print head and nozzle of a 3D printer that doesn’t have a filament runout sensor will continue moving along the path it was supposed to, despite the filament running out.
So, if you fail to notice that the filament is about to run out and pause the print, you might have to generate a new G-Code to print out the unfinished section. You can follow this procedure:
- Step 1: Measure the Height of Your Unfinished Object
First, you’ll need to measure the Z height of your unfinished print. It would be best to use a digital caliper with a depth gauge for the most accurate measurements. I recommend the Electronic Digital Caliper Measuring Tool with a Large LCD Screen from Amazon.
- Step 2: Reslice the Object with the Printed Part Below the Print Bed and Save the G-Code
Now open up your slicer and open your original STL file. Move the object below the print surface by the amount you measured using your digital caliper.
In Cura, inputting a negative value for the height you just measured on the Z axis will bury the printed part of the object. Anything below the print surface will not be printed.
- Step 3: Save the New G-Code File
After that, save the new G-Code file on your computer. Ensure you maintain the same printer settings you used for the original file.
- Step 4: Print the Unfinished Section
Export the new G-Code file to your printer and print it out.
- Step 5: Glue the Two Parts Together
The next step would be to glue the model’s two parts together. Superglue can be a suitable adhesive. Place it on the original model for it to stick better.
- Step 6: Fill the Gaps in Your Print
If you can see any visible gaps in your model, you should repair them with a solution of space-filling epoxy before going to the final step.
- Step 7: Sand and Paint the Object
You might need to sand and polish your final print to look seamless. You can choose to paint the whole print to make the joint invisible.
One user was looking for a solution after leaving his print and falling asleep after the filament spool became empty. Someone commented that they needed to keep the print on the bed, measure the height of the last layer, look for that layer in the G-Code, and delete everything before that.
However, they needed to keep the setup code, like temps and fan speed, the same for it to work. The user replied that they would try it out.
Another user who tried this method said he couldn’t accurately measure the object’s height using a caliper. Instead, he moved the print head to the top of the print and read the Z-height from the panel.
After measuring the layer height as best as possible, cut the model at that height and print the remainder as a new part for gluing together.
Check out this video which explains how you can print an unfinished model after the filament runs out mid-print.