How to 3D Print a Lithophane in Cura – Great Quality + Example
Lithophanes are fun, translucent optical illusions you can create using a 3D printer. However, printing Lithophanes can be difficult for some as their structures and designs can be quite complex.
I’ll show you how to properly set up and slice a Lithophane print in Cura for 3D printing.
To successfully 3D print a Lithophane model in Cura, you can import a JPG or PNG file directly into the Cura software. You’ll then need to input some settings based on preference or leave it as default, then use 100% infill. It’s best to orient the Lithophane vertically.
In this article, I’ll be giving several helpful tips and hacks on how you can achieve this. So, keep on reading for more helpful information!
How to 3D Print a Lithophane in Cura
As I mentioned earlier, Lithophanes are quite delicate models. So, you will want to tweak and adjust your slicing workflow a bit to print them successfully.
This video from YouTuber tr3nD Maker provides a great overview of the entire process, from conversion to slicing and printing.
Let’s go through the steps you have to take when printing a Lithophane model:
- Convert your image to a 3D model
- Edit & slice the model in Cura
Convert Your Image to A 3D Model
Before printing your 2D image as a Lithophane, you must convert it into a 3D STL file. If you want to avoid doing this, you can download several Lithophane models from sites like Thingiverse.
However, if you want to turn a custom image into a Lithophane, you’ll have to handle the conversion yourself.
Lithophane black magic
byu/HeightAquarius in3Dprinting
Note: For better model quality, some 3D printing hobbyists advise converting your image to black and white before turning it into a 3D model. They say the contrast helps bring out the image’s details better.
You can use image manipulation tools like Photoshop to achieve this. I prefer using Windows Photos’ image editor for this.
I’ll show you how to do this in a later section.
There are several ways you can convert a 2D image into a Lithophane. I’ll be using this image from The Mandalorian to demonstrate this.
Here are two of my favorite methods:
- Cura
- 3DP Rocks
Let’s take a look at them.
Creating a Lithophane in Cura
Cura provides a handy method for turning 2D images into 3D models. This is possible thanks to its Image Reader plugin.
You can check out this Lithophane created completely in Cura below.
I didn’t know lithophanes were so simple. They were hiding in Cura all along.
byu/MrYesterday in3Dprinting
Here’s how you can create a Lithophane in Cura:
- Convert the image to black and white (optional)
- Import your image into Cura
- Input the model’s settings
Step 1: Convert the Image to Black and White [Optional]
When converting the image to black and white, I prefer using Windows Photos’ image editor. Here’s how I use it:
- Open the image in the Photos app.
- On the top bar, click the edit icon or use the Ctrl + E shortcut
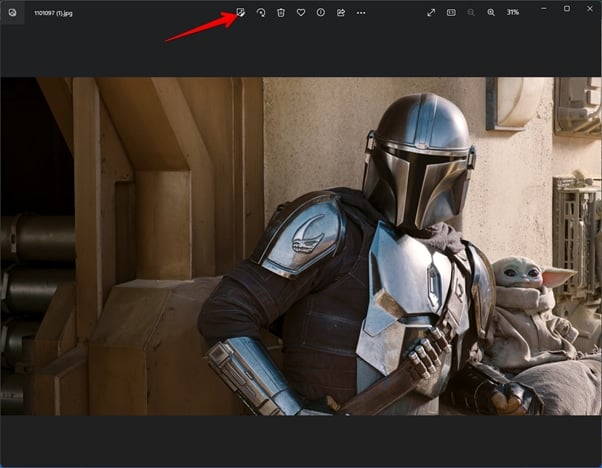
- On the editing page, click on the Filter
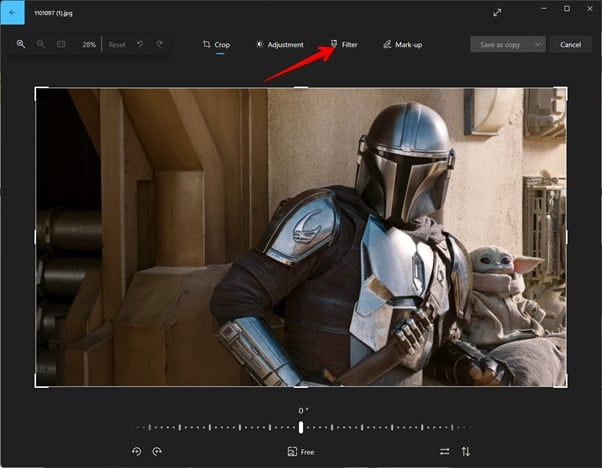
- Select the Black and White High Contrast filter from the list of filters.
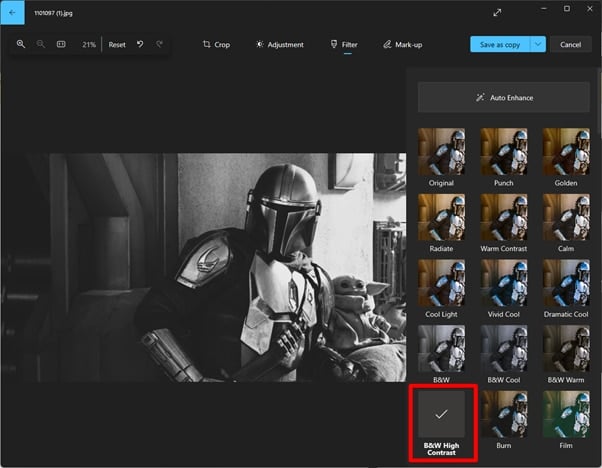
- Once the app applies the filter, click the Save as copy button to save the image.
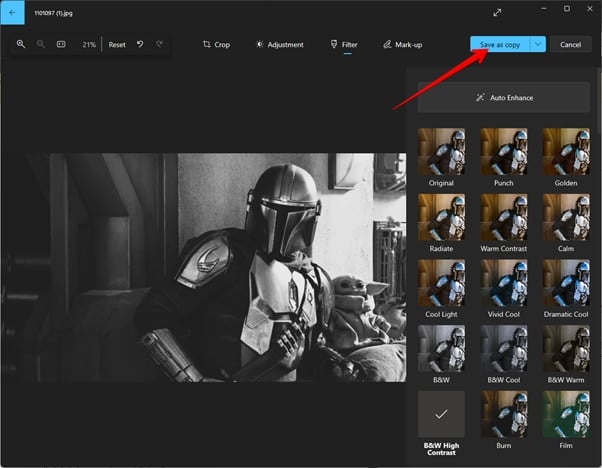
- The file manager will open, and you can choose a save name and location for the new black-and-white picture on your PC.
Step 2: Import Your Image to Cura
Now, it’s time to import your image into Cura. You can easily drag and drop your image into Cura to import it.
You can also use the Ctrl + O shortcut to open your computer’s file system and select the image file.
Step 3: Input the Model’s Settings
Once you open up the model in Cura, a dialog box with several options will open. You can use these options to set the properties for the Lithophane model.
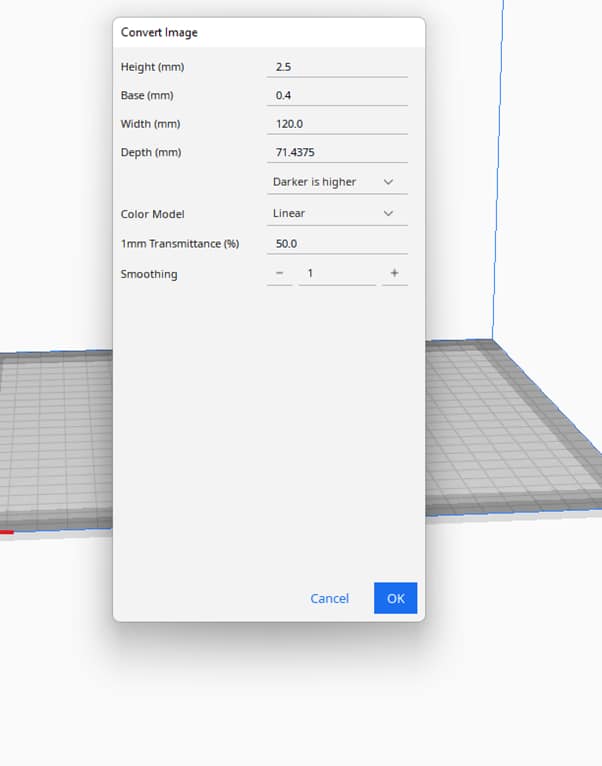
Here are some of the options:
- Height (mm): This value is the maximum thickness of the model. The highest point on the Lithophane’s surface will correspond to this value.Most people recommend keeping this thickness in the 2.5-4mm range. Anything more, and you might need supports for the model, which can ruin its quality.
- Base (mm): This is the minimum thickness for the Lithophane model. This will be the thickness of the model’s lowest point.Most people recommend keeping it at a thickness of 0.3-0.8mm (depending on your printer’s capabilities). Any higher and it might not be able to let light through to create the optical illusion.
- Width & Depth (mm): These two variables control the length and breadth of the Lithophane model on the print bed. You can modify them to increase or decrease the size of the Lithophane model.Also, they are locked together in a defined aspect ratio. So, increasing one will automatically change the other in the pre-defined ratio.
- Color Model: The color model defines the color distribution for the model. It has two options; Darker is higher, and Lighter is Higher.For the former, the darker areas in the image will be thicker in the print and block light. While for the latter, the reverse is the case. The default method is Darker is Higher. Darker is Higher is the preferred method for Lithophane prints.
- 1mm Transmittance (%): This is the amount of light, in percent, that will penetrate a 1mm thick print. If you lower this value, less light will penetrate the darker areas, reducing the contrast in the lighter areas.
- Smoothing: It softens the edges of your model and makes it look less defined. Most people recommend keeping it a zero or, at maximum, 1.
Once you’ve filled in the settings, click the “OK” button. Cura will automatically generate the Lithophane on the build plate for you.
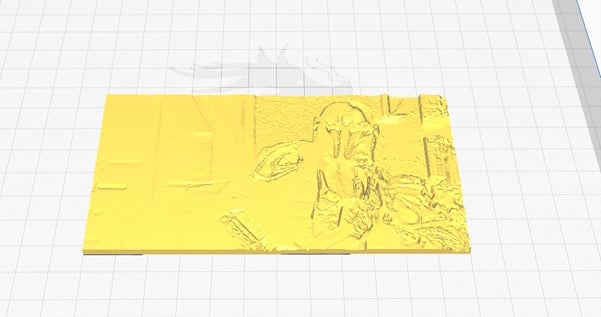
Note: The image reader plugin is what Cura uses to turn the 2D image into a 3D model. It comes bundled with Cura by default, so you don’t need to install it.
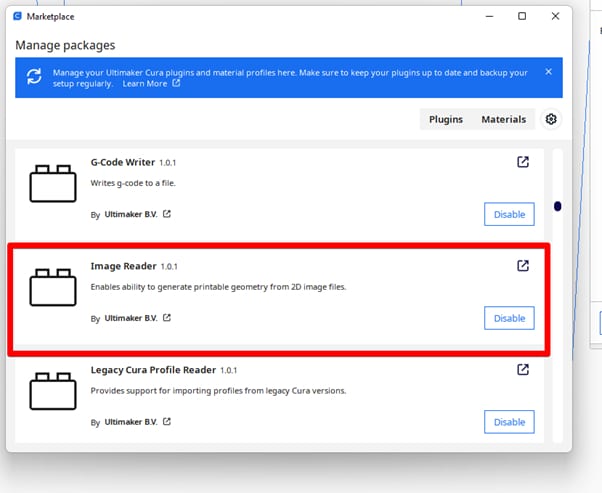
However, some people unwittingly disable the plugin when trying to speed Cura’s processing or optimize its startup speed. Here’s how you can check if it is enabled:
- Open Cura marketplace
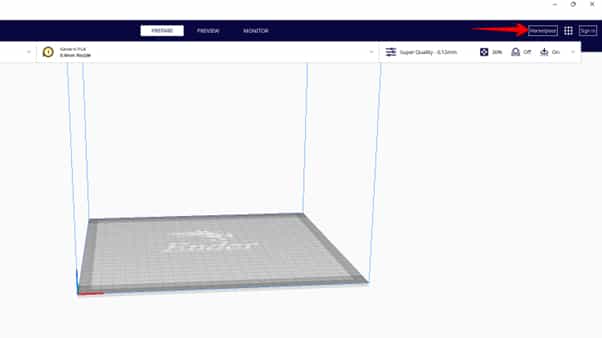
- In Cura 5, you should see a gear icon close to the Materials Click on it. It will show you the list of plugins you have installed on the app.
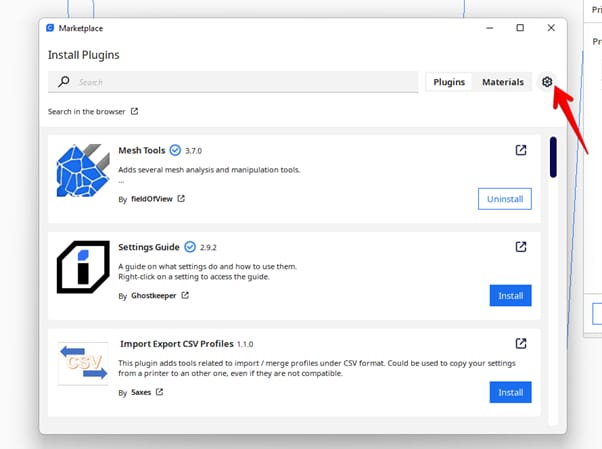
- Under the Bundle Plugin header, scroll down until you see the Image Reader plugin.
- Make sure it is enabled
- Now, you’re ready to convert your image.
Creating a Lithophane in 3DP Rocks
3DP Rocks is my favorite tool for creating Lithophanes from 2D images. It’s an online tool where you can upload your 2D image and transform it into a 3D Lithophane.
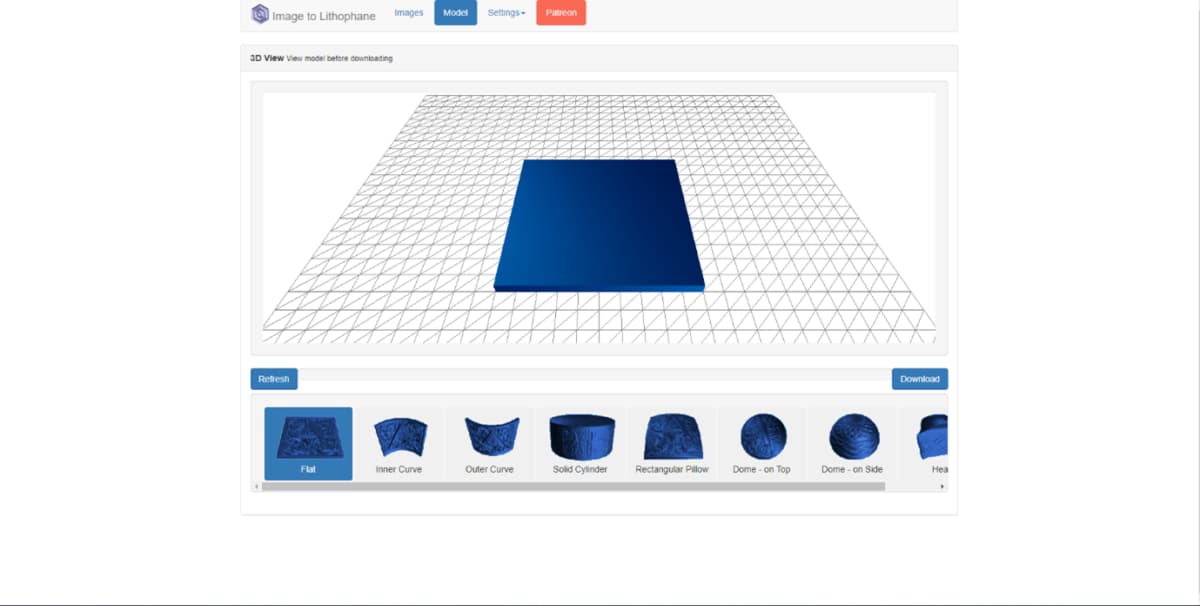
I love this site mainly because it provides several more customization options, like shapes, borders, etc., that Cura doesn’t. Let me show you how to use it:
- Upload your picture to 3DP Rocks
- Choose a shape for the Lithophane model
- Set the model settings
- Set the image settings
- Download the model
Step 1: Upload Your Picture to 3DP Rocks
- Go to the 3DP Rocks
- Click on the Images tab
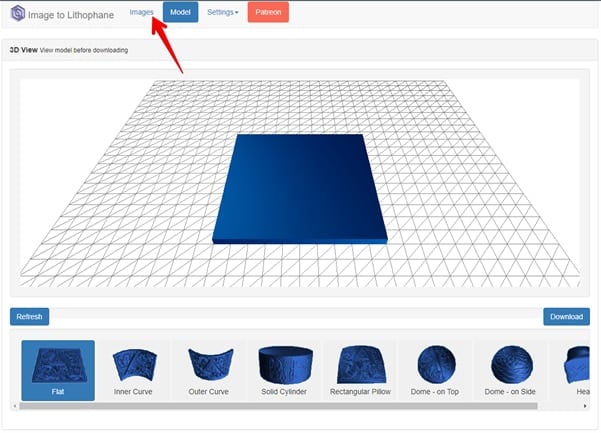
- Once the tab opens, drag and drop your image there. You can also import the file from your PC’s file system using the Choose Files option.
Step 2: Choose a Shape for the Lithophane Model
Once you import the model into 3DP rocks, the site will take you to a page where you can choose a shape for the model. There are plenty of shapes available for your Lithophane model.
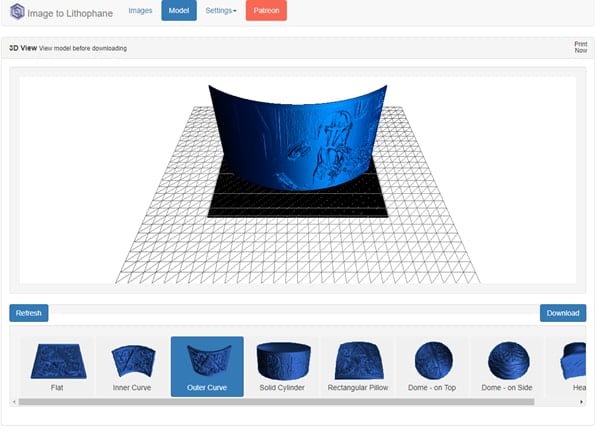
Some examples include:
- Inner curve
- Outer curve
- Solid cylinder
- Heart, etc.
Once you select the shape you want, click the refresh button to apply your changes. I chose the outer curve shape.
Step 3: Set the Model Settings
3DP Rocks provides a suite of settings you can use to customize your model’s size and shape. Click the Settings > Model settings button on the top toolbar to access the settings.
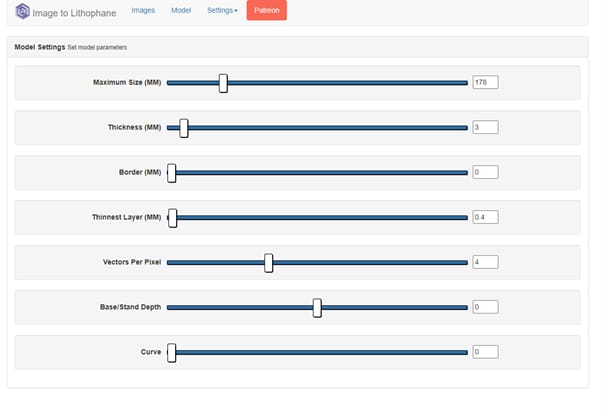
Some of these settings include:
- Maximum Size: You can use this value to increase or decrease the size of your Lithophane. It sets the size of your print’s X-axis, which is usually the largest side.If the print is curved, then this value is the curve’s circumference. The length of the other side is calculated using the image’s aspect ratio.
- Thickness: This will set the height of the thickest part of your model. As I said in Cura, keeping it between 2.5-4mm is best.
- Border: This setting helps add a border all around your Lithophane model. It specifies the thickness of the border. You can keep this at zero if you do not want a border.
- Thinnest Layer: This will set the thickness for the thinnest part of your model. As usual, keep it in the 0.3-0.8mm range.
- Vectors per Pixel: This controls the level of the Lithophane’s definition. The larger the value, the higher the model’s definition.However, this can also result in slow model processing and a large STL file size. So, it’s better to leave it between the 2-4 range. Most people say they get good results when they use a value of 4.
- Base Stand: This adds a raft-like base to the bottom of your print. A positive value means the base is coming forward, while a negative value means it’s going backward.
- Curve: If you select a curved shape, this value controls how many degrees the Lithophane’s surface will curve.
Step 4: Set the Image Settings
The image settings control how your Lithophane model will look after you print it. To access them, click on Settings > Image Settings.
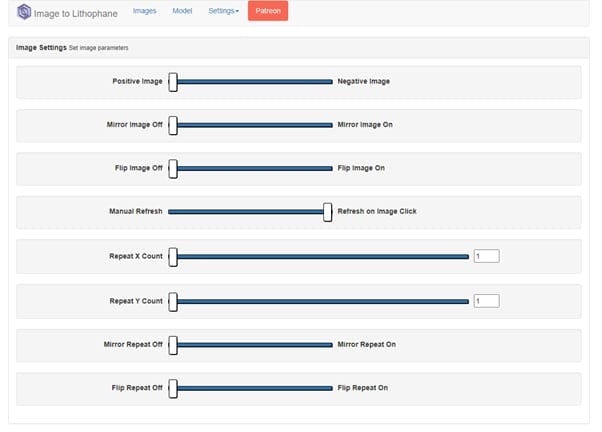
Here are some of the more important ones:
- Positive Image/ Negative Image: Setting the slider to positive image means the darker areas in the image will be thicker and block more light. Negative image does the opposite.
- Mirror Image: If you set this option to on, it will mirror the Lithophane about the X-axis.
- Flip Image: If this option is on, it will flip the Lithophane about the Y- axis. The model will appear upside-down.
- Repeat X & Y Count: These options let you create copies of your Lithophane in the X and Y directions. They both integrate the copies of the model seamlessly with the original.
- Mirror and Flip Repeat: If these settings are on, the application will flip or mirror alternate copies. For example, if you have four mirror images and you turn on the Mirror repeat, the application will flip copies 2 and 4 about the X-axis.
Step 5: Download the Model
After you’ve made all the changes to the model, make sure you click the Refresh button to save the changes. Once you’re satisfied with the changes, click on the download button.
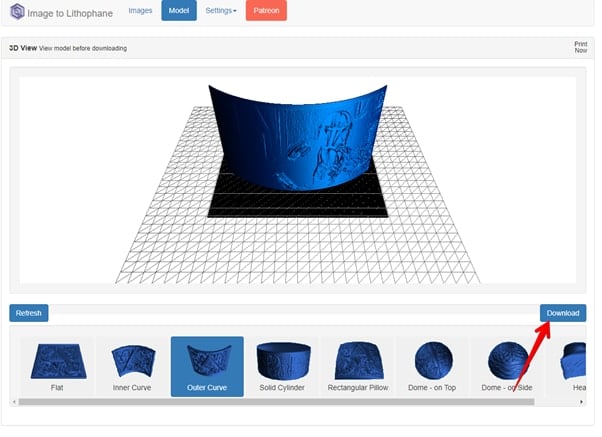
This will download the Lithophane’s STL file to your PC.
Edit and Slice the Model in Cura
Once you’ve gotten the Lithophane model from 3DP Rocks or the Cura Image Reader, it’s time to edit and slice it. So, import the STL model into Cura.
Note: When you import or generate a Lithophane STL into Cura, some errors, like the model not being watertight and missing surfaces, might pop up. Ignore and close these warnings.
Here’s how you can edit the model:
- Orient the model properly
- Add a raft/brim
- Edit the print settings
- Slice the model
Orient the Model Properly
When printing Lithophane models, the orientation is very important as it plays a big role in the print’s final quality. Using the wrong orientation can result in print defects like blobs and zits.
Here are some orientation tips:
- Make sure the Lithophane model is built up vertically on the Z-axis. This will provide better model quality.
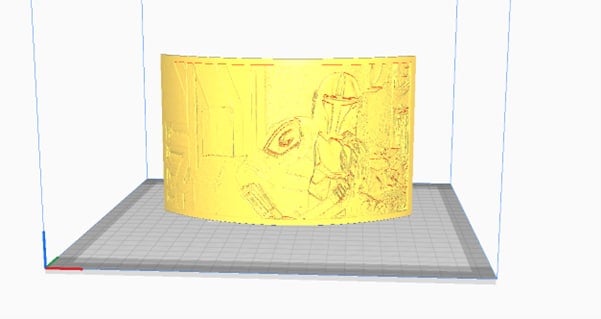
- Ensure that the model’s breadth (longer side) is aligned with the Y-axis. It should be along instead of across your build plate.
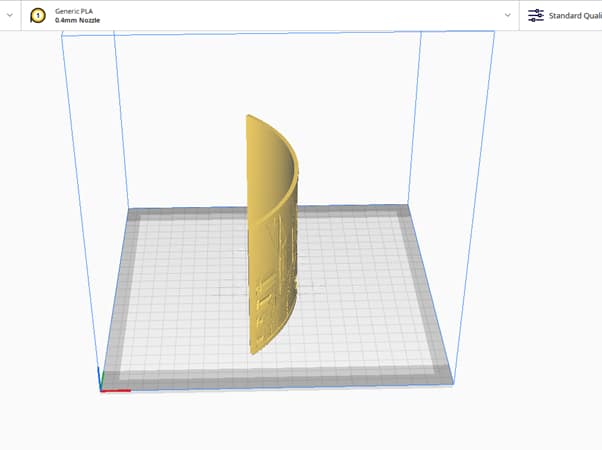
- This will reduce defects and considerably increase the print’s stability on the build plate.
Add a Raft/Brim
Lithophanes are usually thinner than normal 3D models. So, they can easily detach from the build plates if they aren’t held down properly.
Add rafts and brims to help hold the print down to the build plate to avoid this. Here’s how you can do it in Cura:
- Under the print settings, go to the build plate adhesion.
- Under the menu, select between a brim or a raft. Most people prefer using a brim with a width of 15mm.
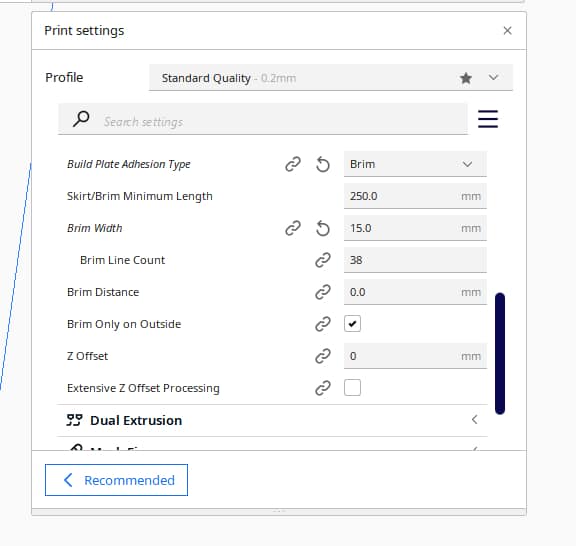
- Once you select one, Cura will apply it to your model.
Edit the Print Settings
As I said earlier, Lithophanes are quite delicate models, so you don’t want to print them with your regular slicer settings.
You’re going to have to change and tweak some of the settings. Some of the important settings you should change include:
- Layer Height: For the best possible quality, you will have to turn the layer height setting to the lowest your printer can go. The lower the layer height, the better the quality of the Lithophane. Most mid-range FDM printers can use layer heights between 0.12mm and 0.2mm.
- Initial Layer Height: For the initial layer height, you will want to use a value of about 1.5 to 2x the regular layer height. For a layer height of 0.12mm, I use an initial layer height of 0.2mm.
- Print Speed: When printing Lithophanes, you will have to go slow. Slower speeds will ensure the layers have time to cure properly and reduce their chances of detaching from the build plate. The optimal speed for Lithophane printing should be between the 25-40mm/s range. This user went a bit too fast (60mm/s), resulting in a bit of quality loss.
How do I fix this lithophane?
byu/ajfilmnfx in3Dprinting
- Infill Percentage: The recommended infill percentage for Lithophane models is 100%. This ensures that the model is solid and blocks the light as intended to create the illusions. However, the popular printing channel 3D Printscape says keeping it within 97-99% is optimal. This can help solve layer problems like blobs, zits, bulging, etc. This Redditor also used a 99% infill density to achieve a great result.
Super happy with my first lithophane!
byu/junskipus in3Dprinting
- Wall Line Count: The wall line count should be around 2-4. This ensures that the print will be solid and there will be no gaps within it.
Some other miscellaneous settings you can tweak for additional performance include:
- Wall Ordering: Outside to inside
- Top Surface Skin layers: 2-4
- Top/Bottom Pattern/ Bottom Initial Layer: Lines (This makes them more solid and reduces gaps.)
- Temperature: Keep it at the normal temperature for your material.
If you need more help, the YouTuber 3D Printscape has graciously made his tried and tested Cura profiles available. So, if you need them, you can easily download them from here.
Slice the Model
Once you’ve edited all the settings properly, you can slice the print. It might take some time to finish slicing, so just be patient.
After slicing, make sure you preview it layer by layer. To do this, switch to the Layer view in Cura’s preview tab. Check your print for any gaps in its body.
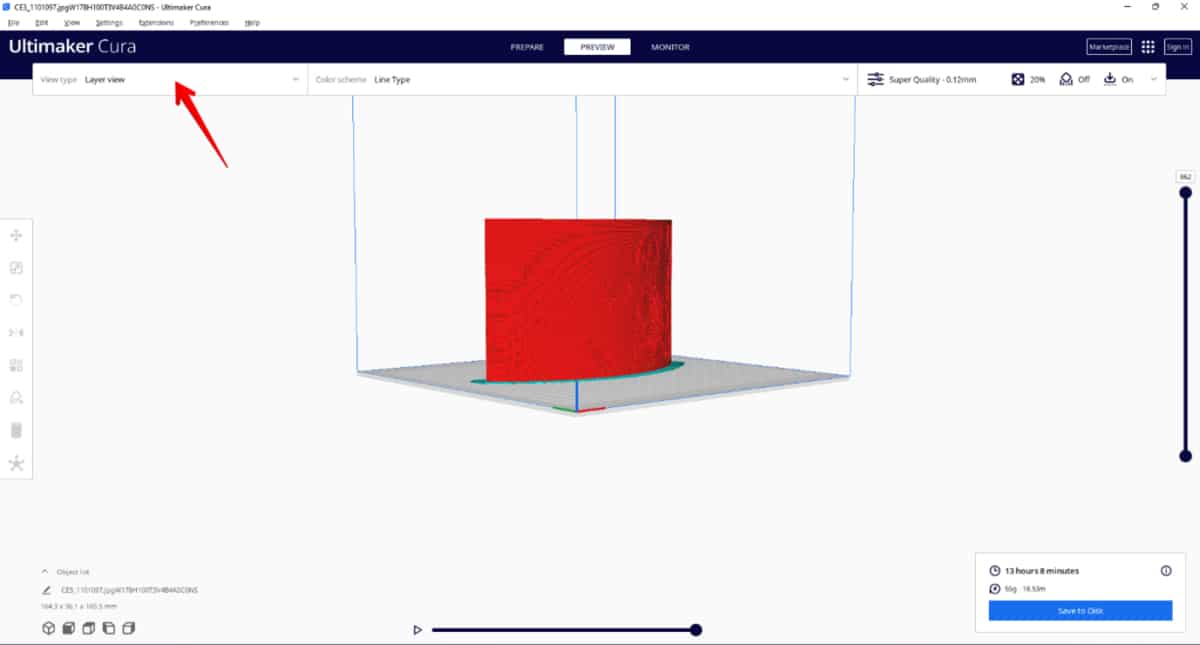
If you see any gaps, this means that the minimum thickness you set for the Lithophane models is too small. So, re-convert the image to a 3D model using a higher minimum thickness.
3D printing hobbyists unanimously recommend using white filaments for printing Lithophanes. The detail and optical illusion seems far better when you use them.
Avoid using darker and transparent filaments, as the effects won’t work as well with these colors.
Final Result
I printed the Mandalorian Lithophane using ERYONE White PLA. It came out quite nice and detailed.
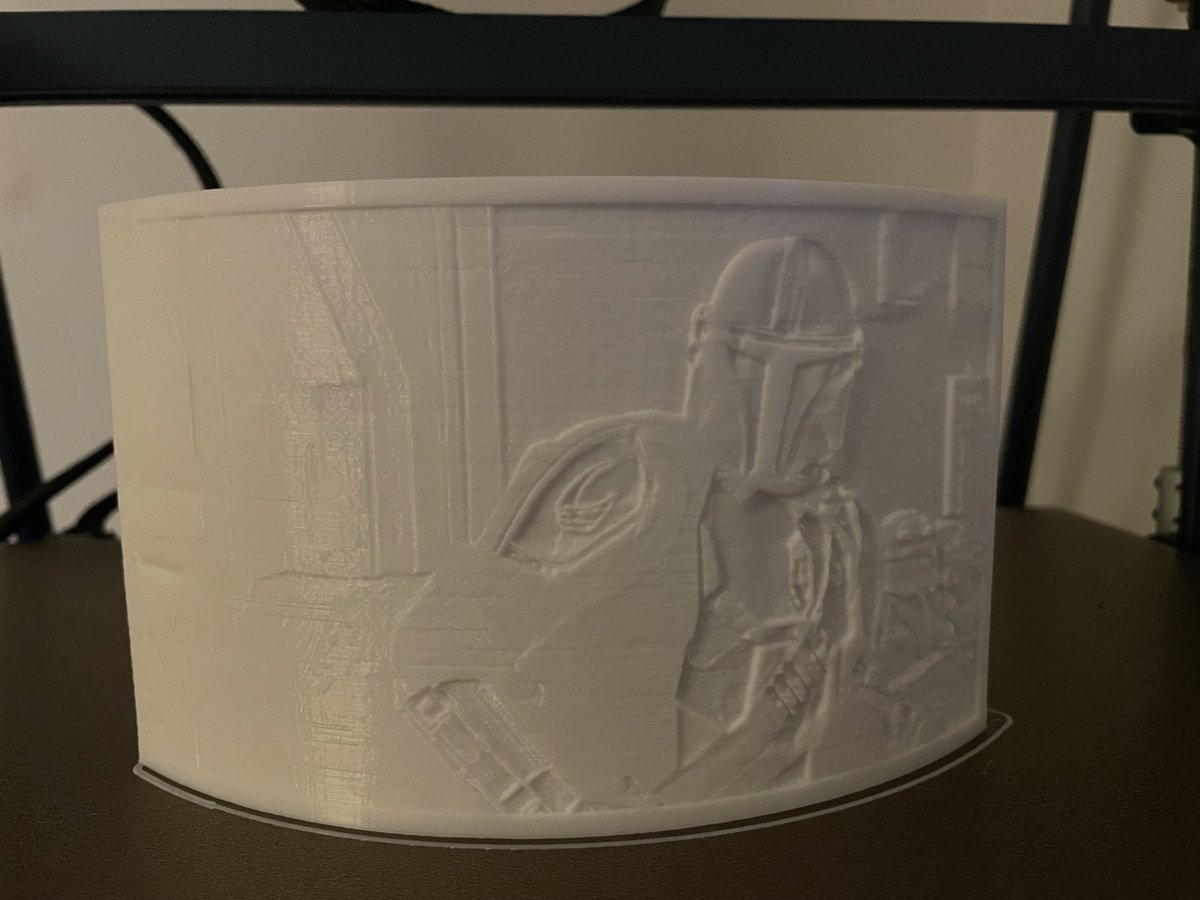
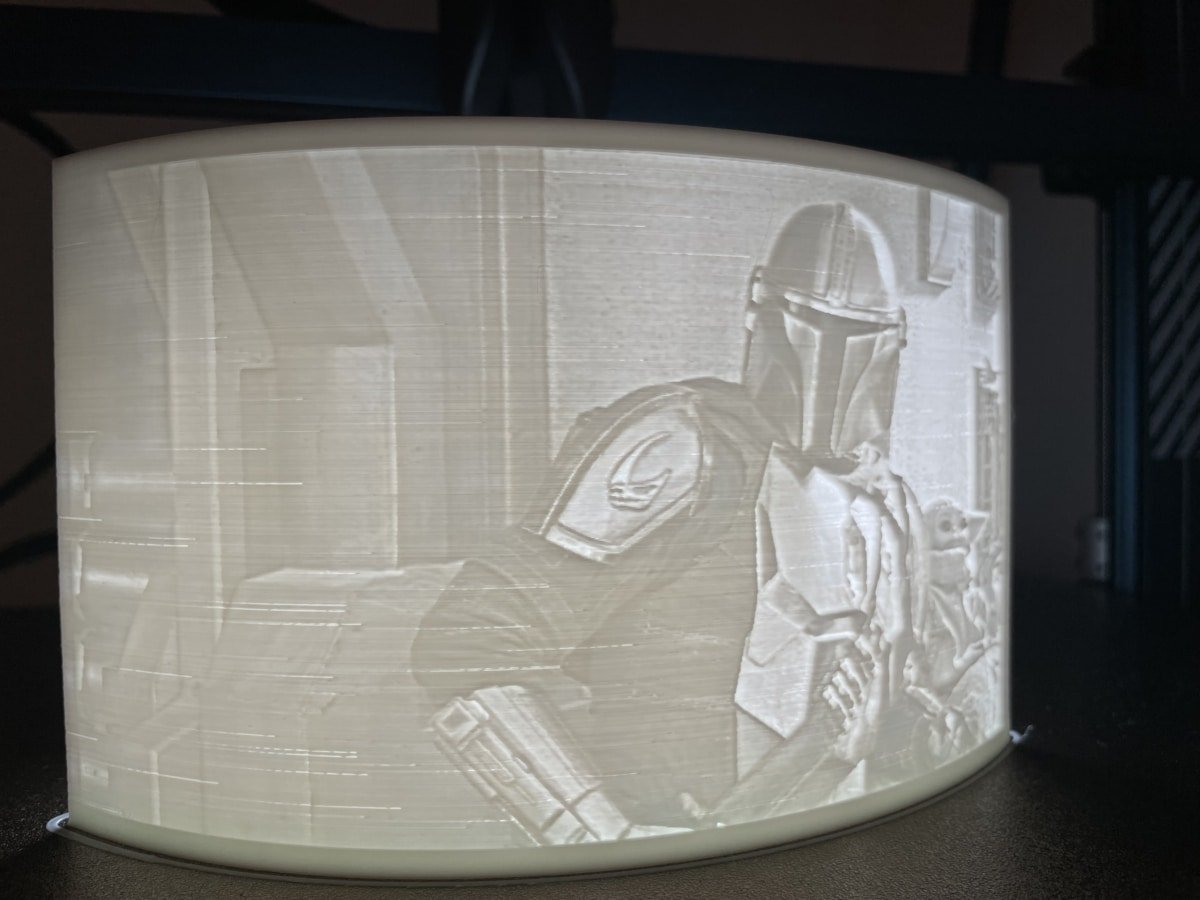
Note: I used Cura’s standard 0.2mm layer height for the model, instead of the superfine 0.12mm layer height. I did this to speed up the model’s printing. I also used a printing speed of 50mm/s but a better speed would have been 30mm/s to not get as many lines in there.
That’s all you need to know about printing Lithophane models. Using Cura, you can slice and print pictures, artworks and you can even create functional household items like this Lithophane lamp shade.
I’m working on lithophane lamps, what do you think?
byu/Guaro97 in3Dprinting
The possibilities are limitless!
