Do Resin 3D Prints Need Supports? How to Do It Like The Pros
Resin 3D printing can create some really high-quality models, but people wonder whether they need support while printing. At some point, I wondered this myself, so I went out to properly research the best methods of making supports for resin prints.
The best way to add supports to your models is to use the auto-generated function in your desired slicer software, then add in extra manual supports if needed around the model. Automatically generated supports aren’t perfect so you’ll have to thoroughly inspect your modeel to look for gaps.
There are many options out there to add your supports, so this article will attempt to guide you in the right direction to improve your resin printing experience.
Do Resin 3D Prints Need Supports?
Resin prints need supports if they have large overhanging parts such as limbs, swords, or any other long objects that are going far beyond the central pattern of the model. Supports are required to provide 3D prints with a strong foundation while they are under the printing process.
You can cut files into different sections to work with fewer supports or even avoid supports but it is a common practice and helpful as well to add supports into your resin 3D print models.
Support provides an additional strength to your prints costing only a small amount of resin, and since it improves the success of your 3D prints, can actually save your resin in the long run.
When it comes to using supports with your resin prints, you have to really take your time to make sure things will print properly throughout the whole print.
If you are missing supports in important areas, you can find yourself missing features in your prints, or even printing a failed 3D print altogether.
You can’t 3D print in mid-air so you are required to either design or orient your 3D prints in a way that doesn’t need as many supports, though this isn’t always possible with many complex models.
Supports are usually pretty easy to remove afterwards, especially if you adjust your support settings to have smaller diameters touching the model itself. I recently used the Lychee Slicer to generate supports and it came off in one piece.
How Do You Add Supports to Resin 3D Prints?
The recommended way to add supports to resin prints is to go to your chosen slicer software and generate an auto-support creating for your models. This one-click solution adds a whole host of supports to your model that provides a great foundation for prints, though some manual edits are recommended too.
There are many slicer software products where you can auto-generate supports such as in ChiTuBox, Lychee Slicer, PrusaSlicer, and the proprietary Anycubic Photon Workshop Slicer.
They all work pretty well, but in my experience I’d have to say the best choice out of these is the Lychee Slicer. This is one that isn’t so well known, but is definitely moving up in popularity due to their responsive updates, host of features, and general ease-of-use for the average user.
The number of supports, their exact location in regards to the model, and even the bridges that attach to the supports are calculated and produced by the software you use.
They change based on the size, shape, weight, and orientation of what ever model you place into your slicer.
With resin printing, you’d have a pretty hard time avoiding supports altogether, especially if you want to create complex 3D prints, so it’s a good idea to learn how the professional resin 3D printers out there do it.
You have
Let’s start of with the Lychee Slicer software to see how we can add supports to our resin models.
How to Add Supports in the Lychee Slicer
First you want to add in your desired model right into the Lychee Slicer work area.
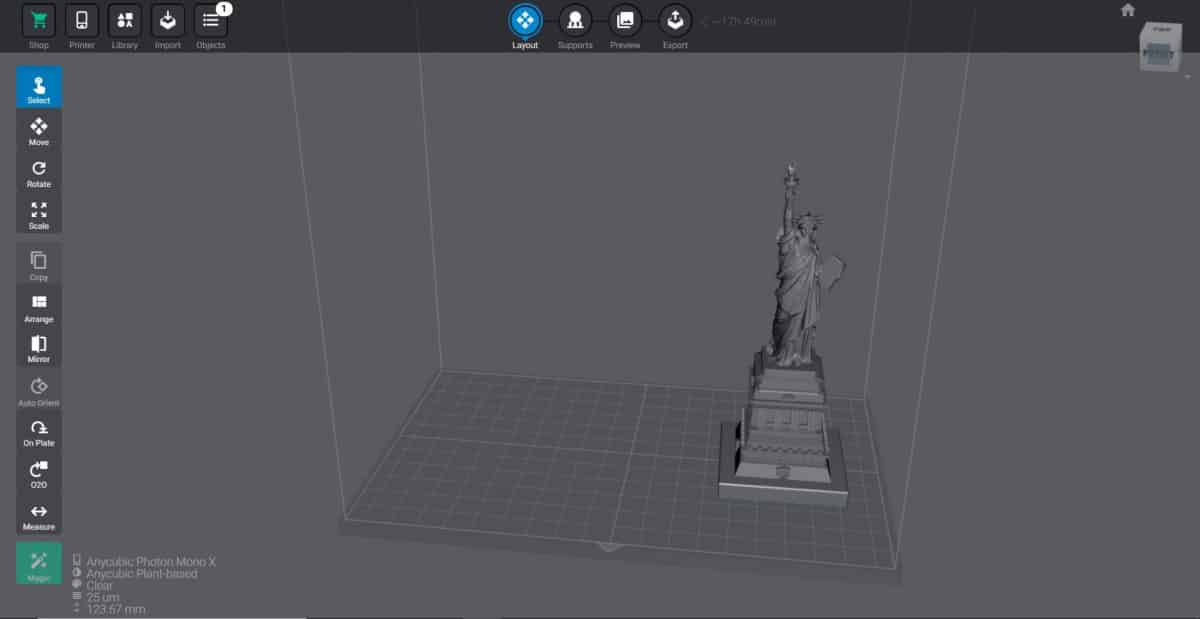
Here you can move your model, rotate, and scale your model as you please. There are simple options to duplicate the model, mirror it, auto-orient, have specific sections touching the build plate, or even orient one object in relation to another object.
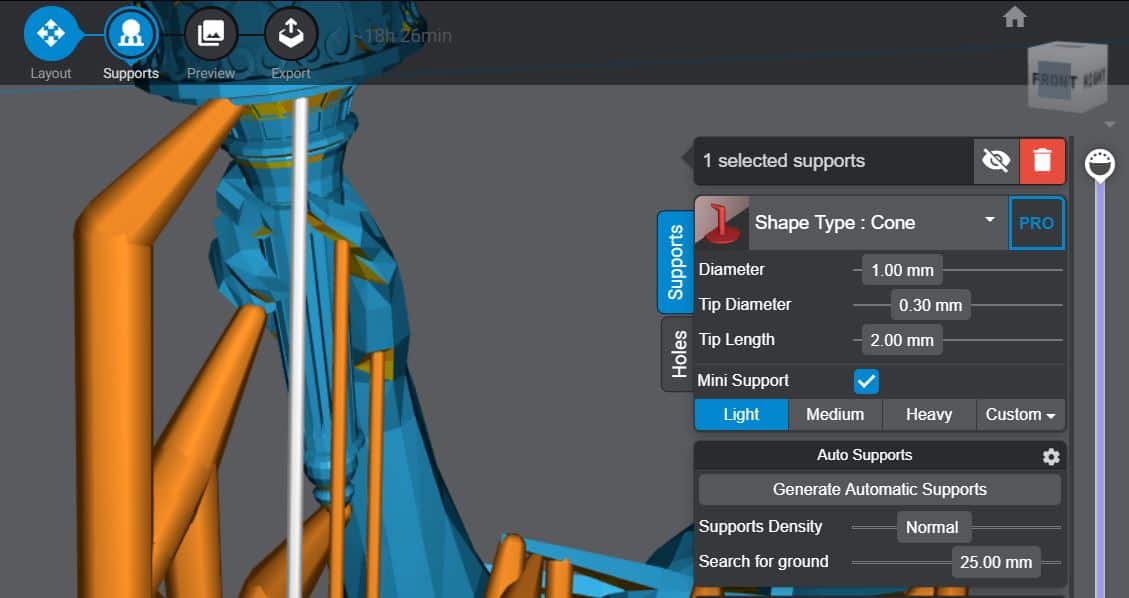
Once you’ve handled that, you’ll see at the top near the middle, 4 circles of options – ‘Layout’, ‘Supports’, ‘Preview’, and ‘Export’. We just finished doing the layout, so now we can click the ‘Support’ circle to get into adding our supports in Lychee Slicer.
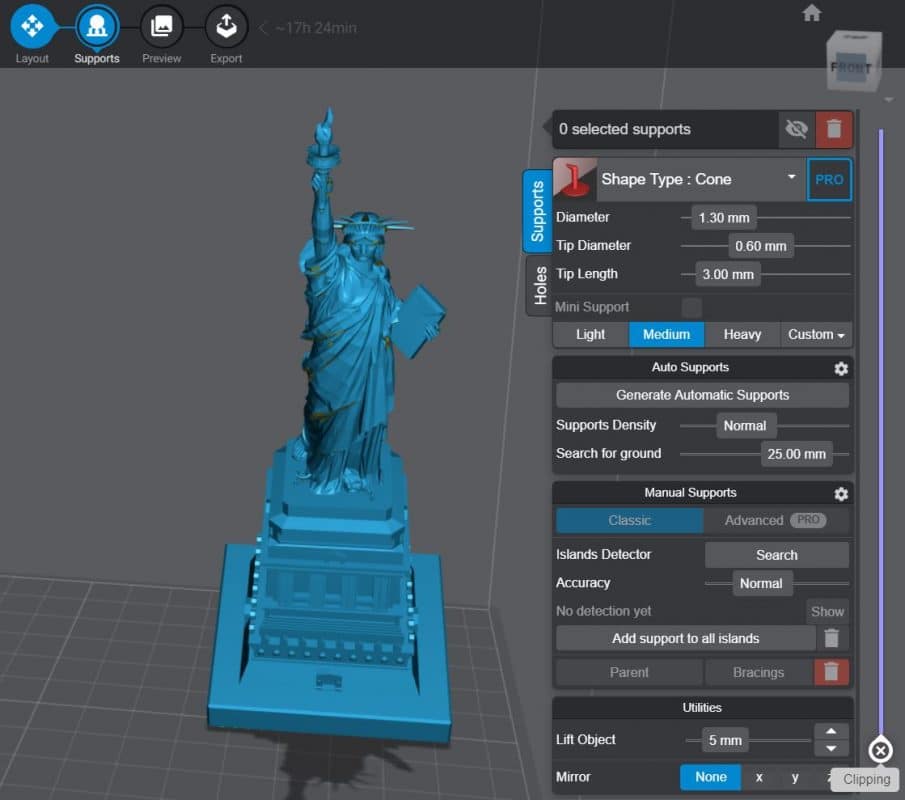
There are many options here, but they are fairly straightforward, and there is even an advice pop-up if you hover over some of the slicers.
You can adjust options such as:
- Diameter of the support itself
- Tip diameter right at the ends of the support
- Tip length which increases the distance of the support from the 3D model
- Mini supports if the space required for a support is very small
- Pre-made ‘Light’, ‘Medium’, ‘Heavy’ or ‘Custom’ support settings
- Auto-Supports
- Manual Supports
- Bracings to add connections between supports, and many more options
Under the ‘Auto Supports Section’ simply click ‘Generate Automatic Supports’ and you can set your preference for ‘Low’, ‘Medium’, ‘High’, or ‘Ultra’.
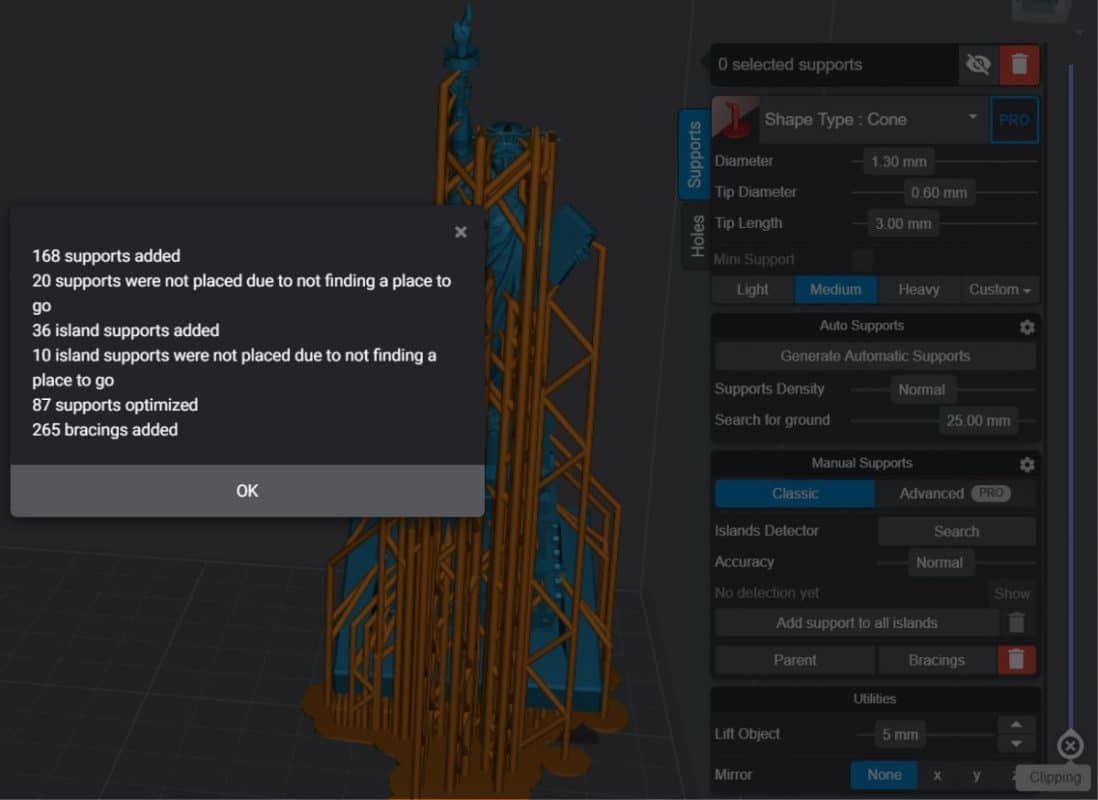
Adding ‘Normal’ automatically generated supports for this Statue of Liberty model took just 20 seconds in total, giving a total of 168 added supports, though it did add that 20 supports were not placed because a place couldn’t be found.
You can now thoroughly preview your model and add in your manual supports by clicking on the model, paying attention to the highlighted areas which show supports can be useful there.
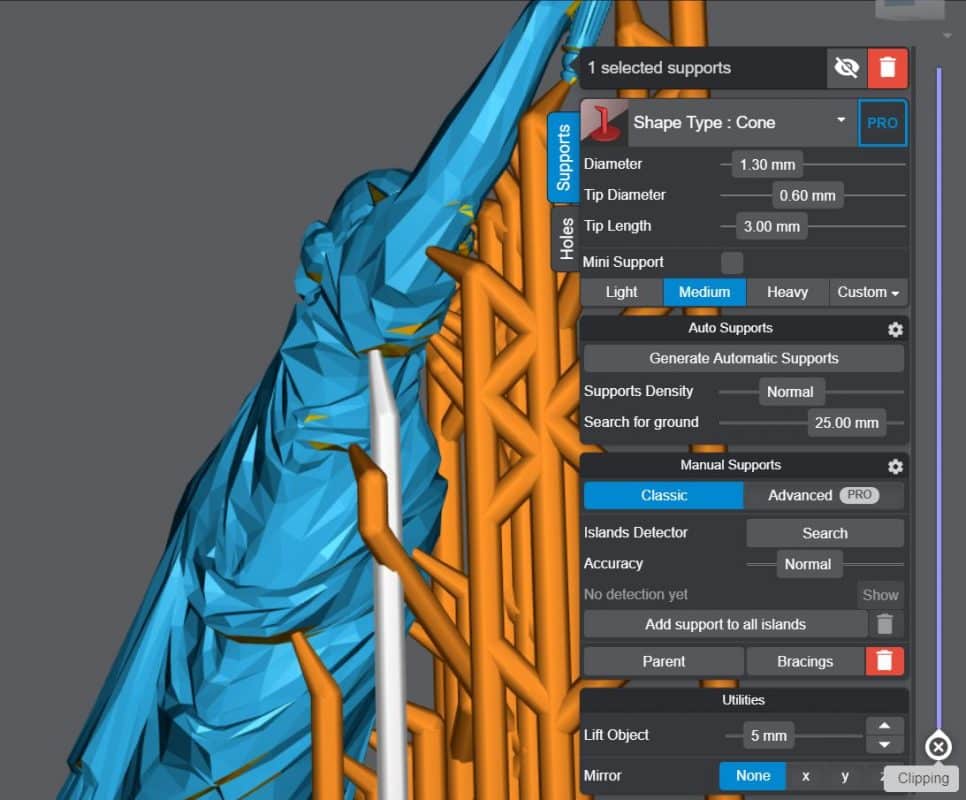
They are really easy to add to any section of the model, and checking the ‘Mini Support’ box will make the highlighted support into a small support which can work just as well as those larger supports, in those hard to reach areas.
Mini Supports are really an amazing addition to resin models, especially one like the Statue of Liberty with the spikes on the crown.
To select multiple supports, you can hold down shift and click each desired support to change them at the same time.
Another really helpful option in the Lychee Slicer is found at the top menu under ‘Supports’ > ‘Selection’, where you have an option to choose all ‘Light’, ‘Medium’, and ‘Heavy’ supports, or ones that are close to those specifications.
Once selected, you can choose to increase the ‘Diameter, ‘Tip Diameter’, and ‘Tip Length’ to make your supports stronger, less invasive, or however you want them to be.
It can take a while to manually add supports to your model properly, and you’ll want to preview your model in the next section to simulate how the resin print will actually be built.
Doing this can help you identify spots that are going to print in mid-air that require some supports.
Then to top it off, they have a cool rendering screen that shows you each layer as it processes.

Lychee Slicer is most experienced people’s favorite choice in terms of resin slicers, just because of how in-depth their features and options go, even in just the free version.
You might think the Pro version is very expensive, but you first get a 30-day free trial, and after that, it’s just around $40 for the first year, and around $60 for subsequent years if you pay annually.
One of the reasons I started using it in the first place is because they updated their export capabilities to include .pwmx files for the Anycubic Photon Mono X that I own. Check out my Photon Mono X review here!
This is the general process of adding supports to each slicer, but I’ll quickly go through the other popular slicers so you can see how it’s done.
How to Add Supports in the ChiTuBox Slicer
1. Position the Print
- First import the model into the ChiTuBox window that you want to print
- The print will be placed in the middle of the build plate
- There will be buttons on the left side as Position, Rotate, Scale, etc.
- From the Position button, you can set an appropriate position for the printing model before adding supports.
- Make sure that not a single part of the print is in red color. The red part indicates that this area is beyond the build surface and cannot be printed.
- From the rotate button, set your print between 30 and 45 degrees on the X-axis because this will cover the most appropriate area for supports.
- From the Scale button, you can modify the size of the print
- If you set a size that looks like it extends from the build area then go back to the position and rotation process and set an ideal position and angle for the print.
- Take a top look at the print for a better understanding of the position
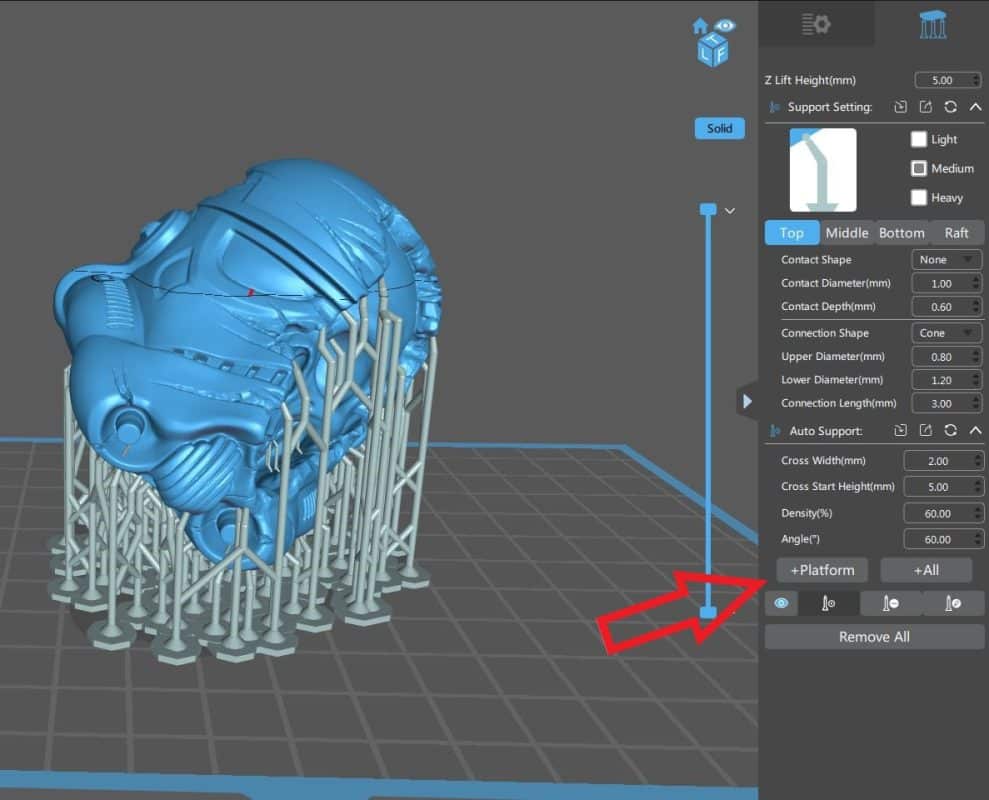
2. Adding and Configuring Supports
- There is a ‘Supports’ icon on the right side of the display screen, clicking on the icon will open up all the settings below.
- Set the Z-lift height at 5.00mm and set the density or thickness of the support to ‘Medium’ or ‘Heavy’, especially if you are a beginner to give you better chances of success.
- From the slider on the right side, you can see a visualization of how your print will develop layer by layer. This will help you to see which parts will print in the air and need the supports.
- There are two options for Auto Supports called ‘Platform’ and ‘All’
- Click on the ‘Platform’ button if your supports need to attach with the build plate but go for the ‘All’ option if there are some parts that need to be placed on the print itself.
- You can delete any support if you find it unnecessary just by clicking on it and hitting the delete button.
How to Add Supports in the PrusaSlicer
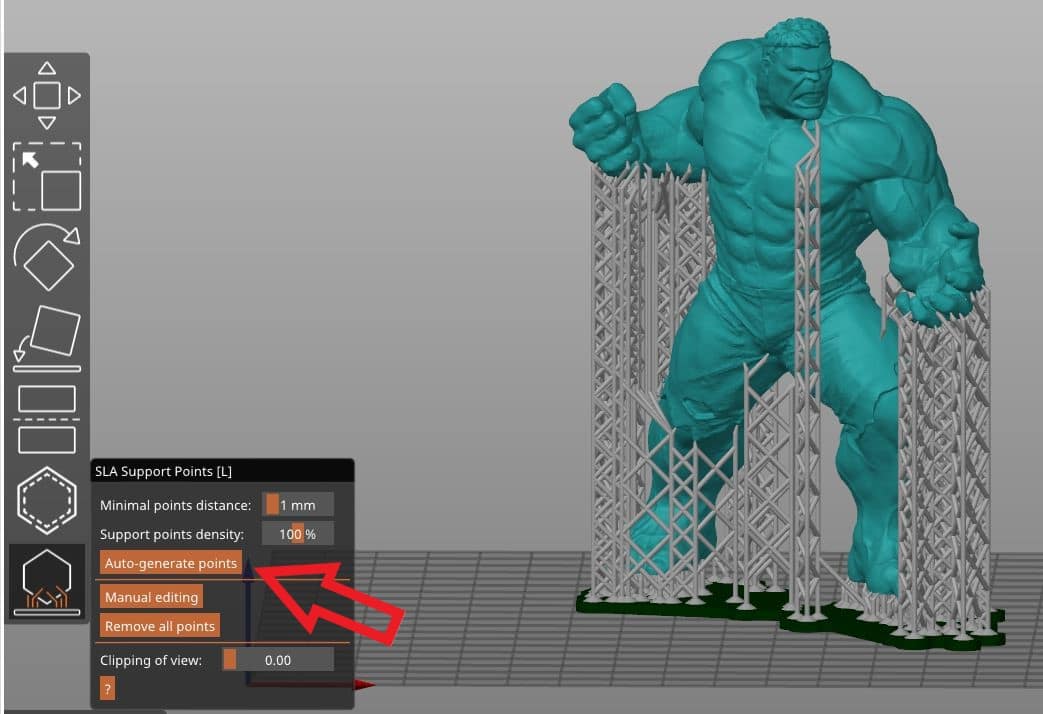
Adding supports to this Hulk model in PrusaSlicer took just under 10 seconds and I like how the rafts are much smaller than Lychee Slicer rafts for the automatically generated supports.
I also like how it elevates the whole model onto rafts and supports so it has a lot less chance of failure while printing. You’d just have to take into account the possible suction pressures on the FEP film.
You should lower the Z-lift speed, try to add at least 2 holes at the bottom to relieve some of that pressure, and try not to fill the build plate too much.
It is fairly similar to the other slicers above, with the simple option to click ‘Auto-generate points’ for supports to be easily added to your model.
You can then hit the ‘Manual Editing’ button to start adding in or taking away current supports as you desire.
PrusaSlicer are great at adding new features that people have been longing for in their 3D prints.
PrusaSlicer 2.3 has a feature called paint on supports which has received great feedback, and works really well for easy custom support creation.
Hopefully this article has helped you out in terms of being able to understand how supports work with resin 3D prints, and the best software to get it done. Download the Lychee Slicer from their official website and get started with awesome support creation.