9 Ways How to Fix PETG Warping or Lifting on Bed
PETG lifting or warping from the print bed is an issue that many people experience when it comes to 3D printing, so I decided to write an article detailing how to fix this.
Why Does PETG Warp or Lift On Bed?
PETG warps/lifts on the print bed because when the heated up filament cools down, it naturally shrinks, causing the corners of the model to pull upwards off the bed. As more layers are printed on top of one another, the tension on the bottom layer increases, and warping becomes more likely.
Below is an example of how warping can ruin a 3D print’s dimensional accuracy.
CNC Kitchen did a quick video explaining some of the reasons why 3D prints in general warp, which you can check out below.
How to Fix PETG Lifting or Warping on Bed
The main ways to fix PETG lifting or warping on bed are to:
- Level the bed
- Clean the bed
- Use adhesives on the bed
- Increase Initial Layer Height and Initial Layer Flow settings
- Use a Brim, Raft, or anti-warping tabs
- Increase print bed temperature
- Enclose the 3D printer
- Turn off cooling fans for first layers
- Reduce printing speed
1. Level the Bed
One method that works for fixing PETG lifting or warping from the bed is to make sure your bed is properly leveled.
When you don’t have good bed adhesion, the shrinking pressure that causes the warping makes it more likely to happen. Good bed adhesion can fight against those warping pressures that occur during printing.
A well-leveled bed helps the first layer squish into the bed which improves adhesion.
One user said he uses more of a gap when 3D printing with PETG since it likes to be laid down rather than smushed like PLA:
Check out the video below to see how to properly level your 3D printer’s bed.
2. Clean the Bed
Another useful method to fix warping or lifting with PETG filament is to clean your 3D printer’s bed properly.
Dirt and grime on the bed can prevent your model from properly sticking to build plate, so cleaning the bed improves adhesion.
You should ideally clean the bed once or twice a week for the best adhesion. It is important to try to make a habit out of this, as cleaning the bed regularly is an essential part of 3D printer maintenance and will make your print bed last longer in the long term.
To clean the print bed, most people suggest using isopropyl alcohol. Wipe the bed surface with a cloth with some of the alcohol on it. Make sure the cloth does not leave any lint behind.
For removing thin layers of plastic leftover from prints, some people suggest heating up the bed to around 80°C and wiping it off by rubbing the surface with the lint-free cloth.
Another user suggested using a metal scraper or razor with the bed heated up to 80°C for PLA and that should come right off.
If you are using any sort of adhesives on your bed, such as glue stick, it’s a good idea to make sure a build up is cleaned off the bed, so you can apply a fresh layer of adhesive.
For glue stick for example, warm water will help you remove most of it, and then isopropyl alcohol will help you clean the bed further.
For 3D printers that use a magnetic sheet on a fiberglass board, you will want to also wipe the underside of the sheet and the board underneath, to remove any dust that might create an uneven printing surface.
Have a look at this video that shows how to clean the printing bed of a 3D printer.
3. Use Adhesives on the Bed
Another method to fix PETG warping from the bed is to use adhesives to help the print stay in place and not warp.
Sometimes, the specific PETG filament roll you have may not stick to the bed properly even after leveling and cleaning the bed surface. In this case, there are many types of 3D printing adhesives you can use, from hair spray to glue sticks or sticky tape.
I usually recommend going with a simple glue stick like the Elmer’s Disappearing Glue Stick from Amazon. I’ve used this for many 3D prints and it works really well, even for many prints.


You can also go with a specialized 3D printing adhesive like the LAYERNEER 3D Printer Adhesive Glue from Amazon. Parts stick nicely when it’s hot and release after the bed cools down. It dries fast and isn’t tacky so you won’t experience clogs in your nozzle.
You can print several times on just one coating by recharging it with a wet sponge. There is an in-built foam tip that makes it easier to apply the coating to your bed surface without spilling.
They even have a 90-day manufacturer guarantee that says if it doesn’t work, you have three months to get a full refund.


Some people have success with using tape such as Kapton Tape or Blue Painter’s Tape, which simply goes over your print bed and you 3D print on the tape itself.
One user who said he’s tried other tapes said they didn’t work as well, but after trying the Duck Clean Blue Painter’s Tape, it worked really well without leaving a residue behind.
With just one layer of this tape, he has 3D printed around 40 hours without issues. It’s still easy to peel off when you want to so this is a great product to help with your PETG warping or lifting from the bed.
This video tests and reviews some interesting adhesive alternatives for a glass bed using only household items, for both PLA and PETG.
4. Increase Initial Layer Height and Initial Layer Flow Settings
To get better adhesion and reduce the risk of warping or lifting off the bed you can try increasing the Initial Layer Height and Initial Layer Flow settings.
Having a higher Initial Layer Height means that more material will extrude on the first layer, leading to better adhesion to the bed surface. It’s the same thing with the Initial Layer Flow to have more material to stick to the bed, which increase contact surface area and improves adhesion.
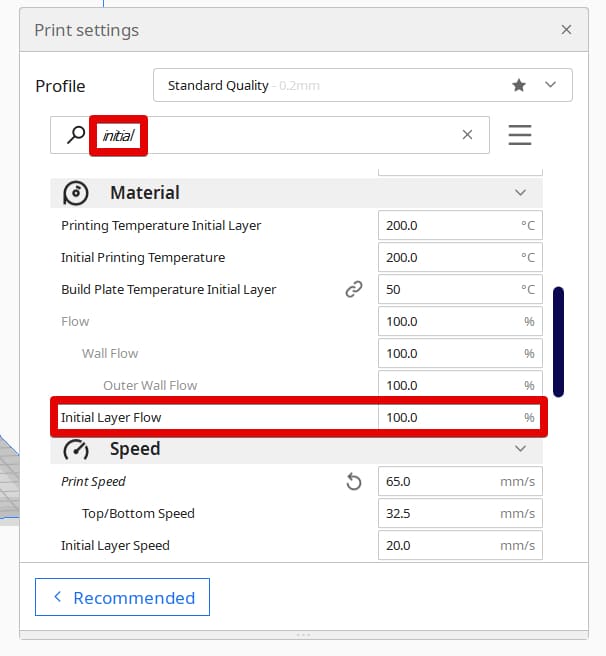
You can find these settings in Cura by simple searching for “initial”.
The default Initial Layer Height in Cura is the same as your Layer Height, which is 0.2mm for a 0.4mm nozzle. I’d recommend increasing that to around 0.24mm or 0.28mm for better adhesion, which reduces warping or lifting from the bed.
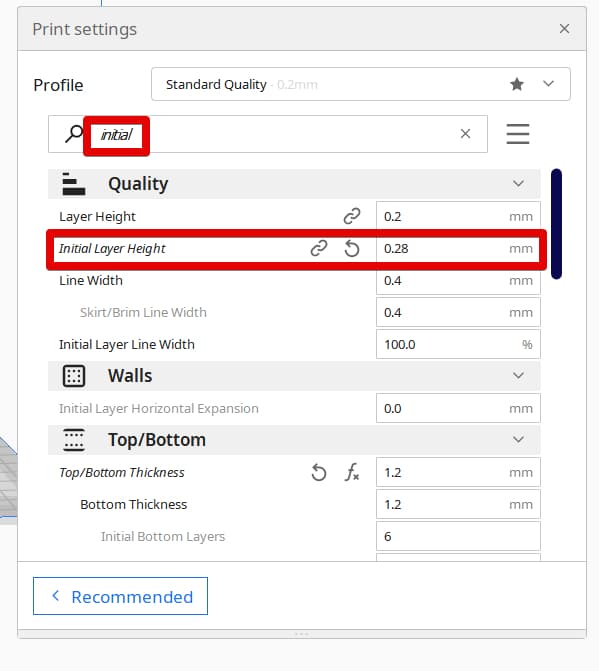
For Initial Layer Flow, you can try increasing this by a few percentage points like 105% and seeing how it goes. It’s all about testing different values to see what works for you.
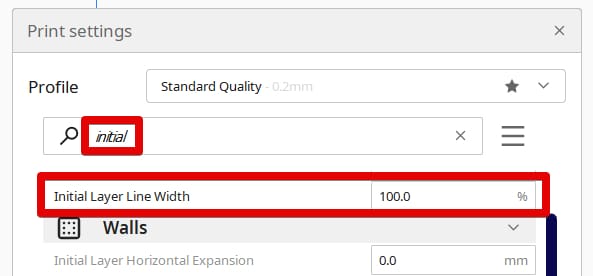
You also have another setting called the Initial Layer Line Width which comes as a percentage. One user recommended increasing this to 125% for better adhesion results for PETG warping.
5. Use a Brim, Raft, or Anti-Warping Tabs
Another method for fixing PETG that warps or lifts from the bed is to use better bed adhesion features such as a Brim, Raft, or Anti-Warping Tabs (also known as mouse ears) that you can find in Cura.
These are basically extra material that is extruded around your 3D model that adds more surface area to improve adhesion.
Brims are a single flat layer area around the base of your model, while Rafts are a thick plate of material between the model and the bed. Rafts provide the highest level of adhesion, but do take longer and use up more material, especially for large models.
Check out the video below for more details on Brims and Rafts.
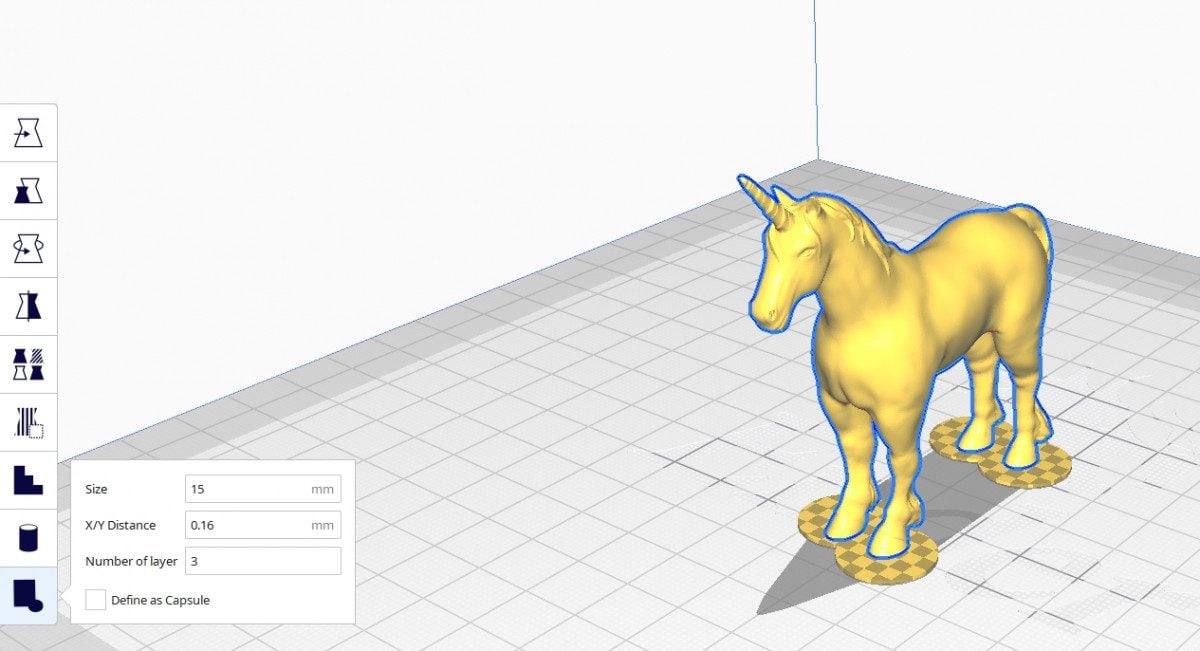
Anti-Warping Tabs are small discs that you manually add to warp-risk areas such as corners and thin areas that make contact with the bed. You can see an example in the picture below.
Once you import a model into Cura and select it, the left toolbar will show. The bottom icon is the Anti-Warping Tab which has settings such as:
- Size
- X/Y Distance
- Number of Layers
You can adjust these settings to your liking and simply click on the model where you want to add the tabs.
CHEP made a great video that walks you through this useful feature.
6. Increase Print Bed Temperature
Another potential fix or PETG warping is increasing the printing bed temperature. When your bed temperature is too low for your material, it makes warping more likely since it doesn’t have the optimal adhesion to the build plate.
A higher bed temperature will melt the PETG better and help it stick to the bed more, while also keeping the material warm for longer. This means the PETG doesn’t cool off too quickly so it shrinks less.
Try raising your bed temperature in 10°C increments until you see better results.
Most users that 3D print with PETG recommend a bed temperature anywhere between 70-90°C, which is higher than a lot of other filaments. While 70°C can work great for some, it may be too low for others, especially depending on what brand of PETG you have.
One user said that using a bed temperature of 90°C worked best for his setup. It’s always a good idea to do your own testing to see the best value for you. Another said an 80°C bed and a layer of glue stick works perfectly.
This user prints with an 87°C bed and also offers some other tips on printer settings that worked well for his PETG prints.
7. Enclose the 3D Printer
Many people suggest printing in an enclosure to prevent the PETG from shrinking and lift off the bed or warp.
If the difference between the temperature of the PETG and the room temperature is too high, the plastic will cool down too quickly and shrink.
Enclosing your printer reduces this temperature difference and basically keeps the plastic warmer for a longer period of time, so it can cool down properly and not shrink.
One user mentioned that simply opening the door of the enclosure for too long caused their print to warp, while another said that tuning in the settings, turning off the fan and using an enclosure seemed to have fixed their issue.
If you can’t use an enclosure, then at least make sure that there are no windows or doors open, as they cause air drafts and increase the temperature difference of your filament, which leads to shrinkage and warping.
Here is a more detailed overview of enclosures and also some advice on how to build your own.
8. Turn Off Cooling Fans for First Layers
Another strong recommendation from many PETG users is to turn off the cooling fans for the first few layers, to make sure the filament doesn’t cool down too fast and shrink.
Some people suggest disabling cooling throughout the entire printing process, while others prefer to reduce it or only disable it for the first few layers.
One user mentioned that cooling leads to massive warping for them, so they don’t use it. Someone else also mentioned that turning off cooling made the most significant difference in reducing warping and shrinking for them.
Generally, most people who use PETG disable the cooling fan for at least the first few layers.
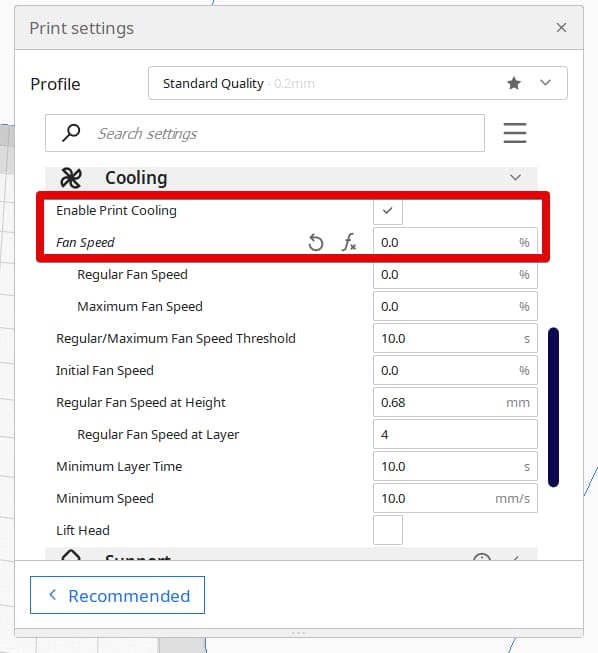
Having the cooling fan low has worked well for one user who uses just 30% for PETG, while another had success with 50%. It’s going to be down to your specific set up and how well the air is directed to your 3D print.
If you have a fan duct that directs air to the front of your part, that temperature change can cause shrinkage which leads to the warping you are experiencing.
This video explains different cooling fan settings and tests whether they make PLA and PETG stronger and more stable.
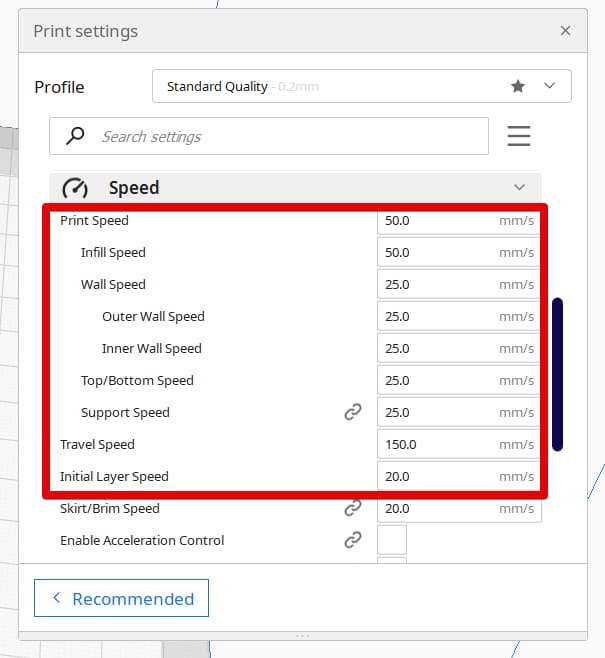
9. Reduce Printing Speed
Reducing printing speed can improve layer adhesion and give the filament time to melt properly and stick to itself, so it doesn’t pull on the lower layers and cause them to lift from the bed.
One user sets his printing speed to 50mm/s with success, alongside a few other settings, such as a 60°C bed temperature – lower than most people would recommend – and 85% cooling – a setting which most users suggest not using at all.
In this case, the lower printing speed worked well without having to turn off or even reduce cooling too much.
Another user mentioned they are using 60mm/s, with a travel speed of 120mm/s. They also suggested that you could increase the speed after the printing starts to reduce printing time.
It’s usually recommended to use a Print Speed of between 40-60mm/s, then having an Initial Layer Print Speed of 20-30mm/s for the best results.
How to Fix PETG First Layer Warping
To fix PETG first layer warping, turn your cooling fan off or 30% and below. Make sure your printing temperature and bed temperature is optimal according to your filament manufacturer’s recommendations. Level your bed accurately so the PETG filament slightly squishes to the bed. Glue sticks work well on the bed too.
When leveling the bed, it can be a good idea to fold up your normal piece of paper so it’s thicker than normal leveling or the filament might squish too much to the print bed which isn’t ideal for PETG.
Some people also recommend that you dry your filament since PETG can absorb moisture from the environment. I’d recommend going with something like the SUNLU Filament Dryer from Amazon to dry filaments.


How to Fix PETG Infill Warping
To fix PETG infill warping upwards, you should decrease the Infill Print Speed within your settings. The default Infill Print Speed is the same as the Print Speed so reducing this can help. Another thing to do is to increase your Print Temperature so you get better layer adhesion throughout the model.
Several users pointed out that a printing speed too high for the infill can result in poor layer adhesion and cause your infill to curl.
One user is working with a travel speed of 120mm/s, a printing speed of 60mm/s and an infill speed of 45mm/s. For one user, reducing the printing speed and reducing the layer height solved the infill issue they experienced.
You should also make sure the bed is not too high, as this could cause the material to overflow during printing.
One user suggested a series of steps that helped them fix the issue:
- Deactivating cooling throughout the entire print
- Decrease the infill printing speed
- Clean the nozzle to avoid under-extrusion
- Make sure the nozzle parts are tightened properly
How to Fix PETG Raft Lifting
To fix PETG rafts lifting, the main solution is to 3D print using an enclosure to control the temperature within the printing environment. You can also follow the main steps for PETG warping since that works for the raft also such as leveling the bed, increasing print temperature, and using adhesives.
The raft lifting off the bed or warping occurs for mostly the same reasons that the normal printed model warps: poor layer adhesion and temperature differences causing the PETG to shrink and the corners to lift.
Sometimes, the layers of the print can pull the raft up as well, especially if the model is quite compact. In this case, you may also try to orient the print differently, to reduce the tension on the bottom layer, and potentially with support material.
Have a look at this video for a comprehensive explanation of PETG and the best ways to print it without facing any issues.