8 Ways How to Fix Cura Not Detecting 3D Printer
Cura not detecting the 3D printer is one issue that prevents many users from initiating their printing process. This might happen for many reasons, and fixing it can be challenging if you don’t know where to start. That is why I wrote this article to share some of the potential solutions.
To fix Cura not detecting your 3D printer, update your printer’s firmware, use a different or updated version of Cura, connect the USB to different ports, and enable the “Print via USB” option. If this doesn’t work, disconnect and reconnect the USB cable and restart the 3D printer.
This is just the basic answer. I will go into more detail in this article, so please continue reading to learn more.
How to Fix Cura Not Detecting the 3D Printer
Here are some of the main ways you can fix Cura not detecting your 3D printer:
- Use an Updated or Different Cura Version
- Connect the Printer’s USB to Different Ports
- Install the USB Printing Plugin and Enable the “Print via USB” Option in Cura
- Restart the Printer and Cura
- Ensure No Other Devices Use the COM Ports
- Disconnect and Reconnect the USB Cable
- Replace a Faulty USB Cable/Use a Different Cable
- Update the Printer’s Firmware
1. Use an Updated or Different Cura Version
Several users have reported that updating Cura to the latest version resolved the problem of their 3D printer not getting detected. Updating the software may eliminate bugs that may have been causing the detection issues.
However, if you are running on the latest version and still have detection problems, you should consider reverting to a previous stable version. The important thing is to ensure the Cura version you’re using is compatible with your printer model.
Here is a video perfectly explaining how you can update Cura on your computer and keep your settings.
One user who bought an MP Select Mini 3D printer and hooked it up via USB said that he couldn’t see it appearing under Device Manager in his Windows 10, nor was it being detected in Cura.
Someone recommended that he switch from Cura 2.3.1 to Cura 15.04.6 version to fix the issue. The reason was that the Cura 2.3.1 version was not designed to handle USB printing, so it wasn’t worth the hassle to try to make it work.
2. Connect the Printer’s USB to Different Ports
Sometimes, the USB port you use to connect your 3D printer to the computer may not have the required power output or may be faulty.
So, unplug the USB cable from the current port and connect it to the different ports available on your computer until you find one where the 3D printer will be detected.
Plugging your printer’s USB cable into a different USB port can help you determine if port-related issues caused Cura not to detect the 3D printer.
One user said that Cura would not detect his printer after plugging in its USB cable and attempting multiple fixes. Another user recommended trying all the USB ports on the desktop to see which one would work.
If all the ports couldn’t show the printer, the only option left would be to re-install Cura to fix the detection problem.
3. Install the USB Printing Plugin and Enable the “Print via USB” Option in Cura
3D printer detection problems can arise if you have not installed the USB Printing Plugin and enabled Cura’s “Print via USB” settings. These settings tell Cura to use the USB connection to communicate with the 3D printer to fix detection issues.
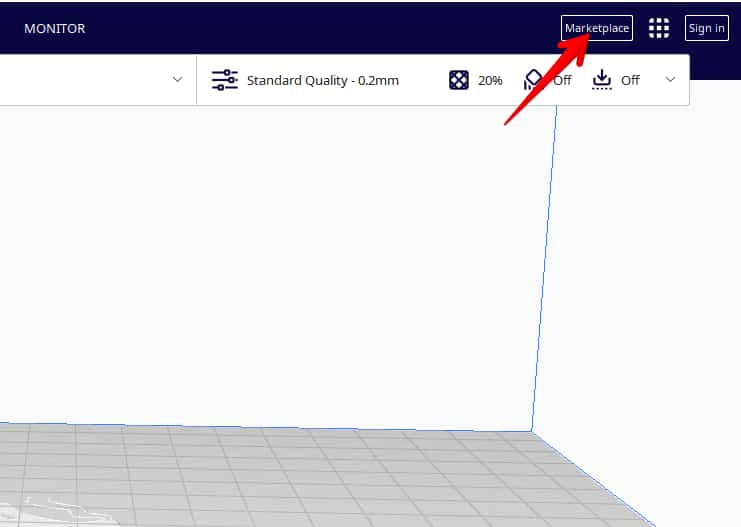
To install the USB Printing plugin, you’ll need to go to Cura’s Marketplace by clicking the Marketplace button on the top right side of your screen.
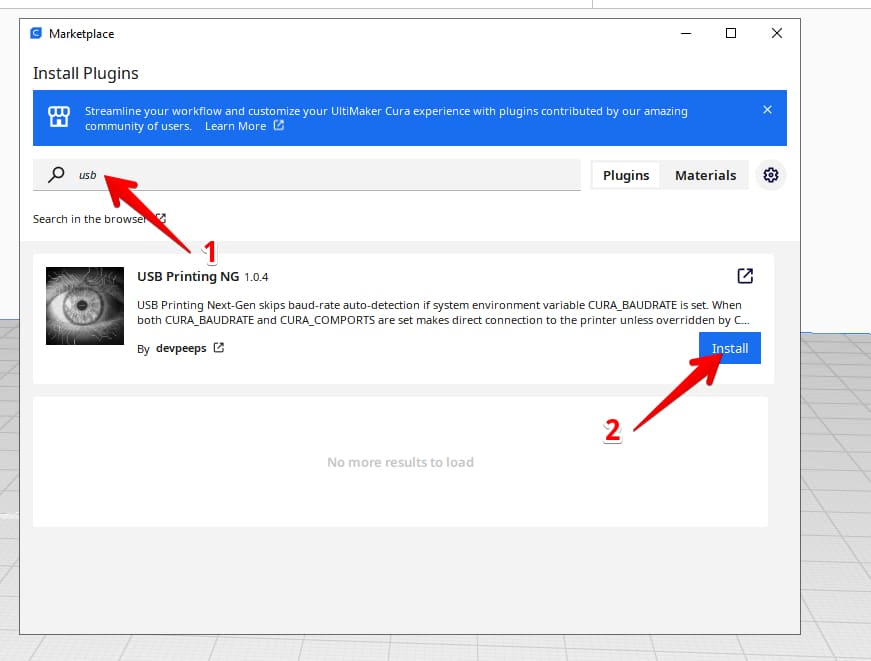
Next, search for the USB Printing Plugin by inputting USB in the search box that appears. Once you find it, click the install button and restart Cura for the plugin to work.
Check out this video by TOTZ3D that explains how to use Cura to print or control the printer using USB.
One user said he couldn’t get Cura to detect his Anycubic Mega S 3D printer. In response, another user said that he could make Cura 4.11 print on his Anycubic Mega Zero 1.0 in this way.
He sliced his model on Cura, and a “Save to USB” button appeared after the process was finished. The button had a down selection arrow with different options, so he selected the “Print via USB” option. This enabled him to select his 3D printer and print.
Another user said that his Maker Select V2 could not be recognized by Cura 4.8.0, and he just couldn’t find a fix to the problem.
Someone advised him to go to the top-right side of Cura, click on Marketplace/Installed, and ensure “USB Printing” was installed. That would enable Cura to open the USB port to the printer.
4. Restart the Printer and Cura
One possible fix to Cura not detecting the 3D printer is restarting both the printer and Cura. This is because temporary glitches may prevent the 3D printer from communicating with Cura making it harder to detect.
Restarting both the printer and Cura resets and removes the temporary glitches. This will also enable them to create a fresh connection, potentially fixing the detection problems.
One user who couldn’t establish a connection between his Mac and Cura said that he occasionally had to power off his printer and let it sit, then power it back on and connect the USB cable. This enabled Cura to see his 3D printer.
He added that turning the printer off and back on again a couple of times could help resolve the issue, but if it didn’t work, you should try other methods.
Another user said that the best way to get your 3D printer to connect with Cura, especially after enabling the “Print via USB” option, is to close and restart Cura or turn your printer off and then back on again.
5. Ensure no Other Devices Use the COM Ports
If other devices share the same COM port as your 3D printer, they interfere with the printer’s communication with the computer. Disconnect these devices to eliminate any potential conflicts.
To do this, you will need to go to the device manager on Windows or System Information on macOS. In Windows, you can do this by clicking the Windows logo key + X and selecting Device Manager.
Under the “Ports (COM & LPT) section, look for the connected devices that share the same port as the 3D printer.
Disconnect them from that specific COM port and restart Cura to check if the 3D printer can be detected without interference.
One user said that you needed to ensure that you have only one instance of Cura open and no other connections on the active COM port your printer is using; otherwise, Windows won’t allow Cura to connect to the printer.
6. Disconnect and Reconnect the USB Cable
Another fix you could try is disconnecting and reconnecting the USB cable. Loose USB connections can sometimes make it difficult for the computer and printer to communicate, causing detection issues.
First, turn off your 3D printer, then carefully unplug the USB cable from the printer and computer. After that, reconnect the USB cable to both devices and power on your 3D printer. Launch Cura on your Computer and check if it can detect the printer.
One user wanted to know how to get his printer to appear in Cura since it was already showing in his Device Manager as a “Compatible 3D Printer”. A user said to resolve his issue, he disconnected and reconnected the USB cable while Cura was still open, and the printer was still on.
7. Replace a Faulty USB Cable/Use a Different Cable
Another effective method of fixing Cura not detecting USB cables is to use a different 3D printer USB cable. You should inspect the USB cable for any visible damage, and if you find any, replace it with a new one compatible with the 3D printer and computer.
Even if there is no damage, you can still try using a different cable because the original one may have been faulty or not meant for transferring data.
Replacing the USB cable helps ensure you have a reliable connection, enabling Cura to detect the printer.
One user said that his Printrbot Simple Metal failed to establish a USB connection on Cura when he tried to link it with a Mac Pro and a Macbook. He diagnosed the problem and found out that his USB cable was faulty. It worked like a charm after buying a new one from Best Buy.
Another user said that if disconnecting and reconnecting the USB cable while Cura was open could not help it appear while trying to print, you should use a different USB cable.
8. Update the Printer’s Firmware
The first method you should use to fix Cura not detecting your 3D printer is to update your printer’s firmware. An outdated or incompatible firmware might not communicate effectively with slicing software such as Cura, making it hard to detect.
Updating the firmware ensures that it is compatible with the version of Cura that you have installed on your Computer for it to be detected.
To update the printer firmware, visit the manufacturer’s website and find the latest version specifically designed for your 3D printer model.
This video can help you learn how to update the firmware of an Ender 3 V2.
One user said that you will need to update the firmware to fix an issue where Cura does not detect your 3D printer. This would unlock new features that the stock firmware may not have, thus causing the connectivity issue.
To do this, you need to download the firmware from Creality, Github or elsewhere, unzip the file, and install it on the SD card properly. After that, plug the SD card into the printer, turn it on, and the new firmware will be flashed onto the printer’s mainboard.