5 Ways How to Fix Cura Not Generating Infill
Many users experience issues generating infill on Cura, which can be a pain – especially when trying to figure out the reason it’s happening in the first place. I wrote this article to show the different ways you can fix the problem once and for all.
To fix Cura not generating infill, you can try unchecking the “Spiralize Outer Contour” setting under the “Special Modes” option. You can also solve the problem by increasing your Infill Overhang Angle or resetting your profile to default. It may be as simple as turning on infill color in “Preview Mode”.
Keep reading to learn the details of these solutions and other important information which will help you fix Cura not generating infill.
How to Fix Cura Not Generating Infill
- Turn off the Spiralize Outer Contour
- Increase the Infill Overhang Angle
- Turn On the Infill color in Preview Mode After Slicing
- Repair the Model/STL File
- Reset your Profile to Default
1. Turn off the Spiralize Outer Contour
One way to fix Cura when not generating infill is to switch off Spiralize Outer Contour under the Special mode option.
The Spiralize Outer Contour mode, or as it’s popularly known, Vase Mode allows a user to print in one direction using a continuous line. This option means the prints are usually hollow with thin walls and meant for aesthetics or non-functional use.
If you switch on this option, the infill is automatically disabled, so you will have problems generating the infill.
To turn off this mode, follow the following instructions:
Step 1: Go to print settings, and under your print profile, select the “Special Mode” tab.
Step 2: After selecting it, it will present some options to you – among these options is one called “Spiralize Outer Contour.”
Step 3: Uncheck the box by its side.
You can also find it by searching for it on the search bar on your print settings.

One user whose print was hollow when it needed infill in them discovered he turned on the spiral outer contour feature. He resolved the issue by switching it off.
Another user infill did not work unless at 100%. He found out the problem was the Spiralize Outer Contour feature was enabled and he had to uncheck it to resolve this issue.
2. Increase the Infill Overhang Angle
Another way to fix Cura not generating infill is to increase the degree of the Infill Overhang Angle. The Infill Overhang Angle determines what angle infills are generated to support the top or overhangs of models.
The Infill Overhang Angle is the minimum angle at which infills are generated to support the internal structure of a model at an overhang. The default Infill Overhang Angle when turned on is 40°.
An example is if you are printing a model and the top of the model is at an angle of 50°. It means infill overhang will work if you set the value at 50° or higher but will fail to generate infill if the value is 49° or lower.
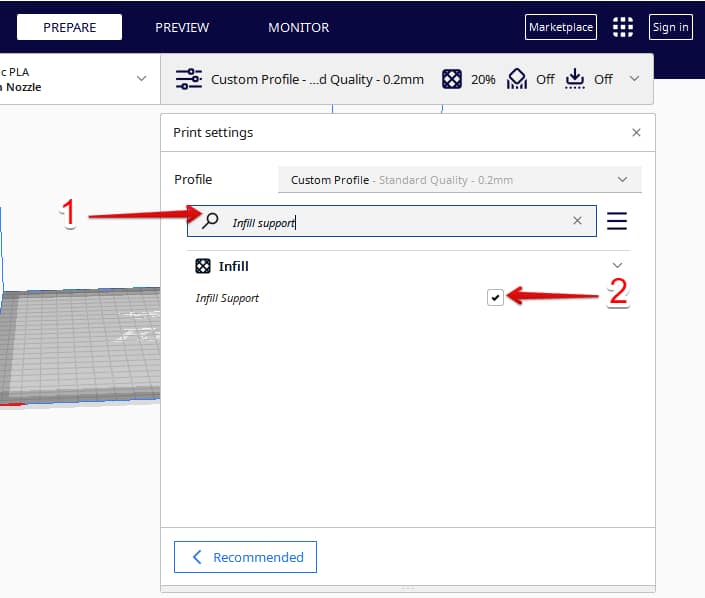
To find the Infill Overhang Angle in Cura:
Step 1: Go to your print settings and click on it
Step 2: Scroll down and click on the Infill tab, and a list of options will roll down
Step 3: Scroll down and select infill support. This will show you some options, including the Infill Overhang Angle.
Step 4: Edit the number there and see at what stage your model will produce infill at an overhang or on top of a model.
You can also get there by searching for Infill Support under the search tab on the print setting.
One user whose Cura didn’t generate infill for the top of his model discovered that his Infill Overhang Angle was set low. He resolved the issue by increasing the figure on his Infill Overhang Angle settings.
3. Turn on the Infill Color in Preview Mode after Slicing
A way to fix Cura not generating infill is by turning on the infill color when previewing it. This is a common mistake or oversight many users experience. It happens when you don’t select the infill color box under the preview tab.
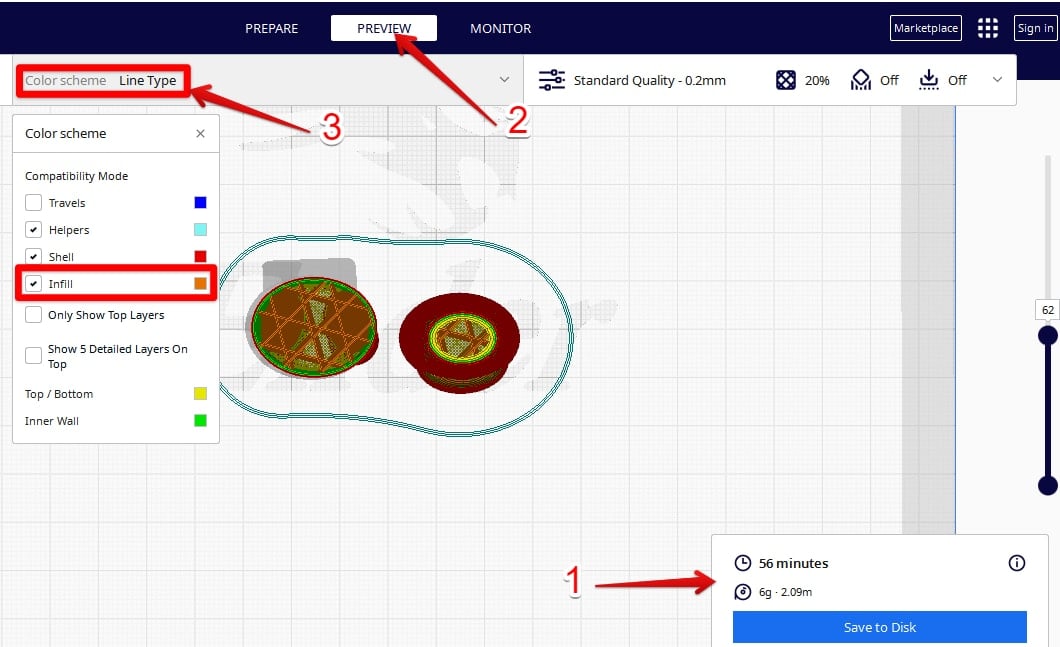
To check if you turned on your infill color box:
Step 1: Slice the model on the buildplate.
Step 2: Click on the “Preview” tab after slicing the model.
Step 3: Select the color scheme option tab.
Step 4: A drop-down menu will appear where you can check if your infill box is turned on or off.
A user whose Cura wasn’t generating infill for his model found out he didn’t check the infill box under the color scheme tab. He resolved the issue by selecting it.
Another user who has experienced Cura not generating infill for his model admitted he resolved it by turning on the infill color in the color scheme. He also said this had happened to him on more than one occasion.
Forgetting to turn on your infill under your preview is more common than you think and maybe the fix you need to resolve your infill issue.
4. Repair the Model/STL File
Another way to fix Cura when not generating infill is to repair the model/STL file. In some cases, Cura isn’t the problem but the imported file. Users may have to make adjustments to their models on software like Blender, Meshmixer, or any other CAD software.
A user whose model wasn’t generating infill discovered he had to tweak his settings on Blender. He selected the “most center” vertex and hitting cmd + many times until the inside was selected, then scaled the model.
Another user who wanted the top part of his dispenser box to be solid with infill resolved the issue by fixing the model/STL file on CAD software.
One user whose Cura didn’t generate infill discovered that it was because his model was hollow and was unable to produce infill at the hollow regions. He had to make that section solid to generate infill.
5. Reset Your Profile to Default
One way to fix Cura when not generating infill is by resetting your profile to its default mode. If you have exhausted all options and are uncertain about what function you need to tweak, you can just reset your profile.
While this will wipe out your previous settings for the profile, it may be the solution for you if you have exhausted all other options.
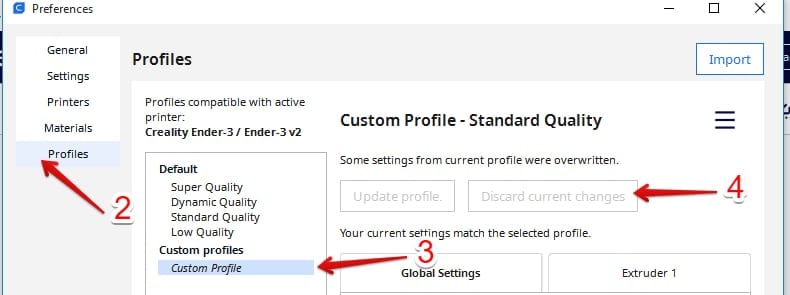
To reset your Cura profile, click on your settings profile name, then go down and re-select your profile. A dialog should come up asking if you want to discard changes or Keep the changes.
Select “Discard” changes then the settings will go back to however they were defined for that particular profile.

A user who had problems with Cura not generating infills for his model resolved the issue by resetting his profile.