15 Ways How to Fix Cura Freezing, Not Opening, Crashing or Shutting Down
Users have experienced issues with Cura not working or opening for some reason which can be frustrating. This article will help you identify why Cura might not be working, and provide methods of fixing it once and for all.
To fix Cura freezing, not opening, crashing or shutting down, you should first restart your computer as a basic measure. Uninstalling and reinstalling Cura has worked for many users, as well as unplugging extra monitors or USB devices. You can also try to run Cura as an administrator or run it with your dedicated GPU.
There’s more information that you’ll want to know to finally Cura and have it running smoothly, along with pictures to help so keep reading on.
Why is Cura Not Working?
There are many reasons why Cura might not be working for your computer or laptop, so narrowing it down to one issue can be difficult. Various reasons include outdated drivers, outdated Windows security updates, compatibility issues, or just needing a computer restart.
Sometimes Cura may have compatibility issues with other software, such as ChiTuBox or OctoPrint. Other times, the slicer might get confused by multiple displays or external devices plugged in the laptop or computer.
I will present some fixes for the issues mentioned above, as well as for other less common ones that users have encountered, in the following sections of the article.
Each Cura problem has a different solution, so I will go through some issues users have encountered with the slicer and their respective fixes below.
Here are a few general solutions to try before attempting any time-consuming or complex ones.
- Go on the Cura website and install the newest version they have available. Many of the issues you might be experiencing in older versions get fixed in newer versions as users report them.
- Uninstall and reinstall Cura. Sometimes this solves the issue, sometimes it doesn’t, but it can be a quick fix.
- Make sure the file you are importing or exporting is not too large. Cura may crash when exporting or even opening a very large model. A standard STL file is usually under 20MB, but higher quality files can easily be 100MB+. These are more likely to cause crashes when loading.
These could be the reasons why Cura won’t open files properly.
How to Fix Cura Freezing, Crashing, or Shutting Down
There are several possible solutions on how to fix Cura when you find it freezing, crashing or shutting down. Some of them are fairly basic and quick fixes while others get a little more complex.
I’d recommend starting with the simple fixes before getting into the more detailed ones. I tried to put them in that order to make things easier.
Some fixes may be patched already from Cura updates, but I still included a few of them for reference.
Here’s the list of fixes I found:
- Get the Right Computer Specs for Cura
- Restart Your Computer
- Uninstall and Re-Install Cura
- Disable Your Network Connection & Disable Bundled Plugins from the Marketplace
- Unplug Extra Monitors and External USB Devices
- Uncheck “Send (anonymous) print information” & “Check for updates on start” in your Cura Settings
- Run as Cura as an Administrator
- Delete Old Cura Versions & Folders
- Uninstall ChiTuBox
- Disable the OctoPrint Connection Plugin
- Locate Your Cura Log File & Check for Errors
- Run Cura Using NVIDIA Driver Rather than Intel Graphics Card
- Pause/Shut Off Your Internet Security Before Running Cura
- For Cura 4.6 – Reduce the Number of Autosaves Using
- For Cura 4.9 – Delete a Row of Text in the cura.cfg File
Below, we’ll go through them one by one.
1. Get the Right Computer Specs for Cura
Cura does actually have some minimum system requirements they require to run properly, so you want to make sure your computer has them (most should).
These are the minimum system requirements for Cura:
- OpenGL 2 compatible graphics card, OpenGL 4.1 for 3D layer view
- Display resolution 1024 x 768
- Intel Core 2 or AMD Athlon 64
- 550 MB available hard disk space
- 4GB RAM memory
These are the recommended system requirements for Cura:
- OpenGL 4.1 compatible graphics card for 3D layer view
- Display resolution 1920 x 1080
- Intel Core i3 or AMD Athlon 64
- 600 MB available hard disk space
- 8GB RAM memory
Another thing to note is that Cura is a 64-bit program so it’s not available for 32-bit variant systems. It’s recommended to run Cura on the latest operating system version so it is supported, though as long as the version isn’t too old it should be fine in this regard.
2. Restart Your Computer
Sometimes a simple restart of your computer or laptop can help solve an issue of Cura freezing. This has worked for many users so I’d definitely try this simple fix before moving on to some of the more time-consuming ones.
3. Uninstall and Re-Install Cura
Plenty of users who experienced Cura freezing found that the issue got fixed by uninstalling and re-installing Cura, especially if there was a newer version to download.
If you have the minimum Cura specs and have tried restarting your computer already, try doing this and it may solve your issues. Cura regularly gets updated and many bugs and errors get fixed during these.
To uninstall Cura, simply search for Cura in your desktop by pressing WinKey + Q and typing in Cura. You should then see an option to uninstall the program, or right-click and select “uninstall”.

Then re-install Cura by going to the Ultimaker Cura download page and downloading the latest version.
4. Disable Your Network Connection & Disable Bundled Plugins from the Marketplace
You should try starting Cura again, but with a disabled network connection. Sometimes Cura will try to load some other things in the background through your internet connection which may be causing issues.
Some users reported that disabling certain plugins can help with fixing issues with Cura freezing, crashing or shutting down. Some of these bundled plugins include:
- Firmware Update Checker
- UM3 Network Printing
- USB Printing
- Update Checker
Try disabling similar plugins and restart Cura, back with the network connection enabled to see if it fixes the issue.
5. Unplug Extra Monitors and External USB Devices
Unplugging USB devices and extra monitors might be what fixes your issues with Cura. As mentioned in the fix above, the same user managed to solve his issues by unplugging everything from his laptop and it started working flawlessly.
He even changed many of the settings back to the original and it still worked fine, so for him, this was the issue. It was most likely because Cura does checks for the USB ports in order to figure out if there is something connected to a 3D printer.
Previously, they had many things plugged into their laptop such as a USB-C docking station, along with two monitors and another USB 3.0 hub splitter.
Unplug any USB cables, including wireless mouses, external hard drives or extra displays. This fixed the issue for some users.
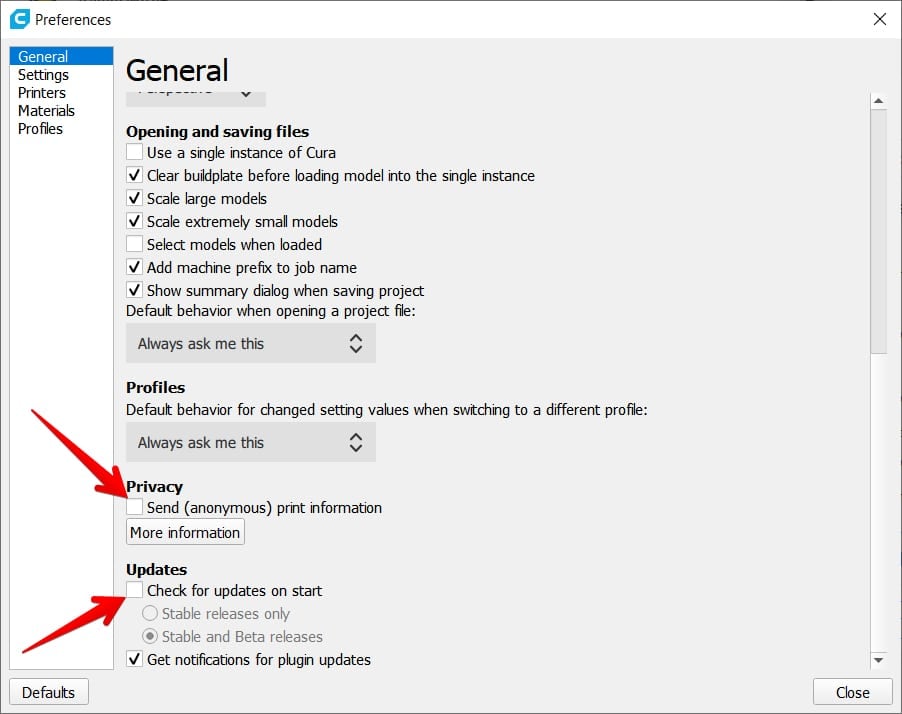
6. Uncheck “Send (anonymous) print information” & “Check for updates on start” in your Cura Settings
Some users mentioned that going into Cura settings and unchecking a specific setting called “Send (anonymous) print information” worked to help stop Cura freezing.
This setting is easily found by going to Preferences (top left of Cura screen) > General, scroll down and uncheck “Send (anonymous) print information”. You can also press CTRL + K to get to the Preferences’ “Materials” tab then simply select the “General” tab.
Another setting you’ll want to disable is the “Check for updates on start” which is just below the previous setting.
7. Run as Cura as an Administrator
One user who had issues with Cura freezing on launch found that running Cura as an administrator gave him enough time to try the fix above which is unchecking the Cura setting before it froze. Running Cura as an admin can help with Cura freezing but it might not solve the problem altogether.
To do this, simply find your Cura file, right-click it and select “Run as Administrator”.

8. Delete Old Cura Versions & Folders
One user found that deleting some older Cura versions and folders worked to resolve their problems with Cura. They simply followed these steps:
- Exited Cura
- Opened a file explorer window and enter in %APPDATA%/Cura to get to your Cura folder
- Remove older versions of Cura

9. Uninstall ChiTuBox
If you have ChiTuBox (a resin slicing software), installed then try removing it following the steps provided by the Ultimaker support team, as the two slicers might be incompatible sometimes.
One user who removed their ChiTuBox download said it got their Cura 4.10 to work properly again. They did unfortunately experience issues with opening files directly from the Cura icon or the file dropdown menu. This issue may be unrelated to the initial problem though.
Ultimaker Support also provided another method:
- Open command prompt with administrator rights
- Enter the command: regsvr32 /u “C:\Program Files\<ChiTuBox version>\CHITUBOX_Thumbnail.dll”
- Restart your computer
Replace <ChiTuBox version> with the location on your system.
Example: regsvr32 /u “C:\Program Files\CHITUBOX64 1.8.1\CHITUBOX_Thumbnail.dll”
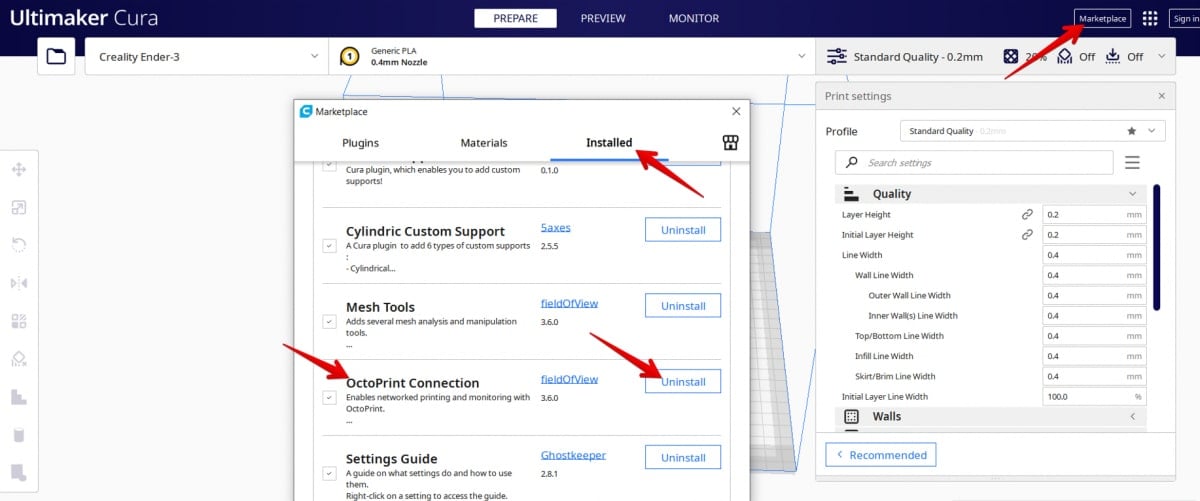
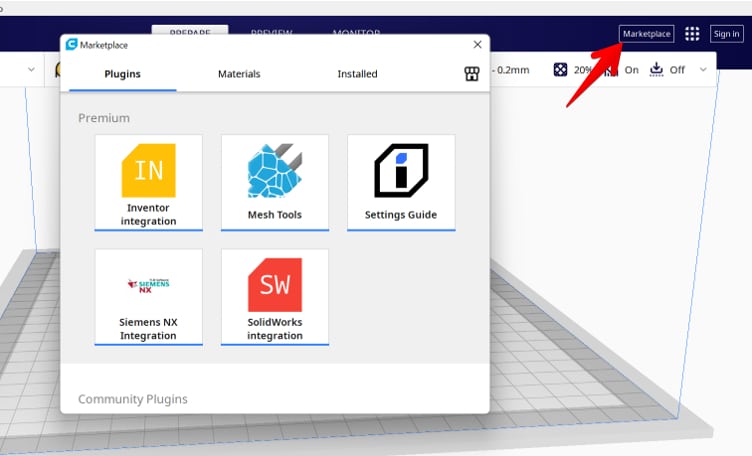
10. Disable the OctoPrint Connection Plugin
- If you are using OctoPrint, try going to the Marketplace (top-right corner of the Cura window), click the “Installed” tab and uninstall OctoPrint Connection, then restart Cura. This improved the situation for one user.
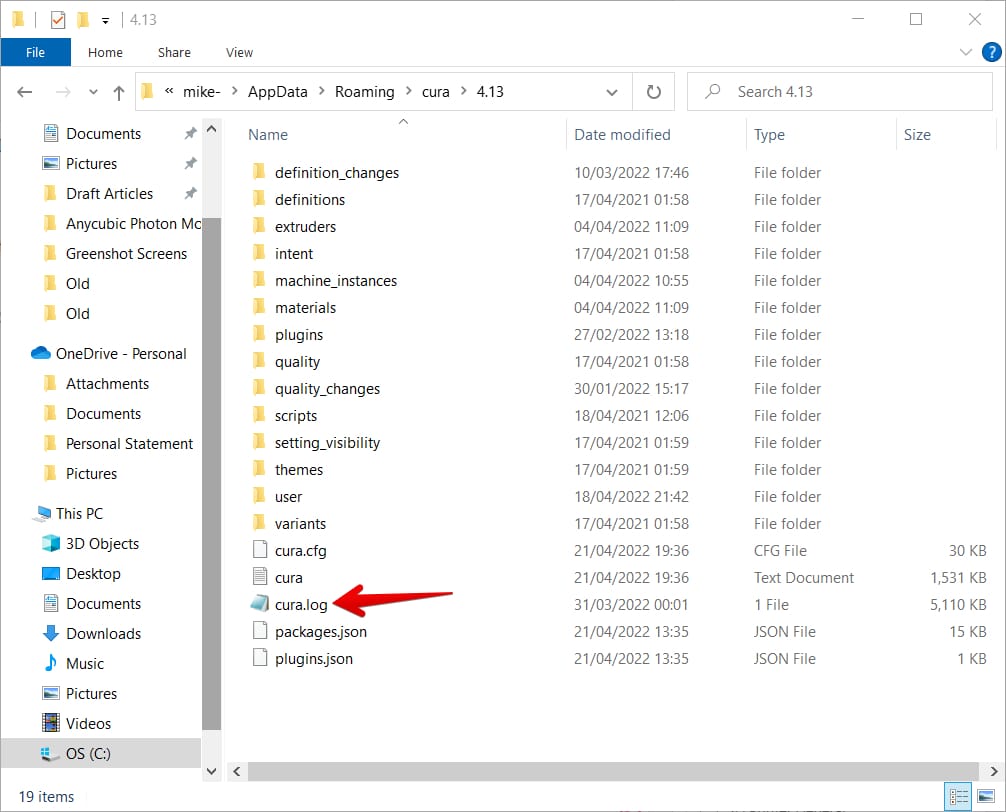
11. Locate Your Cura Log File & Check for Errors
I came across another fix that involves locating your Cura log file and checking for specific errors that may tip you off to a specific issue. The actual log file can be difficult to make sense of, so you can try sending the file to a forum with more experienced used to have a look.
The Ultimaker Forum is a good idea, as well as 3D printing Subreddits like r/3DPrinting, or r/FixMyPrint. They also have plenty of benefits and interesting posts outside of fixing Cura.
You should be able to find your Cura log files within your Cura folder. Simply enter %APPDATA%/Cura into your file explorer window and select your version of Cura.
12. Run Cura Using NVIDIA Driver Rather than Intel Graphics Card
Another method of fixing Cura crashing or freezing is to run Cura using the GPU rather than the usual option.
One user changed his settings so that Cura was forced to use the GPU and this enabled him to get into Cura long enough to change some settings such as checking for updates and sending the print information boxes in the preferences section.
They also tested Cura with their Antivirus disabled and not connected to the internet.
Unfortunately, the issue was still present after that but he went on to try another fix that worked which I will explain in the next method.
In order to run Cura with the GPU you need to:
- Press your Windows Key or click the start button and type “graphics settings” then press Enter.
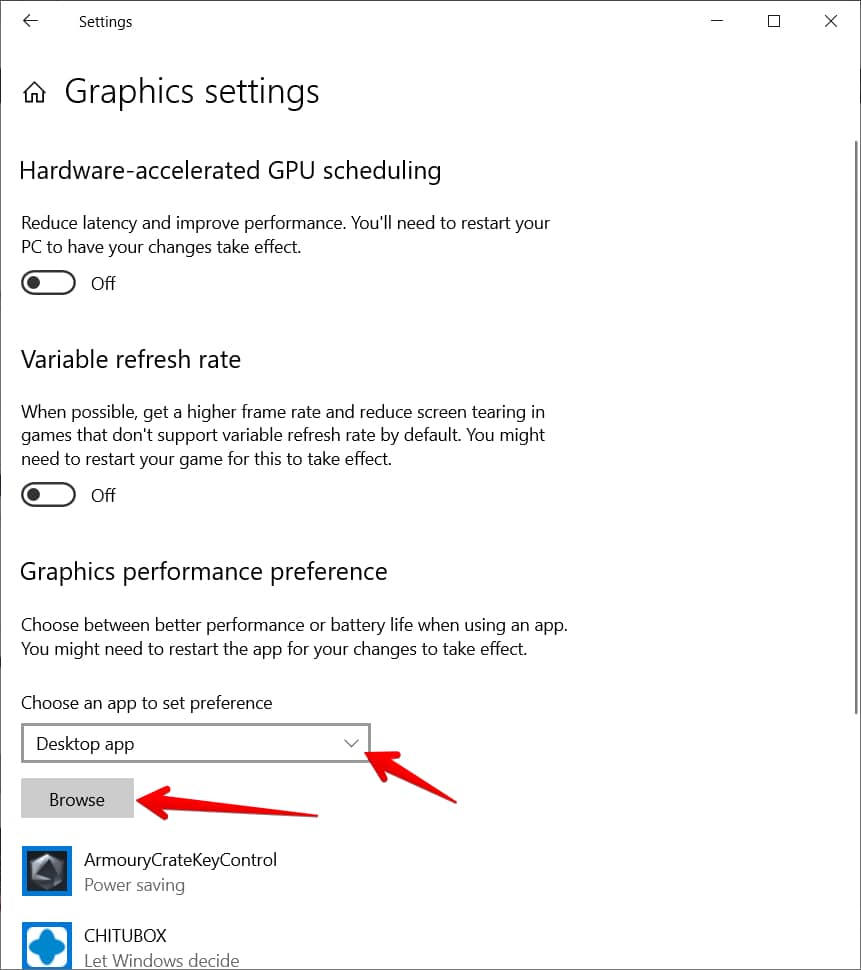
- Select “Desktop app” from the dropdown menu then hit “Browse”
- Next, find Ultimaker Cura in your “Program Files” folder and Add it
- You should now see Ultimaker Cura – select “Options”
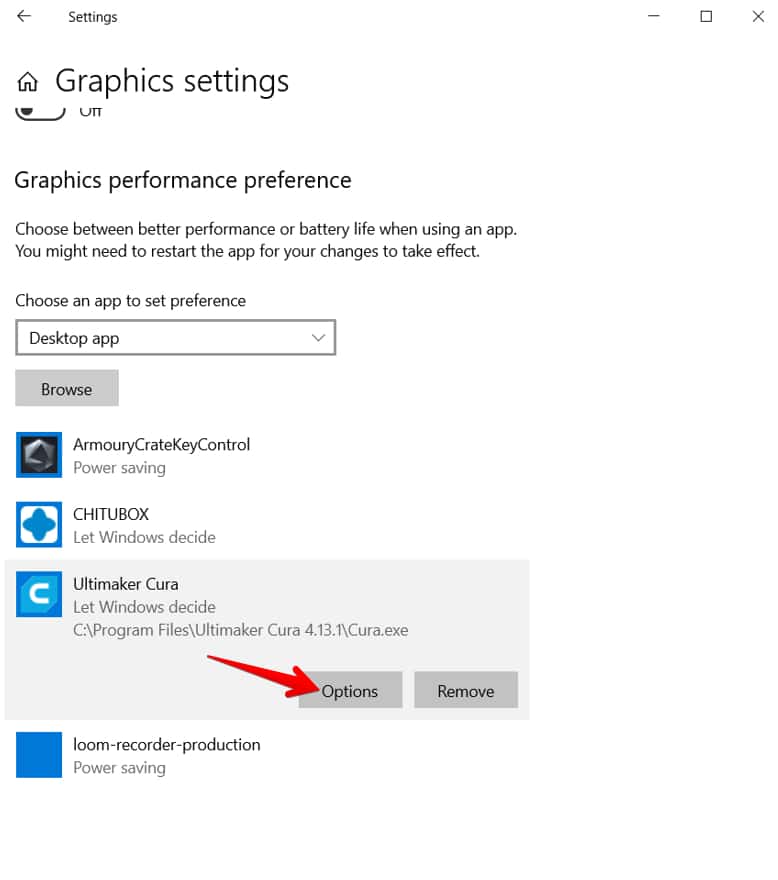
- Select your chosen GPU – “High performance” runs the NVIDIA GeForce specifically for Cura, then “Save” to finish.

13. Pause/Shut Off Your Internet Security Before Running Cura
Another thing that can help with fixing Cura freezing is to pause or shut off your internet security before running Cura. One user who installed a new security software called Kaspersky among doing other things found that Cura kept on freezing, or technically ran really slowly.
It’s a good idea to check your antivirus, VPN, and firewall to see if they are blocking Cura. If you find that they are, you can try to add Cura.exe and curaengine.exe to the excluded list within the program.
You can try temporarily shutting off these software programs and trying to run Cura to see if it makes a difference.
One user found that going to their Firewall, going to “App & browser control” then “Exploit protection settings” and changing the default settings all to “Off” allowed him to use Cura without issues.
It’s not recommended to operate with these settings off though while being online. This user had a computer that was offline that was separate to their usual computer.


14. For Cura 4.6 – Reduce the Number of Autosaves Using
In Cura 4.6, an issue would cause the slicer to autosave much more frequently than it should have. However, this was reportedly fixed in Cura 4.7.
- Type %APPDATA%/Cura in the location search bar of the File Explorer
- Choose the folder that has the number of the Cura version you are using as a name
- Right click on “cura.cfg”, click on “Open with” (or press “Enter”) and choose a specialized text editor, such as Notepad++
- In the [cura] section, add the line “autosave_delay=1000000” (which should make the interval between autosaves 1000 seconds instead of the default 10 seconds)

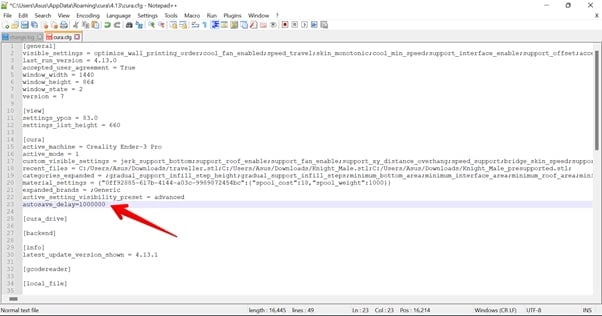
15. For Cura 4.9 – Delete a Row of Text in the cura.cfg File
In the case of Cura 4.9, users reported a freeze at the “initializing build volume” stage of the startup process; the solution is to open cura.cfg in Notepad++ as mentioned before, and delete the row that starts with “ultimaker_auth_data=…”, then re-sign in when launching Cura next time.
This issue was reported to be partially fixed in Cura 4.10, but some users said they still experienced issues when logging in again.
Hopefully after trying a few of these fixes, you finally have Cura back up and running smoothly how it should be.
How to Fix Cura Not Opening or Launching
There are several possible fixes if Cura won’t open:
- Update Your Graphics Drivers
- Check Compatibility
- Install the vcredist_x64.exe file
- Uninstall ASUS GPU Tweaks if you Have an ASUS System
- Uninstall Your Version of Cura & Install a Previous Version
One thing users experience is when they open Cura, then see the Cura logo appear for a few seconds but the app doesn’t actually open afterwards.
You can check the Task Manager to see if the Cura app is showing as actually running by pressing CTRL + SHIFT + ESC and when it pops up, press ‘c’ and scroll down to look for Cura. If you don’t see Cura, try to open it up again.
If this doesn’t work, or you also see a blank pop-up with the message “Not responding”, you want to try the fixes below:
Update Your Graphics Drivers
Your graphics card doesn’t always update automatically, so you may have to go to the drivers manufacturer’s website and install them yourself.
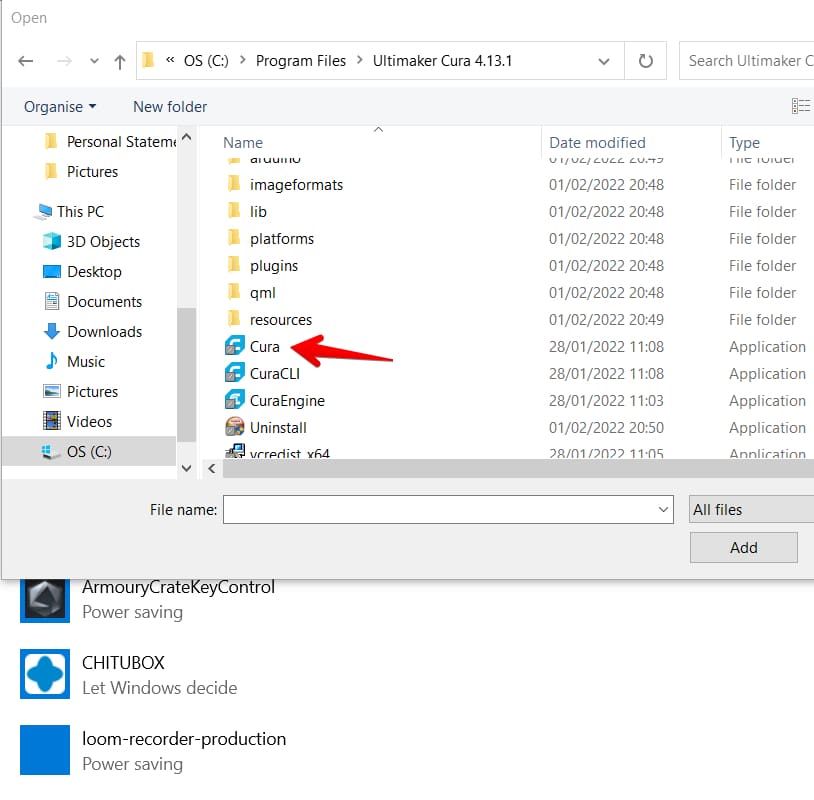
Check Compatibility
To make sure Cura is compatible with your version of Windows, do the following:
- Go to C:\Program Files\Ultimaker Cura (followed by the version number) or use the Windows key + Q to open the Start menu, type in “Cura”, then right click and choose “Open file location”.
- Right-click on the blue Cura file and choose “Properties”
- Go to “Compatibility” and choose the correct version of Windows that you have; choose Windows 8 if you have Windows 10 or later.
You can also choose to “Run compatibility troubleshooter” and see if that helps address your issues.

Install the vcredist_x64.exe File or Reinstall the Visual C++ Redistributable
vcredist_x64.exe is a Dynamic Link Library required for programs created with Microsoft Software, Cura being one program which needs this library. Try following these steps to see if it helps fix the issue.
- Go to C:\Program Files\Ultimaker Cura (followed by the version number) and try to install vcredist_x64.exe by clicking on it (vcredist_x64)
- If you can’t install it, you might have to uninstall the Microsoft C++ Redistributable versions which are newer than 2015 (the version Cura uses)
- Go to the Control Panel > Programs > Programs and Features and uninstall any Microsoft Visual C++ Redistributable which has a year past 2015
- Be aware that some newer software may require the latest version of the Visual C++ Redistributable. If this is the case, it might break the program, so you can reinstall the later C++ versions from the Microsoft Website after you install vcredist_x64.exe
- Uninstall your version of Cura and install a previous one
You can find more details from the GitHub page.
One user also found that reinstalling the Visual C++ alone helped to solve their Cura issues.
Uninstall ASUS GPU Tweaks if you Have an ASUS System
Something within the ASUS GPU Tweaks program messes with the graphics driver, which then causes a crash, so try uninstalling it if you have an ASUS computer or laptop.
Uninstall Your Version of Cura & Install a Previous Version
Sometimes, if the problem is not obvious, trying a previous version of Cura might work. That means that your current version has some incompatibilities with parts of your system, and these are not always easily detectable.
The same works for newer versions, as mentioned at the beginning of the article. It is more likely that the newest version would fix more bugs reported by users, but this doesn’t always mean that it is the best version for your device, so try both newer and older versions.
You can find a list of Cura’s previous version to download on GitHub.
How to Fix Cura Marketplace Not Responding
There are a few ways to fix the Marketplace not responding or not showing plugins:
- Check your Network Connection
- Log Into Your Ultimaker Account Again
Check your Network Connection
The Ultimaker Marketplace needs an internet connection, so make sure you have a stable network.
Sometimes a firewall might have an impact on the connection, so if you think that is the issue check that the domains required by Cura are whitelisted, as presented on the Ultimaker Support page.
Log Into Your Ultimaker Account Again
Although this issue should be fixed in newer versions, in some versions of Cura the log-in token necessary for the Ultimaker account would not refresh properly (usually because of network issues), therefore making it necessary to log into your account again.
How Do You Get to Cura Marketplace?
You can access the Cura Marketplace from the Ultimaker marketplace webpage or from Cura itself using the button in the top-right corner of the interface.
I was able to use Cura for my Elegoo Neptune 3 on Windows 10 with no problems. But when I just tried to reinstall on a new machine, Cura would always crash during startup. I gave up on Cura and installed Prusa instead – worked perfectly. I’m now curious to know what people think of Prusa vs Cura.
Hey Seanna, ah that’s unfortunate but at least you got a working solution now! I actually wrote an article on Cura vs Prusa if you want to check that out – https://3dprinterly.com/cura-vs-prusaslicer-which-is-better-for-3d-printing/
Updates happen with the software so some information may be different compared to when I wrote it.