12 Ways How to Fix Diagonal Lines on 3D Prints – Ender 3 & More
Some people experience diagonal lines in their 3D prints and aren’t sure why exactly it’s happening. I decided to write this article to show people some different methods on how you can fix these linens in your models.
The fix that will work for you depends on what’s causing it, so I’d recommend trying out a few of the solutions that makes the most sense to you and going from there. These are mostly for filament 3D prints, but I also have a few fixes for resin models with diagonal lines.
How to Fix Diagonal Lines on 3D Prints
There are specific fixes recommended in this article if you experience diagonal lines on your 3D print. Follow the guidelines outlined below to ensure that your 3D prints are made without diagonal lines.
Here’s how to fix diagonal lines in your 3D prints:
- Reboot the 3D Printer
- Adjust Your Volumetric Extrusion Setting
- Adjust the Tightness of the X Gantry Rollers
- Rotate Your Model in the Slicer
- Increase Wall Thickness of the Model
- Use TL Smoothers
- Add the Z Hop When Retracted Setting
- Disable Combing Setting
- Adjust the Tension of Your Belts
- Fix Bad Bearing on the 3D Printer
1. Reboot the 3D Printer
Rebooting your 3D printer is potential fix for diagonal lines on your 3D prints. One user who experienced diagonal lines on his 3D prints before the 3D printer crashed reveals that rebooting the printer fix the issue.
He further shared that the printer was not oozing on travel and the prints often had diagonal stripes on them.
Another user who experienced the same problem with his Prusa MK3 printed the same 3D model twice and experienced the same errors on both prints. He confirmed that the problem had been resolved after rebooting his Prusa MK3.
What are all these strange diagonal lines in my print? This should be all right angles.
byu/HankScorpion in3Dprinting
2. Adjust Your Volumetric Extrusion Setting
Another reason why diagonal lines occur on your 3D print is having your volumetric extrusion on, especially with the Ender 3. It’s a feature in Marlin firmware which uses different units of volume which changes the flow of material through the nozzle.
If it’s enabled, your flow will effectively be at 40% rather than your usual value due to how it calculates the flow. You can either compensate this by increasing your flow by 150%+ or turn off the setting.
You can fix this issue by following these steps:
- Locate “Control” on the LCD and select filament
- E in mm^3 > Disable
- Save all settings to EEPROM
- Revert the e-step calibration
Among numerous users that testified to this fix. A user shared that he prints wonderfully at these settings and his flow rate has been structured properly.
Another user shared that after experiencing the same problem for a couple of weeks, he went ahead to exchange his Ender 3 pro after attempting all fixes except this. After coming across this fix, but also recommends this fix to other users.
3. Adjust the Tightness of the X Gantry Rollers
In a specific case, a user found that he started getting diagonal lines after installing a direct drive extruder on his 3D printer. The fix that worked for him was to tighten the POM rollers on the right side of the X gantry, that attach the rail to the rollers on the Z-axis.
There are screws on the other side that you can adjust, while holding the nut with a wrench. The wheels should be able to roll with a little pressure, with a smooth movement.

4. Rotate Your Model in the Slicer
One potential fix could be simply rotating your model in your slicer. You can simply rotate your model by around 15° in Cura for example in the direction flat on the build plate through the Z axis or blue rotation.
The way you slice the object does make a difference on the travel movements of your nozzle, so this simple adjustment can help fix those diagonal lines in your 3D prints.

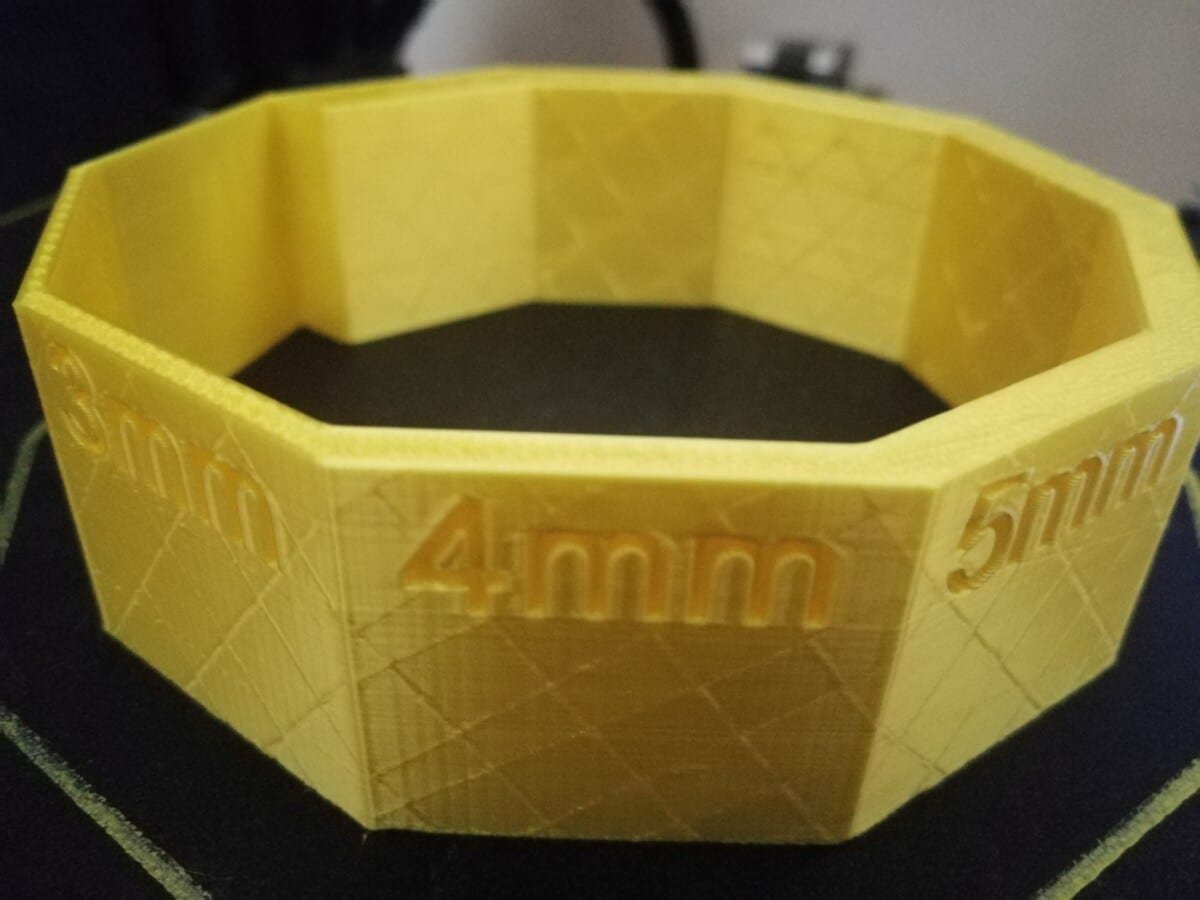
5. Increase Wall Thickness of the Model
If the infill of your model is creating these diagonal lines, that usually means that your Wall Thickness is too low. The simple fix here is to increase your Wall Thickness. I usually recommend a minimum of 1.2mm, while using 1.6mm+ for a good amount of strength in your model.
Cura gives a default of 0.8mm when using a 0.4mm nozzle which can be a little low for 3D prints. Here’s an example of a model that actually shows Wall Thickness differences and has the diagonal lines.
The actual model itself had a low Wall Thickness which is why the diagonal lines showed through. If you increase that Wall Thickness, the infill should stop showing through the model.
6. Use TL Smoothers
One way to fix the diagonal lines on your 3D prints is to use TL Smoothers. Using TL Smoothers is an excellent way to improve the quality of your 3D prints is and also an excellent 3D printer accessory, especially if you have an Ender 3.
When printing on an Ender 3, diagonal lines often occur on your 3D prints due to an intensive vibration on the extruder. When you experience this problem, the recommended solution is to apply TL Smoothers to solve the problem with your extruder.
More modern 3D printers that have newer motherboards have drivers that do what TL Smoothers do, but if you have older 3D printers that have older motherboards, this fix can work for those diagonal lines.
I’d recommend getting something like the Onyehn TL Smoother Addon from Amazon. Many people have used it to reduce the vibrations on their 3D printer.

One user mentioned that TL Smoothers did an excellent job of smoothing their 3D prints. He advised that users who are experiencing low-quality 3D prints to install TL Smoothers if they have a 3D printer with an older motherboard.
Another user tried some other things such as adjusting their extruder steps value and trying different flow rates, but what ended up working was installing TL Smoothers to their 3D printer.
Check out the video below by CHEP to see how to install these TL Smoothers.
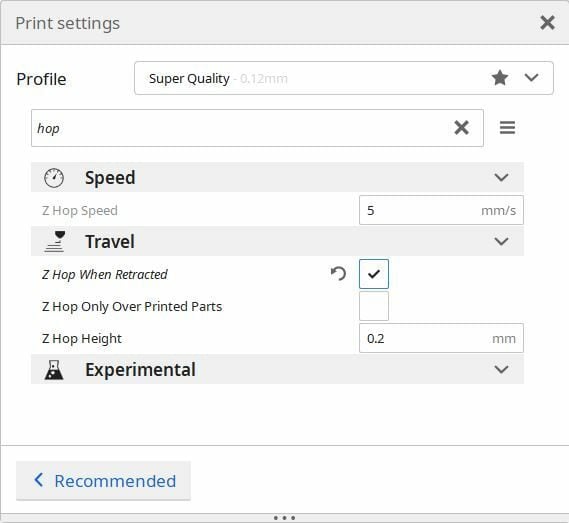
7. Add the Z Hop When Retracted Setting
If you’ve followed completely some of the steps described above and are still seeing diagonal lines in your 3D prints, adding Z Hop can help fix or minimize this issue.
The diagonal lines that you see in your 3D prints might be due to the printer head or nozzle dragging on the upper surface of the print while it’s traveling. Adding the Z Hop When Retracted setting helps adjust the distance between the printer head and the print as it travels from one layer to another.
One user described his experience with his 3D printers producing diagonal lines which he called travel scars.
According to this user, adding a Z hop setting to his 3D printer was a good fix.
8. Disable Combing Setting
Another potential fix for the diagonal lines on your 3D prints is to adjust your Combing settings to “Off” or “Not on Outer Surface”.
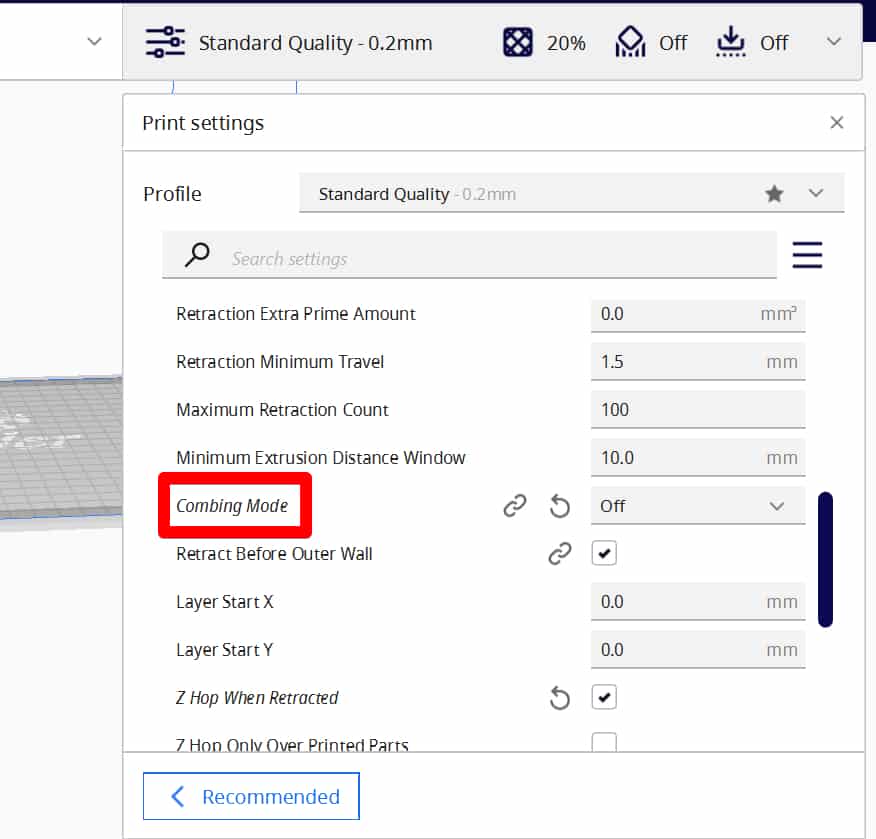
Just like the Z Hop setting, Combing is another setting that adjust the travel movements in your 3D printer. Combing basically tells your 3D printer what pathway to take while printing the object, mainly to avoid crossing the walls in your model.
One user claimed to have experienced the same diagonal lines on finished prints. According to this user, all he did was change the combing setting, and the problem was eliminated.
You can simply adjust this in Cura.
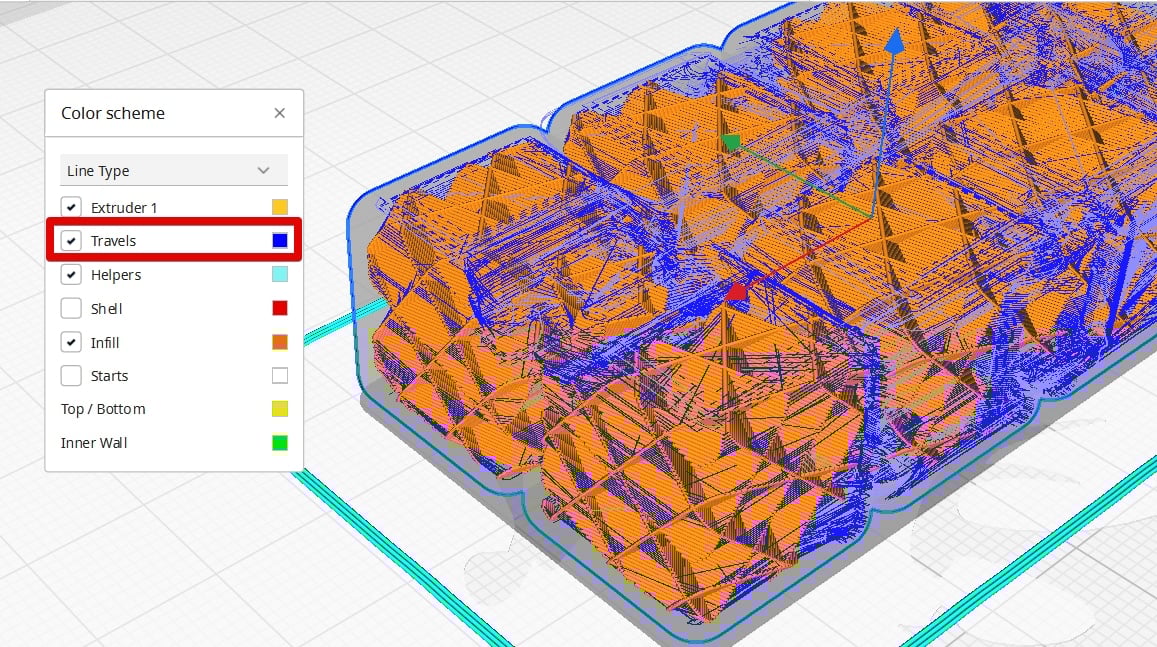
It’s possible to tell whether Combing is the issue by checking the travel models in Cura’s Preview mode. You’ll see diagonal lines as dark blue lines, while the light blue lines are retracted moves.
You can also turn off the “Shell” Line Type to see the inner part of your model, as well as adjust the layer number slider to look inside the model.
9. Adjust the Tension of Your Belts
One reason why you might have diagonal lines in your 3D prints is having loose belts in your 3D printer. Loose belts can cause a printer to malfunction and prevent proper or smooth printing.
One user experienced this same issue on his Ender 3 Pro. After trying several solutions, he came across this fix, and it was exactly what he needed for a clear print.
All you need to do is to tighten up the belt on the X axis. With modern 3D printers, you should have a belt tension wheel at the end of the axis that you can adjust belt tension with. If not, you’ll have to do it manually.
Check out the video below to see how to do this.
10. Fix Bad Bearing on the 3D Printer
Fixing a bad bearing on your 3D printer is another quick way to eliminate diagonal lines in your 3D prints.
When you have a bad bearing or something like a flat spot in your wheels, it can cause these issues. To check this, turn your 3D printer off and move the carriages by hand from left to right, then forward and backwards. If you feel a bump or a notch, then that is the issue.
One user who experienced diagonal line issues in his prints discovered a bump while moving the carriage.
Check out the video below to learn how to fix a bad bearing in your 3D printer.
How to Fix Diagonal Lines in Resin 3D Prints
To fix diagonal lines in resin 3D prints, you can try to:
- Update Your 3D Printer’s Firmware
- Adjust the Angle of Your Model
1. Update Your 3D Printer’s Firmware
Updating your 3D printer’s firmware is possible fix for diagonal lines in resin 3D prints. One user who has an Anycubic Photon Mono experienced these issues and figured out that updating his 3D printer’s firmware resolved the issue, going from V0.0.15 to V0.1.7.
Check out the video below on how to update the firmware on a Creality Halot One.
2. Adjust the Angle of Your Model
If your 3D print develops diagonal lines, it could also be because it was printed flat without any orientation or angle.
A lot of the time, a proper print orientation is a solution to achieving a successful print, without these diagonal lines. Angling the prints will reduce peel force, thereby reducing diagonal lines in the final print.
Try to adjust the angle of your model and see if it makes a difference in these diagonal lines.
If you closely follow and apply the fix provided for solving diagonal lines on your 3D prints, henceforth your 3D prints should look smooth and flawless.
Good Luck and Happy Printing.