How to Wipe Nozzle Before Print – Cura & G-Code
Many people wonder about a setting called Wipe Nozzle Before Print in Cura, but they aren’t sure how to implement this. I’ll be going through how to wipe your nozzle before the print in this article.
You can wipe your printer’s nozzle before every print by editing the start G-Code of the print in your slicer’s software. This enables you to purge your printer of the filament that was earlier in it. Also, it serves as a means to ensure that the filament flows properly once it begins printing.
This is just a basic answer, so keep reading to find out more about each step you need to take to wipe your printer’s nozzle before any print.
How to Wipe Nozzle Before Print
Here’s how to wipe your nozzle before printing using G-Code on your Cura slicer;
- Launch Cura and access the printer settings
- Access the Start G-Code section
- Customize the Start G-Code
- Save and test changes
Launch the Cura Slicer Software
On your computer, launch the Cura slicer software. Ensure that your 3D printer is connected. This is to ensure you can select the printer and change its settings. You can also add a new printer if your printer is not listed there.
Access the Start G-Code
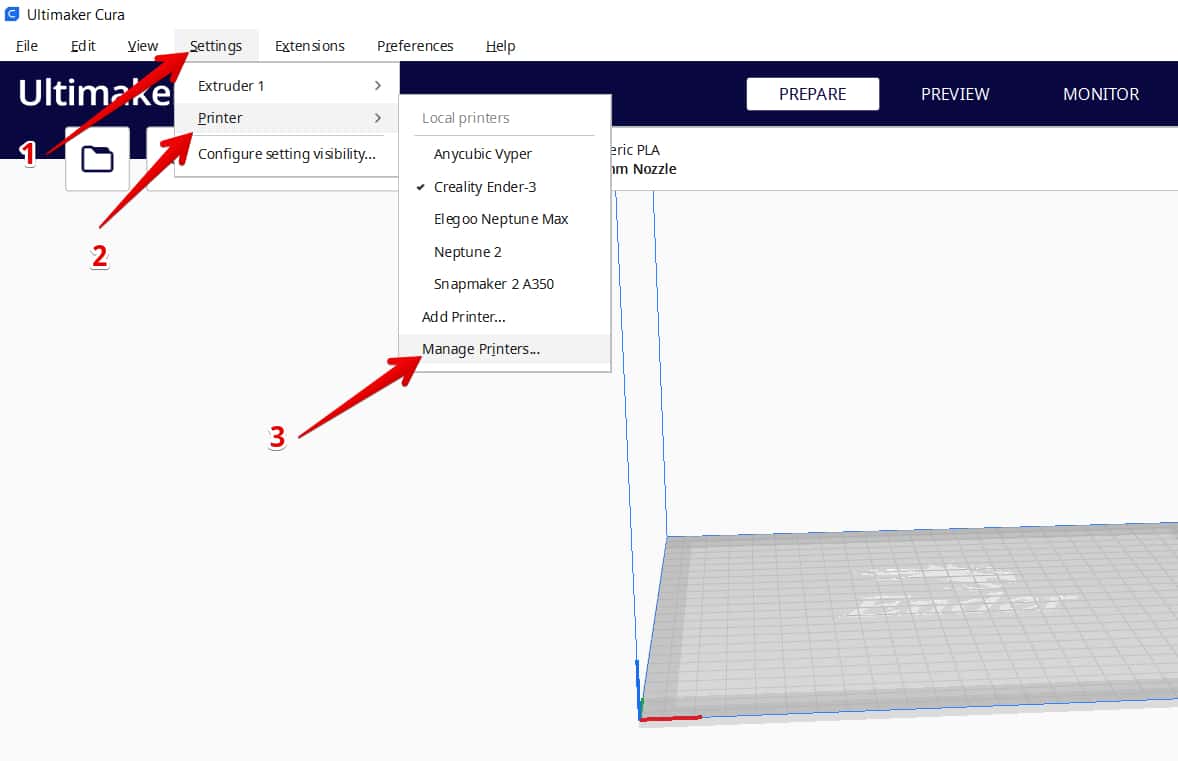
To access the start G-Code, click on “Settings” at the top menu bar, select “Manage Printers”, and select “Machine Settings”. A dialogue box pops up and at the bottom, you will find the “Start G-Code” section.
The start code contains a series of commands that prepare your printer for printing, such as homing the axes, heating the bed and nozzle, and priming the extruder.
Customize the Start G-Code
To edit the start code, click on the text box containing the default code. You can edit your existing start G-Code or add new commands of your choice, to achieve specific actions.
While you may want to add new commands of your choice, you need to ensure that these codes are correct and compatible with your printer. Else, it can cause issues with your printer while in operation.
Before you edit the G-Code of your printer, you need to understand the syntax of various G-Code commands and what they mean. You may need to look at your printer’s documentation for G-Code commands specific to your printer model.

Save and Test the Changes
After making the changes you want to the start code, click the “Close” button to save your changes. Once you save the changes, you can now slice your model and print it, using the new start G-Code.
Before starting a print, it is recommended to run a test print to ensure that the changes are working as intended.
Check out this video from Technivorous 3d Printing for a visual demonstration of how to clean your printer’s nozzle using Cura.
One user said that he kept getting old filament melted into the first layer of his prints and it causes it to look bad. Another user recommended the start G-Code he uses on his 3D printer to help stop that.
- G28 X0 Y0 Z0 ; home X, Y, and Z axis end-stops
- G29 ; initiate z-probing
- G0 X0 Y0 F9000 ; Go to front
- G0 Z0.15 ; Drop to bed
- G92 E0 ; zero the extruded length
- G1 X40 E25 F500 ; Extrude 25mm of filament in a 4cm line
- G92 E0 ; zero the extruded length
- G1 E-1 F500 ; Retract a little
- G1 X80 F4000 ; Quickly wipe away from the filament line
- G1 Z0.3 ; Raise and begin printing.
Another user stated that he uses a purge line and skirt to clean his printer’s nozzle, before the start of a print. He said that the purge clears the nozzle and the skirt allows the filament to start flowing properly before it starts your print.
Another user stated that he does multiple skirts around the object(s) depending on the size of the print. He said larger prints get at least 3 skirts and smaller parts get 5.
He also stated that you can set a distance, instead of a number of skirts, this would help remove the residue hanging on the nozzle instead of it getting deposited on the skirt.