How to Use Mesh Bed Leveling – Ender 3, Marlin & More
Mesh bed leveling or MLB is a straightforward method of compensating for an uneven print surface. It can be really helpful in the case of larger beds, where it is more challenging to level the bed at each point.
That’s why I wrote this article, to teach you how to use mesh bed leveling on different printers and firmware.
How to Use Mesh Bed Leveling – Ender 3 & Marlin
Here’s how to use mesh bed leveling on the Ender 3:
- Edit the configuration file
- Level the bed
- Print a bed test pattern
1. Edit the Configuration File
The first step in order to use mesh bed leveling on the Ender 3 is to adjust your printer’s firmware by editing a configuration file.
Marlin is the default firmware of the Ender 3. Firmware is a type of software that controls a specific device, in this case, Marlin is the firmware that controls your 3D printer.
To edit the configuration file, you’ll need to download Marlin and find the “Configuration.h” file inside the “Marlin” folder.
You will need to use software such as Microsoft VSCode to edit a configuration file from the firmware.
Just be aware that changing firmware configurations can always lead to different consequences so be careful as you go along.
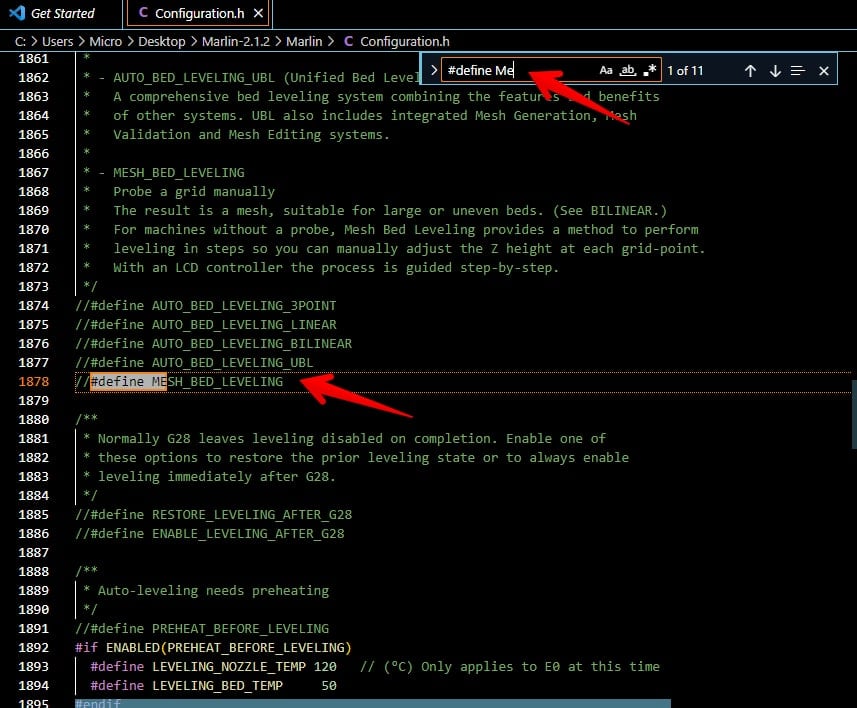
Use Ctrl+F to search in “Configuration.h” for the text “#define MESH BED LEVELING” and remove the two slashes (“//”). Doing this will enable your printer’s mesh bed leveling, just be sure none of the other leveling methods are turned on.
Next, remove the two slashes from the line: “#define RESTORE LEVELING AFTER G28.”
Before each print, this will automatically send the G28 instruction to your printer, restoring any mesh bed leveling settings that may have been lost.

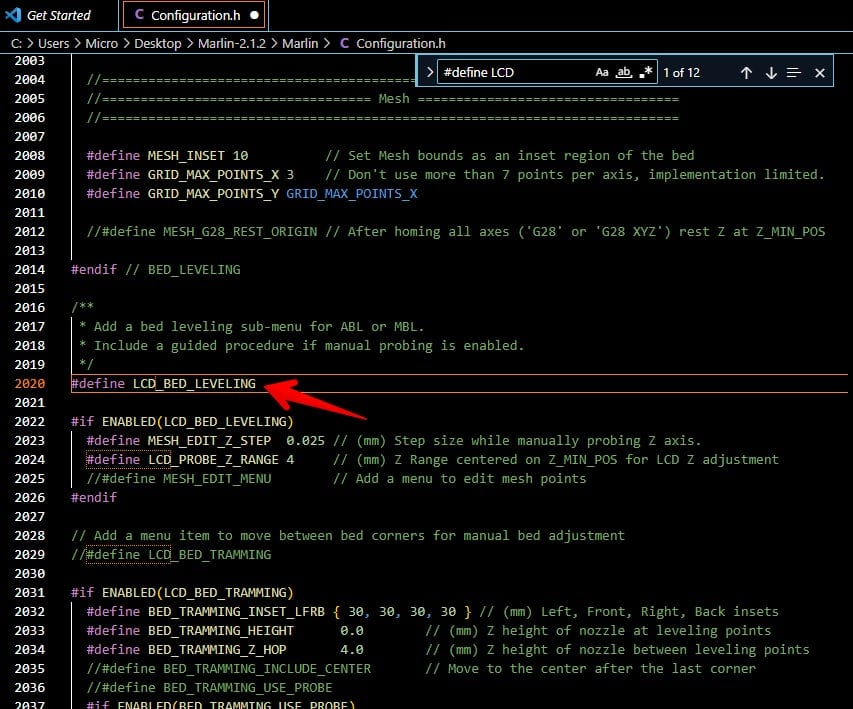
Then, find the “#define LCD BED LEVELING” command and uncomment it – which means removing the two slashes. That will enable mesh bed leveling operations via your printer’s LCD panel.
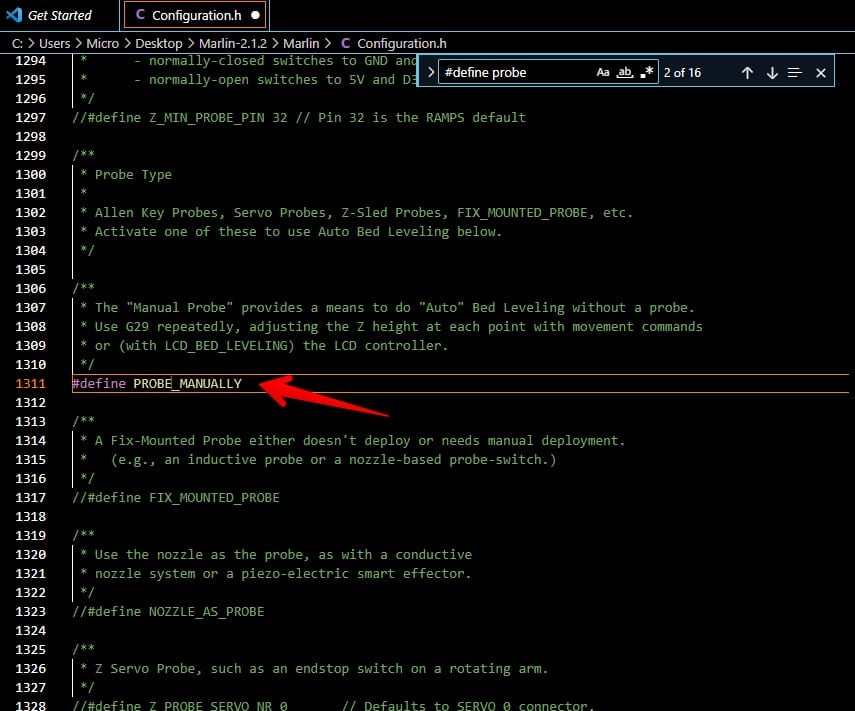
Finally, you must inform your printer that you will be doing the leveling procedure manually because mesh bed leveling doesn’t need the use of a probe. Uncommenting the line “#define PROBE MANUALLY” will do this.
After editing the configuration file, you’ll need to recompile your firmware and load it into your 3D printer.
Check out the video below for more information on how to edit Marlin firmware.
2. Level the Bed
The next step in order to use mesh bed leveling on the Ender 3 is to start the leveling process, which you can use a piece of paper to assist you.
Heat up your printer for your preferred filament when you’re ready. Navigate to “Level Bed” by selecting “Bed Leveling” from your LCD.
Using the knob next to the LCD screen, you may incrementally increase or decrease the Z-axis at each point in a grid of nine points. Adjust it so that your piece of paper passes between the nozzle and the build surface.
After passing through all points, your printer should make a noise noting that it has completed the process.
3. Print a Bed Test Pattern
Then, after completing the step above, you should print a test pattern to make sure your mesh bed leveling has worked correctly.
Users recommend a model such as the Bed Leveling Calibration Test Object, which will print nine super thin squares in each corner of your printer bed.
That way, you can easily check if your bed has been correctly leveled by using the mesh bed leveling technique.
Check out the video below for more information on how to use mesh bed leveling on an Ender 3.
How to Use Mesh Bed Leveling – Prusa
Here’s how to use mesh bed leveling on Prusa 3D printers:
- Tune in mesh bed leveling settings
- Initiate the mesh bed leveling
- Print a bed test pattern
1. Tune in Mesh Bed Leveling Settings
The first step in order to properly use mesh bed leveling with your Prusa printer is to tune in the mesh bed leveling settings.
To find the mesh bed leveling settings just go to the LCD screen and find the “Settings” option and then go into “Mesh Bed Leveling”.
There you’ll be able to adjust three basic options:
- Mesh (3 x 3 – 7 x 7)
- Z-probe nr. (1 – 3 – 5)
- Magnet comp. (ON / OFF)
The Mesh option allows you to change the grid density from the default 3×3, which covers 9 points, to 7 x 7 which will cover 49 points.
Changing this parameter can help you if you are experiencing uneven first layer adhesion, as stated by a few users.
Just be aware that a few Prusa models, such as the Mini, won’t have the 7 x 7 option due to its smaller print bed, as noted by another user. You may also have to update firmware configuration to enable some meshes.
The Z-probe nr. determines how frequently each point will be measured. Given that the final result is determined by taking an average of the measurements of each location, users advise using 3 or 5.
Be aware that the length of time it takes for the mesh bed leveling process to finish will change if you adjust this option.
The last setting, magnet compensation, will ignore readings from points that are too close to magnets – which can cause the calculations to be off. It is especially useful if you’re using a grid density of 7 x 7.
That’s because the reading can be incorrect by up to 80 microns since 11 of the 49 locations are so close to magnets. The data from these 11 locations are disregarded, and magnet compensation determines them from the nearby points.
2. Initiate the Mesh Bed Leveling
After tuning in settings from the previous step, you should initiate the mesh bed leveling. For that, you just need to go to the LCD screen and then go into “Calibration” and finally “Mesh Bed Leveling”.
That will initiate an automatic mesh bed leveling using the SuperPINDA sensor that is installed in all Prusa 3D printers.
Check out the video below to see a Prusa MK3 doing mesh bed leveling with a grid density of 7 x 7.
3. Print a Bed Test Pattern
Another important step in order to make sure mesh bed leveling has worked correctly is to print a bed test pattern. These bed test models can help you visualize if the mesh bed leveling actually worked. Users recommend printing the Bed Level Test for any Prusa printer.
That way you’ll be able to quickly check if the mesh bed leveling worked and what you need to change in case it didn’t.
Users also recommend you get some Digital Calipers, which are available at Amazon for great a great price, to help you accurately measure the printed bed test.

How to Use Mesh Bed Leveling – BLTouch
In case you own a BLTouch sensor, which will automate your 3D printer bed leveling, you can still use mesh bed leveling.
The BLTouch sensor measures the exact distance between the build plate and the nozzle of your 3D printer using a push pin. The firmware of your 3D printer can then utilize this data to modify the distance between the extruder and print bed as necessary.
If you’re printing with an Ender 3 or another FDM printer that uses Marlin as its firmware, just follow the instructions in the first section of this article as the configuration will be the same even with the BLTouch upgrade.
Users question the need for a BLTouch when you can manually apply mesh bed leveling in your firmware and get the same results with a lot less work.
Another user who is using both Jyers and BLTouch started to do mesh bed leveling and found great success in his first tests.