How to Use Cura Fuzzy Skin Settings for 3D Prints
Cura has a setting called Fuzzy Skin which can be useful for creating 3D prints with a certain textured surface. Many users have made great models with this setting, but others don’t know how to use the correct settings.
This article will take you through all the Fuzzy Skin settings, as well as many examples of how they look and how to use them. Keep on reading through this article to finally learn how to properly use Fuzzy Skin in Cura.
What is the Fuzzy Skin Setting in Cura?
Fuzzy Skin is a Cura feature that generates rough texture on the external parts of a 3D print by adding a random jitter to the outer wall. It only adds this texture to the outermost and innermost part of the print but not the top.
Do keep in mind that the Fuzzy Skin affects the dimensional accuracy of your model, making it larger than the actual model, so you want to avoid it for models that fit together. There is a special setting that allows you to have Fuzzy Skin on only the outside which I’ll talk about further in this article.
Fuzzy Skin also increases the printing time of your model since the print head goes through a lot more acceleration while printing the outer wall.
Advantages of Fuzzy Skin:
- Hides imperfections on the sides of prints – layer lines will be less visible so you don’t need to use as many post-processing methods to hide imperfections.
- Can simulate the look of fur – you can make really unique 3D prints of animal models like cats and bears.
- Provides a good grip to 3D prints – if you require better grip for models, you can do that for many objects such as handles.
- Looks great for certain prints – one user created a bone print of a skull with the texture and it looked great.
I modified some of the cura fuzzy skin settings, and I am loving the texture for my bone prints!
byu/IAmAPhysicsGuy in3Dprinting
Disadvantages of Fuzzy Skin:
- Increases printing time – using Fuzzy skin takes more printing time due to the extra movement of the 3D printer nozzle.
- Produces noise – due to the movements that create this rough texture, the print head jitters and makes noise
Check out the video below to see the Fuzzy Skin setting in action on a lemon model.
How to Use the Fuzzy Skin Settings in Cura
To use Fuzzy Skin in Cura, simply use the search bar and type in “fuzzy skin” to bring up the “Fuzzy Skin” setting which it found under the “Experimental” section of the settings, then check the box.
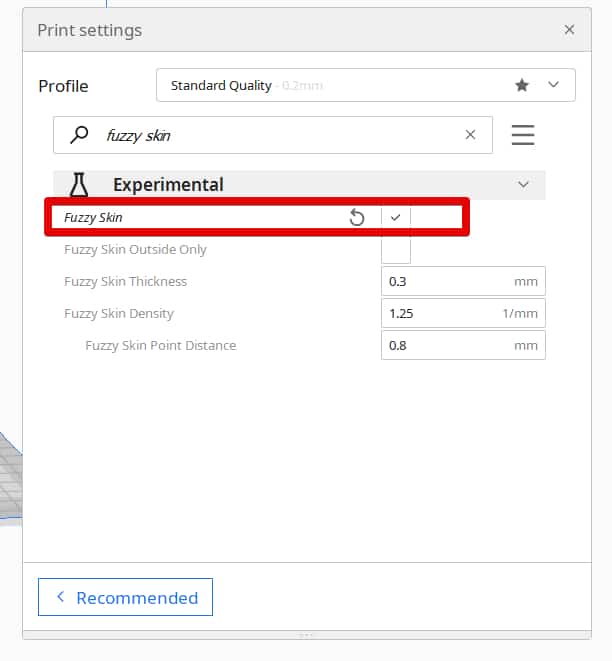
If the settings are greyed out, you can right-click them and select “keep this setting visible” so you can see the setting by scrolling down to it in the future.
Now let’s look into the individual Fuzzy Skin settings after you enable it.
- Fuzzy Skin Outside Only
- Fuzzy Skin Thickness
- Fuzzy Skin Density
- Fuzzy Skin Point Distance
Fuzzy Skin Outside Only
The Fuzzy Skin Outside Only setting simply allows you to only have the Fuzzy Skin be on the outermost surface and not on the innermost surface.
It’s a very useful setting if you need to keep good dimensional accuracy on the inner surfaces for 3D prints that require mounting on something such as a handle or screws. You’ll get your usual smoother finish on the internal surfaces of your 3D prints.
If you don’t see this setting, it may be because you have an older version of Cura, so you can download a newer version to solve this (4.5 and onwards).
This setting is off by default.
Fuzzy Skin Thickness
The Fuzzy Skin Thickness is a setting that controls the width of your nozzle jittering back and forth during the process, measured in millimeters. The default value for this setting is 0.3mm which works pretty well for most people.
The highest the value, the rougher and more bumps the surface will have. You can create a more elegant and subtle texture on your 3D print by using a lower Fuzzy Skin Thickness.
One user who implemented the Fuzzy Skin settings used a Fuzzy Skin Thickness of 0.1mm for a gun grip. He described the feel as being a little bumpier and grippier than smooth parts of a usual Glock frame.
Another user mentioned that a 0.2mm Fuzzy Skin Thickness feels something like a 200 grit sandpaper.
You can see an example of a 0.1mm Fuzzy Skin Thickness in the video below.
In this video you can see the fuzzy skin setting shaking the printer and making the camera vibrate
byu/tomsloat in3Dprinting
The example below is a great comparison between 0.3mm, 0.2mm and 0.1mm Fuzzy Skin Thickness values. You can see the level of detail and texturing in each cylinder. You can use it to match up what you want in your 3D prints.
Fuzzy Skin Density
The Fuzzy Skin Density controls the level of roughness or smoothness based on how the nozzle moves. It basically determines how frequent the nozzle vibrates as it travels across the walls.
Using a higher Fuzzy Skin Density creates a rougher texture while a lower value creates a smoother but bumpy texture. The default value is 1.25, measured in 1/mm. When you have a Fuzzy Skin Thickness is too high, you can’t increase the Fuzzy Skin Density as much.
For the bone 3D print of the dentures earlier in the article, that user had a Fuzzy Skin Density of 5.0 (1/mm). Another user who 3D printed a cardholder used a value of 10.0 (1/mm).
This user made a really detailed comparison that compares different Fuzzy Skin Thicknesses and Density settings.
You can have a look at the textures to figure out which settings are right for the 3D model you want to create.
Fuzzy Skin Point Distance
The Fuzzy Skin Point Distance controls the distance between movements for the Fuzzy Skin along the original wall. A smaller distance would mean you’ll get more movements in different directions along the wall, creating more of a rougher texture.
A larger distance creates a smooth, but bumpy texture which can be good depending on what result you are looking for.
The video below goes through the process of using Fuzzy Skin for a cool bear model.
Examples of Objects That Used Fuzzy Skin
Chunky Headphone Stand
This user designed his own headphone stand and implemented the Fuzzy Skin settings to create a lovely textured effect, but this was actually done in PrusaSlicer rather than Cura, which works similarly.
It was done with a 0.6mm nozzle, 0.8mm line width, and a 0.2mm layer height.
These are the settings used:
- Fuzzy Skin Thickness: 0.4mm
- Fuzzy Skin Point Distance: 0.4mm
Pistol Casing
You can make a really good pistol casing using the Fuzzy Skin settings. This user created a one using a bone white filament. He mentioned that it’s really good at hiding layer lines as well so you don’t see those imperfections.
Shoutout again to u/booliganairsoft for yet another cool design, the Lil’ Chungus. In bone white, using Cura’s fuzzy skin settling. It does a great job at hiding layer lines.
byu/SC_Lakelife infosscad
Here are the settings used:
- Fuzzy Skin Outside Only: On
- Fuzzy Skin Thickness: 0.3mm
- Fuzzy Skin Density: 1.25 1/mm
- Fuzzy Skin Point Distance: 0.8mm
Card Case
This card case was created using the Fuzzy Skin settings, but with a twist to make the logo smooth. The user created it for a single Magic the Gathering Jumpstart booster pack, also having a slot on the front to display the face card that comes with each booster.
I’ve been messing with Cura’s “fuzzy skin” settings for my Card Case design. What do you think of the finish?
byu/ncarson9 in3Dprinting
They got the smooth effect on the logo by using an overlapping mesh setting in Cura in the shape of the logo. You can read more about this by checking out this post.
Here are the basic instructions:
- You basically have two models, your main model, then a separate logo model.
- Then you move the logo to where you want it on the main model and apply “Per Model Settings”
- Navigate to “Modify settings for overlaps”
- Change “Infill mesh only” to “Cutting mesh”
- Click “Select settings” and select “Fuzzy Skin” for the main model

This basically makes the main model have the Fuzzy Skin, but the separate logo model 3D print normally, which gives a smoother surface. You can find the original STL file here.
Here are the settings used:
- Fuzzy Skin Outside Only: On
- Fuzzy Skin Thickness: 0.3mm
- Fuzzy Skin Density: 1.25 1/mm
- Fuzzy Skin Point Distance: 0.2mm
Human Jawbone
This very unique human jawbone 3D print is a great use of the Fuzzy Skin settings. It adds a lovely texture that makes the model look more realistic. They used it as a sign holder for a Halloween dinner party.
You can do this for anatomy 3D prints or similar models.
I modified some of the cura fuzzy skin settings, and I am loving the texture for my bone prints!
byu/IAmAPhysicsGuy in3Dprinting
Here are the settings used for this model:
- Fuzzy Skin Outside Only: On
- Fuzzy Skin Thickness: 0.1mm
- Fuzzy Skin Density: 5.0 1/mm
- Fuzzy Skin Point Distance: 0.1mm
Poker Cardholder
This 3D printer hobbyist used the Fuzzy Skin setting to make an aesthetically pleasing Cardholder using PLA. As expected, the Fuzzy Skin was only applied on the sides but not the top and bottom.
The user noted a 10% increase in printing time due to the Fuzzy Skin, but this does depend on the size of the model.
Really loving the fuzzy setting in cura the textured surface makes layer line nearly disappear . It’s a card holder for a poker game im hosting next week
byu/Thedeepergrain in3Dprinting
Check out the settings used:
- Fuzzy Skin Outside Only: On
- Fuzzy Skin Thickness: 0.1mm
- Fuzzy Skin Density: 10 1/mm
- Fuzzy Skin Point Distance: 0.1mm
Colorful Penguins
These Penguin models are a great use of the Fuzzy Skin settings, maybe the best on this list! It’s made with different types of PLA such as Hatchbox, Eryone, and some multipack spools of filament.
Thanks to this sub I learned about the fuzzy skin setting and now can’t stop making fuzzy penguins
byu/Josephus-Miller-Lite in3Dprinting
These are the settings used for these penguins:
- Fuzzy Skin Outside Only: On
- Fuzzy Skin Thickness: 0.1mm
- Fuzzy Skin Density: 10 1/mm
- Fuzzy Skin Point Distance: 0.1mm
Hand Grip with Sandpaper Texture
One of the great uses of the Fuzzy skin settings was for this hand grip made from Inland Rainbow PLA. The hand grip was made using Fuzzy Skin values highlighted below and feels slightly bumpy and grippier than the OEM Glock frame.

- Fuzzy Skin Outside Only: On
- Fuzzy Skin Thickness: 0.1mm
- Fuzzy Skin Density: 0.4 1/mm
- Fuzzy Skin Point Distance: 0.1mm
Circle & Triangle Shapes
This user made a circle shape out of PLA and a triangle shape out of PETG using Cura with the Fuzzy Skin settings on a Monoprice Mini V2 and Ender 3 Max respectively. The pieces came out really well, being compared to injection molded parts.
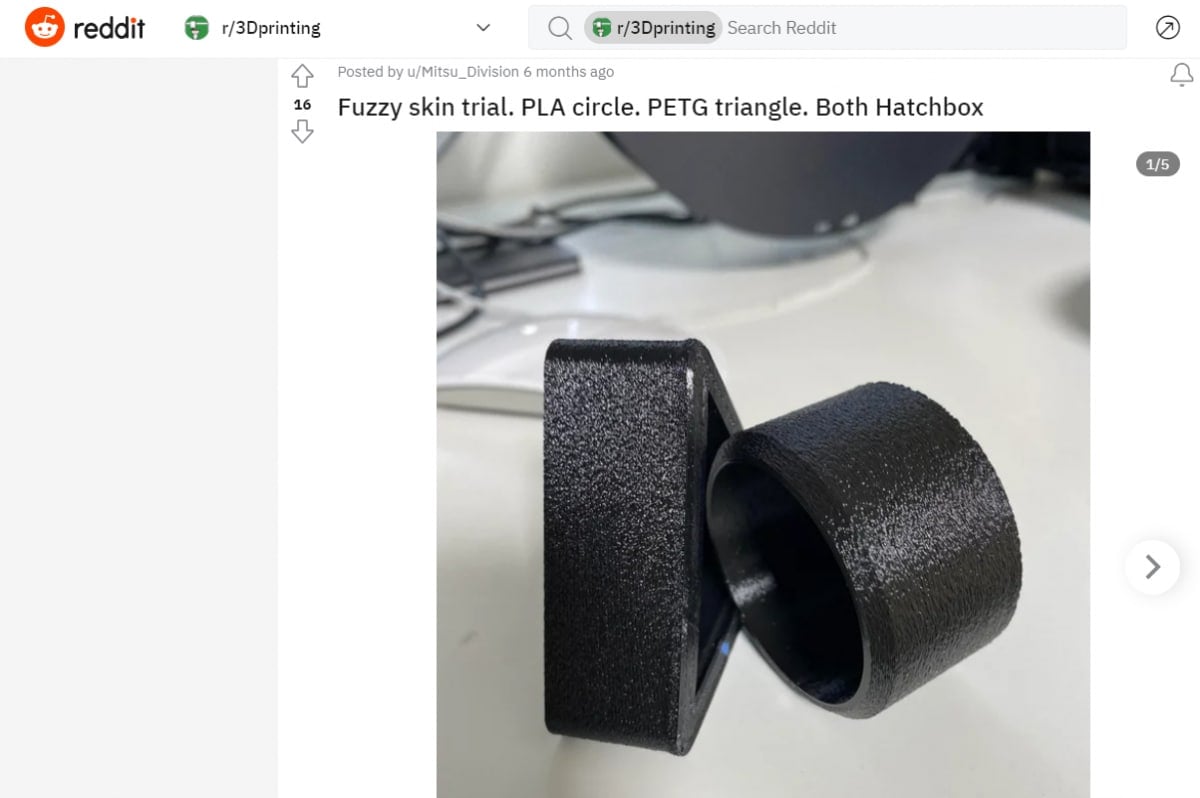
Here are the settings he used:
- Fuzzy Skin Outside Only: On
- Fuzzy Skin Thickness: 0.1mm
- Fuzzy Skin Density: 1.25 1/mm
- Fuzzy Skin Point Distance: 0.1mm
He used a 0.2mm layer, a printing speed of 50mm/s, and infill of 15%.