How to Use Combing in 3D Printing – Cura & PrusaSlicer
Anyone that has been 3D printing knows that stringing can be a complicated issue and there is one setting that can help with that called combing. Many users still wonder how to properly use this feature.
To use combing in 3D printing you’ll have to enable it on your slicer software, such as Cura or PrusaSlicer. There are different combing modes that you can choose from, for most 3D prints you’ll want to use “All” or “Within Infill” but for more complex models you may want to use “Not in Skin” or “Not on Outer Surface”.
Keep reading for more information about how to use combing in 3D printing.
How to Use Combing in Cura
Combing is a feature available in most 3D printing software, including Cura and PrusaSlicer. It helps the printer to avoid crossing the walls of the object when traveling from one place to another, which minimizes the risk of stringing.
These are the different combing modes to choose from when using Cura:
- Not in Skin
- Within Infill
- Not on Outer Surface
- All
- Off
I’ll have a section that compares some of the travel movements further in this article in some images.
Not in Skin
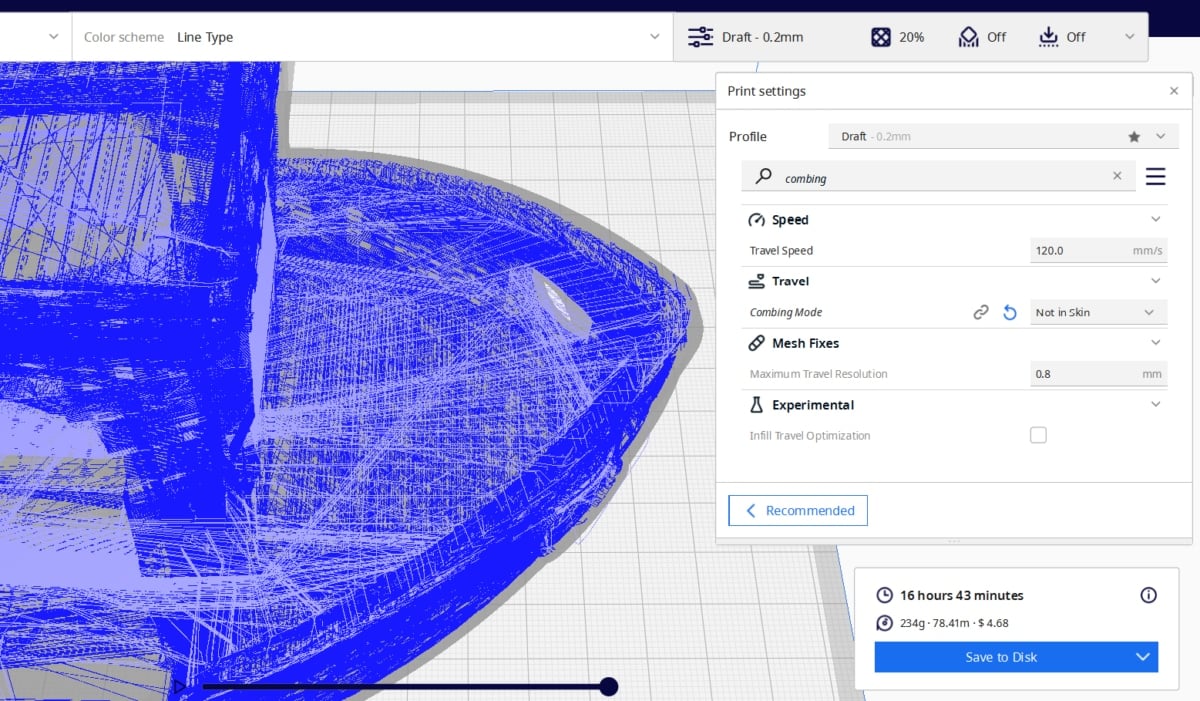
The “Not in Skin” mode is the default and works with most prints. It prevents the printer from traveling over the outer wall of your model, as this can result in visible marks on the surface.
I used a 3D Benchy that’s been scaled up by 300% so you can see the travel moves easier.
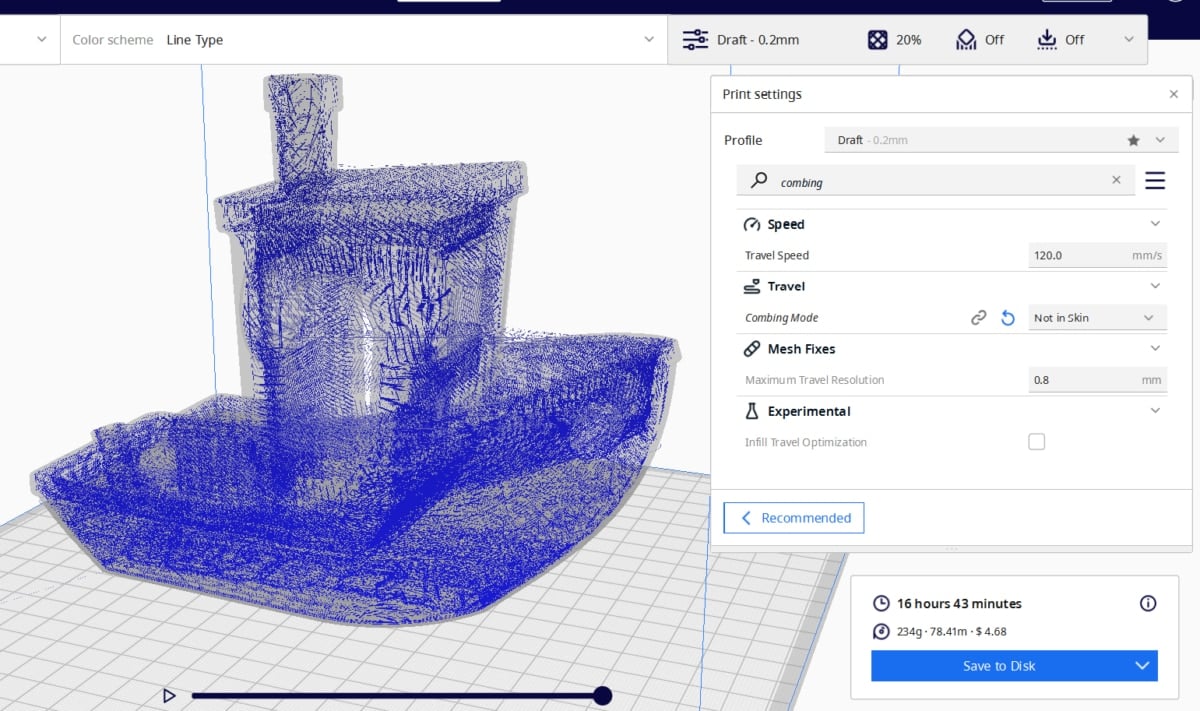
This mode can be very useful for prints with complicated details or high surface quality requirements. With this mode enabled, it will take a 3D printer an average of 16 hours and 43 minutes to print a 300% scale 3D Benchy.
You can find any combing mode by searching for “combing” in the search bar or manually going into “print settings” and then going into the “travel” section, there you’ll find the combing option and a drop-down menu to choose the mode you want.
One user stated that combing determines the movement path of the print head. Instead of retracting the filament, which can take time, combing selects a direct path that will be infilled later or has already been filled.
Just be aware that this can result in oozing along the travel path and lines in the top/bottom skin of the print.
The user also suggests that the best setting for a balance between time and appearance is to set combing to “Not in Skin.” as it forces the print head to make travel moves via the walls, rather than taking a direct path.
By using this setting, the user has been able to achieve better results in his 3D prints. Another user also suggests the “Not in Skin” combing mode as the best setting to avoid stringing on the final object.
Check out the video below for detailed information about combing and its different modes.
Within Infill
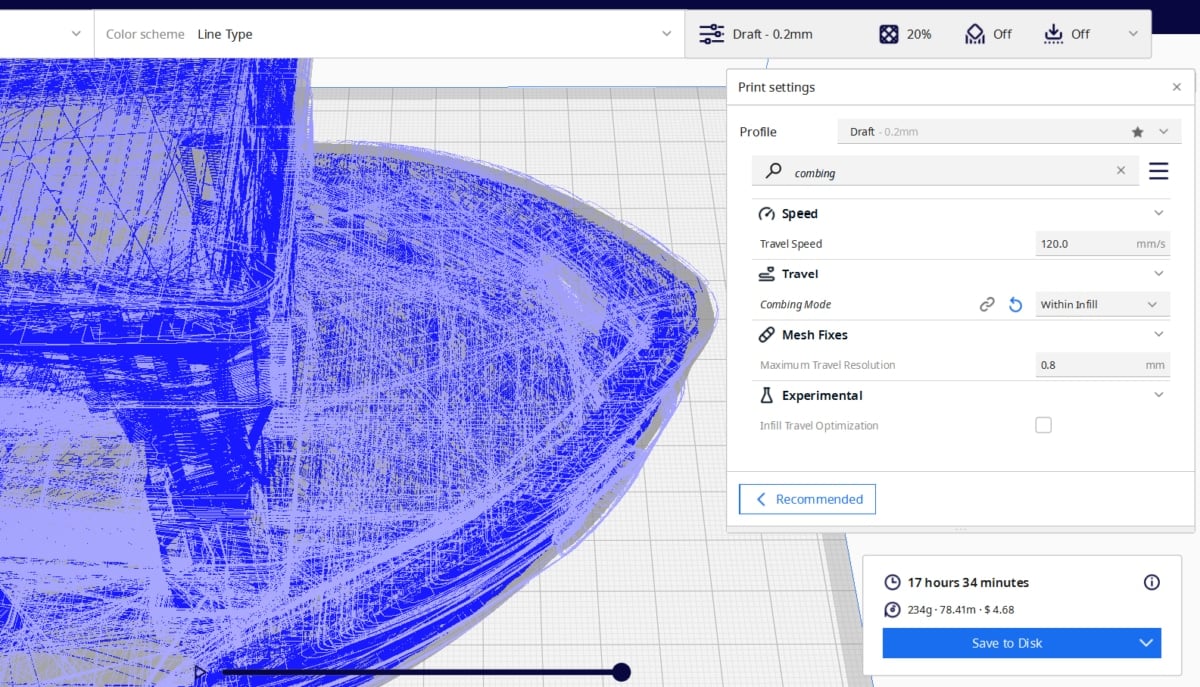
The “Within Infill” mode is stricter and will avoid hitting the inner walls, the outer walls, and the skin, resulting in a cleaner finish. This mode can be useful for prints that require high surface quality or have a large infill volume.

You should also be aware that this mode will require the printer to make a lot more retractions because a direct path may not be available, which can increase the printing time.
With this mode enabled, it will take a 3D printer an average of 17 hours and 34 minutes to print this 300% scale 3D Benchy. That’s why it is important to experiment with this mode and adjust the combing settings as needed to achieve the desired results.
One user was having issues when printing concave surfaces on his Elegoo Neptune 2S and found that the combing mode “All” setting made little to no difference. When he changed his setting to “Within Infill”, he was able to achieve the result he was looking for.
Not on Outer Surface
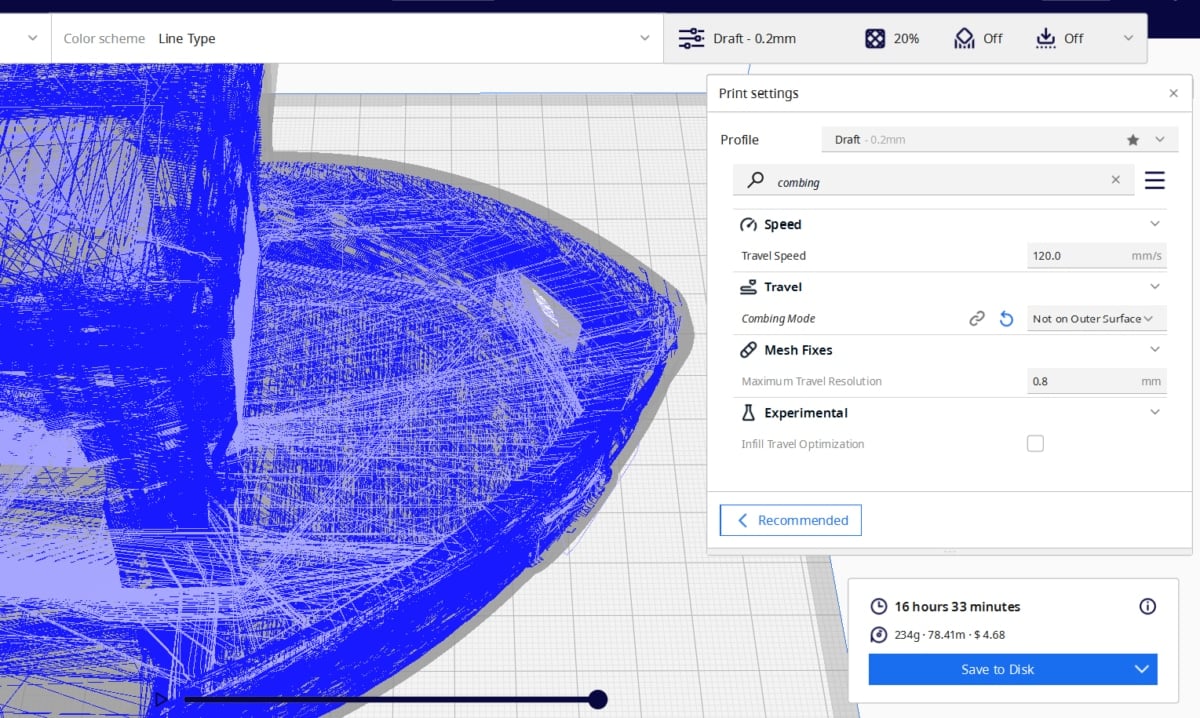
Cura’s “Not on Outer Surface” combing mode is a variation of the “Not in Skin” mode that provides more control over where the printer will comb.
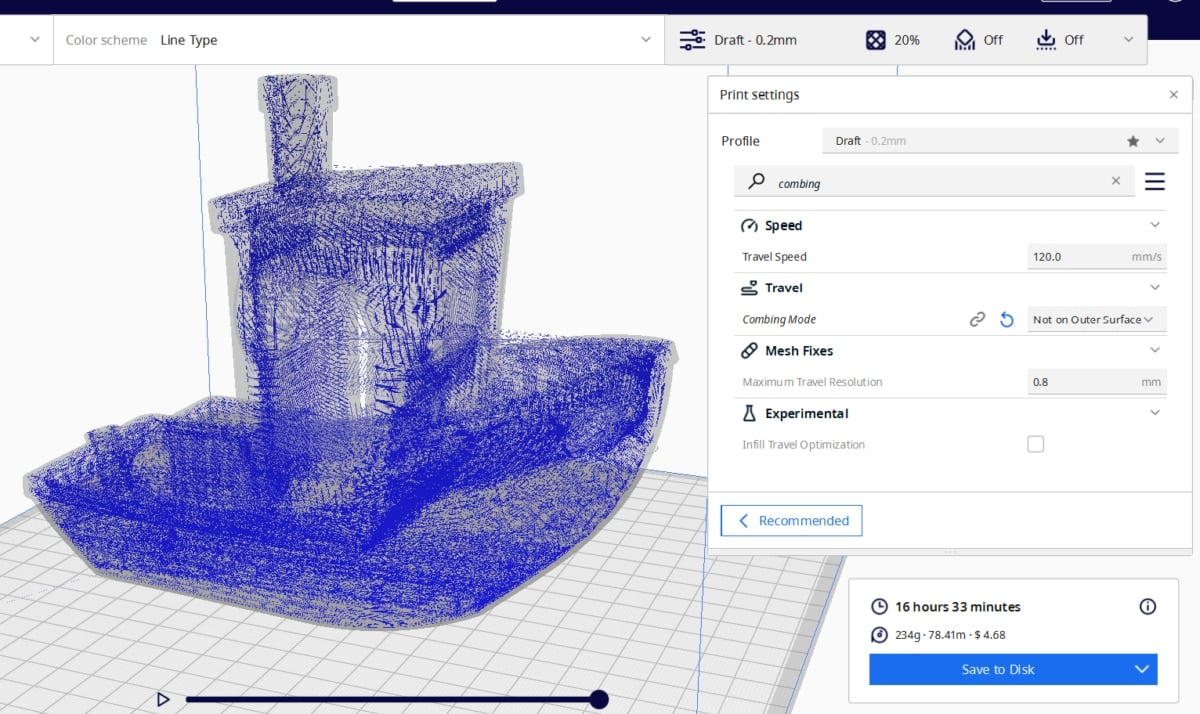
With this setting, the printer will avoid combing over the outer layer of your model, but will still comb over other areas that are not part of the outer wall. With this mode enabled, it will take a 3D printer an average of 16 hours and 33 minutes to print this 3D Benchy.
This mode can be useful if you have a model with complicated details or a complex surface that would benefit from a more direct combing path.
When you avoid the outer layer, you can reduce the risk of visible marks or scars on the surface of your print, while still maintaining a high level of precision and control over the combing behavior.
One user suggests using the “Not on Outer Surface” combing mode to avoid getting lines printed between sections on the first layer.
He stated that this mode won’t allow the printer to move on a top or bottom surface layer, which helps to reduce unwanted lines in the first layer.
Check out the video below for a detailed recommendation about using the “Not on Outer Surface” combing mode.
All
The “All” combing mode is a combination of the “Not in Skin” and “Within Infill” modes, which means that the nozzle will not hit any walls when traveling on the inside of the print.

Using the “All” combing mode can help to reduce stringing and produce a clean final object, especially for models with complex geometries.
With this mode enabled, it will take a 3D printer an average of 16 hours and 32 minutes to print this 3D Benchy, making it the fastest combing mode available.
Check out the video below for detailed information about using combing in 3D printing.
There is a setting in Cura called “Avoid Printed Parts When Traveling” that is useful when using combing in a 3D printer.
The setting will make sure that the printer does not travel over previously printed areas, even if they are not part of the outer skin, helping to prevent stringing and improving the quality of prints with delicate details or overhangs.
One user stated that his setting only works when combing is set to “Not in Skin”. He tried the setting with combing set to “All” and did not see any difference.
He really recommends using the setting with the combing mode “Not in Skin” as it produces some great final objects without any scars or marks.
Another user recommends toggling this setting on when using combing as it will decrease the possibility of problems on the surface of the printed object.
Off
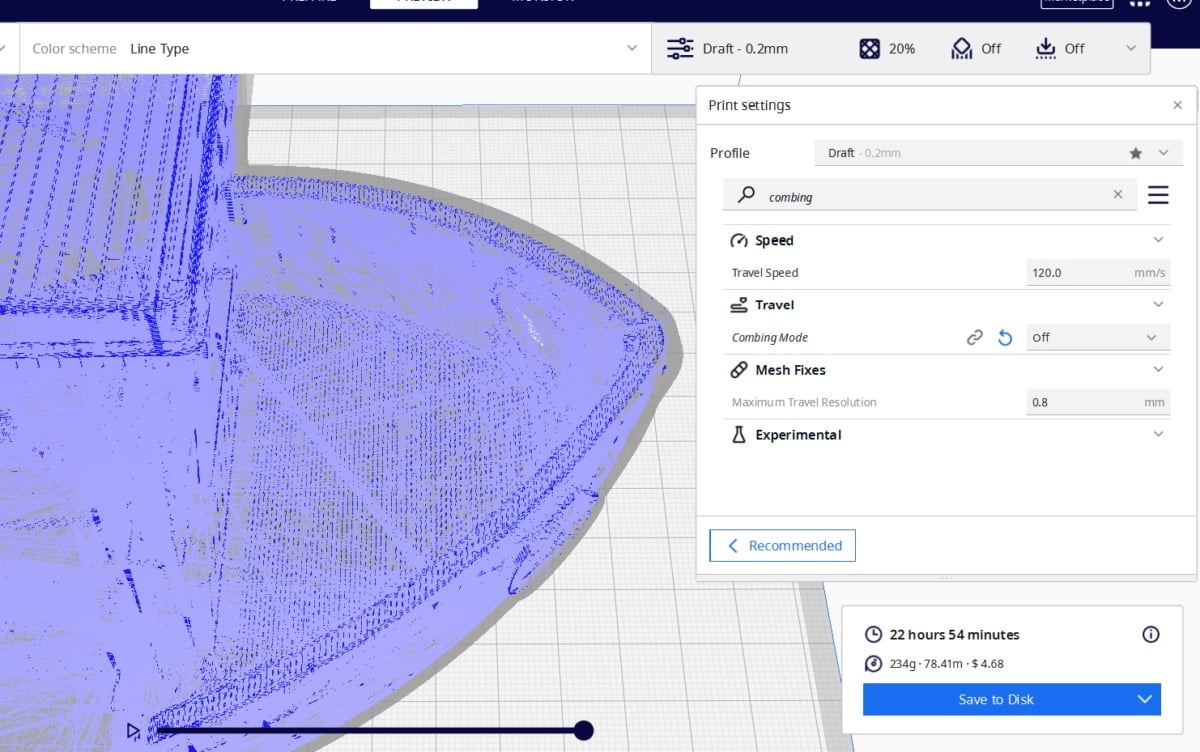
If you’re experiencing issues with combing not working correctly, the “Off” mode disables combing altogether, allowing you to troubleshoot other factors that may be contributing to the problem.
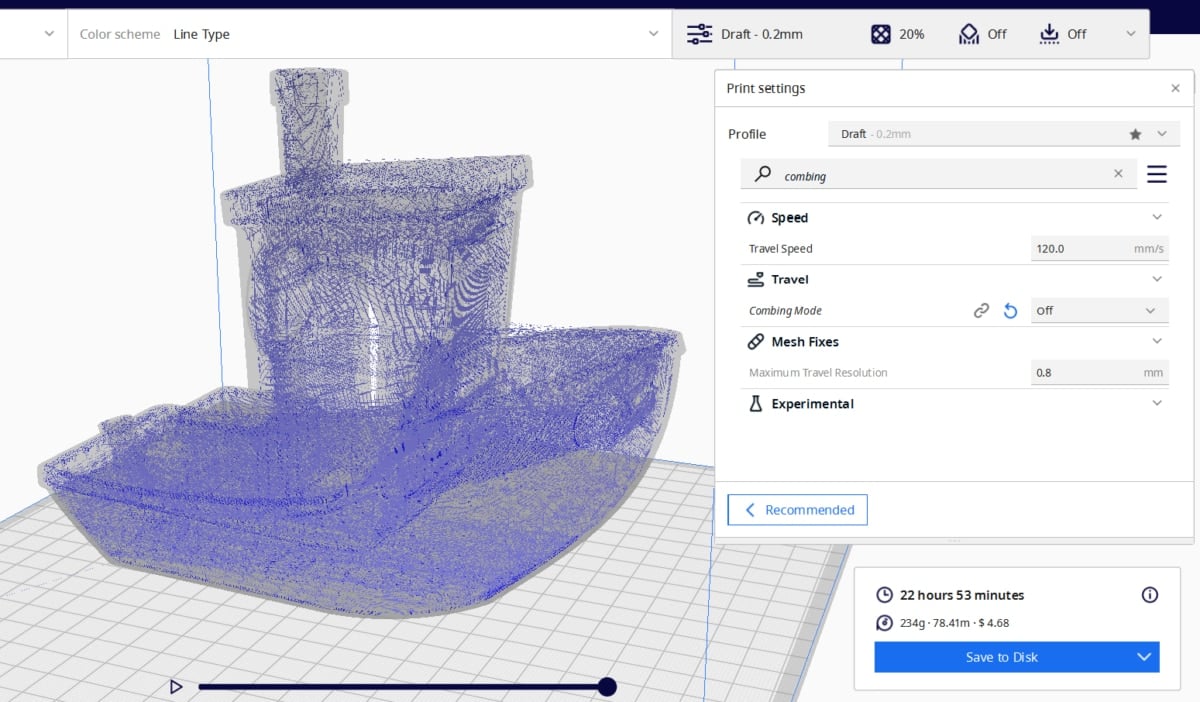
With the “Off” combing mode enabled, the printer will not perform any combing movements during the print. This can be useful if you are experiencing issues with stringing or if combing is not working.
With this mode enabled, it will take a 3D printer an average of 22 hours and 53 minutes to print this 3D Benchy, which makes it the slowest combing mode available.
Just be aware that disabling combing altogether can also lead to increased print time or reduced surface quality, so it’s important to test the print with and without combing.
One user recommends disabling combing if you’re having trouble with a tricky bottom layer stringing up and not properly sticking to the bed. He stated that setting his combing to “Off” will usually solve this kind of situation.
Another user doesn’t recommend turning combing off as it can cause your printer to make a lot of retractions, leading to a very long print time.
Check out the pictures below which feature a comparison of the movement of the print head with different combing modes.

How to Use Combing in PrusaSlicer
In PrusaSlicer, there is no specific “combing mode” setting.
These are similar options that can achieve the same results:
- Avoid Crossing Perimeters
- Only Retract When Crossing Perimeters
The “Avoid Crossing Perimeters” setting is used to prevent the printer from crossing over previously printed areas, which includes both the skin and infill.

You can find this setting in the “Print Settings” menu under “Layers and Perimeters” and then “Quality” This setting works in the same way as Cura’s “Within Infill” combing mode.
The “Only Retract When Crossing Perimeters” setting will make the printer only retract the filament when it needs to cross over perimeters.

This setting can be found in the “Print Settings” menu under “Infill” and then “Advanced” and it works just like Cura’s “All” combing mode. One user recommends using the search bar on the PrusaSlicer settings to quickly find the combing options.
Another user found a lot of success reducing stringing when printing with TPU by using the setting “Avoid Crossing Perimeters”.