How to Get Best Flow Rate (Extrusion Multiplier) for 3D Printing
The Flow Rate, also known as the extrusion multiplier is an important setting that can help you with getting better 3D prints. This is measured in a percentage, so the default is 100%, but you can adjust this in certain situations. I decided to write an article about how to get the best extrusion multiplier or Flow Rate for 3D printing.
It’s pretty simply to understand and use to your benefit once you get the basics down, so keep reading to find out.
What is Flow Rate in Cura?
The Flow Rate is a setting used to adjust how much material is placed down from the nozzle. Normally, Cura calculates the amount of material to fill the exact space within the line’s width and similar gaps. Increasing the Flow Rate will place more material down, while decreasing it will place less material down.
The Flow Rate values can be used to compensate for a fault in your extrusion pathway due to something like a partially clogged nozzle, or when your filament has varying diameters.
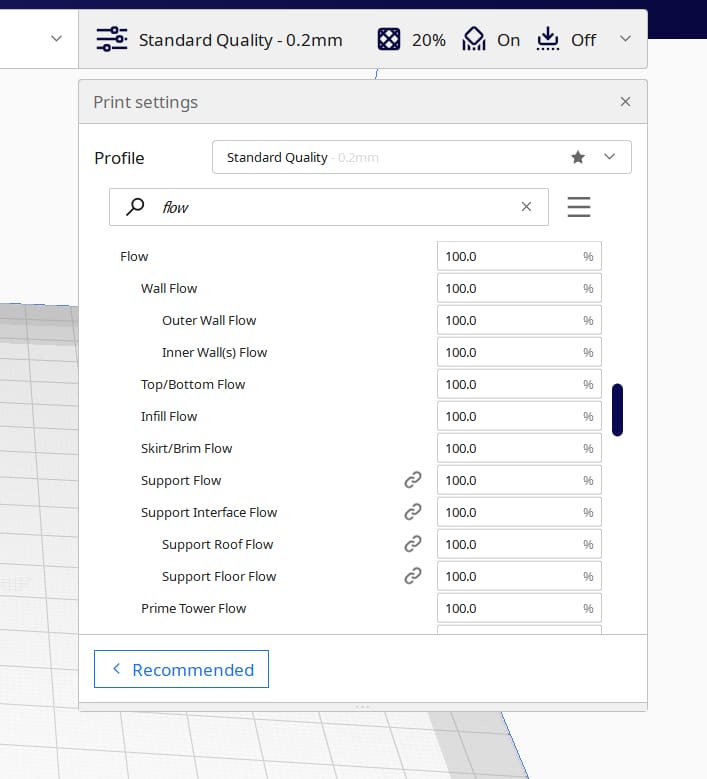
There are various parameters under “Flow” that you can adjust such as:
- Wall Flow
- Top/Bottom Flow
- Infill Flow
- Skirt/Brim Flow
- Support Flow
What Should Your Flow Rate Be? How to Calculate Flow Rate
Your Flow Rate should be at 100% in most cases. If you do experience issues with not extruding enough filament or too much, you want to change other settings such as printing temperature, printing speed, and line width. Calibrating your extruder steps is another important thing to do to ensure good filament extrusion.
Some users suggest that adjusting Flow Rate values should be a last resort to any printing issues you are experiencing. Regardless of whether you are using an Ender 3, Prusa i3 MK3S+, or an Anycubic Vyper, your Flow Rate is usually stable.
If you do want to change your Flow Rate, it’s usually in the range of 90-110%. A small change to the Flow Rate can make a significant difference to your models. I do suggest that every try this out themselves so they can see the differences.
Take a model and print a few of them using different Flow Rates so you can see the direct impact. You can use values such as 90%, 95%, 100%, 105% and 110% then compare the models.
I have seen some cases of people adjusting Flow Rate to account for using a different filament, though you can have separate profiles for different filament types.
A key settings that affects the Flow Rate is your printing temperature. The higher your temperature, the more the filament will be able to flow through the nozzle since it melts more. Optimize your printing temperature can reduce the need to adjust your Flow Rate.
Check out this video by CNC Kitchen that shows the influence of temperature and print speed on the Flow Rate.
A really good extrusion test is the Part Fitting Calibration file by MEH4D from Thingiverse. It’s simply an S-Plug that you 3D print and try to plug together. Once you’ve calibrated your extruder steps and line width, you should be able to put the pieces together easily.
The Flow Rate can also be adjusted to get a more precise fit. The designer mentioned that the print bed not being level is another key reason why the plug might not fit, since the bottom layers would squish and cause inaccuracies.
You can also make use of a setting called Horizontal Expansion, an Experimental setting in Cura, to change the size of the holes in your model. One user used a value of -0.15mm and it worked great to make the plug fit together.
Another thing you can do is to print a hollow cube and measure the walls to see how accurate they are. You can then adjust the Flow Rate based on your measurements. Check out the video below by 3D Printscape on calibrating your Flow Rate using this method.
Another important thing you can do is to measure your filament in multiple places and enter the average value into your slicer. Some filaments don’t have the most accurate tolerances so it can alter how much material is being extruded, leading to dimensional inaccuracy.
How Do You Increase/Adjust Flow Rate in Cura?
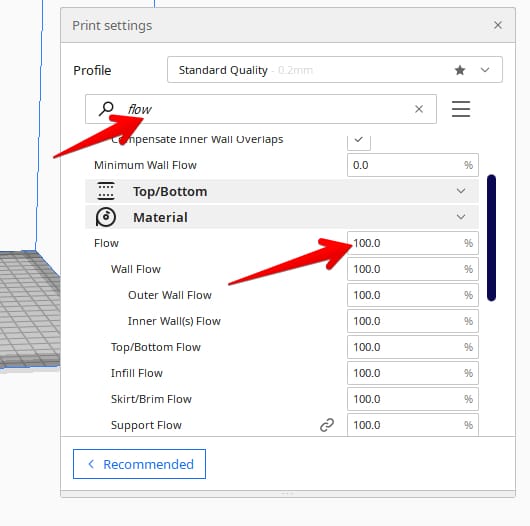
You can increase the Flow Rate in Cura by changing the flow value in settings. You just have to find the Flow Rate using the steps outlined above and put in the value.
To adjust the Flow Rate value in Cura you simply need to search “Flow” using the search bar to get the appropriate setting where you enter the appropriate value.
Check out this video by Hard Firm Soft tries to investigate how adjusting Flow Rate affects the print’s measurements and surface quality.
They suggested that making your extruder wall 120% your nozzle opening and increasing the overlap between walls and skin could help get better Flow Rate values for adjusting. This would mean using a 0.48mm line width for a 0.4mm nozzle.
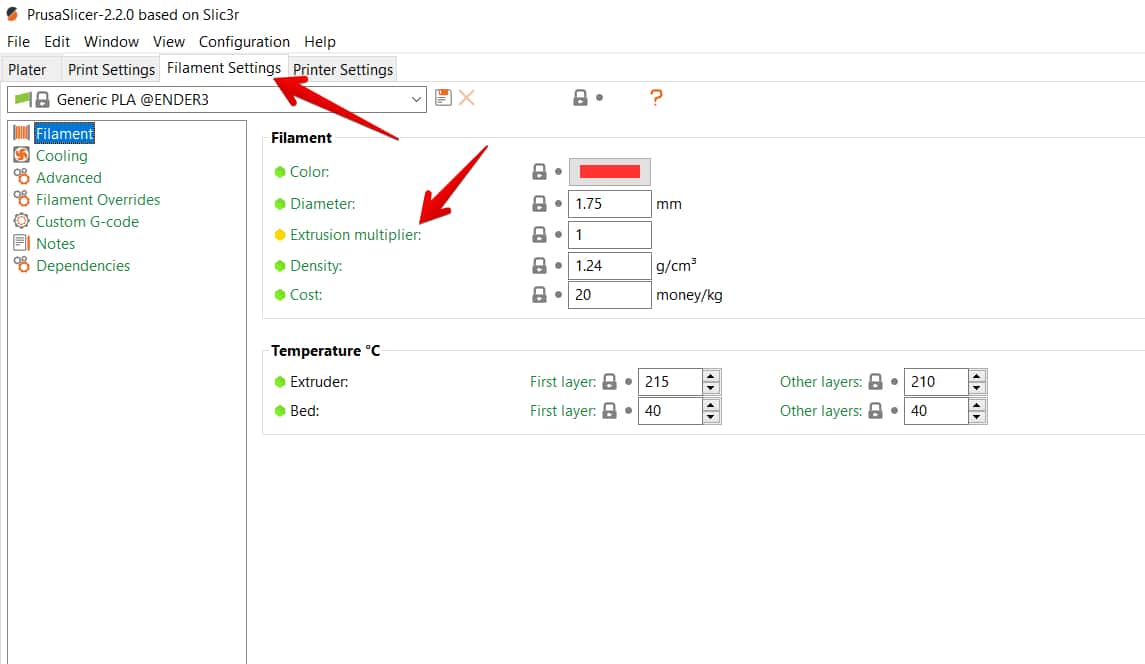
Similarly, if you want to adjust your Extrusion Multiplier in a software like PrusaSlicer or Simplify3D, you simply find the setting and adjust the number beside it.
Here’s where you can find it in PrusaSlicer, under Filament Settings.
Best Flow Rate for PLA
The best Flow Rate for PLA filament is 100% in most cases. If you do find under or over extrusion in your 3D prints, you’ll want to calibrate your e-steps and printing temperature before you start adjusting Flow rate. If you do adjust Flow Rate, it’s usually between 90-110%.
One user mentioned that they don’t adjust their Extrusion Multiplier much after they find a value that works for a specific filament and 3D printer.
They gave an example saying they might find that 0.93 (93%) works well for PLA on one 3D printer, then they might adjust it by 0.01 (1%) for a specific part, but not very often.
In their opinion, calibrating the e-steps isn’t always a good idea based on what 3D printer you are using. A 3D printer like the Flashforge Creator Pro has a more commercially-made feel to it, and the e-step values are known and calculated.
There is some truth to this because many 3D printers come with the e-steps not properly calibrated. Another thing is, you might end up changing extruders which means you’ll want to freshly calibrate your e-steps.
I wrote an article called How to Calibrate Your Extruder E-Steps & Flow Rate Perfectly that goes into more detail.
Best Flow Rate for PETG
The best Flow Rate for PETG filament is also 100%. Some users have used Flow Rates between 95-100% to get good results from under extrusion. It’s better to solve under extrusion through proper calibration of the extruder steps though. You can adjust the Flow of other parameters to improve certain sections.
One user decided to adjust their Bridging Flow to 80% and had success with creating better bridges in their 3D prints. The reason behind this is that less material means that the cooling fans can cool it quicker, leading to more stability as a bridge.
Another user also tried adjusting their Bridge Flow Rate to 95% with PETG, but it made it harder to bridge as it broke in the air. It really does depend on your specific setup, 3D printer, and environment. The most important thing here is to do testing and see what works for you.
You can check out the video below by The 3D Print General who does several PETG print tests using Cura. He used both a Bowden and Direct Drive 3D printer, testing angles up to 60°, while using a 100% Flow Rate.
https://www.youtube.com/watch?v=VIqJ48pxGwc