Does PLA, ABS, PETG, TPU Stick Together? 3D Printing on Top
One of the great things about 3D printing is that you get to experiment with different sorts of new things. You can always test your hand at creating or improving models using new techniques.
Many users wonder whether they can combine two different materials within a single 3D model.
Simply put, users want to know if they can print, let’s say, a PLA component on an ABS base. They are curious to see if it would stick together and stay stable.
If you’re one of those users, you’re in luck. I’m going to answer those questions and more in this article. As a bonus, I’ll also include some other tips and tricks to help you while printing with two different filament types. So, let’s get started.
Can I 3D Print Different Types of Filament Together?
Yes, it’s possible to 3D print different types of materials together, but not all materials are going to stick together very well. There are certain materials with complementary characteristics that enable them to be printed together relatively trouble-free.
Let’s take a look at some of the most popular materials and how they stick to others.
Does PLA Stick on Top of ABS, PETG & TPU for 3D Printing?
PLA, short for (Poly Lactic Acid) is one of the most popular filaments out there. It enjoys widespread use due to its non-toxic nature, cheapness, and ease of print it offers.
So, does PLA stick on top of other filaments?
Yes, PLA can stick on top of other filaments like ABS, PETG, and TPU. Users have been combining PLA filaments with others to make multicolor prints. Also, they have been using these other filaments to serve as support structures for the PLA model.
However, PLA doesn’t stick to all filaments well. For example, PLA and ABS fuse well and cannot be separated by conventional means. The same also goes for TPU.
But when you try to print PLA with PETG, the resulting model can be separated with little mechanical force. Therefore, it is advisable to combine PLA and PETG only for support structures.
When combining PLA with other filaments, keep in mind that failure can be very close if you take the wrong step. Many prints have failed due to the wrong settings and configurations.
To ensure a smooth printing experience, here are some basic tips to follow:
- Print hot and at a slow speed to avoid warping from the ABS.
- Keep in mind that TPU sticks well to a PLA bottom layer, but PLA doesn’t adhere well to a TPU bottom layer.
- When using PETG for support materials for PLA or vice versa, reduce the amount of separation required to zero.
Does ABS Stick on Top of PLA, PETG & TPU for 3D Printing?
ABS is another popular 3D printing filament. It is known for its good mechanical properties, low cost, and excellent surface finish.
However, ABS does have its disadvantages, like the toxic fumes it gives off and its high sensitivity to temperature changes during printing. Nonetheless, it is still a popular material for printing among 3D printing enthusiasts.
So, does ABS combine well with PLA, PETG, and TPU?
Yes, ABS combines well with PLA and forms prints with good mechanical strength. It also fuses well with PETG because both of them have close temperature profiles and are chemically compatible. ABS combines well with TPU when it is the bottom layer, but you might have some trouble printing with ABS on TPU.
For the best print quality, here are some printing tips to follow when printing ABS on top of other materials.
- It is usually better to print at a slow speed.
- Too much cooling with ABS can lead to the layers warping or stringing. Try and adjust the cooling temperature.
- Print in an enclosed space if possible, or use an enclosed 3D printer. The Creality Enclosure on Amazon is a great option to control temperature.

Does PETG Stick on Top of PLA, ABS & TPU in 3D Printing?
PETG is a thermoplastic filament made from the same materials found in plastic water bottles and plastic food packaging. It is often viewed as a high-strength alternative to ABS.
PETG provides almost all the positive properties ABS has to offer- good mechanical stress, smooth surface finish. It also has other great features including, ease of print, dimensional stability, and water resistance.
So, for those looking to experiment with PETG, does it stick on top of other materials?
Yes, PETG can stick on top of PLA, as long as you change the temperature to the ideal printing temperature for PETG. Once the material has melted well enough, it can bond nicely with the material below it. Some people have had issues getting good bond strength, but having a flat surface should make it easier.
Here is an example of a model I done with ERYONE Silk Gold PLA (Amazon) at the bottom and ERYONE Clear Red PETG at the top. I simply used a “Post-Processing” G-Code script in Cura to automatically stop the print at a specific layer height.
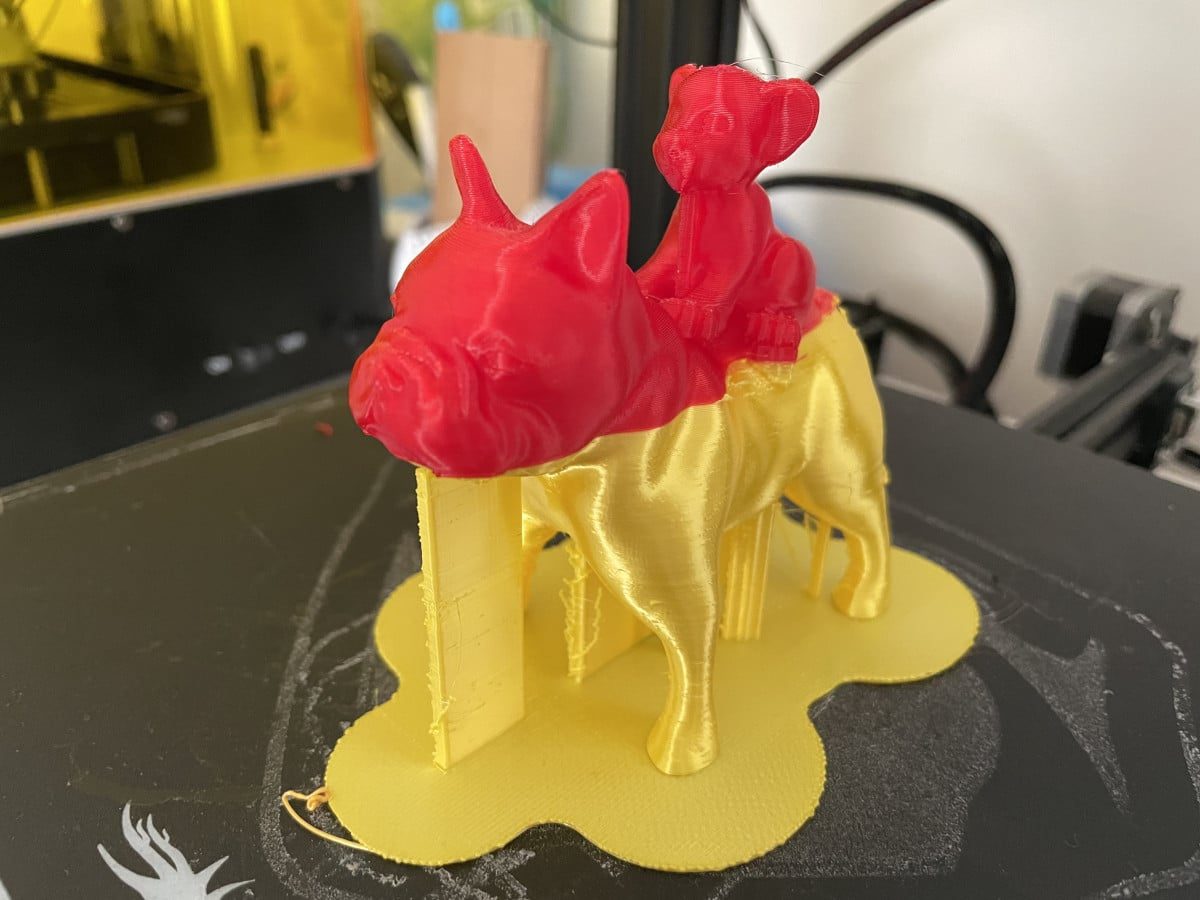
It has a function which retracts the filament out of the extruder pathway, by retracting around 300mm of filament. I then pre-heated the nozzle to a higher temperature of 240°C for PETG, up from 220°C for PLA.
You can check out my article on How to Mix Colors in 3D Printing for a more detailed guide.
In terms of other materials, PETG sticks well on top of TPU. The mechanical strength of the bond is decent and it can serve some functional purposes. However, you have to experiment for a while before you get the right print settings.
To print PETG successfully, here are some tips:
- As usual, make sure you print slowly for the first few layers.
- Your extruder and hot end should be able to reach the temperatures required for PETG 240°C
- It doesn’t warp like ABS so you can cool it faster.
Does TPU Stick on Top of PLA, ABS & PETG in 3D Printing?
TPU is a very intriguing 3D filament. It is a highly flexible elastomer capable of withstanding high tensile and compressive forces before it eventually fractures.
Due to its durability, decent strength, and abrasion resistance, TPU is very popular in the printing community for making things like toys, seals, and even phone cases.
So, can TPU stick on top of other materials?
Yes, TPU can print and stick on top of other materials like PLA, ABS & PETG. Many people have had success combining these two materials within one 3D print. It’s a great way to add a unique and custom feel to your standard PLA 3D prints.
So, if you are looking for a flexible rubber addition to your parts TPU is a great option to consider.
For the best quality prints, here are some tips to consider:
- Generally, when printing TPU, a slow speed like 30mm/s is best.
- Use a direct drive extruder for the best results.
- Keep the TPU filament in a dry place so it doesn’t absorb moisture in the environment
How to Fix TPU not Sticking to Build Plate
When printing TPU some people can have trouble getting it to stick to the build plate. A bad first layer can lead to a lot of print issues and failed prints.
To combat this problem and help users get that perfect first-layer adhesion, we’ve put together some tips. Let’s take a look at them.
Make Sure Your Build Plate Is Clean and Level
The road to a great first layer starts with a level build plate. No matter the printer, if your build plate is not level, the filament may not stick to the build plate and can lead to a failed print.
Before you start printing, make sure the build plate is level. Check out the video below for instructions on how to manually level your print bed.
Using the method in the video below will easily show you which sides are too high or too low, so you can adjust the bed level as things are printing.
Dirt and residue from other prints remaining from other prints can also interfere with TPU sticking to the build plate. They form uneven ridges on the print bed that interfere with printing.
To get the best results, make sure you clean your build plate with a solvent like Isopropyl alcohol before printing.
Use the Right Print Settings
Using the wrong print settings can also interfere with the formation of a great first layer.
The main settings you want to calibrate with TPU is:
- Print Speed
- First Layer Speed
- Printing Temperature
- Bed Temperature
Let’s talk about speed first. Printing flexible filaments like TPU at high speed can lead to problems at the beginning of the print. It is better to go slow and steady.
A speed that works for most users tends to be around the 15-25mm/s mark, and around 2mm/s for the first layer. With some types of TPU filament, they are designed to be able to print at higher speeds up to 50mm/s.
You would have to properly tune up and calibrate your 3D printer, as well as use the right filament to achieve these results. I’d definitely have a direct drive extruder if you want to use higher speeds.
Cura has a default initial layer speed of 20mm/s which should work well for getting your TPU to stick well to the build plate.
Another setting is temperature. Both the print bed and the extruder temperature can affect a 3D printer’s build plate adhesion when it comes to flexible materials.
TPU doesn’t require a heated build plate, but you can still experiment with it. Just make sure the bed temperature does not pass 60oC. The optimal extruder temperature for TPU is between 225-250oC depending on the brand.
Coat the Print Bed with An Adhesive
Adhesives like glue and hairspray can work wonders when it comes to first-layer adhesion. Everybody has their magic formula for sticking their prints to the build plate using adhesives.
I recommend using a thin coat of glue like Elmer’s Disappearing Glue from Amazon. You can apply a thin coat of this glue to the build plate and spread it around with a wet tissue.

Use a Reliable Bed Surface
Having a reliable material for your bed surface can also work wonders, with a bed like BuildTak. Many people also have good results with a warm glass bed with PVA glue on it.

Another bed surface that plenty of people vouch for is the Gizmo Dorks 1mm PEI Sheet from Amazon, which can be installed on any existing bed surface, ideally borosilicate glass since its flat. You won’t need other additional adhesives when using this bed surface.
You can easily cut down the sheet to fit your 3D printer’s size. Simply remove both sides of the film from the product and install it. Users recommend using a brim to help you remove the prints after printing.

Cover the Bed with Painter’s Tape
You can also cover the print bed with a type of tape called Blue Painter’s tape or Kapton tape. This tape enhances the adhesive properties of the bed. It also makes it easier to remove the print once it’s done.
I’d recommend going with ScotchBlue Original Multi-Purpose Blue Painter’s Tape from Amazon for your 3D printing bed adhesion.

If you want to go with Kapton Tape, you can go with the CCHUIXI High Temperature 2-Inch Kapton Tape from Amazon. One user mentioned how they use this tape, then supplement it with either a layer of glue stick or unscented hairspray to help 3D prints stick.
This can work very well for your TPU prints. You can leave the tape on your print bed for multiple 3D prints. Another user mentioned how Blue Painter’s Tape didn’t work very well for them, but after using this tape, ABS prints hold very nicely.
If your print bed gets too hot, this tape can work well to cool it down and make sure it doesn’t bend or warp from the heat.

When laying down the tape on the bed, make sure all the edges line up perfectly without overlap. Also, on average, you want to replace the tape after about five print cycles to keep it from losing its efficiency, though it can be longer.
There you have it. I hope I’ve been able to answer your questions about combining filaments. I hope you have fun experimenting and creating with different material combinations.