Best Raft Settings for 3D Printing in Cura
Trying to get the best raft settings in Cura can be quite difficult to achieve and may require much trial and error, especially if you don’t have a lot of experience with 3D printing.
I decided to write this article to help people who are confused about the best raft settings for 3D printing in Cura.
Keep reading through this article for some guidance on getting the best raft settings on Cura for 3D printing.
Best Cura Raft Settings
The default raft settings on Cura usually work pretty well to provide a good amount of bed adhesion and support to your model’s base.
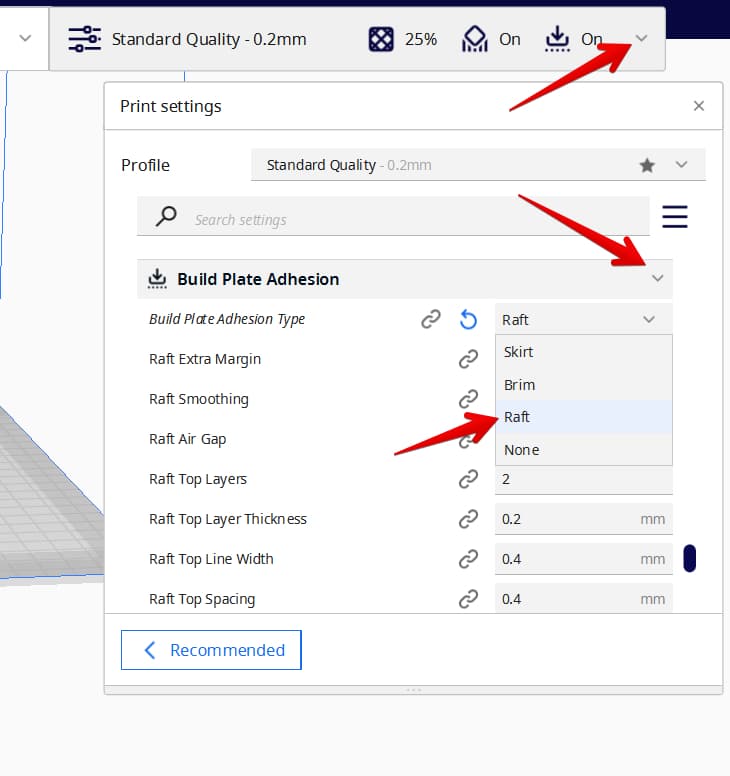
In order to enable a raft for your 3D prints, follow the steps below:
- Click the drop-down menu at the top right of the screen to display the settings panel.
- Click Build Plate Adhesion
- In the Build Plate Adhesion Type option, select Raft.
- The Raft settings panel should be displayed below the Build Plate Adhesion panel; if it is not, you can search for “Raft” at the search settings section of the panel.
Here are the raft settings that you can adjust in Cura:
- Raft Extra Margin
- Raft Smoothing
- Raft Air Gap
- Initial Layer Z Overlap
- Raft Top Layers
- Raft Top Layer Thickness
- Raft Top Line Width
- Raft Top Spacing
- Raft Middle Layers
- Raft Middle Thickness
- Raft Middle Line Width
- Raft Middle Spacing
- Raft Base Thickness
- Raft Base Line Width
- Raft Base Line Spacing
- Raft Print Speed
- Raft Fan Speed
I’ll go through each setting to give you more details about it and how it’s used.
Raft Extra Margin
The Raft Extra Margin is a setting that allows you to increase the width of the raft around the model.
The default value in Cura is 15mm – based on the Ender 3 since it’s the most popular 3D printer.
When you increase the value, your raft will be wider, while if you decrease the value, your raft will be narrower to the model. Having a wider raft increase adhesion to the bed, but it also increases how much time the print takes and how much material is used.
One user has had good results setting the raft margin to 3mm, so you can test out different values and see what works for you. Smaller models will do well with a smaller raft, while larger models probably requires a larger value.
Raft Smoothing
The Raft Smoothing is a setting that allows you to make the inside corners of the raft smoother.
The default value is 5.0mm.
When you increase the value, the raft will become stiffer and stronger, but the volume of the raft will also increase, thereby using more print material. It basically makes separate pieces from the raft come together more so have a stronger connection.
It makes the surface area of the raft bigger which means it will increase print time as well.
Raft Air Gap
The Raft Air Gap setting is simply how large the gap is between the raft and the model itself. The larger this gap is, the easier it is to remove. It basically allows the model to be lightly extruded on top of the raft.
The default value in Cura is 0.3mm.
When you increase the Raft Air Gap, it increases the gap between the model and the raft. If the Raft Air Gap is too wide though, it might defeat the purpose of the raft since it won’t be connected to the model too well and might break off during printing.
One user recommends starting with an air gap of 0.3mm if you are printing PETG. If the raft requires its edges to be trimmed, increase it by 0.1mm and do a test print to find a suitable value.
Another effective way to easily detach a model from a raft would be to reduce the Raft Top Line Width which I’ll talk about further down, or the Initial Layer Line Width.
Initial Layer Z Overlap
The Initial Layer Z Overlap setting allows you to lower all layers of the model except the initial layer. It squishes the first layer onto the raft harder.
The default value in Cura is 0.15mm.
Its purpose is to compensate for the Raft Air Gap setting. The initial layer has some time to cool further away from the raft so it prevents the model sticking down too much to the raft. After that, the second layer of your model will get pressed down into the first layer so it attaches to the raft better.
Increasing the Initial Layer Z Overlap can give stronger adhesion to the raft, but can cause over extrusion and dimensional accuracy issues if it’s too high.
Raft Top Layers
The Raft Top Layers setting allows you to increase the number of layers in the top portion of the raft. These top layers are usually very dense to produce a smooth surface to print the model on.
The default value for this setting in Cura is 2.
Having more layers makes the print surface of the raft smoother because the lightly filled base and middle layers need to be filled and connected better.
For your 3D prints, having this smoother surface makes the bottom of your model look much better and improves the adhesion between your raft and model.
Raft Top Layer Thickness
The Raft Top Layer Thickness allows you to adjust the thickness of the surface layers. It refers to the height of one layer so to work out the total height of your surface layers, you’ll multiply this value by the Raft Top Layers number.
The default value in Cura is 0.2mm.
When you use smaller layer heights for this setting, there is usually an improved cooling effect on the raft, leading to a smoother raft. Having your 3D prints on a smooth raft also improves adhesion between the raft and model.
A raft that’s too shallow can cause under extrusion, which would reduce adhesion between the model and raft.
Raft Top Line Width
The Raft Top Line Width setting allows you to adjust the width of the lines of the top layers of the raft.
The default value of this setting in Cura is 0.4mm.
It’s better to have thin top layers to produce a smooth surface for your raft. It also contributes to a smoother bottom side of your 3D print and improved adhesion.
Keep in mind that having a Raft Top Line Width too thin causes the model to take longer to print and can cause under extrusion, leading to less adhesion.
Raft Top Spacing
The Raft Top Spacing setting allows you to increase the spacing between the lines of the top layers of the raft.
The default value in Cura is 0.4mm.
Having a small spacing between the lines of the top layers of the raft makes the top layer denser which makes the surface of the raft smoother.
This makes the bottom side of the print on top of the raft to be smoother as well.
Raft Middle Layers
The Raft Middle Layers setting allows you to set how many middle layers your raft has.
The default value is 1.
You can have any number of middle layers but it does increase how long it takes to print. It helps to increase the stiffness of the raft and helps protect the model from the heat of the build plate.
It’s better to adjust this setting rather than Raft Top Layers since the top layers are tuned to be smooth, which makes it take longer to print.
Raft Middle Thickness
The Raft Middle Thickness allows you to increase the vertical thickness of the middle layer of the raft.
The default value of this setting in Cura is 0.3mm.
The thicker your raft is, the stiffer it’s going to be so it bends less during and after the printing process. Rafts are supposed to be supportive, so it shouldn’t be too flexible, but enough that it can break away from the model easily.
Raft Middle Line Width
The Raft Middle Line Width setting allows you to increase the width of the lines in the middle layer of the raft.
The default value of this setting in Cura is 0.8mm.
When you have wider lines in your raft, it increases the stiffness of the raft. Some materials behave differently when trying to remove it from the raft, so adjusting this setting can make it easier for some materials that warp a lot from the raft.
For other materials, it can make it harder to remove from the raft, so make sure to do some basic testing of different values.
Raft Middle Spacing
The Raft Middle Spacing setting allows you to adjust the spacing between adjacent lines in the middle layers of your raft. The main reason for it is to adjust the stiffness of your raft and the support that your top layers get.
The default value in Cura is 1.0mm.
The more your lines are spaced apart, it reduces the stiffness of your raft so it bends and breaks off easier. If the lines are spaced out too much, it produces less support to the top layer of your raft so it can make your raft’s surface uneven.
This would lead to less adhesion between your raft and model, as well as making the bottom of the model messier.
Raft Base Thickness
The Raft Base Thickness setting allows you to increase the vertical thickness of the lowest layer of the raft.
The default value of this setting in Cura is 0.24mm.
When you increase the Raft Base Thickness, your nozzle will extrude more material which increases adhesion between the raft and build plate. It can also compensate for a slightly uneven build plate.
Raft Base Line Width
The Raft Base Line Width setting allows you to adjust the line width of the bottom layer of your raft.
The default value in Cura is 0.8mm.
Having thicker lines will cause the material to be pushed very hard on the build plate and this improves adhesion. You can have line widths that are wider than the nozzle, but not too wide since there’s a limit of how much material can flow sideways out of a smaller nozzle.
Raft Base Line Spacing
The Raft Base Line Spacing allows you to adjust the distance between the lines in the base layer of the raft. This determines how well the raft adheres to the build plate.
The default value of this setting in Cura is 1.6mm.
When you reduce the space between the lines of the base layers, it increases the adhesion between the raft and build plate since there is more surface for the raft to stick to.
It also makes the raft slightly stiffer, while making it take longer to print the initial raft layer.
Raft Print Speed
The Raft Print Speed setting allows you to adjust the overall speed that your raft is printed with.
The default value of this setting on Cura is 25mm/s.
If you print the raft more slowly, it reduces warping during printing. It’s ideal to print your raft slowly because it also helps to anneal the filament which leads to higher strength as it stays hotter for longer.
The Raft Print Speed has three sub-settings, namely:
- Raft Top Print Speed
- Raft Middle Print Speed
- Raft Base Print
Raft Top Print Speed
The Raft Top Print Speed allows you to adjust the print speed of the top layer of the raft.
The default value is 25mm/s.
Decreasing this value reduces the possibility of warping when printing the raft. However, printing the raft more slowly adds to the printing time of the raft.
Raft Middle Print Speed
The Raft Middle Print Speed allows you to adjust the print speed of the middle layer of the raft.
The default value on Cura is 18.75mm/s.
Raft Base Print Speed
The Raft Base Print Speed setting allows you to increase the speed at which the base layer of the raft is printed.
More raft base area increases the adhesion between the raft’s base and the build plate.
The default value of this setting on Cura is 18.75mm/s.
The user below is using a raft speed far too high, looking like around 60-80mm/s and has been trouble having his raft to stick. Make sure to use the default values or something in a similar range.
Raft Fan Speed
This setting adjusts the speed of the cooling fans while the raft is being printed.
The default value of this setting on Cura is 0.0%.
Increasing the fan speed makes the printed model cool down more quickly. However, this can cause warping in the model if the raft fan speed is set too high.
One user has experienced good results with the following Raft settings on Cura:
One user said he managed to reduce his raft to half the material and print twice as fast using these settings:
- Raft Top Layer: 0.1mm
- Raft Middle Layer: 0.15mm
- Raft Bottom Layer: 0.2mm
- Raft Print Speed: 35.0mm/s
Another user recommended increasing the raft air gap by 0.1mm and the initial layer Z overlap by 0.5mm until the desired raft is printed.
If the base layer of your 3D prints look too rough, increase the Initial Layer Z Overlap by 0.05mm and reduce the raft’s extra margin to around 3–7mm depending on the model.
Cura Raft Settings for Easy Removal
In order to easily remove rafts from your model, make sure to adjust your Raft Air Gap setting. The default value of 0.3mm usually works pretty well but you can adjust this value in 0.01mm increments until it works well enough for your models.
CHEP has a great video about using Rafts in Cura Slicer V4.8 on Ender 3 V2.