5 Ways How to 3D Print Fine Details Properly
Learning how to 3D print fine details is important for certain models where you want to show off the resolution. This article will take you through the steps on how you can 3D print finer details.
Keep on reading for more information about 3D printing details.
How Detailed Can 3D Printing Be?
3D printing can be very detailed, reaching resolutions of up to 0.01mm (10 microns) per layer. Resin 3D printers can reach those higher resolutions, but for filament 3D printers, these usually max out at 0.05mm (50 microns) resolutions. It’s comparable to cast resin and can even make fine jewelry.
You can see some great examples of how highly detailed some 3D prints can be when you look at models like miniatures and busts. You can see all kinds of details like crevices, thin parts, sharp points and plenty more. You can even create unique textures on the surfaces of your models.
Here is a really cool miniature that has been resin 3D printed and painted with some amazing detail.
You can see this other example of a miniature 3D printed with a resin machine.
https://www.reddit.com/r/PrintedMinis/comments/x0dghm/garo_robe_from_b_team_minis/
Check out the impressive realistic fine details of this Albert Einstein Bust made by LSMiniatures, available on Thingiverse.
As a lot of users and owners of resin 3D printers are extremely involved in the miniature world, 3D printed miniatures have gained a lot of space because of their fine details that only 3D printers can create.
This Mandalorian Miniature was printed on a Photon M3 3D printer, using Anycubic Water Washable 3D printer resin and sliced using the Lychee Slicer. He painted the model using Vallejo Acrylics.
How to 3D Print Fine Details
Here’s how to 3D print fine details:
- Choose a Model with Fine Details
- Use a Resin 3D Printer
- Decrease the Layer Height
- Dial in your Exposure Times
- Use Supports and Rafts for Stability
1. Choose a Model with Fine Details
Firstly, the model itself has to have fine details. If you are trying to 3D print a model that doesn’t have the fine details already in it, it won’t be possible to create them when 3D printing it.
Check out some models with a lot of fine details, different textures and thin lines such as:
You can find high quality models by searching for specific things on a website like Thingiverse or MyMiniFactory like miniatures, statues, and busts.
2. Use a Resin 3D Printer
As previously mentioned, if you want to 3D print the finest details on a 3D printer, you’ll have to go with a resin 3D printer. These can reach much higher resolutions and doesn’t show layer lines as much as filament 3D printers.
Any 3D prints that require things like small text or fine detail is going to work best with a resin machine. The technology is a lot more accurate since it uses lights to cure the layers rather than extruding material from a nozzle with heat.
You can definitely achieve some respectable results with a 0.1mm nozzle on a filament 3D printer, but still not on par with a resin one.
Here some are some popular resin 3D printers:
There are even some resins that are known to be higher quality than others like Anycubic Craftsman Resin from Amazon.

Squidmar Miniatures did a very interesting video that you can check below comparing a standard printer that costs around $350 dollars to a professional that costs over $60,000.
Many gamers who require high quality models for their games like D&D say that resin 3D printed models can reach those levels with ease. They are even starting to compare to professionally made gaming models.
3. Decrease the Layer Height
This is a key step on getting those finer details. The layer height is a direct factor in how detailed your 3D print will be, so don’t stick to the default layer heights in your slicer.
Make sure to adjust your layer height to the maximum resolution your 3D printer can handle for the best results. There’s going to be a trade-off between the resolution of your model and how long it takes though.
A resin 3D print that takes 5 hours with a 0.05mm layer height is essentially going to double to 10 hours when you decrease the layer height to 0.025mm. If you go even lower with 0.01mm resolution, the model will take 25 hours, which is a massive difference.
You can see a clear difference between the detail in this Joyful Yell with a 0.1mm, 0.05mm, and 0.025mm resolution.
Check out the video below by the 3DPrintingPro on how to adjust your layer exposure times when changing layer height.
4. Dial in Your Exposure Times
As we’ve figured out that resin 3D printing is the best for 3D printing fine details, we want to figure out how to actually 3D print the best quality using this technology.
One of the key things you’ll want to do is to dial in your exposure times, since this has a direct effect on the quality of resin models.
The exposure time is the amount of time the light source will expose through the LCD screen to cure each layer of the model. When your exposure is too low, you lack detail in the model, while having it too high over exposes the model and blurs detail.
You can find the optimal exposure time for your resin 3D printer and particular resin by following the video below. You basically 3D print the Photonsters Validation Matrix V2 file that has specific features which tell you whether you are under exposed, over exposed, or in the right place.
When doing the resin exposure test, make sure to do it at the layer height you actually want to use since the times do adjust based on layer height.
5. Use Supports and Rafts for Stability
When highly detailed and complex objects are being printed with a high 3D printer resolution, it is very important to use support structures and rafts for strong bed adhesion. Not having good supports or a raft can decrease the printing quality of your objects.
The key is to ensure the right distance between the support and the object and the correct thickness for the raft.
However, it’s good to remember that the denser the support is, the more troublesome and difficult it can be to remove it once the 3D print job has been completed.
When you don’t have supports in the right places, part of the model won’t print properly. When you don’t have a raft, the suction pressure from resin printing can cause support failures and print imperfections that result in poorer quality.
One user mentioned that some 3D prints are a lot less likely to print unless they have a raft.
I’d recommend checking out this tutorial by Rybonator on how to support resin 3D prints.
How to Increase 3D Printer Resolution (Filament)
Here are some ways to increase your 3D printer resolution:
- Decreasing the Layer Heights
- Calibrating and Adjusting the Extruder
- Optimize Printing Temperature
- Optimize Orientation Angle
- Enable Ironing for Smooth Top Surfaces
Decreasing the Layer Heights
The first thing you want to do to increase 3D printer resolution on a filament 3D printer is to decrease the layer height. You can usually reach resolutions of around 0.05mm with a good filament 3D printer and a 0.2mm nozzle.
Check out the video by 3D Printed Tabletop on how he created “Resin-Like” miniatures on an FDM 3D printer using a 0.05mm layer height.
Calibrating and Adjusting the Extruder
Your extruder’s calibration is another key factor in getting the best quality results from filament 3D printers. When your 3D printer sends a command to extrude 100mm of filament, it doesn’t always extrude 100mm depending on various factors.
It’s a good idea to calibrate your extruder steps in order to make the extrusion more accurate. Some 3D printers will extrude 90mm or 110mm when you tell it to extrude 100mm, and this result will show up in your 3D prints by lowering the detail.
Check out the video below by Crosslink that explains how to correctly adjust and calibrate your extruder.
Optimize Printing Temperature
It is important to know how to optimize your 3D printer temperature in order to get a better resolution and detail quality. One way of doing this is printing a temp tower test in Cura.
It’s basically a tower that has blocks with temperatures on them, and you can apply a script to automatically change the printing temperature as it moves up the tower. This allows you to see the differences in surface quality between the temperatures, so you can pick the optimal one.
The YouTube channel Slice Print Roleplay did an excellent video on how to create a temp tower and help you optimize the printing temperature of your 3D printer.
After you have done your initial temperature tower, you can dial the temperature in again by printing a second, more precise one with 2°C increments from the range of towers that look the best.
Optimize Orientation Angle
Optimizing your orientation angle is another great way to improve 3D printing resolution as the surface quality in 3D printing varies if you change the orientation angle.
3D prints are usually the highest quality when the details are 3D printed on the Z-axis, or with height. An example would be trying to 3D print a statue flat on the build plate so the face is facing upwards, versus printing it horizontally.
Here’s an example of the decrease in detail when printing horizontally rather than vertically. You can see the steps or staircase effect in the layers.
The Z-axis has the more precise movements since it can be controlled better than XY movements on a filament 3D printer.
Maker’s Muse did a great video about the impact that knowing how to optimize your orientation angle causes in the strength and appearance of the final result. Watch it below.
Enable Ironing for Smooth Top Surfaces
If you are working with flat surfaces, there is a useful function you can turn on called ironing.
This function uses the nozzle to simulate an “ironing” technique on the top layers by passing the nozzle across the surface while extruding a small amount of plastic to smooth over the surface.
One user did a great comparison of 3D printing the same object with the ironing function turned on and turned off and posted the results. The difference in quality and smoothness is very apparent.
Check out the video below from ModBot all about using Ironing in Cura.
What is the Maximum Cura Resolution?
Maximum resolution in Cura is a setting that defines the minimum length of a line segment. That means it breaks a curve into smaller and smaller lines, improving fine details.
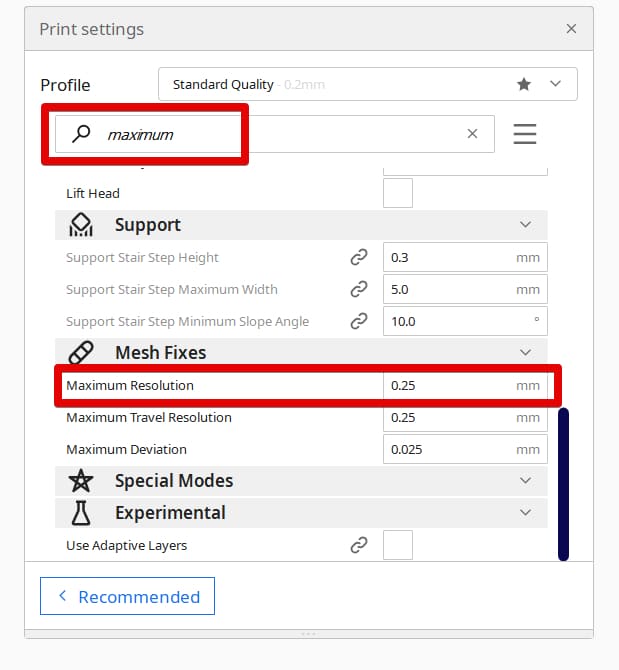
Maximum resolution is a setting that will really help you get the finer details possible in each layer of the print, as mentioned by one user. You can find this setting under the Mesh Fixes column in the settings, or search for “maximum” in the search box and scroll down.
Cura will try to merge segments with the individual print movements if they are smaller than the set value, while also allowing smaller print moves depending on the defined deviation.
Check out this CNC Kitchen video that talks more about this setting and how it solved an issue with blobs on 3D prints.
For one user he improved the quality of his 3D print by changing the maximum resolution setting from the default 0.05mm to 0.5mm, reducing the blobs present in the final product.
It’s important to mention that Cura did change the default Maximum Resolution from 0.05 mm to 0.25 mm which ended up fixing a lot of these issues. Still, if you are experiencing blobs, it may be a good idea experimenting with different settings.