How to Use Retract at Layer Change in 3D Printing
The “Retract at Layer Change” is an important feature that helps prevent unwanted oozing and stringing of the filament when the printhead moves to a new starting position is the “Retract at Layer Change.” Don’t worry if you’re unfamiliar with it; I’ll discuss how to use it in this article.
To use the “Retract at layer change” feature, you simply need to enable the “Retract at Layer Change” setting in Cura. You could also go to the Printer Settings in PrusaSlicer and, under the Retraction Settings, enable the “Retract on Layer Change” setting.
This is just a basic explanation. So, if you want to learn more about using the “Retract at Layer Change” feature, continue reading this article.
How to Use the Retract at Layer Change in Cura
Cura’s “Retract at Layer Change” setting is designed to help you achieve better-quality prints. When you enable it, it instructs the 3D printer to retract the filament before the print head travels to a different starting position to print a new layer.
When the extruder pulls the filament back before these movements, it effectively stops the flow of molten plastic from the nozzle. This reduces the chances of oozing and stringing, which might ruin the quality of your 3D prints.
Here is how you can enable this setting in Cura:
- Open Print Settings
- Search for the “Retract at Layer Change” setting and enable it
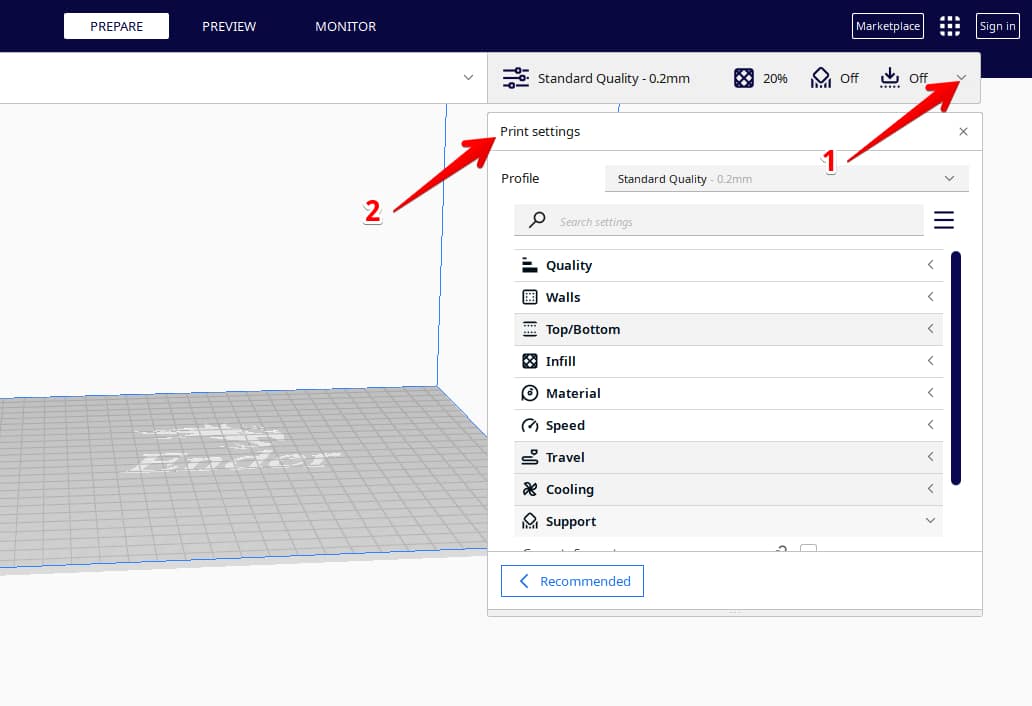
1. Open Print Settings
First, you need to open Print Settings. You can do this by clicking the downward-facing arrow icon on the menu bar on the top left side of your screen.
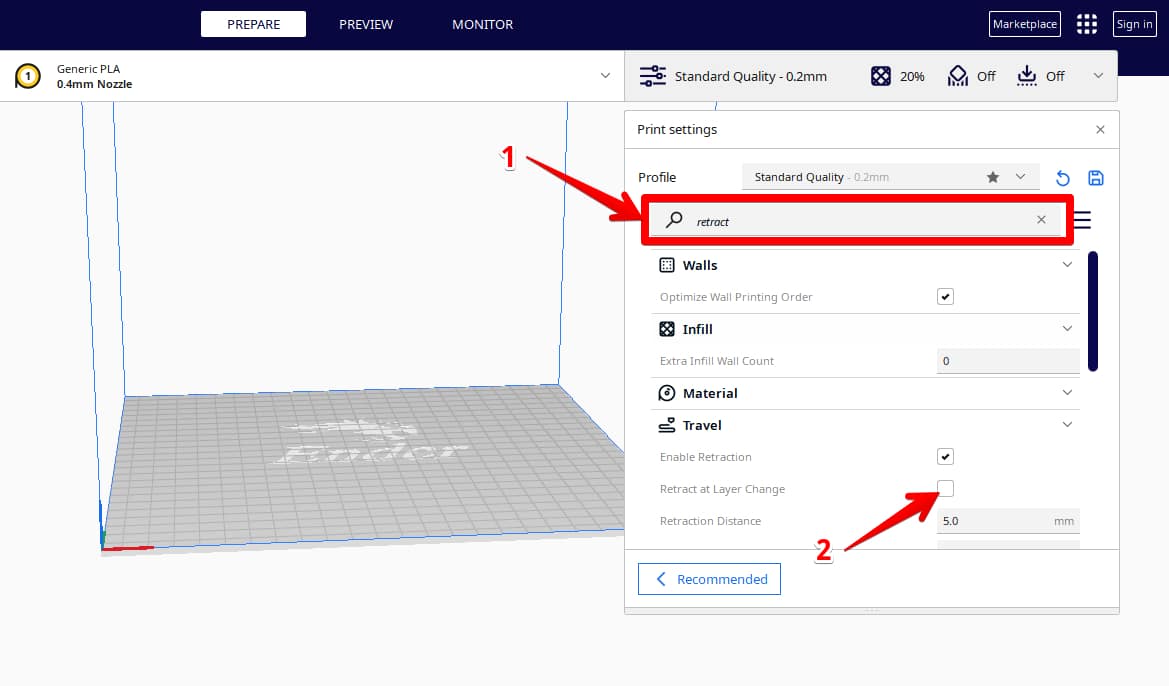
2. Search for the “Retract at Layer Change” setting and Enable it
Next, you need to search for the “Retract at Layer Change” settings by inputting “retract” in the Search Settings box on the Print Settings panel.
Under the Travel Settings, you’ll find the “Retract at Layer Change” setting. Check the box beside it to enable it.
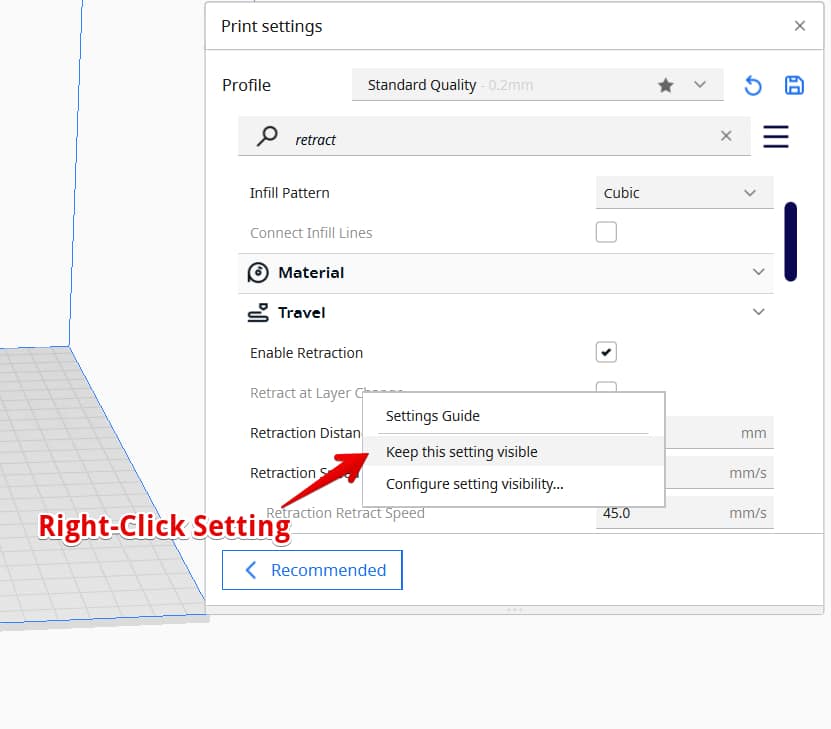
- You can always keep this setting visible by right-clicking on the “Retract at Layer Change” setting and choosing the “Keep this setting visible” option.
Once you’re done, your changes will be saved automatically, so close the Print Settings. Your print will now retract every time a new layer is printed.
Check out this video by Sandtube 3D that explains various Cura Retraction Settings, including the “Retract at Layer Change” setting.
One user said the retraction settings shared in the video above provided the best solution to his stringing problems. He was using a Creality CR6 SE and slicing with Cura. His stringing reduced after changing his retraction distance and speed to 4mm and 40mm/s.
Another user warned that heat creep could occur if your retracting distance was too high. He added that lowering the temperature could also reduce stringing.
How to Use the Retract on Layer Change in PrusaSlicer
Like the “Retract at Layer Change” setting in Cura, the “Retract on Layer Change” in PrusaSlicer tells the printer to pull back the filament from the hot end just before the printhead moves to a new layer. This is to prevent any unwanted extrusion from happening.
If you have enabled the “Retract on Layer Change” setting and your 3D printer is ready to move to the next layer after completing the previous one, it will send a retraction command to the extruder.
In response, the extruder motor reverses its movements and pulls the filament back slightly. This reduces pressure on the hot end and minimizes the blobbing and oozing of the filament from the nozzle.
Now that you know how this setting works let’s see how you can enable it in PrusaSlicer:
- Go to Printer Settings
- Select Extruder 1 and locate the Retraction Settings
- Check the “Retraction on Layer Change” box
1. Go to Printer Settings
First, go to the Printer Settings on the menu bar on the top-left side of your screen. Also, select “Expert Mode” on the top-right side of your screen.
2. Select “Extruder 1” and Locate the Retraction Settings
Under the Printer Settings, click “Extruder 1” from the list on the left side of the screen and then locate the Retraction Settings.
3. Check the “Retraction on Layer Change” Box
Finally, check the “Retraction on Layer Change” box under the Retraction Settings to enable it.
In this video, Roy Boy explains how using the “Retraction on Layer Change” setting and other Retraction Settings can help remove stringing with the new PrusaSlicer 2.5.0 version.
One user who followed the advice given in the video said that it saved his time from searching for a fix for his stringing problems. Previously, he unsuccessfully troubleshot his printer, not knowing that the settings mentioned in the video could help him solve the issue.