How to 3D Print PETG Filament Like a Pro – Ultimate Guide & FAQ
When it comes to 3D printing with PETG, it does take some knowledge and practice to get good quality models. It’s not too difficult when you follow the right methods, so I decided to write this article to show users how to get good-looking PETG prints.
To 3D print PETG, you should use a printing temperature between 235-250°C and a bed temperature between 70-100°C for the best results. Your cooling fan should be at 100%, with a print speed of 40-60mm/s. Also, PETG absorbs moisture easily so, keep it dry in an airtight container when not in use.
This article is a simple yet in-depth guide on how to 3D print PETG filament just like the pros do, so stick around to see how it’s done and get your questions answered.
What is PETG Filament?
PETG or Polyethylene Terephthalate Glycol, is a popular thermoplastic polyester. PETG is different from the popular PET plastics. It is a glycol-modified variant of PET which leads to greater strength, impact resistance, and heat resistance. Common products made from PETG are water bottles and food containers.
It is widely used in different manufacturing industries due to its excellent formability, chemical resistance, high strength, and other excellent physical properties.
As a 3D printing filament, PETG is fast becoming the filament of choice for most 3D printing enthusiasts. This is because PETG prints display high strength, they are less prone to warping, and they have smooth and glossy surface finishes.
Also, PETG filament does not produce toxic odors like other thermoplastic filaments during printing. Furthermore, it is ductile, waterproof, and displays very little shrinkage, which makes it ideal for flat surfaces and models with low tolerances.
What Printing & Bed Temperature Should You Print PETG?
Printing temperatures for PETG filaments usually fall within the 235°C to 250°C range. Temperatures hotter or cooler than this can lead to stringing, blocked nozzles, over extrusion, etc. A heated bed isn’t necessary for small PETG prints, but for larger flat prints, a heated bed at 70-100°C is ideal.
Print temperatures can vary within the ranges given above for different brands of filaments. For the best results, always use the temperature values supplied by the filament manufacturers and adjust the settings if needed.
Here are some of the popular filaments on the market and their printing temperatures.
Overture PETG
- Recommended Extrusion/Nozzle Temp: 230°C – 250°C
- Heated Bed Temp: 80°C – 90°
Hatchbox PETG
- Recommended Extrusion/Nozzle Temperature: 230°C – 260°C
- Heated Bed Temp: 80°C – 100°C
TecBears PETG
- Recommended Extrusion/Nozzle Temperature 220°C – 250°C
- Heated Bed Temp: 70°C – 80°C
Another less glamorous way you can determine the ideal temperature for your filament is through old-fashioned trial and error. Calibration prints like the temperature tower can help in figuring out the proper settings for the filament.
Here’s how you can print one using Cura.
What Print Speed Should I Use for PETG Filament?
The final quality of the PETG model heavily depends on the print speed. Most users and manufacturers recommend a printing speed between 30 and 60mm/s for the best results.
Printing too fast above the recommended speed can lead to low-quality prints with many defects. So, it’s better to put a cap on the maximum printing speed to get quality prints.
On the other end of the spectrum, printing at a slow pace is good for first-layer adhesion and great print quality. However, below a certain point, slow printing speeds can also lead to print defects like stringing and oozing.
Lastly, one thing to note is that the optimal printing speed can vary between printers and filament brands. To get the best results, you should probably experiment with the settings to find the sweet spot.
Also, the printing speed should factor in the type of model being printed. For models with curved or complex geometries, a lower printing speed will probably be better.
Does PETG Need Cooling?
PETG filament does not necessarily need part cooling, but the cooling helps immensely with the final model quality. Your rate of cooling should be high to reduce print defects and stringing, while low cooling (30-50%) is better for strength due to better layer adhesion from previous layers melting into each other.
When deciding a cooling rate, you should choose one based on the purpose of the final part. The rate of cooling determines how well or beautiful the final model turns out.
When the cooling rate is high (70-100%), it helps to eliminate print defects and stringing, and the model’s details are rendered in great detail.
So, when deciding the cooling rate to use, you have to balance between aesthetic and functional value. Parts cooled faster will have a better surface finish and look, but they will not be as strong and durable as those done with lesser cooling.
Note: It’s good practice to print the first few layers without cooling to enhance first layer adhesion.
What Are the Best PETG Retraction Settings?
Retraction settings for PETG are very different from those for other filaments. This is because PETG prints at a relatively high temperature so, the material flow is very hard to stop and control.
The optimal retraction speed for PETG is relatively low, around 35-40mm/s, for both Bowden and Direct Drive extruders. The optimal retraction distance is between 5-7mm for Bowden extruders and 2-4mm for direct-drive extruders. Good retraction settings can help to avoid stringing, nozzle clogs and jams, etc.
To get the exact settings for your printer, you can experiment using a retraction tower to see what works best. You can check out how to do that in the video below.
Best Cura PETG Settings for 3D Printing
Ultimaker Cura is one of the most popular slicing software out there. Many users like and use it because of the number of features and functionality it offers at every user’s favorite price point, Free.
To slice and print your PETG 3D model using Cura, you’ll need the correct material settings for PETG. Luckily, the Cura software comes with a default material profile for printing PETG.
Here’s how you can activate it:
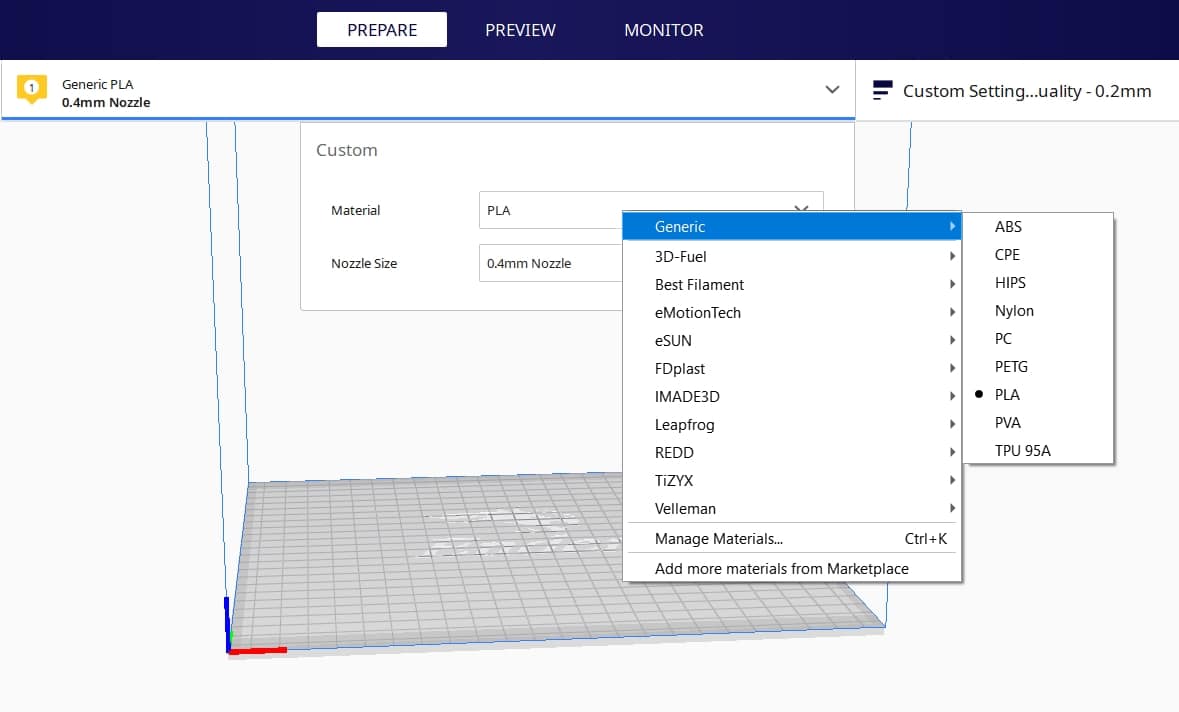
Step 1: Open the Cura software and click on the Material drop-down menu in the top toolbar.
Step 2: Click on the button to the right of the “Material” icon.
Step 3: In the menu that appears, hover your cursor over ‘Generic” and choose “PETG” from the menu.
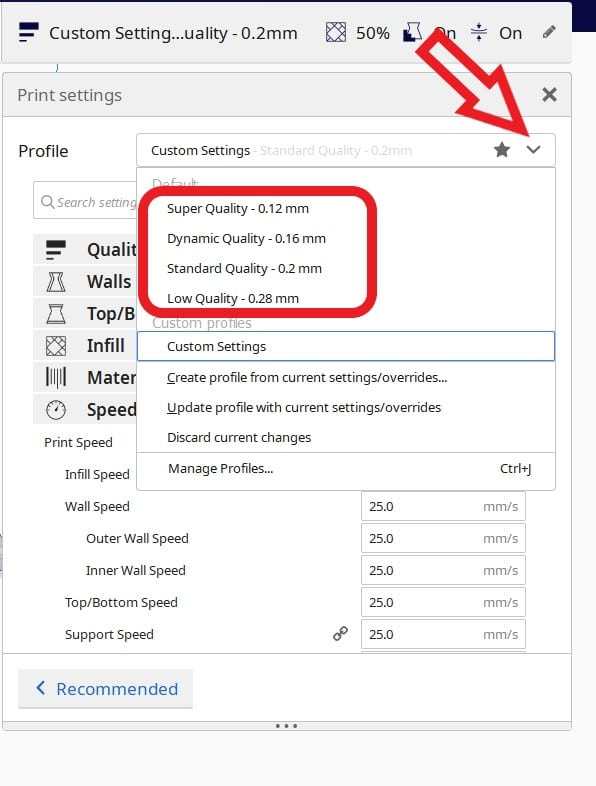
Step 4: You can choose the type of print quality you want in terms of layer height. You can choose between:
- Standard Quality (0.12mm)
- Dynamic Quality (0.16mm)
- Super Quality (0.2mm)
- Low Quality (0.28mm)
Step 5: You can check out the default print settings on the main interface. You can also tweak or customize any value you want.
Using the default profile can be a time-saver for some. But in case you want to get straight into printing, you can use these custom settings. These settings have been tried and vetted by many 3D printing enthusiasts as the optimal settings for printing PETG.
Let’s have a look at them.
Best Cura PETG Settings
- Nozzle Temperature: 235-250°C
- Bed Temperature: 70-100°C
- Print Speed: 40-60mm/s
- Initial Layer Print Speed: 20mm/s
- Retraction Distance: 6mm (Bowden setups), 2-3mm (direct drive setups)
- Retraction Speed: 40-45mm/s
- Combing: “Not in Skin” or “Within Infill”
- Cooling Fan Speed: 0-50% for strength, 50-100% for quality
- Initial Layer Cooling Speed: 0%
- Build Plate Adhesion: Raft or Brim
Is PETG Filament Toxic & Safe to 3D Print Indoor?
No, PETG filament is non-toxic, and it can be printed safely indoors. Also, it doesn’t even emit any smell when it is printing. Just make sure your 3D printing area is well ventilated to avoid a buildup of nanoparticles in the air. These particles can cause eye and throat irritations.
Is PETG Heat Resistant? What Temperature Can PETG Withstand?
PETG has decent heat resistance properties, especially when compared to most other filaments. It can resist temperatures up to its glass transition temperature, which is around 80-85⁰C. It handily beats out filaments like PLA in this respect, but it displays less heat resistance than ABS.
However, it is more UV resistant than both of them, making it the perfect choice for outdoor applications.
Can You 3D Print PETG on a Glass Bed?
Yes, you can print PETG on a glass bed. PETG adheres well to the glass surface. Sometimes, it can even stick too well to the glass surface, making it hard to remove. In some extreme cases, removing it can even take out chunks of the glass plate.
To help you avoid this, I’ll cover how to safely remove PETG prints from a glass bed in a later section.
Can You 3D Print PETG Without a Heated Bed or Enclosure?
You can 3D print PETG without a heated bed, but it is recommended to have an active heated bed for the best results. A heated bed helps reduce the chances of your PETG prints warping and curling around the edges. It also gives much better first layer adhesion, which is the main foundation of all 3D prints.
How to Fix PETG Not Sticking to the Bed – Improve Bed Adhesion
Several issues can cause poor first layer adhesion when printing PETG. It can be due to problems in the printer’s set up like a dirty and poorly leveled print bed, print settings, or even poor filament quality.
To fix these, let’s run through a couple of solutions that will get your printer up and running in no time.
- Make sure your print bed is clean and free from debris and leftover print materials.
- Buy quality filament and ensure you keep it in a dry place where it cannot absorb moisture. PETG filament is hygroscopic, and moisture can ruin it.
- Make sure you level the print bed properly, leaving an appropriate Z- offset of 0.2 to 0.3mm between the bed and the nozzle. You can use three slices of paper or a thick card to get the distance right.
- To help the first layer adhere well to the bed, you can use glue sticks, hairspray, or printer tape. Some users even combine some of them to get better results.
- Turn off fan cooling, turn down the speed, and print the first layer slowly while using a heated bed.
- Check the nozzle and the print bed’s temperature to make sure they are within the range specified by the manufacturer. It’s usually between 210⁰C to 260⁰C for the hot end and 70⁰C to 90⁰C for the bed.
How to Fix PETG Stuck to Glass Bed
To fix PETG filament stuck to a glass bed, you can try alternating between hot and cold environments to loosen the material by heating the bed up or putting the glass bed in your freezer. You shouldn’t directly print PETG on a glass bed, but rather coat the bed with a layer of glue, hairspray or blue painter’s tape.
These coatings provide a coating that makes it easier to remove prints. A properly leveled bed that doesn’t have the nozzle squishing onto the bed should fix the issue. PETG should be laid down from a higher height than PLA for this reason.
If your nozzle’s first layer goes deep onto the print bed, you are likely to see your PETG print getting really stuck to the print bed.
You can also try reheating the print bed, or you can pry the print off with a flat tool like a spatula. Try not to use excessive force with the spatula to avoid damaging the glass bed.
How to Fix PETG Stringing
The main methods to fix stringing in PETG prints is to increase retraction speed & distance, increase travel speeds, and decrease your nozzle temperature. PETG is prone to stringing, so you want to test your retraction settings by using a retraction tower. Use travel speeds of 200-250mm/s, depending on your printer.
Stringing is a big issue most users face when printing with PETG. The good news is that it can be avoided by modifying a few settings.
The first setting to modify would be the retraction settings. Try increasing the retraction distance gradually in 1mm increments until the stringing stops. Also, reduce the minimum travel distance too.
Secondly, increase the printer’s travel speed in 10-20mm/s intervals until you find the sweet spot. This reduces the time the printer takes to move from one point to another, giving the nozzle less time to ooze.
Lastly, if all these aren’t working, try reducing the nozzle temperature. The reduced temperature means that less molten filament will be available in the nozzle to ooze.
How Do You Smooth PETG 3D Prints?
There are several ways you can smooth your PETG print. Here are some of them:
- Sanding: You can erase the layer lines and other imperfections from your 3D print using sandpaper. It’s best to use a circular motion when sanding to avoid creating new directional layer lines on the model. Also, when sanding, start with coarse sandpaper and finish off with the finer sandpaper for the best results.
- Polishing: You can also smooth your 3D prints by applying a polishing compound like wax or a metal polish. The polish helps fill in the microscopic layer lines and gaps. Also, if it’s done right, it gives the 3D print a smooth mirror-like finish.
- Heat Treatment: It involves using a heat gun to smooth out the print’s surface. The heat gun melts a thin layer of the print’s outer surface to fill in the layer lines. This is done continuously until the print is finally smooth.
Is PETG Flexible?
Although PETG is not as flexible as filaments like TPU, it still displays impressive tensile strength, which makes it virtually unbreakable in the layer direction. It is also more durable, impact-resistant, and flexible than ABS or PLA.
What is the Best PETG Filament?
There are several PETG filaments on the market for buyers to choose from. Out of these, there are some filaments users generally flock to because they offer great quality at a decent price.
These filaments are:
Here are some of the popular filaments on the market and their printing temperatures.
Overture PETG

Overture PETG is one of the most popular brands of PETG you can get out there, with over 8,000 reviews and a rating of 4.5/5.0 at time of writing. Many reviews mention how it is an amazing filament, especially for the low and competitive price.
This filament comes in several colors that you can use for any 3D printing projects and even comes with a 200 x 200mm build surface.
It has characteristics such as:
- Clog free & bubble free
- Less tangles and easy to use
- Cost-effective
- Wide range of compatibility
- Safe & odorless
- Little shrinkage
- High impact strength
- Has a little shine and spark to it
- 100% satisfaction guarantee
Get yourself a spool of Overture PETG from Amazon today.
Hatchbox PETG

Hatchbox PETG is a well-respected brand of PETG that works for plenty of users and comes in over 30 different colors. It has a dimensional accuracy of +/- 0.03mm which significantly reduces clogging and print failures.
PETG is a great alternative to PLA and ABS since it has amazing toughness and stiffness, while still being relatively lightweight. This Hatchbox PETG is good at resisting moisture absorption, gives good adhesion and is even safe for the environment.
You can trust in the quality and reliability of this filament. It comes vacuum-sealed with desiccant for the ideal quality that produces successful 3D prints.
You can find a spool of Hatchbox PETG from Amazon.
TecBears PETG

Another great PETG filament that many users are happy with is the TecBears PETG filament. It has high purity and low shrinkage so you can get the best dimensional accuracy with your 3D models. You’ll get some excellent layer bonding with this filament.
Each spool of filament is dried for 24 hours before they package it up with a vacuum-sealed packaging, along with the desiccants to keep it dry. They make sure it is mechanically wound up with strict manual examination, to guarantee a smooth 3D printing experience.
It has an even better dimensional accuracy than the Hatchbox PETG at +/- 0.02mm, making it a high quality and consistent filament to use in your 3D printer. They recommend a nozzle temperature of 220-250°C and a bed temperature of 70-80°C.
Get yourself a spool of TecBears PETG from Amazon today.
Well, we’ve reached the end of the article. I hope I’ve been able to answer all your questions about PETG. Remember, don’t be scared to experiment and find your perfect settings.
Good luck printing!